Annotate images and measure the annotated with ease.
Verified details
These details have been verified by PyPIProject links
GitHub Statistics
Maintainers

Project description
EZannot: annotate and measure the annotated with ease.


Key features & Workflow:
-
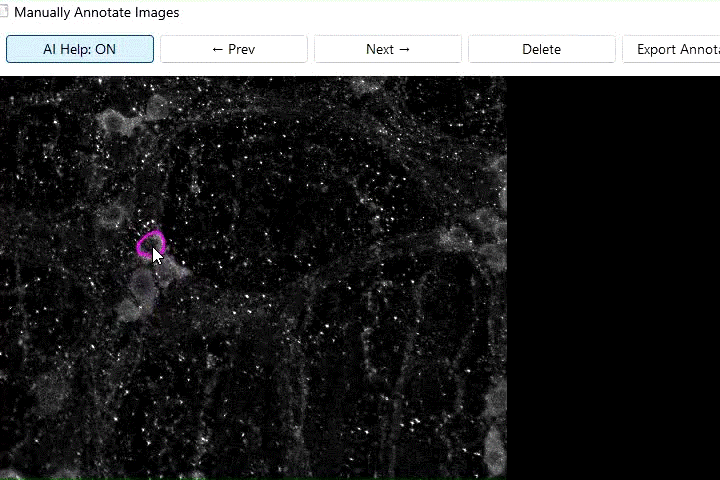
AI (SAM2) help enables manual annotation of an object/region with a single
Mouse click. -
The augmentation is up to 135 X for each image and enhances the generalizability of training.
-
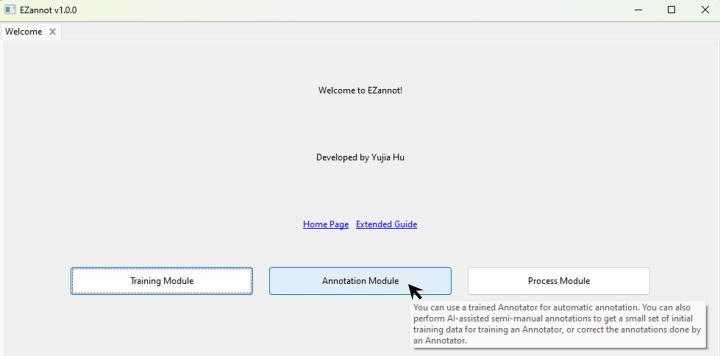
Manually annotate a few to train an AI Annotator and use it to automatically annotate the rest.
-
Refine the annotations performed by the automatic Annotator and iterate a better Annotator.
-
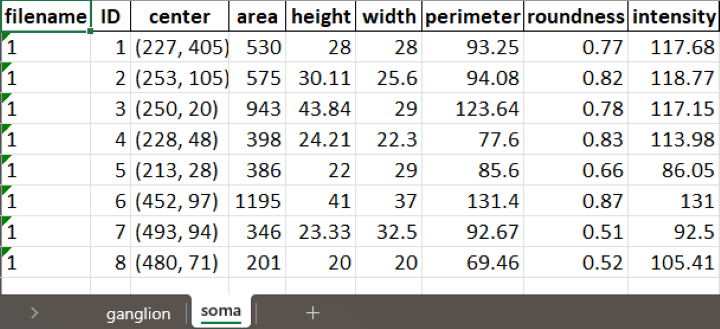
All the annotations can be quantified by diverse measurements such as area and pixel intensity.
-
Totally free, and keeps your data private since the work is done locally on your computer.
How to use?
1. For manual annotation, turn on the AI Help button to annotate the outlines of objects or regions with ease.
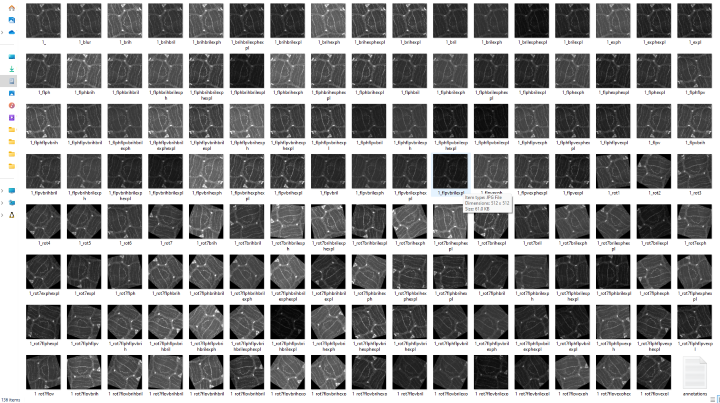
[!TIP] To include more images to an annotated dataset, simply put new images inside the folder that stores the annotated images and the annotation file(s).
[!TIP] To merge multiple annotated datasets, merge the folders that store the annotated images and the annotation files (rename each annotation file to avoid overwriting).
[!TIP] To visualize or refine the annotations, use
Annotate Manuallyunit, navigate to the folder that stores the annotated images and the annotation files, select the images you want to visualize or refine, go through all the buttons, andStart to annotate images.
[!TIP] For large images, you can use
Mouse scrollto zoom in or out, or useTile Annotationsunit, to divide a large, annotated image into smaller annotated tiles.
Some demo:
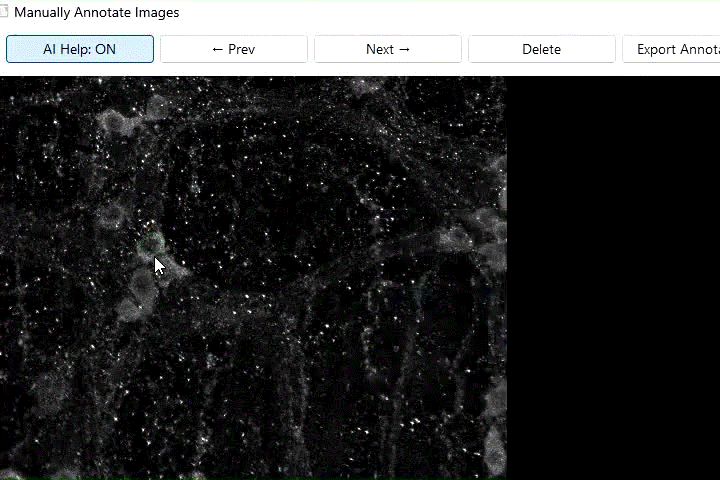
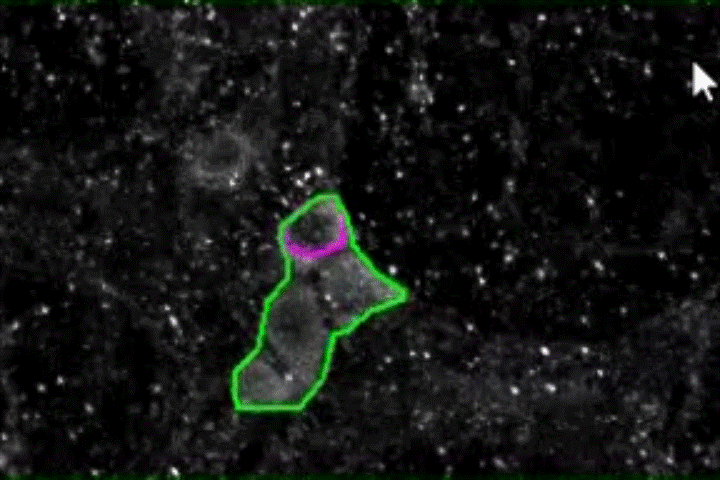
[!NOTE] First, click
Mouse leftto detect the outline, and then hitEnterto specify the classname to finalize the annotation, or hitEscto cancel the annotation.
[!TIP] Speed up by hitting
Enterinstead of using mouse to click "OK" so that no need to move mouse back and forth.
[!TIP] If there is no object of interest in an image, simply don't do any annotation and proceed to the next image, and the 'null' image will be marked as 'null' in the annotation file.
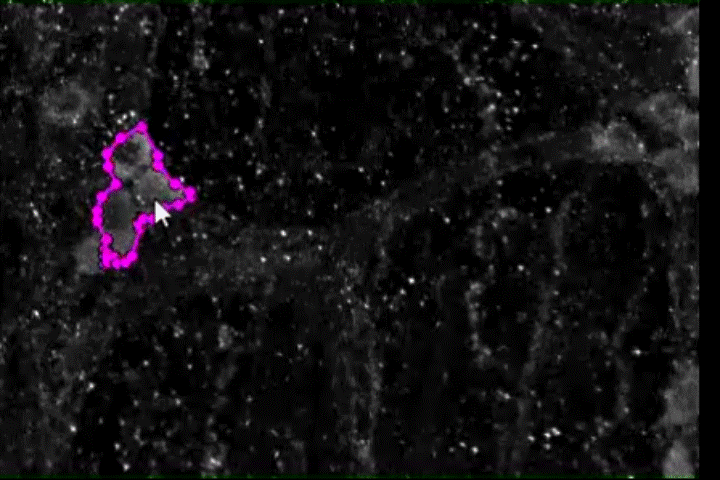
[!NOTE] Another
Mouse leftclick to include an additional area in an annotation before finalizing it.
[!NOTE] A
Mouse leftclick to select a region and aMouse rightclick to exclude some areas in an annotation.
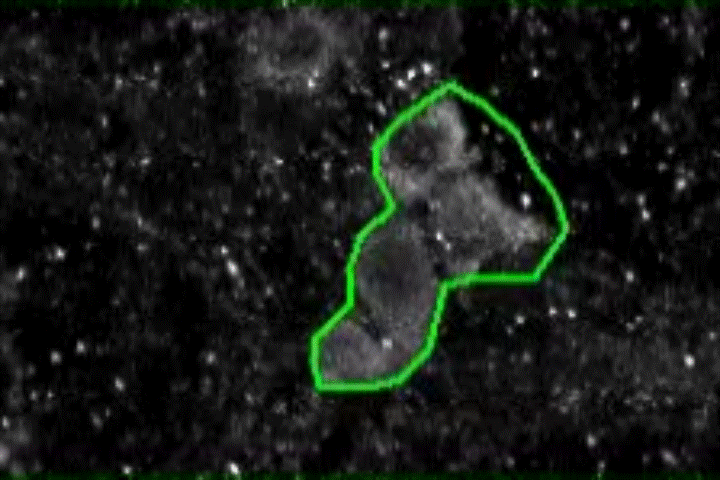
[!NOTE] To modify the polygon of an annotation, press
Shiftonce to enter or exit the editing mode.
[!NOTE] To show the classnames of all annotations, press
Spaceonce to enter or exit the showing mode.
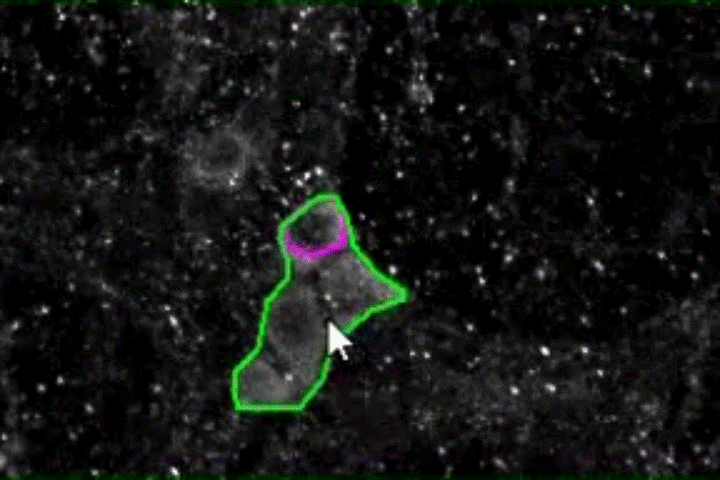
[!NOTE] To delete an annotation, a
Mouse rightclick on any area inside the outline of that annotation.
2. Augments each annotated image to 134 additional manipulated images to improve the model training.
[!TIP] The augmented images and the annotation file for them are stored in the output folder you specified. The annotation file for the original, unaugmented images is stored in the original image folder.
3. Provides quantitative measures, such as area and pixel intensity, for each annotated object/region.
Installation
[!IMPORTANT] If you are a LabGym or FluoSA user, you need to install EZannot under a different version of Python3 or environment. For example, if your LabGym/FluoSA is installed under Python3.10, you need to install EZannot under another version of Python (e.g., Python3.12). This is because LabGym/FluoSA and EZannot use different versions of PyTorch and different versions of PyTorch cannot be installed within the same Python3 or environment. You can use commands like
py -3.10andpy -3.11to activate different versions of Python3.
EZannot works for Windows, Mac and Linux systems. Installation steps can vary for different systems. But in general, you need to:
- Install Python3 (>=3.10)
- If using an NVIDIA GPU, set up CUDA (v11.8) and install PyTorch with cu118 support
- Install EZannot with pip
- Download SAM2 models for AI-help in annotation
Windows
You need to access the terminal. To do this, open the start menu by clicking the Win key, type "PowerShell", and hit enter. All terminal commands going forward should be entered in this terminal.
-
Install Python>=3.10, for example, Python 3.12.
Scroll down to the bottom and click the
Windows installer (64-bit)option. Run the installer and select "Add python to path" and "Disable long path limit". -
If you're using an NVIDIA GPU, install CUDA Toolkit 11.8 and cuDNN, and install PyTorch>=v2.5.1 with cu118 support.
First, install CUDA Toolkit 11.8. Select your version of Windows, select "exe (local)," then click "Download."
Next, install cuDNN. You will need to register an NVIDIA Developer account, which you can do for free. You can choose cuDNN v8.9.7 that supports CUDA toolkit v11.8. Choose 'Local Installer for Windows (Zip)', download and extract it. And then copy the three folders 'bin', 'lib', and 'include' into where the CUDA toolkit is installed (typically, 'C:\Program Files\NVIDIA GPU Computing Toolkit\CUDA\v11.8'), and replace all the three folders with the same names.
Finally, install PyTorch>=v2.5.1 with cu118 support:
py -3.12 -m pip install torch==2.5.1 torchvision==0.20.1 torchaudio==2.5.1 --index-url https://download.pytorch.org/whl/cu118 -
Upgrade
pip,wheel,setuptools.py -3.12 -m pip install --upgrade pip wheel setuptools -
Install EZannot via
pip.py -3.12 -m pip install EZannot -
Setup SAM2 models.
Find the 'site-packages' folder where the EZannot is by typing:
py -3.12 -m pip show EZannotAnd download the SAM2 models ('large' is more accurate but slower than 'tiny'; if you have a good GPU, go for large). You can download the individual files and organize them in the same way as they appear in the folder, and put them (e.g., the entire 'large' folder) inside the '.../site-packages/EZannot/sam2 models/' folder for easy access within EZannot's user interface, or store them somewhere else and choose the option of 'Choose a new directory of the SAM2 model' and navigate to where you store them to access these models.
Mac
You need to access the terminal. Use Cmd+Space to enter Spotlight Search, then search for "Terminal" and hit enter to open it. Next, follow these steps.
-
Install Python>=3.10, for example, Python 3.12.
Scroll down to the bottom and click the
macOS 64-bit universal2 installeroption. Run the installer and select "Add python to path". -
Upgrade
pip,wheel,setuptools.python3.12 -m pip install --upgrade pip wheel setuptools -
Install EZannot via
pip.python3.12 -m pip install EZannot -
Setup SAM2 models.
Find the 'site-packages' folder where the EZannot is by typing:
python3.12 -m pip show EZannotAnd download the SAM2 models ('large' is more accurate but slower than 'tiny'). You can download the individual files and organize them in the same way as they appear in the folder, and put them (e.g., the entire 'large' folder) inside the '.../site-packages/EZannot/sam2 models/' folder for easy access within EZannot's user interface, or store them somewhere else and choose the option of 'Choose a new directory of the SAM2 model' and navigate to where you store them to access these models.
Launch the user interface
-
Launch EZannot:
First, open the terminal, and then enter:
EZannotThe user interface may take a few minutes to start up during the first launch. If the user interface fails to initiate with the above method, which is typcially because the python3 is not added into the 'PATH' environmental variable, you can still make it show up by three lines of code in terminal:
py -3.12from EZannot import __main____main__.main() -
There's a hint for each button in the user interface:
Project details
Verified details
These details have been verified by PyPIProject links
GitHub Statistics
Maintainers
Release history Release notifications | RSS feed

Download files
Download the file for your platform. If you're not sure which to choose, learn more about installing packages.
Source Distribution
Built Distribution
Filter files by name, interpreter, ABI, and platform.
If you're not sure about the file name format, learn more about wheel file names.
Copy a direct link to the current filters
File details
Details for the file ezannot-1.0.0.tar.gz.
File metadata
- Download URL: ezannot-1.0.0.tar.gz
- Upload date:
- Size: 657.2 kB
- Tags: Source
- Uploaded using Trusted Publishing? Yes
- Uploaded via: twine/6.1.0 CPython/3.13.7
File hashes
| Algorithm | Hash digest | |
|---|---|---|
| SHA256 |
1ec64150549aa67109d859065ef7dfc2c89fac50747a1187314cd2c0dde25d82
|
|
| MD5 |
94a1ead1f7ffb87089adb48d9e503ea0
|
|
| BLAKE2b-256 |
9c78637cb4232331d3d16940999d2e4d8cc9cc4314796cf965e0199f46d87a25
|
Provenance
The following attestation bundles were made for ezannot-1.0.0.tar.gz:
Publisher:
python-publish.yml on yujiahu415/EZannot
-
Statement:
-
Statement type:
https://in-toto.io/Statement/v1 -
Predicate type:
https://docs.pypi.org/attestations/publish/v1 -
Subject name:
ezannot-1.0.0.tar.gz -
Subject digest:
1ec64150549aa67109d859065ef7dfc2c89fac50747a1187314cd2c0dde25d82 - Sigstore transparency entry: 1125799827
- Sigstore integration time:
-
Permalink:
yujiahu415/EZannot@74b78a0e34946057700a4c50f4762b2b7d4da8c8 -
Branch / Tag:
refs/tags/v1.0.0 - Owner: https://github.com/yujiahu415
-
Access:
public
-
Token Issuer:
https://token.actions.githubusercontent.com -
Runner Environment:
github-hosted -
Publication workflow:
python-publish.yml@74b78a0e34946057700a4c50f4762b2b7d4da8c8 -
Trigger Event:
release
-
Statement type:
File details
Details for the file ezannot-1.0.0-py3-none-any.whl.
File metadata
- Download URL: ezannot-1.0.0-py3-none-any.whl
- Upload date:
- Size: 852.2 kB
- Tags: Python 3
- Uploaded using Trusted Publishing? Yes
- Uploaded via: twine/6.1.0 CPython/3.13.7
File hashes
| Algorithm | Hash digest | |
|---|---|---|
| SHA256 |
8c25e95794a2e23702f9baad47b649f8b4f6eb8687f4f74ba1ec97538a4e0148
|
|
| MD5 |
62a68edd4da1680f5d4428dbba6101f2
|
|
| BLAKE2b-256 |
dd0a4f5e367e844793745da358f5aefcf8cc6ef0843e0cf9a43f6c8c8717c265
|
Provenance
The following attestation bundles were made for ezannot-1.0.0-py3-none-any.whl:
Publisher:
python-publish.yml on yujiahu415/EZannot
-
Statement:
-
Statement type:
https://in-toto.io/Statement/v1 -
Predicate type:
https://docs.pypi.org/attestations/publish/v1 -
Subject name:
ezannot-1.0.0-py3-none-any.whl -
Subject digest:
8c25e95794a2e23702f9baad47b649f8b4f6eb8687f4f74ba1ec97538a4e0148 - Sigstore transparency entry: 1125799880
- Sigstore integration time:
-
Permalink:
yujiahu415/EZannot@74b78a0e34946057700a4c50f4762b2b7d4da8c8 -
Branch / Tag:
refs/tags/v1.0.0 - Owner: https://github.com/yujiahu415
-
Access:
public
-
Token Issuer:
https://token.actions.githubusercontent.com -
Runner Environment:
github-hosted -
Publication workflow:
python-publish.yml@74b78a0e34946057700a4c50f4762b2b7d4da8c8 -
Trigger Event:
release
-
Statement type:


