The free-forever Python GUI framework.
Verified details
These details have been verified by PyPIProject links
GitHub Statistics
Maintainers

Project description


FreeSimpleGUIQt
Getting Started with FreeSimpleGUIQt
Welcome to the Alpha Release of FreeSimpleGUI for Qt!
You can use the exact same code that you are running on the older, tkinter, version of FreeSimpleGUI.
FreeSimpleGUIQt uses PySide6 as of version 2.0.0 -- Version 1.0 used PySide2
Porting your FreeSimpleGUI code to FreeSimpleGUIQt
To "port" your code from the tkinter implementation. Follow these steps:
- Change
import FreeSimpleGUItoFreeSimpleGUIQt
That's it! OK, maybe I should have said step instead of steps. It may not be that simple in all cases, but it's pretty simple generally speaking.
Differences between FreeSimpleGUI and FreeSimpleGUIQt
Sizes
While you can use "Character-based" sizes like you did in tkinter, it's best to use pixel based sizes as that is what Qt uses. FreeSimpleGUIQt does some very rough / basic conversions from the character sizes to pixel sizes. It's enough that your elements will at least be visible. But the conversion is likely to not be ideal.
Fonts
Fonts should be in the format (font family, size). You can use the older string based too, but it will not work with setting like bold and italics. FreeSimpleGUIQt converts from the string 'Courier 20' to the tuple ('Courier', 20) for you.
Installing FreeSimpleGUIQt for Python 3
pip install --upgrade FreeSimpleGUIQt
On Linux systems you need to run pip3.
pip3 install --upgrade --no-cache-dir FreeSimpleGUIQt
PySide dependency
As of version 2.0.0 this project depends on PySide6, which in turn requires Python3.9 or greater. Version 1.0 of this project
used PySide2, which supports Python versions up to 3.10. The correct version of FreeSimpleGUIQt and respective
required version of PySide will be installed automatically when you install FreeSimpleGUIQt using pip.
Testing your installation
Once you have installed, or copied the .py file to your app folder, you can test the installation using python. At the command prompt start up Python.
  python3
    >>> import FreeSimpleGUIQt
    >>> FreeSimpleGUIQt.main()
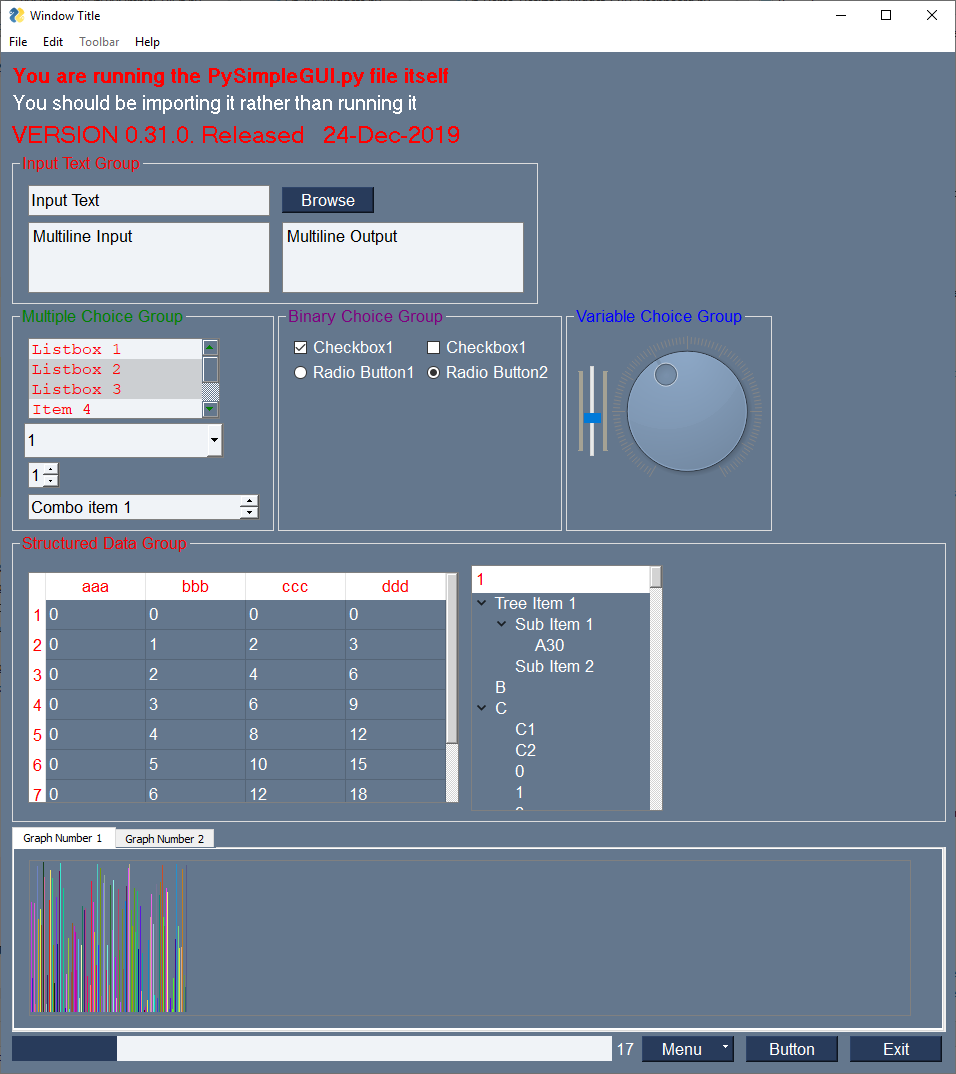
You will see a sample window in the center of your screen. If it's not installed correctly you are likely to get an error message during one of those commands
Here is the window you should see:
Using - Python 3
To use in your code, simply import....
import FreeSimpleGUIQt as sg
Then use the exact same code as any other FreeSimpleGUI program that runs on tkinter.
Status
Documentation
For the primary PySimpleGUI documentation go to http://www.PySimpleGUI.org. HOWEVER, bear in mind that is the tkinter version. But it's the best documentation for the package at the moment. Docstrings are coming to this Qt Release, but it's going to take some time to get them done. When they are, then this readme will also be fabulous.s
FEATURE COMPLETE! (Sorta... all elements are available)
All of the major features are DONE. They may not have all of their options working, but they can be added to your windows. It's been an amazing week to get here.
I hope you enjoy this ALPHA release! Please post a screenshot on the GitHub site. There is an Issue where users have been posting their applications. It's a place for you to show-off and a place for others to learn from your designs. Your window does not have to be complex.... all GUIs, no matter how simple, are something we can learn from.
Functioning features
Features are being added daily to this Qt port of FreeSimpleGUI. These Elements are "complete" (a relative term... more are more complete than others):
- Text
- Input single line
- Input multiline
- Output multiline (new)
- Dial (new)
- Output - reroute stdout
- Spinner
- Sliders
- Buttons - RButtons, CButtons, Short-cut Buttons
- Checkbox
- Radio Buttons
- Listbox
- ComboBox
- Labeled Frames
- Columns - enables you to make pretty much any layout!
- Alpha channel for windows
- No Title Bar setting
- Enter submits for multiline
- Fonts
- Colors for text and background
- Timeouts for Read calls
- Change Submits parameters for most Elements
- Table
- Basic display
- Read selected rows
- change_submits events
- Updates
- Image as a background (new feature)
- Graph - Draw line, draw circle, draw text
- Image Element
- Tree Element
- Tabs
- Menus
- Menu Button Element
Missing Features
Notable MISSING features at the moment include:
- Graphs Element Methods - erasing, draw arc, etc
- Tree element - returns rows selected, but a little difficult to map those values to something meaningful for the user.
SystemTray
This is a FreeSimpleGUIQt only feature. Don't know of a way to do it using tkinter. It looks likely to work on WxPython however.
In addition to running normal windows, it's now also possible to have an icon down in the system tray that you can read to get menu events. There is a new SystemTray object that is used much like a Window object. You first get one, then you perform Reads in order to get events.
Here is the definition of the SystemTray object.
SystemTray(menu=None, filename=None, data=None, data_base64=None, tooltip=None):
        '''
 SystemTray - create an icon in the system tray
 :param menu: Menu definition
 :param filename: filename for icon
 :param data: in-ram image for icon
 :param data_base64: basee-64 data for icon
 :param tooltip: tooltip string '''
You'll notice that there are 3 different ways to specify the icon image. The base-64 parameter allows you to define a variable in your .py code that is the encoded image so that you do not need any additional files. Very handy feature.
System Tray Design Pattern
Here is a design pattern you can use to get a jump-start.
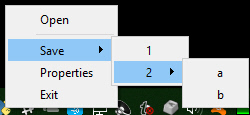
This program will create a system tray icon and perform a blocking Read. If the item "Open" is chosen from the system tray, then a popup is shown.
import FreeSimpleGUIQt as sg

menu_def = ['BLANK', ['&Open', '---', '&Save', ['1', '2', ['a', 'b']], '&Properties', 'E&xit']]

tray = sg.SystemTray(menu=menu_def, filename=r'default_icon.ico')

while True:  # The event loop
	menu_item = tray.Read()
	print(menu_item)
	if menu_item == 'Exit':
		break
	elif menu_item == 'Open':
		sg.Popup('Menu item chosen', menu_item)
The design pattern creates an icon that will display this menu:
Icons
When specifying "icons", you can use 3 different formats.
filename- filenamedata_base64- base64 byte string- '
data- in-ram bitmap or other "raw" image
You will find 3 parameters used to specify these 3 options on both the initialize statement and on the Update method.
Menu Definition
menu_def = ['BLANK', ['&Open', '&Save', ['1', '2', ['a', 'b']], '!&Properties', 'E&xit']]
A menu is defined using a list. A "Menu entry" is a string that specifies:
- text shown
- keyboard shortcut
- key
See section on Menu Keys for more information on using keys with menus.
An entry without a key and keyboard shortcut is a simple string
'Menu Item'
If you want to make the "M" be a keyboard shortcut, place an & in front of the letter that is the shortcut.
'&Menu Item'
You can add "keys" to make menu items unique or as another way of identifying a menu item than the text shown. The key is added to the text portion by placing :: after the text.
'Menu Item::key'
The first entry can be ignored.'BLANK' was chosen for this example. It's this way because normally you would specify these menus under some heading on a menu-bar. But here there is no heading so it's filled in with any value you want.
Separators
If you want a separator between 2 items, add the entry '---' and it will add a separator item at that place in your menu.
Disabled menu entries
If you want to disable a menu entry, place a ! before the menu entry
Stretch Element for Justifying Elements
Use the Stretch Element to left justify, right justify or center justify one or more elements within their container.
If a single Stretch Element is on a row, then it will push the other elements on the row to either the left or right. If Stretch is on the left, then the elements to the rigth will be pushed to the right.
To center elements, place a Stretch Element on each side of them (2 Stretch Elements will be on the same row)
SystemTray Methods
Read - Read the context menu or check for events
def Read(timeout=None)
    '''
 Reads the context menu
 :param timeout: Optional.  Any value other than None indicates a non-blocking read
 :return:   String representing meny item chosen. None if nothing read.
    '''
The timeout parameter specifies how long to wait for an event to take place. If nothing happens within the timeout period, then a "timeout event" is returned. These types of reads make it possible to run asynchronously. To run non-blocked, specify timeout=0on the Read call.
Read returns the menu text, complete with key, for the menu item chosen. If you specified Open::key as the menu entry, and the user clicked on Open, then you will receive the string Open::key upon completion of the Read.
Read special return values
In addition to Menu Items, the Read call can return several special values. They include:
EVENT_SYSTEM_TRAY_ICON_DOUBLE_CLICKED - Tray icon was double clicked EVENT_SYSTEM_TRAY_ICON_ACTIVATED - Tray icon was single clicked EVENT_SYSTEM_TRAY_MESSAGE_CLICKED - a message balloon was clicked TIMEOUT_KEY is returned if no events are available if the timeout value is set in the Read call
Hide
Hides the icon. Note that no message balloons are shown while an icon is hidden.
def Hide()
Close
Does the same thing as hide
def Close()
UnHide
Shows a previously hidden icon
def UnHide()
ShowMessage
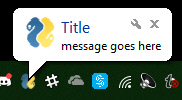
Shows a balloon above the icon in the system tray area. You can specify your own icon to be shown in the balloon, or you can set messageicon to one of the preset values.
This message has a custom icon.
The preset messageicon values are:
SYSTEM_TRAY_MESSAGE_ICON_INFORMATION
SYSTEM_TRAY_MESSAGE_ICON_WARNING
SYSTEM_TRAY_MESSAGE_ICON_CRITICAL
SYSTEM_TRAY_MESSAGE_ICON_NOICON
ShowMessage(title, message, filename=None, data=None, data_base64=None, messageicon=None, time=10000):
    '''
 Shows a balloon above icon in system tray
 :param title:  Title shown in balloon
 :param message: Message to be displayed
 :param filename: Optional icon filename
 :param data: Optional in-ram icon
 :param data_base64: Optional base64 icon
 :param time: How long to display message in milliseconds  :return:
 '''
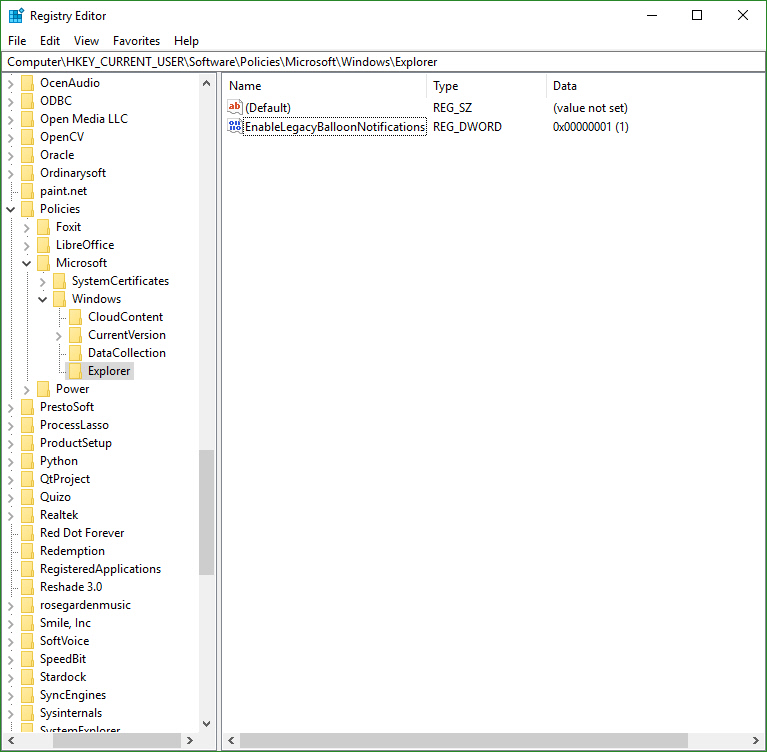
Note, on windows it may be necessary to make a registry change to enable message balloons to be seen. To fix this, you must create the DWORD you see in this screenshot.
Update
You can update any of these items within a SystemTray object
- Menu definition
- Icon
- Tooltip
Change them all or just 1.
Update(menu=None, tooltip=None,filename=None, data=None, data_base64=None,)
    '''
 Updates the menu, tooltip or icon
 :param menu: menu defintion
 :param tooltip: string representing tooltip
 :param filename:  icon filename
 :param data:  icon raw image
 :param data_base64: icon base 64 image
 :return:
 '''
Menus with Keys
FreeSimpleGUIQt offers the ability to add a key to your menu items. To do so, you add :: and the key value to the end of your menu definition.
menu_def = ['File', ['Hide::key', '&Open::key', '&Save',['1', '2', ['a','b']], '&Properties', 'E&xit']]
The menu definition adds a key "key" to the menu entries Hide and Open.
If you want to change the separator characters from :: top something else,change the variable MENU_KEY_SEPARATOR
When a menu item has a key and it is chosen, then entire string is returned. If Hide were selected, then Hide::key would be returned from the Read. Note that the shortcut character & is NOT returned from Reads.
Dynamic Windows (Element Visibility)
Finally, the ability to grow and shrink has been added as of release 0.20.0
While the window appears to be dynamic, the reality is that the elements are created up front, when you define the window layout. You will create these "extra" elements with the flag visible=False. Then, when you wish to show those elements, call the element's Update method setting visible=True.
After you call the Update method, it's important to call window.VisibilityChanged() so that your window can change sizes. Without that call your window will not shrink. It will grow properly, but it will not shrink. While this could have been done by FreeSimpleGUI on the user's behalf, the thought was that perhaps the user wants the window size to remain the same and the element simply appears and disappears, leaving a blank spot. If the window automatically grew and shrank, this would not be possible. Just buck-up and make the call to VisibilityChanged.
enable_events Parameter
All elements that are capable of producing events now have a parameter enable_events. This is identical to the old parameter change_submits or click_submits. The idea is to standardize on 1 name that all elements use. The old parameters will continue to work, but the documentation and sample programs will steer you away from them and towards enable_events.
License
GNU Lesser General Public License (LGPL 3) +
Copyright 2024 Spencer Phillip Young Copyright 2018, 2019, 2020 PySimpleGUI
Project details
Verified details
These details have been verified by PyPIProject links
GitHub Statistics
Maintainers
Release history Release notifications | RSS feed


Download files
Download the file for your platform. If you're not sure which to choose, learn more about installing packages.
Source Distribution
Built Distribution
Filter files by name, interpreter, ABI, and platform.
If you're not sure about the file name format, learn more about wheel file names.
Copy a direct link to the current filters
File details
Details for the file freesimpleguiqt-2.0.0.tar.gz.
File metadata
- Download URL: freesimpleguiqt-2.0.0.tar.gz
- Upload date:
- Size: 144.1 kB
- Tags: Source
- Uploaded using Trusted Publishing? Yes
- Uploaded via: twine/6.1.0 CPython/3.12.9
File hashes
| Algorithm | Hash digest | |
|---|---|---|
| SHA256 |
c58f2798642c474a9e9a6867995b3aa48987dcbe18712e8af4e728bd83864ffa
|
|
| MD5 |
60675f597958781e0af207905e165f2c
|
|
| BLAKE2b-256 |
aefaa7f8f2e57c327208ae74bb91a51521ff31b6138f7a3cc27df9723179e6e4
|
Provenance
The following attestation bundles were made for freesimpleguiqt-2.0.0.tar.gz:
Publisher:
release-qt.yaml on spyoungtech/FreeSimpleGUI
-
Statement:
-
Statement type:
https://in-toto.io/Statement/v1 -
Predicate type:
https://docs.pypi.org/attestations/publish/v1 -
Subject name:
freesimpleguiqt-2.0.0.tar.gz -
Subject digest:
c58f2798642c474a9e9a6867995b3aa48987dcbe18712e8af4e728bd83864ffa - Sigstore transparency entry: 180590009
- Sigstore integration time:
-
Permalink:
spyoungtech/FreeSimpleGUI@1f77b0267b2c6f31b4adf9066bc6d730c27025bd -
Branch / Tag:
refs/tags/qt-v2.0.0 - Owner: https://github.com/spyoungtech
-
Access:
public
-
Token Issuer:
https://token.actions.githubusercontent.com -
Runner Environment:
github-hosted -
Publication workflow:
release-qt.yaml@1f77b0267b2c6f31b4adf9066bc6d730c27025bd -
Trigger Event:
push
-
Statement type:
File details
Details for the file freesimpleguiqt-2.0.0-py3-none-any.whl.
File metadata
- Download URL: freesimpleguiqt-2.0.0-py3-none-any.whl
- Upload date:
- Size: 142.4 kB
- Tags: Python 3
- Uploaded using Trusted Publishing? Yes
- Uploaded via: twine/6.1.0 CPython/3.12.9
File hashes
| Algorithm | Hash digest | |
|---|---|---|
| SHA256 |
138d1098287f903aa50a665904beede12405a9a6ffce6cdc208205f258ce2c5b
|
|
| MD5 |
b0263938f302a85a92d1a5345779d493
|
|
| BLAKE2b-256 |
ae5090603a6a9d41e438d96a5af536359abab8aef0f9b1c6282238e08de5396d
|
Provenance
The following attestation bundles were made for freesimpleguiqt-2.0.0-py3-none-any.whl:
Publisher:
release-qt.yaml on spyoungtech/FreeSimpleGUI
-
Statement:
-
Statement type:
https://in-toto.io/Statement/v1 -
Predicate type:
https://docs.pypi.org/attestations/publish/v1 -
Subject name:
freesimpleguiqt-2.0.0-py3-none-any.whl -
Subject digest:
138d1098287f903aa50a665904beede12405a9a6ffce6cdc208205f258ce2c5b - Sigstore transparency entry: 180590012
- Sigstore integration time:
-
Permalink:
spyoungtech/FreeSimpleGUI@1f77b0267b2c6f31b4adf9066bc6d730c27025bd -
Branch / Tag:
refs/tags/qt-v2.0.0 - Owner: https://github.com/spyoungtech
-
Access:
public
-
Token Issuer:
https://token.actions.githubusercontent.com -
Runner Environment:
github-hosted -
Publication workflow:
release-qt.yaml@1f77b0267b2c6f31b4adf9066bc6d730c27025bd -
Trigger Event:
push
-
Statement type:


