


GeospaNN - Neural networks for geospatial data
Authors: Wentao Zhan (wzhan3@jhu.edu), Abhirup Datta (abhidatta@jhu.edu)
A package based on the paper: Neural networks for geospatial data
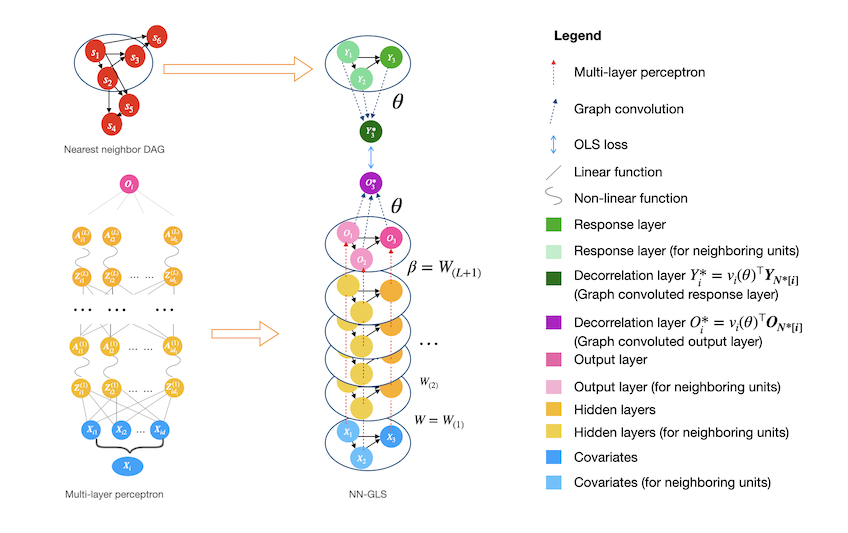
GeospaNN is a formal implementation of NN-GLS, the Neural Networks for geospatial data proposed in Zhan et.al (2024), that explicitly accounts for spatial correlation in the data. The package is developed using PyTorch and under the framework of PyG library. NN-GLS is a geographically-informed Graph Neural Network (GNN) for analyzing large and irregular geospatial data, that combines multi-layer perceptrons, Gaussian processes, and generalized least squares (GLS) loss. NN-GLS offers both regression function estimation and spatial prediction, and can scale up to sample sizes of hundreds of thousands. Users are welcome to provide any helpful suggestions and comments.
-
The official website (with documentation and running examples) is available at https://wentaozhan1998.github.io/geospaNN-doc/.
-
A vignette is available at https://github.com/WentaoZhan1998/geospaNN/blob/main/vignette/vignette.pdf.
Acknowledgement: This work is supported by National Institute of Environmental Health Sciences grant R01ES033739.
Overview
The Python package geospaNN stands for 'geospatial Neural Networks', where we implement NN-GLS, neural networks tailored for analysis of geospatial data that explicitly accounts for spatial dependence (Zhan et.al, 2024). Geospatial data naturally exhibits spatial correlation or dependence and traditional geostatistical analysis often relies on model-based approaches to handle the spatial dependency, treating the spatial outcome $y(s)$ as a linear regression on covariates $x(s)$ and modeling dependency through the spatially correlated errors. For example, using Gaussian processes (GP) to model dependent errors, simple techniques like kriging can provide powerful prediction performance by properly aggregating the neighboring information. On the other hand, artificial Neural Networks (NN), one of the most popular machine learning approaches, could be used to estimate non-linear regression functions. However, common neural networks like multi-layer perceptrons (MLP) does not incorporate correlation among data units.
Our package geospaNN takes the advantages from both perspectives and provides an efficient tool for geospatial data analysis. In NN-GLS, an MLP is used to model the non-linear regression function while a GP is used to model the spatial dependence. The resulting loss function then becomes a generalized least squares (GLS) loss informed by the GP covariance matrix, thereby explicitly incorporating spatial correlation into the neural network optimization. The idea mimics the extension of ordinary least squares (OLS) loss to GLS loss in linear regression for dependent data.
Zhan and Datta, 2024 shows that neural networks with GLS loss can be represented as a graph neural network, with the GP covariances guiding the neighborhood aggregation on the output layer. Thus NN-GLS is implemented in geospaNN with the framework of Graph Neural Networks (GNN), and is highly generalizable. (The implementation of geospaNN' uses the 'torch_geom' module.)
geospaNN provides an estimate of regression function 𝑓(𝑥) as well as accurate spatial predictions using Gaussian process (kriging), and thus constitutes a complete geospatial analysis pipeline. To accelerate the training process for the GP, geospaNN approximates the working correlation structure using Nearest Neighbor Gaussian Process (NNGP) (Datta et al., 2016) which makes it suitable for larger datasets towards a size of 0.5 million.
Temporary notes (Updated on Nov 2025)
- The installation of the package relies is now based on PyTorch 2.7.0.
Installation
We provide two straightforward installation approaches: via conda and via pip. Depending on your system setup, it is possible to combine both methods, but be aware that mixing Conda and Pip installations can sometimes lead to dependency conflicts. Proceed with caution and ensure that package versions remain compatible.
Approach 1: all-in-one through conda (recommended)
- If you haven't installed anaconda on your machine, refer to this doc follow the instruction and install the right version.
- Create the conda virtual environment from the environment.yml file in this repository. You can specify your environment name by editing "env_name" on the first line of the yml file.
Example:
# bash
conda env create -f environment.yml
Note: For Apple Silicon users on a Mac with an Apple M-series (ARM64) chip, you can improve performance by explicitly creating the environment for the ARM architecture instead:# bash conda env create -f environment.yml --subdir osx-arm64
For more details on creating a conda environment, refer to this doc. - Enter the virtual environment by running:
# bash
conda activate [name of your environment]
Approach 2: using pip
(Currently) to avoid running issue, matched PyTorch and PyG libraries are needed, requiring us to install torch and pyg library manually.
- For pip, installation in the following order is recommended to avoid any compilation issue.
The following chunk has been tested in a python 3.10 environment.
# bash pip install numpy torch==2.7 torch_geometric pip install pyg_lib torch_scatter torch_sparse torch_cluster torch_spline_conv -f https://data.pyg.org/whl/torch-2.7.0+cpu.html - Once PyTorch and PyG are successfully installed, use the following command in the terminal for the latest version (version 04/2025):
To install the pypi version, use the following command in the terminal (version 04/2025):# bash pip install https://github.com/WentaoZhan1998/geospaNN/archive/main.zip# bash pip install geospaNN - (Skip if you already have R ready to use). The current version of geospaNN uses R-package BRISC
for spatial parameter estimation through rpy2, thus requiring R installed in the environment. To install an R version compatible with your Python and system architecture, Mac users can check their architecture with:
Then download the appropriate R installer from CRAN for macOS. Windows users can download R from CRAN for Windows.# bash python -c "import platform; print(platform.machine())" - If rpy2 cannot find your R installation, you may need to set the R home directory manually. First, find R’s home path by running in terminal:
Then, set this directory in your Python environment before importing geospaNN:# bash R R_HOME
Make sure to use the path to the correct R.# bash python -c "import os; os.environ["R_HOME"] = [R home path]"
An easy running sample (functionality verification):
This is a simple running sample to check the functionality of the package. First, run python in the terminal:
python
import the modules and set up the parameters
- Define the Friedman's function, and specify the dimension of input covariates.
- Set the parameters for the spatial process.
- Set the hyperparameters of the data.
import torch
import geospaNN
import numpy as np

# 1.
def f5(X): return (10*np.sin(np.pi*X[:,0]*X[:,1]) + 20*(X[:,2]-0.5)**2 + 10*X[:,3] +5*X[:,4])/6

p = 5; funXY = f5

# 2.
sigma = 1
phi = 3/np.sqrt(2)
tau = 0.01
theta = torch.tensor([sigma, phi, tau])

# 3.
n = 1000            # Size of the simulated sample.
nn = 20             # Neighbor size used for NNGP.
Next, simulate and split the data.
- Simulate the spatially correlated data with spatial coordinates randomly sampled on a [0, 10]^2 squared domain.
- Order the spatial locations by max-min ordering.
- Build the nearest neighbor graph, as a torch_geometric.data.Data object.
- Split data into training, validation, testing sets.
# 1.
torch.manual_seed(2024)
X, Y, coord, cov, corerr = geospaNN.Simulation(n, p, nn, funXY, theta, range=[0, 10])

# 2.
X, Y, coord, _ = geospaNN.spatial_order(X, Y, coord, method = 'max-min')

# 3.
data = geospaNN.make_graph(X, Y, coord, nn)

# 4.
data_train, data_val, data_test = geospaNN.split_data(X, Y, coord, neighbor_size=20,
                                                   test_proportion=0.2)
Compose the mlp structure and train easily.
- Define the mlp structure (torch.nn) to use.
- Define the NN-GLS corresponding model.
- Define the NN-GLS training class with learning rate and tolerance.
- Train the model.
# 1.
mlp = torch.nn.Sequential(
    torch.nn.Linear(p, 50),
    torch.nn.ReLU(),
    torch.nn.Linear(50, 20),
    torch.nn.ReLU(),
    torch.nn.Linear(20, 10),
    torch.nn.ReLU(),
    torch.nn.Linear(10, 1),
)

# 2.
model = geospaNN.nngls(p=p, neighbor_size=nn, coord_dimensions=2, mlp=mlp, theta=torch.tensor([1.5, 5, 0.1]))

# 3.
nngls_model = geospaNN.nngls_train(model, lr =  0.01, min_delta = 0.001)

# 4.
training_log = nngls_model.train(data_train, data_val, data_test,
                                 Update_init = 10, Update_step = 10)
Estimation from the model. The variable is a torch.Tensor object of the same dimension
train_estimate = model.estimate(data_train.x)
Kriging prediction from the model. The first variable is supposed to be the data used for training, and the second variable a torch_geometric.data.Data object which can be composed by geospaNN.make_graph()'.
test_predict = model.predict(data_train, data_test)
Running examples:
-
Python packages time, pandas, seaborn, geopandas, and matplotlib are required to run the following experiments.
-
A simulation experiment with a common spatial setting is shown here.
-
For the linear regression case, a performance comparison with the R package BRISC is shown here.
-
A real data experiment is shown here.
-
The PM2.5 data is collected from the U.S. Environmental Protection Agency datasets for each state are collected and bound together to obtain 'pm25_2022.csv'. daily PM2.5 files are subsets of 'pm25_2022.csv' produced by 'realdata_preprocess.py'. One can skip the preprocessing and use the daily files directory.
-
The meteorological data is collected from the National Centers for Environmental Prediction’s (NCEP) North American Regional Reanalysis (NARR) product. The '.nc' (netCDF) files should be downloaded from the website and saved in the root directory to run 'realdata_preprocess.py'. Otherwise, one may skip the preprocessing and use covariate files directly.
-
More running examples are available on the geospaNN website
Citation
Please cite the following papers when you use geospaNN:
Zhan, Wentao, and Abhirup Datta. 2025. “Neural Networks for Geospatial Data.” Journal of the American Statistical Association 120 (549): 535–547. https://doi.org/10.1080/01621459.2024.2356293 Zhan, Wentao, and Abhirup Datta. 2026 "geospaNN: A Python package for geospatial neural networks." Journal of Open Source Software 11.117 (2026): 8389. https://doi.org/10.21105/joss.08389
References
Datta, Abhirup, Sudipto Banerjee, Andrew O. Finley, and Alan E. Gelfand. 2016. “Hierarchical Nearest-Neighbor Gaussian Process Models for Large Geostatistical Datasets.” Journal of the American Statistical Association 111 (514): 800–812. https://doi.org/10.1080/01621459.2015.1044091.
Zhan, Wentao, and Abhirup Datta. 2025. “Neural Networks for Geospatial Data.” Journal of the American Statistical Association 120 (549): 535–547. https://doi.org/10.1080/01621459.2024.2356293
Katzfuss, Matthias, and Joseph Guinness. 2021. "A General Framework for Vecchia Approximations of Gaussian Processes." Statist. Sci. 36 (1) 124 - 141. https://doi.org/10.1214/19-STS755
1 maintainer

Download files
Download the file for your platform. If you're not sure which to choose, learn more about installing packages.
Source Distribution
Built Distribution
Filter files by name, interpreter, ABI, and platform.
If you're not sure about the file name format, learn more about wheel file names.
Copy a direct link to the current filters
File details
Details for the file geospann-0.1.10.tar.gz.
File metadata
- Download URL: geospann-0.1.10.tar.gz
- Upload date:
- Size: 7.4 MB
- Tags: Source
- Uploaded using Trusted Publishing? No
- Uploaded via:
twine/5.0.0 CPython/3.10.9
File hashes
| Algorithm | Hash digest | |
|---|---|---|
| SHA256 |
59a639dd0cccb8245ceb8ee59589a761d9ebe99d939103f7211213adccc1a280
|
|
| MD5 |
9a98d92368de1c6be0a7945cbd1f2ec7
|
|
| BLAKE2b-256 |
69bd335a57d2125e29b3c85465a10db77fa8c3569238acb94e159980e6ac2ce3
|
File details
Details for the file geospann-0.1.10-py3-none-any.whl.
File metadata
- Download URL: geospann-0.1.10-py3-none-any.whl
- Upload date:
- Size: 31.3 kB
- Tags: Python 3
- Uploaded using Trusted Publishing? No
- Uploaded via:
twine/5.0.0 CPython/3.10.9
File hashes
| Algorithm | Hash digest | |
|---|---|---|
| SHA256 |
0c57be526466ef725249debe0119b800eb21a78809186a83740bba6069149710
|
|
| MD5 |
01083d3e2af065a01f5785caeb4efc49
|
|
| BLAKE2b-256 |
9b74db71ef9d34586f73694d521eff2905f11afaf2bc220f739c9ad7e7e51552
|














