思维导图MCP服务器 - 将Markdown转换为PNG格式的思维导图

Project description
Mind Map MCP Server | 思维导图MCP服务器
🌟 Mind Map MCP Server
A powerful MCP (Model Context Protocol) server that converts Markdown text into beautiful mind map PNG images.

👨💻 Author
sawyer-shi
📦 Repository
Source Code: https://github.com/sawyer-shi/mind-map-mcp-server.git
✨ Features
- 📝 Markdown Input Support - Convert any Markdown text to mind maps
- 🖼️ High-Quality PNG Output - Generate crisp, clear mind map images (watermark-free)
- 🐳 Docker Ready (HIGHLY RECOMMENDED) - One-command deployment with Docker
- 🔌 Full MCP Protocol - Standard MCP compliance with optimized responses
- ⚡ Fast Generation - Quick conversion and processing with advanced validation
- 🌐 Multiple Access Methods - HTTP and stdio transport support
- ☁️ Multi-Cloud Storage - Support for local, Aliyun OSS, Huawei OceanStor, MinIO, Amazon S3, Azure Blob, and Google Cloud Storage
- 🔗 Direct Access URLs - Get shareable links to your generated mind maps
- 🔍 Smart Image Listing - Query images by date and fuzzy name matching
- ✅ Advanced Validation - Comprehensive image validation and error handling
🎯 Core Functions
1. list_images
- Purpose: List generated mind map images by date with optional name filtering
- Parameters:
date(string, optional): Date in YYYY-MM-DD format (defaults to current date)name_filter(string, optional): Fuzzy name matching filter
- Returns: List of matching mind map images with URLs and metadata
2. create_mind_map
- Purpose: Generate high-quality, watermark-free mind map PNG from Markdown content with intelligent viewport sizing
- Parameters:
markdown_content(string): Markdown formatted text with hierarchical structure supporttitle(string, optional): Mind map title (used as filename)quality(string, optional): Image quality level - 'low', 'medium', 'high', 'ultra' (defaults to 'high')
- Returns: Mind map image URL, storage information, and validation status
- Features:
- 🧠 Smart Content Analysis: Automatically analyzes content complexity and adjusts viewport size
- 📐 Dynamic Viewport: Viewport size scales from 800x600 to 2400x1600 based on content
- 🎯 High-DPI Rendering: Supports 1x to 3x scale factors for crisp images on any display
- ✨ Quality Levels: Choose from 4 quality presets for different use cases
🚀 Quick Start
🚨 CRITICAL DEPLOYMENT CONFIGURATION | 关键部署配置
⚠️ MUST READ BEFORE DEPLOYMENT | 部署前必读
🎯 When deploying as a service, you MUST modify the
LOCAL_HOSTconfiguration!🎯 当作为服务部署时,必须修改
LOCAL_HOST配置!# 1. Copy environment template | 复制环境模板 cp env.template .env # 2. ⚠️ CRITICAL: Change LOCAL_HOST from 127.0.0.1 to your server's IP # ⚠️ 关键:将 LOCAL_HOST 从 127.0.0.1 改为您服务器的IP地址 LOCAL_HOST=YOUR_SERVER_IP_ADDRESS # Examples | 示例: # LOCAL_HOST=192.168.1.100 # Local network | 局域网 # LOCAL_HOST=10.10.228.155 # Internal network | 内网 # LOCAL_HOST=209.0.113.1 # Public IP | 公网IP🔥 Why This Matters | 为什么这很重要
✅ Correct:
http://YOUR_SERVER_IP:8090/output/file.png- Accessible from anywhere❌ Wrong:
http://127.0.0.1:8090/output/file.png- Only works on the server itself✅ 正确:
http://您的服务器IP:8090/output/file.png- 任何地方都可访问❌ 错误:
http://127.0.0.1:8090/output/file.png- 只能在服务器本机访问🐳 RECOMMENDED: Use Docker Deployment | 推荐:使用Docker部署
Method 1: Docker Deployment (🔥Recommended🔥)
- Start the service:
docker-compose up -d
-
Access URLs【🔥Change the follow localhost to your server's or hosts IP🔥】:
- HTTP MCP Endpoint:
http://localhost:8091/mcp - Service Status:
http://localhost:8091
- HTTP MCP Endpoint:
-
Check service status:
docker-compose logs -f
- Stop service:
docker-compose down
Method 2: uvx Deployment (Recommended for Python environments)
- Install uvx (if not already installed):
# Install uvx using pip
pip install uvx

# Or install using pipx
pipx install uvx
- Run with uvx (from local project):
# Navigate to project directory first
cd mind-map-mcp-server

# For stdio mode (MCP client integration)
uvx --from . python main.py stdio

# For streamable HTTP mode
uvx --from . python main.py streamable-http --host 0.0.0.0 --port 8091
- Access URLs (HTTP mode):
- HTTP MCP Endpoint:
http://localhost:8091/mcp - Service Status:
http://localhost:8091
- HTTP MCP Endpoint:
Method 3: Local Installation
- Auto-install and start:
python start_server.py
- Manual installation:
pip install -r requirements.txt
npm install -g markmap-cli
playwright install chromium
python main.py
🔧 Technical Architecture
- Markdown Parsing - Process user input text
- HTML Conversion - Use markmap-cli to create interactive HTML mind maps
- PNG Generation - Use Playwright to capture HTML as PNG images
- Multi-Cloud Storage - Support for various storage providers with unified interface
- MCP Protocol - Standard MCP server implementation
☁️ Storage Configuration
The server supports multiple storage providers. Configure your preferred storage in the .env file:
Local Storage (Default)
STORAGE_TYPE=local
LOCAL_STORAGE_URL_PREFIX=http://localhost:8091/output
Aliyun OSS
STORAGE_TYPE=aliyun_oss
ALIYUN_OSS_ACCESS_KEY_ID=your_access_key_id
ALIYUN_OSS_ACCESS_KEY_SECRET=your_access_key_secret
ALIYUN_OSS_ENDPOINT=oss-cn-hangzhou.aliyuncs.com
ALIYUN_OSS_BUCKET_NAME=your_bucket_name
ALIYUN_OSS_URL_PREFIX=https://your_bucket_name.oss-cn-hangzhou.aliyuncs.com
Huawei OceanStor
STORAGE_TYPE=huawei_oceanstor
HUAWEI_ACCESS_KEY_ID=your_access_key_id
HUAWEI_SECRET_ACCESS_KEY=your_secret_access_key
HUAWEI_ENDPOINT=https://obs.cn-north-4.myhuaweicloud.com
HUAWEI_BUCKET_NAME=your_bucket_name
HUAWEI_URL_PREFIX=https://your_bucket_name.obs.cn-north-4.myhuaweicloud.com
MinIO
STORAGE_TYPE=minio
MINIO_ENDPOINT=localhost:9000
MINIO_ACCESS_KEY=your_access_key
MINIO_SECRET_KEY=your_secret_key
MINIO_BUCKET_NAME=mindmaps
MINIO_SECURE=false
MINIO_URL_PREFIX=http://localhost:9000/mindmaps
Amazon S3
STORAGE_TYPE=amazon_s3
AWS_ACCESS_KEY_ID=your_access_key_id
AWS_SECRET_ACCESS_KEY=your_secret_access_key
AWS_DEFAULT_REGION=us-east-1
AWS_S3_BUCKET_NAME=your_bucket_name
AWS_S3_URL_PREFIX=https://your_bucket_name.s3.amazonaws.com
Azure Blob Storage
STORAGE_TYPE=azure_blob
AZURE_STORAGE_ACCOUNT_NAME=your_storage_account
AZURE_STORAGE_ACCOUNT_KEY=your_storage_key
AZURE_STORAGE_CONTAINER_NAME=mindmaps
AZURE_STORAGE_URL_PREFIX=https://your_storage_account.blob.core.windows.net/mindmaps
Google Cloud Storage
STORAGE_TYPE=google_cloud_storage
GCS_PROJECT_ID=your_project_id
GCS_BUCKET_NAME=your_bucket_name
# Option 1: Use service account key file
GCS_CREDENTIALS_FILE=path/to/your/service-account-key.json
# Option 2: Use service account key as JSON string
# GCS_CREDENTIALS_JSON={"type":"service_account","project_id":"..."}
GCS_URL_PREFIX=https://storage.googleapis.com/your_bucket_name
📦 Storage Dependencies
Install additional packages based on your storage choice:
# For Aliyun OSS
pip install oss2>=2.17.0

# For Huawei OceanStor
pip install esdk-obs-python>=3.23.0

# For MinIO
pip install minio>=7.2.0

# For Amazon S3
pip install boto3>=1.34.0

# For Azure Blob Storage
pip install azure-storage-blob>=12.19.0

# For Google Cloud Storage
pip install google-cloud-storage>=2.10.0
📁 Project Structure
mind-map-mcp-server/
├── README.md                 # 📖 Project documentation | 项目文档
├── main.py                  # 🧠 Main entry point (modular) | 主入口点(模块化)
├── src/                     # 📁 Source code modules | 源代码模块
│   ├── __init__.py         # 📦 Package initialization | 包初始化
│   ├── config.py           # ⚙️ Configuration management | 配置管理
│   ├── server.py           # 🖥️ Main server class | 主服务器类
│   ├── mind_map_generator.py # 🎨 Mind map generation logic | 思维导图生成逻辑
│   ├── storage_manager.py  # ☁️ Multi-cloud storage manager | 多云存储管理器
│   ├── mcp_tools.py        # 🔧 MCP tool definitions | MCP工具定义
│   └── utils.py            # 🛠️ Utility functions | 工具函数
├── start_server.py          # ⚙️ Auto-install startup script | 自动安装启动脚本
├── quick_start.py           # 🚀 User-friendly startup interface | 用户友好启动界面
├── ARCHITECTURE.md          # 📋 Architecture documentation | 架构文档
├── requirements.txt         # 🐍 Python dependencies | Python依赖
├── package.json            # 📦 Node.js dependencies | Node.js依赖
├── Dockerfile              # 🐳 Docker build file | Docker构建文件
├── docker-compose.yml      # 🚢 Docker orchestration | Docker编排
├── env.template            # ⚙️ Environment configuration template | 环境配置模板
├── temp/                   # 📂 Temporary files | 临时文件
├── output/                 # 🖼️ Generated images | 生成的图片
├── logs/                   # 📝 Log files | 日志文件
└── examples/               # 📋 Usage examples | 使用示例
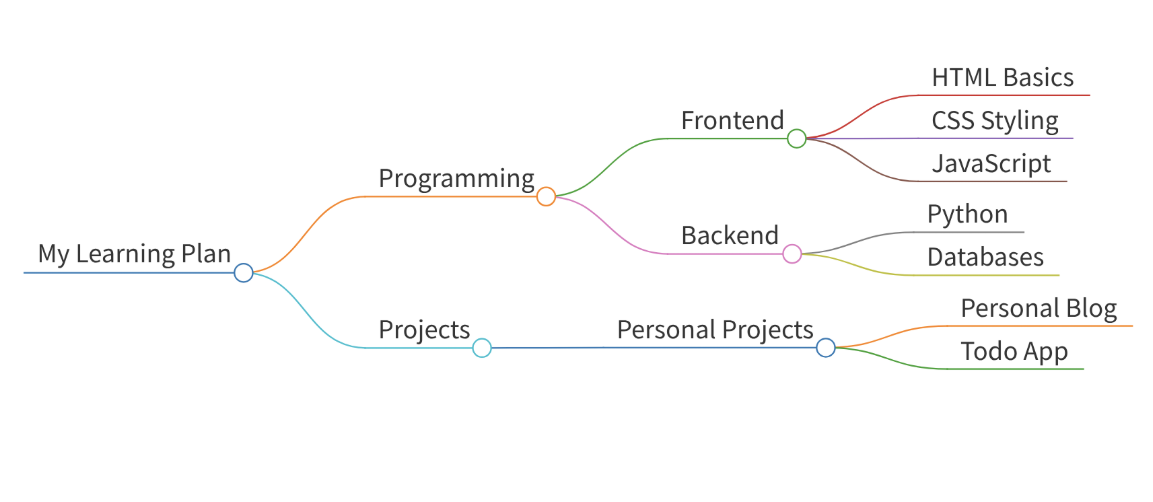
🎬 Usage Example
Input (Markdown):
# My Learning Plan

## Programming
### Frontend
- HTML Basics
- CSS Styling
- JavaScript

### Backend
- Python
- Databases

## Projects
### Personal Projects
- Personal Blog
- Todo App
Output: Beautiful PNG mind map visualizing the complete learning structure!
❓ FAQ
🚀 Getting Started | 入门问题
Q: Can non-programmers use this? A: Absolutely! We provide multiple easy-to-use options:
- Simplest: Run
python start_server.pyand follow the prompts - Docker:
docker-compose up -dfor one-command deployment - uvx:
uvx --from . python main.py streamable-httpfor modern Python environments
Q: What are the different deployment methods? A: We offer 3 main deployment methods:
- Docker (🔥Recommended):
docker-compose up -d- Production-ready with automatic restarts - uvx: Modern Python tool execution - great for development
- Local Installation: Traditional pip install method - full control
Q: Which ports does the service use? A: Default ports are:
- 8091: Main MCP service (streamable HTTP)
- 8090: Static file server (for image access)
- 8000: Internal FastMCP port (Docker only)
- All ports are configurable via
.envfile
🖼️ Features & Functionality | 功能相关
Q: Why PNG instead of HTML? A: PNG images offer several advantages:
- Easy insertion into documents and presentations
- Universal compatibility across all platforms
- No dependency on JavaScript or web browsers for viewing
- Perfect for sharing and archiving
Q: What image quality options are available? A: Four quality levels:
- low: 800x600 viewport, 1x scale - fast generation
- medium: 1000x700 viewport, 1.5x scale - balanced
- high: 1200x800 viewport, 2x scale - recommended default
- ultra: 2400x1600 viewport, 3x scale - maximum quality
Q: Does it support non-English languages? A: Yes! Full Unicode support including:
- Chinese (中文) - with proper font rendering
- Japanese (日本語)
- Arabic (العربية)
- All other Unicode languages
- Automatic font injection ensures proper display
☁️ Storage & Configuration | 存储配置
Q: What storage options are supported? A: Multiple storage providers:
- Local: Default option, files saved locally
- Aliyun OSS: Chinese cloud storage
- Huawei OceanStor: Enterprise cloud storage
- MinIO: Self-hosted S3-compatible storage
- Amazon S3: AWS cloud storage
- Azure Blob: Microsoft cloud storage
- Google Cloud Storage: Google cloud platform
Q: How do I configure cloud storage? A:
- Copy
env.templateto.env - Set
STORAGE_TYPEto your preferred provider - Configure the provider-specific credentials
- Install the required package:
pip install [provider-package]
Q: Can I access generated images directly? A: Yes! The service provides:
- Direct URLs: Each image gets a shareable URL
- Date-based organization: Images organized by YYYY/MM/DD structure
- Static file server: Built-in HTTP server for image access
- list_images tool: Query images by date and name filter
🔧 Technical Questions | 技术问题
Q: What dependencies are required? A: Core dependencies:
- Python 3.8+: Main runtime
- Node.js 16+: For markmap-cli
- Playwright: Browser automation for PNG generation
- FastAPI: HTTP transport
- MCP Protocol: Core functionality
Q: How does the mind map generation work? A: The process involves 4 steps:
- Markdown Parsing: Analyze input structure
- HTML Generation: Use markmap-cli to create interactive HTML
- Browser Rendering: Playwright captures HTML in headless browser
- PNG Output: High-quality image with intelligent viewport sizing
Q: Can I customize the generated mind maps? A: Yes, through several options:
- Quality levels: Choose from low to ultra quality
- Viewport sizing: Automatic adjustment based on content complexity
- Title customization: Set custom titles for your mind maps
- Storage location: Choose where to save your images
🐳 Docker & Deployment | Docker部署
Q: Why is Docker recommended? A: Docker provides:
- One-command setup: No complex dependency management
- Consistent environment: Same behavior across all systems
- Production-ready: Built-in health checks and auto-restart
- Multi-service: Separate containers for MCP and static files
Q: How do I configure Docker deployment? A:
- Copy configuration:
cp env.template .env - Critical: Change
LOCAL_HOSTfrom127.0.0.1to your server IP - Start services:
docker-compose up -d - Access at:
http://YOUR_SERVER_IP:8091/mcp
Q: What Docker services are included? A: Three services:
- mind-map-streamable: Main MCP HTTP service
- mind-map-static: Static file server for images
- mind-map-stdio: Interactive command-line mode (optional)
🛠️ Troubleshooting | 故障排除
Q: Images show as broken links?
A: This usually means LOCAL_HOST is incorrectly configured:
- ❌ Wrong:
LOCAL_HOST=127.0.0.1(only works locally) - ✅ Correct:
LOCAL_HOST=YOUR_SERVER_IP(accessible remotely)
Q: Mind map shows only one dot? A: Check your API parameters:
- Use
markdown_content(notcontent) as the parameter name - Ensure your Markdown has proper hierarchical structure with
#headers
Q: Getting "Unexpected content type" errors? A: This was fixed in v1.0.1 - make sure you're using the latest version. All responses now return proper JSON format.
Q: Chinese characters appear as garbled text?
A: This was resolved in v1.0.1 with Chinese font support. If you're still seeing issues, try rebuilding your Docker image: docker-compose up --build -d
🌟 思维导图MCP服务器
一个强大的MCP(模型上下文协议)服务器,可将Markdown文本转换为美观的思维导图PNG图片。
👨💻 作者
sawyer-shi
📦 代码仓库
源码地址: https://github.com/sawyer-shi/mind-map-mcp-server.git
✨ 功能特性
- 📝 Markdown输入支持 - 将任何Markdown文本转换为思维导图
- 🖼️ 高质量PNG输出 - 生成清晰、美观的思维导图图片(无水印)
- 🐳 Docker就绪(强烈推荐) - 一键Docker部署
- 🔌 完整MCP协议 - 标准MCP合规,优化响应性能
- ⚡ 快速生成 - 快速转换和处理,高级验证机制
- 🌐 多种访问方式 - 支持HTTP和stdio传输
- ☁️ 多云存储支持 - 支持本地、阿里云OSS、华为OceanStor、MinIO、Amazon S3、Azure Blob和Google Cloud存储
- 🔗 直接访问链接 - 获取生成的思维导图的可分享链接
- 🔍 智能图片列表 - 按日期查询图片,支持模糊名称匹配
- ✅ 高级验证 - 全面的图片验证和错误处理机制
🎯 核心功能
1. list_images
- 用途:按日期列出生成的思维导图图像,支持可选的名称过滤
- 参数:
date(字符串,可选): YYYY-MM-DD格式的日期(默认为当前日期)name_filter(字符串,可选): 模糊名称匹配过滤器
- 返回:匹配的思维导图图像列表,包含URL和元数据
2. create_mind_map
- 用途:根据Markdown内容生成高质量、无水印思维导图PNG,支持智能视口调整
- 参数:
markdown_content(字符串): 支持分层结构的Markdown格式文本title(字符串,可选): 思维导图标题(用作文件名)quality(字符串,可选): 图像质量级别 - 'low'、'medium'、'high'、'ultra'(默认'high')
- 返回:思维导图图像URL、存储信息和验证状态
- 特色功能:
- 🧠 智能内容分析:自动分析内容复杂度并调整视口尺寸
- 📐 动态视口:视口尺寸根据内容从800x600扩展到2400x1600
- 🎯 高DPI渲染:支持1倍到3倍缩放因子,在任何显示器上都清晰
- ✨ 质量级别:提供4个质量预设适应不同使用场景
🚀 快速开始
🚨 关键部署配置 | CRITICAL DEPLOYMENT CONFIGURATION
⚠️ 部署前必读 | MUST READ BEFORE DEPLOYMENT
🎯 当作为服务部署时,必须修改
LOCAL_HOST配置!🎯 When deploying as a service, you MUST modify the
LOCAL_HOSTconfiguration!# 1. 复制环境模板 | Copy environment template cp env.template .env # 2. ⚠️ 关键:将 LOCAL_HOST 从 127.0.0.1 改为您服务器的IP地址 # ⚠️ CRITICAL: Change LOCAL_HOST from 127.0.0.1 to your server's IP LOCAL_HOST=您的服务器IP地址 # 示例 | Examples: # LOCAL_HOST=192.168.1.100 # 局域网 | Local network # LOCAL_HOST=10.10.228.155 # 内网 | Internal network # LOCAL_HOST=207.0.113.1 # 公网IP | Public IP🔥 为什么这很重要 | Why This Matters
✅ 正确:
http://您的服务器IP:8090/output/file.png- 任何地方都可访问❌ 错误:
http://127.0.0.1:8090/output/file.png- 只能在服务器本机访问✅ Correct:
http://YOUR_SERVER_IP:8090/output/file.png- Accessible from anywhere❌ Wrong:
http://127.0.0.1:8090/output/file.png- Only works on the server itself🐳 推荐:使用Docker部署 | RECOMMENDED: Use Docker Deployment
方式1:Docker部署(🔥推荐🔥)
- 启动服务:
docker-compose up -d
-
访问地址【🔥将下面的localhost改为你宿主机服务器或者主机的IP地址🔥】:
- HTTP MCP端点:
http://localhost:8091/mcp - 服务状态:
http://localhost:8091
- HTTP MCP端点:
-
查看服务状态:
docker-compose logs -f
- 停止服务:
docker-compose down
方式2:uvx部署(推荐用于Python环境)
- 安装uvx(如果尚未安装):
# 使用pip安装uvx
pip install uvx

# 或使用pipx安装
pipx install uvx
- 使用uvx运行(从本地项目):
# 首先导航到项目目录
cd mind-map-mcp-server

# stdio模式(MCP客户端集成)
uvx --from . python main.py stdio

# 流式HTTP模式
uvx --from . python main.py streamable-http --host 0.0.0.0 --port 8091
- 访问地址(HTTP模式):
- HTTP MCP端点:
http://localhost:8091/mcp - 服务状态:
http://localhost:8091
- HTTP MCP端点:
方式3:本地安装
- 自动安装启动:
python start_server.py
- 手动安装:
pip install -r requirements.txt
npm install -g markmap-cli
playwright install chromium
python main.py
🔧 技术架构
- Markdown解析 - 处理用户输入文本
- HTML转换 - 使用markmap-cli创建交互式HTML思维导图
- PNG生成 - 使用Playwright将HTML捕获为PNG图片
- 多云存储 - 支持各种存储提供者的统一接口
- MCP协议 - 标准MCP服务器实现
☁️ 存储配置说明
服务器支持多种存储提供者,在.env文件中配置您首选的存储:
本地存储(默认)
STORAGE_TYPE=local
LOCAL_STORAGE_URL_PREFIX=http://localhost:8091/output
阿里云OSS
STORAGE_TYPE=aliyun_oss
ALIYUN_OSS_ACCESS_KEY_ID=your_access_key_id
ALIYUN_OSS_ACCESS_KEY_SECRET=your_access_key_secret
ALIYUN_OSS_ENDPOINT=oss-cn-hangzhou.aliyuncs.com
ALIYUN_OSS_BUCKET_NAME=your_bucket_name
ALIYUN_OSS_URL_PREFIX=https://your_bucket_name.oss-cn-hangzhou.aliyuncs.com
华为OceanStor
STORAGE_TYPE=huawei_oceanstor
HUAWEI_ACCESS_KEY_ID=your_access_key_id
HUAWEI_SECRET_ACCESS_KEY=your_secret_access_key
HUAWEI_ENDPOINT=https://obs.cn-north-4.myhuaweicloud.com
HUAWEI_BUCKET_NAME=your_bucket_name
HUAWEI_URL_PREFIX=https://your_bucket_name.obs.cn-north-4.myhuaweicloud.com
MinIO
STORAGE_TYPE=minio
MINIO_ENDPOINT=localhost:9000
MINIO_ACCESS_KEY=your_access_key
MINIO_SECRET_KEY=your_secret_key
MINIO_BUCKET_NAME=mindmaps
MINIO_SECURE=false
MINIO_URL_PREFIX=http://localhost:9000/mindmaps
Amazon S3
STORAGE_TYPE=amazon_s3
AWS_ACCESS_KEY_ID=your_access_key_id
AWS_SECRET_ACCESS_KEY=your_secret_access_key
AWS_DEFAULT_REGION=us-east-1
AWS_S3_BUCKET_NAME=your_bucket_name
AWS_S3_URL_PREFIX=https://your_bucket_name.s3.amazonaws.com
Azure Blob存储
STORAGE_TYPE=azure_blob
AZURE_STORAGE_ACCOUNT_NAME=your_storage_account
AZURE_STORAGE_ACCOUNT_KEY=your_storage_key
AZURE_STORAGE_CONTAINER_NAME=mindmaps
AZURE_STORAGE_URL_PREFIX=https://your_storage_account.blob.core.windows.net/mindmaps
Google Cloud存储
STORAGE_TYPE=google_cloud_storage
GCS_PROJECT_ID=your_project_id
GCS_BUCKET_NAME=your_bucket_name
# 选项1:使用服务账户密钥文件
GCS_CREDENTIALS_FILE=path/to/your/service-account-key.json
# 选项2:使用服务账户密钥作为JSON字符串
# GCS_CREDENTIALS_JSON={"type":"service_account","project_id":"..."}
GCS_URL_PREFIX=https://storage.googleapis.com/your_bucket_name
📦 存储依赖包
根据您选择的存储安装额外的包:
# 阿里云OSS
pip install oss2>=2.17.0

# 华为OceanStor
pip install esdk-obs-python>=3.23.0

# MinIO
pip install minio>=7.2.0

# Amazon S3
pip install boto3>=1.34.0

# Azure Blob存储
pip install azure-storage-blob>=12.19.0

# Google Cloud存储
pip install google-cloud-storage>=2.10.0
📁 项目结构
mind-map-mcp-server/
├── README.md                 # 📖 项目文档 | Project documentation
├── main.py                  # 🧠 主入口点(模块化)| Main entry point (modular)
├── src/                     # 📁 源代码模块 | Source code modules
│   ├── __init__.py         # 📦 包初始化 | Package initialization
│   ├── config.py           # ⚙️ 配置管理 | Configuration management
│   ├── server.py           # 🖥️ 主服务器类 | Main server class
│   ├── mind_map_generator.py # 🎨 思维导图生成逻辑 | Mind map generation logic
│   ├── storage_manager.py  # ☁️ 多云存储管理器 | Multi-cloud storage manager
│   ├── mcp_tools.py        # 🔧 MCP工具定义 | MCP tool definitions
│   └── utils.py            # 🛠️ 工具函数 | Utility functions
├── start_server.py          # ⚙️ 自动安装启动脚本 | Auto-install startup script
├── quick_start.py           # 🚀 用户友好启动界面 | User-friendly startup interface
├── ARCHITECTURE.md          # 📋 架构文档 | Architecture documentation
├── requirements.txt         # 🐍 Python依赖 | Python dependencies
├── package.json            # 📦 Node.js依赖 | Node.js dependencies
├── Dockerfile              # 🐳 Docker构建文件 | Docker build file
├── docker-compose.yml      # 🚢 Docker编排 | Docker orchestration
├── env.template            # ⚙️ 环境配置模板 | Environment configuration template
├── temp/                   # 📂 临时文件 | Temporary files
├── output/                 # 🖼️ 生成的图片 | Generated images
├── logs/                   # 📝 日志文件 | Log files
└── examples/               # 📋 使用示例 | Usage examples
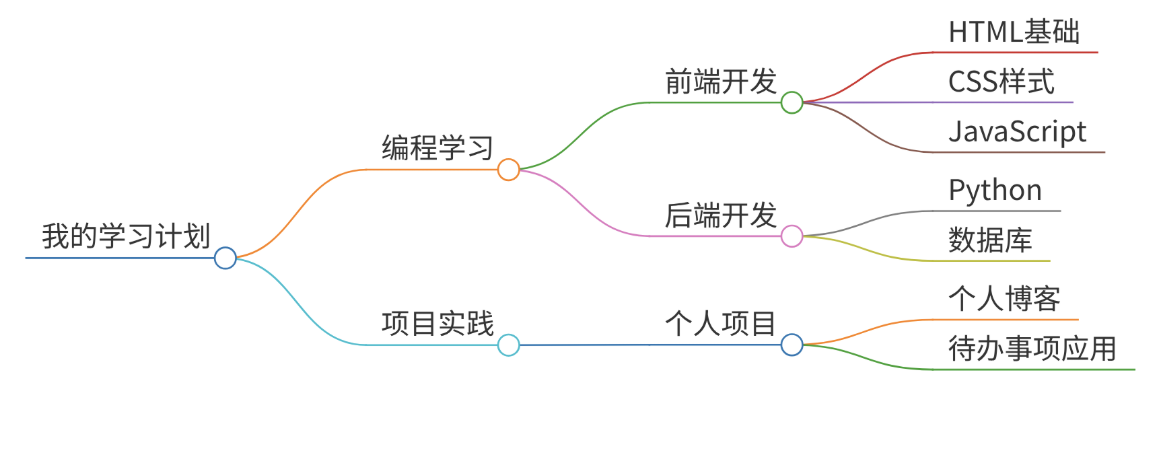
🎬 使用示例
输入(Markdown):
# 我的学习计划

## 编程学习
### 前端开发
- HTML基础
- CSS样式
- JavaScript

### 后端开发
- Python
- 数据库

## 项目实践
### 个人项目
- 个人博客
- 待办事项应用
输出:生成一张美观的PNG思维导图,展示完整的学习计划结构!
❓ 常见问题
🚀 入门问题 | Getting Started
Q: 不懂编程的人能用吗? A: 当然可以!我们提供多种简单易用的选择:
- 最简单: 运行
python start_server.py并按提示操作 - Docker:
docker-compose up -d一键部署 - uvx:
uvx --from . python main.py streamable-http适用于现代Python环境
Q: 有哪些部署方式? A: 我们提供3种主要部署方法:
- Docker(🔥推荐):
docker-compose up -d- 生产就绪,自动重启 - uvx: 现代Python工具执行 - 适合开发环境
- 本地安装: 传统pip安装方法 - 完全控制
Q: 服务使用哪些端口? A: 默认端口:
- 8091: 主MCP服务(流式HTTP)
- 8090: 静态文件服务器(图片访问)
- 8000: 内部FastMCP端口(仅Docker)
- 所有端口都可通过
.env文件配置
🖼️ 功能特性 | Features & Functionality
Q: 为什么输出PNG而不是HTML? A: PNG图片有几个优势:
- 易于插入文档和演示文稿
- 跨所有平台的通用兼容性
- 查看时不依赖JavaScript或网页浏览器
- 完美适合分享和归档
Q: 有哪些图片质量选项? A: 四个质量级别:
- low(低): 800x600视口,1倍缩放 - 快速生成
- medium(中): 1000x700视口,1.5倍缩放 - 平衡选择
- high(高): 1200x800视口,2倍缩放 - 推荐默认
- ultra(超高): 2400x1600视口,3倍缩放 - 最高质量
Q: 支持中文和其他语言吗? A: 完全支持!包括全面的Unicode支持:
- 中文 - 带正确字体渲染
- 日文(日本語)
- 阿拉伯语(العربية)
- 所有其他Unicode语言
- 自动字体注入确保正确显示
☁️ 存储配置 | Storage & Configuration
Q: 支持哪些存储选项? A: 多种存储提供者:
- 本地: 默认选项,文件保存在本地
- 阿里云OSS: 中国云存储
- 华为OceanStor: 企业云存储
- MinIO: 自托管S3兼容存储
- Amazon S3: AWS云存储
- Azure Blob: 微软云存储
- Google Cloud存储: Google云平台
Q: 如何配置云存储? A:
- 复制
env.template到.env - 设置
STORAGE_TYPE为您的首选提供者 - 配置提供者特定的凭据
- 安装所需包:
pip install [提供者包名]
Q: 可以直接访问生成的图片吗? A: 可以!服务提供:
- 直接URL: 每个图片都有可分享的URL
- 按日期组织: 图片按YYYY/MM/DD结构组织
- 静态文件服务器: 内置HTTP服务器用于图片访问
- list_images工具: 按日期和名称过滤器查询图片
🔧 技术问题 | Technical Questions
Q: 需要哪些依赖? A: 核心依赖:
- Python 3.8+: 主要运行时
- Node.js 16+: 用于markmap-cli
- Playwright: 用于PNG生成的浏览器自动化
- FastAPI: HTTP传输
- MCP协议: 核心功能
Q: 思维导图生成是如何工作的? A: 过程包含4个步骤:
- Markdown解析: 分析输入结构
- HTML生成: 使用markmap-cli创建交互式HTML
- 浏览器渲染: Playwright在无头浏览器中捕获HTML
- PNG输出: 高质量图片,智能视口调整
Q: 可以自定义生成的思维导图吗? A: 可以,通过多个选项:
- 质量级别: 从低到超高质量选择
- 视口调整: 根据内容复杂度自动调整
- 标题自定义: 为思维导图设置自定义标题
- 存储位置: 选择保存图片的位置
🐳 Docker部署 | Docker & Deployment
Q: 为什么推荐Docker? A: Docker提供:
- 一键设置: 无需复杂的依赖管理
- 一致环境: 在所有系统上行为相同
- 生产就绪: 内置健康检查和自动重启
- 多服务: MCP和静态文件的独立容器
Q: 如何配置Docker部署? A:
- 复制配置:
cp env.template .env - 关键: 将
LOCAL_HOST从127.0.0.1改为您的服务器IP - 启动服务:
docker-compose up -d - 访问地址:
http://您的服务器IP:8091/mcp
Q: 包含哪些Docker服务? A: 三个服务:
- mind-map-streamable: 主MCP HTTP服务
- mind-map-static: 图片静态文件服务器
- mind-map-stdio: 交互式命令行模式(可选)
🛠️ 故障排除 | Troubleshooting
Q: 图片显示为损坏链接?
A: 这通常意味着LOCAL_HOST配置不正确:
- ❌ 错误:
LOCAL_HOST=127.0.0.1(只能本地访问) - ✅ 正确:
LOCAL_HOST=您的服务器IP(可远程访问)
Q: 思维导图只显示一个点? A: 检查您的API参数:
- 使用
markdown_content(不是content)作为参数名 - 确保您的Markdown具有带
#标题的正确层次结构
Q: 出现"Unexpected content type"错误? A: 这在v1.0.1版本中已修复 - 确保您使用的是最新版本。所有响应现在都返回正确的JSON格式。
Q: 中文字符显示为乱码?
A: 这在v1.0.1版本中已解决,添加了中文字体支持。如果仍有问题,请尝试重建Docker镜像:docker-compose up --build -d
⚠️ 注意事项 | Notes
- 🌐 需要网络连接(下载依赖时)| Network required for dependency downloads
- 💾 PNG图片保存在output目录 | PNG images saved in output directory
- 🧹 临时文件自动清理 | Temporary files auto-cleaned
- 🖥️ 支持Windows、Mac、Linux | Cross-platform support
- 🚪 默认端口:8091 | Default port: 8091
📄 License | 许可证
MIT License - see LICENSE for details.
Created with ❤️ by sawyer-shi
🔄 Update History | 更新历史
Latest Updates | 最新更新
- ✅ Cleaned up temporary and test files | 清理了临时文件和测试文件
- ✅ Optimized project structure | 优化了项目结构
- ✅ Updated dependencies | 更新了依赖项
- ✅ Enhanced documentation | 增强了文档
- ✅ Improved Docker configuration | 改进了Docker配置
File Structure | 文件结构
mind-map-mcp-server/
├── README.md                 # 📖 Project documentation | 项目文档
├── main.py                  # 🧠 Main entry point (modular) | 主入口点(模块化)
├── mind_map_server.py        # 🧠 Legacy MCP server (deprecated) | 旧版MCP服务器(已弃用)
├── src/                     # 📁 Source code modules | 源代码模块
│   ├── __init__.py         # 📦 Package initialization | 包初始化
│   ├── config.py           # ⚙️ Configuration management | 配置管理
│   ├── server.py           # 🖥️ Main server class | 主服务器类
│   ├── mind_map_generator.py # 🎨 Mind map generation logic | 思维导图生成逻辑
│   ├── mcp_tools.py        # 🔧 MCP tool definitions | MCP工具定义
│   └── utils.py            # 🛠️ Utility functions | 工具函数
├── start_server.py          # ⚙️ Auto-install startup script | 自动安装启动脚本
├── quick_start.py           # 🚀 User-friendly startup interface | 用户友好的启动界面
├── ARCHITECTURE.md          # 📋 Architecture documentation | 架构说明文档
├── requirements.txt         # 🐍 Python dependencies | Python依赖
├── package.json            # 📦 Node.js dependencies | Node.js依赖
├── Dockerfile              # 🐳 Docker build file | Docker构建文件
├── docker-compose.yml      # 🚢 Docker orchestration | Docker编排
├── env.template            # ⚙️ Environment configuration template | 环境配置模板
├── temp/                   # 📂 Temporary files (cleaned) | 临时文件(已清理)
├── output/                 # 🖼️ Generated images | 生成的图片
├── logs/                   # 📝 Log files | 日志文件
└── examples/               # 📋 Usage examples | 使用示例
Release history Release notifications | RSS feed

Download files
Download the file for your platform. If you're not sure which to choose, learn more about installing packages.
Source Distribution
Built Distribution
Filter files by name, interpreter, ABI, and platform.
If you're not sure about the file name format, learn more about wheel file names.
Copy a direct link to the current filters
File details
Details for the file iflow_mcp_sawyer_shi_mind_map_mcp_server-1.0.0.tar.gz.
File metadata
- Download URL: iflow_mcp_sawyer_shi_mind_map_mcp_server-1.0.0.tar.gz
- Upload date:
- Size: 52.4 kB
- Tags: Source
- Uploaded using Trusted Publishing? No
- Uploaded via: uv/0.10.2 {"installer":{"name":"uv","version":"0.10.2","subcommand":["publish"]},"python":null,"implementation":{"name":null,"version":null},"distro":{"name":"Debian GNU/Linux","version":"13","id":"trixie","libc":null},"system":{"name":null,"release":null},"cpu":null,"openssl_version":null,"setuptools_version":null,"rustc_version":null,"ci":null}
File hashes
| Algorithm | Hash digest | |
|---|---|---|
| SHA256 |
396fc4bfaccb66830151374e1b14b67e6bcab2d9d36bc4630aeee472a68fbdae
|
|
| MD5 |
0485474dc181de4886d3328b8462f656
|
|
| BLAKE2b-256 |
6c8eec23c0fc8cd0bc07cadb46c52be851eae93e76329b04adf362235e164dc1
|
File details
Details for the file iflow_mcp_sawyer_shi_mind_map_mcp_server-1.0.0-py3-none-any.whl.
File metadata
- Download URL: iflow_mcp_sawyer_shi_mind_map_mcp_server-1.0.0-py3-none-any.whl
- Upload date:
- Size: 38.7 kB
- Tags: Python 3
- Uploaded using Trusted Publishing? No
- Uploaded via: uv/0.10.2 {"installer":{"name":"uv","version":"0.10.2","subcommand":["publish"]},"python":null,"implementation":{"name":null,"version":null},"distro":{"name":"Debian GNU/Linux","version":"13","id":"trixie","libc":null},"system":{"name":null,"release":null},"cpu":null,"openssl_version":null,"setuptools_version":null,"rustc_version":null,"ci":null}
File hashes
| Algorithm | Hash digest | |
|---|---|---|
| SHA256 |
e0b9339b55c5d7a3e381b4222fde7caba7f0579441f641500319d95a5465eefe
|
|
| MD5 |
c45669c1e27256a35e58e609d2bcfae1
|
|
| BLAKE2b-256 |
705f7aabfc1e57fab7b2a9de504c21ecb1e5ed786fd6a0ed5a1599e2b7e655a5
|


