This module allows to easy send data to Orange LiveObjects using Python3 and uPython


Project description
Prototype with Orange using Live Objects
Discover Orange Live Objects using dedicated SDK for Python 3 and uPython compatible boards and systems.
This code wraps all the functions necessary to make your object work with Live Objects.
You can declare parameters, which you can later update OTA from Live objects. You can also create commands to trigger actions remotely. Only thing you must do yourself is connecting the board with internet.
Code uses MQTT connection to exchange data with Live objects under the hood to keep your parameters up to date or execute the commands received without you having to take care of them (apart from writing the code of these commands, of course).
Compatibility
| System | MQTT | MQTTS |
|---|---|---|
| Linux | OK | OK |
| Windows | OK | OK |
| Raspberry Pi | OK | OK |
| ESP8266 | OK | - |
| ESP32 | OK | OK |
| LoPy (Pycom) | OK | - |
| GPy (Pycom) | OK | - |
Prerequisites / dependencies
This code needs a few libraries to run:
- Python needs paho-mqtt
- Python for Windows needs python-certifi-win32
- uPython needs umqttsimple and umqttrobust
How to use
- Log in to Live Objects or request a trial account (up to 10 devices for 1 year) if you don't have one,
- Create an API key for your device. Give it a name, select the Device access role and validate. Copy the key,
- Clone or download the directory from GitHub,
- Change <APIKEY> in
credentials.pyto one you generated, - Run selected
.pyscript
Developer guide
Constructor
Constructor of LiveObjects looks like below:
lo = LiveObjects.Connection()
Debug messages
You can use LiveObjects to output debug messages.
VALUE = 21
# INFO / ERROR / WARNING
lo.output_debug(LiveObjects.INFO, "example value", VALUE, ...)
# Output: [INFO] example value 21 ...
Declare parameters
You can update over the air some parameters of your script using Live Objects's parameters. Parameters and Commands must be declared before your device connects to Live Objects.
You can declare parameters with the addParameter() instruction, which accepts the following arguments:
- the label of your parameter as it will be displayed on Live Objects;
- the value of parameter
- parameter type [INT STRING FLOAT BINARY]
- (optional) a callback function, if you need to perform some tasks after the parameter has been updated
To retrieve a parameter use function getParameter() which takes following arguments:
- Parameter name
Example:
lo.add_parameter("message_rate", 25, LiveObjects.INT)
lo.add_parameter("send_DHT_data", true, LiveObjects.BINARY, my_callback_function)
# ...
if lo.get_parameter("send_DHT_data"):
    lo.add_to_payload("temperature", DHT.read_temeprature())
    lo.add_to_payload("humidity", DHT.read_humidity())
The callback function takes 2 arguments:
def my_callback_function(parameter_name, new_value):
    # do stuff
Further reading on Live Objects' Parameters.
Declare commands
Commands let you trigger specific actions on your device from Live Objects. Parameters and Commands must be declared before your device connects to Live Objects.
Commands can be declared using the addcommand() instruction, which accepts the following arguments:
- the label of your command
- the callback function that will execute the command.
lo.add_parameter("a command", my_callback, );
The callback function should take 1 parameter and return dictionary:
def my_callback(args={}):
    # do stuff
    return {}
Arguments and response are optional when using commands, but they can be useful if you want to pass parameters to your function. For instance, you could define a play tone command that will use some parameters like the frequency of the tone, or its duration.
- Any incoming arguments will be passed as member of a dictionary
- You can pass response arguments in the form of a dictionary by returning them
def play_tone(args={}):
    duration = args["duration"]
    frequency = args["frequency"]
    # play the tone accordingly to arguments
    # ...
    return {"I played": "the tone"}


def setup():
    lo.add_command("play tone", play_tone)
Warning: Command name and arguments are case-sensitive when creating the command on Live Objects.: On the opposite, there is no specific order for specifying the command arguments.
Further reading on Live Objects' Commands.
Sending data
You can send data very easily to Live Objects.
Dead simple method
Compose your payload using the addToPayload() instruction. You will need to provide a label for your value, and the data itself. Your data can be of any simple type.
Data is added on each call to addToPayload(), so repeat the instruction if you have multiple data to send. When your payload is ready, send it using sendData(). That simple.
VALUE = 21
MY_OTHER_VALUE = 37


def foo():
    # collect data
    lo.add_to_payload("my data", VALUE)
    lo.add_to_payload("my other data", MY_OTHER_VALUE)
    lo.send_data()  # send to LiveObjects
As soon the data is sent, your payload is cleared and waiting for the next sending.
Advanced payload features
# Add "model" property to your message
lo.add_model("example_name")

# Add "tag" property to your message
lo.add_tag("kitchen")
lo.add_tags(["humidity", "bathroom"])

# Use your object as payload (this function doesn't append current payload)
obj = {"example": "value", "example2": "value2"}
lo.set_object_as_payload(obj)
Connect, disconnect and loop
You can control the connection and disconnection of your device using connect() and disconnect().
In order to check for any incoming configuration update or command, you need to keep the loop() instruction in your main loop.
def foo():
    lo.connect();
    while True:
        # Do some stuff
        #...
        lo.loop(); #Keep this in main loop
    lo.disconnect()
Changing default carrier to connect to the network
Every board has its own default carrier for connection to the network (see below).
| System | Default carrier | Optional carrier |
|---|---|---|
| Linux | Delivered by OS | - |
| Windows | Delivered by OS | - |
| Raspberry Pi | Delivered by OS | - |
| ESP8266 | Wi-Fi | - |
| ESP32 | Wi-Fi | - |
| LoPy (Pycom) | Wi-Fi | - |
| GPy (Pycom) | Wi-Fi | LTE |
For GPy you can switch connectivity to optional carrier. You need to do change in Connection class in Connection.py
from:
def __init__(self, debug=True):
    self.__board = LiveObjects.BoardsFactory(net_type=LiveObjects.BoardsInterface.DEFAULT_CARRIER)
...
to:
def __init__(self, debug=True):
    self.__board = LiveObjects.BoardsFactory(net_type=LiveObjects.BoardsInterface.LTE)
...
Then GPy will connect via LTE network.
Adding new boards
There is possibility to add your new type of board supporting Python/uPython.
You need to add your own class in hal.py. Name of this class has to be the same as output of sys.platform
and has to start from capital letter.
>>> sys.platform
'GPy'
>>>
Below code shows basic constructor:
def __init__(self, net_type):
    self._lang_id = BoardsInterface.MICROPYTHON
    self._net_type = BoardsInterface.WIFI if net_type == BoardsInterface.DEFAULT_CARRIER else net_type
    self._carrier_capability = (BoardsInterface.WIFI,)
    self._wifi_tls_capability = False
    self._credentials = super().create_credentials(self._net_type)
Basic fields meaning:
- _lang_id: used Python dialect: PYTHON / MICROPYTHON,
- _net_type: used type of network: WIFI / LTE / network delivered by OS / ...
- _carrier_capability: tuple containing supported type(s) of network,
- _wifi_tls_capability: True if TLS is supported and MQTTS could be used,
- _credentials: required credentials depended on network type: SSID/PASS for Wi-Fi, PIN/APN for LTE etc.
If other specific fields are necessary you need to define them.
You need to override specific methods - e.g. connect which is depended on type of board.
All specific functions are placed in services.py.
If your board needs function supporting its equipment you need to put it in this file.
VL6180X Sensor use-case
We can connect sensor using I2C to board supporting Python like Raspberry Pi.
The VL6180X is the latest product based on ST’s patented FlightSense™technology. This is a ground-breaking technology allowing absolute distance to be measured independent of target reflectance. Instead of estimating the distance by measuring the amount of light reflected back from the object (which is significantly influenced by color and surface), the VL6180X precisely measures the time the light takes to travel to the nearest object and reflect back to the sensor (Time-of-Flight). Description from st.com.
Prerequisites
Enabling I2C
Enable (if needed) I2C interface on your Raspberry Pi using terminal and command:
sudo raspi-config
and selecting: 3 Interface Options -> P5 I2C -> <Yes>

Wiring
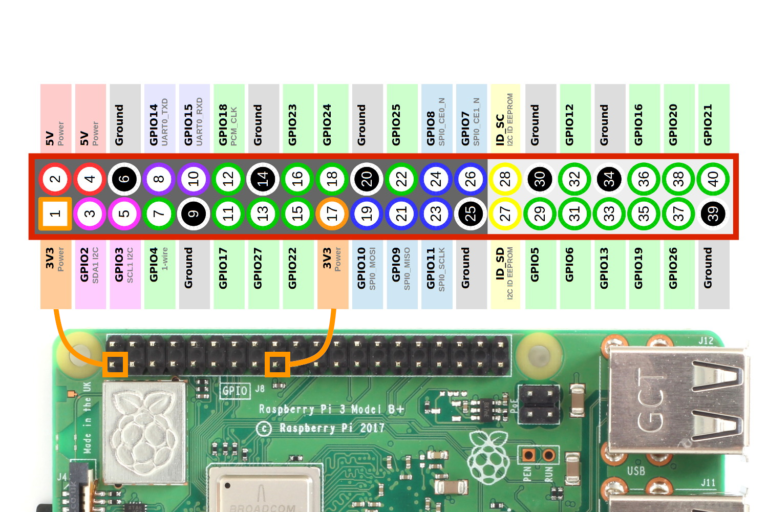
Example of development module using VL6180X you can find here. Below diagram shows how to connect it to Raspberry Pi.

Adding VL6180X Python module
Necessary module by Adafruit can be installed using pip
pip3 install adafruit-circuitpython-vl6180x
How to use
To run you need to use below command:
python3 7_distance_and_light_sensor.py
Installation guide for uPython
Example for ESP32 / ESP8266
Requirements
- ampy
- umqttsimple, umqttrobust and ssl (for your convenience they are included in
micropythonfolder) - PuTTY (for Windows)
Installation steps
- Preparation
Change <APIKEY> in credentials.py to one you generated.
Change <WIFI_SSID> and <WIFI_PASS> suitable to your Wi-Fi or
change <PIN> and <APN> suitable to your SIM card.
- Copy files into device
> ampy --port COMx put umqttrobust.py
> ampy --port COMx put simple.py
> ampy --port COMx put LiveObjects // It will copy directory with its content
- Prepare your script and save it as
main.pythen copy file into device. You can use one of example ones (1_send_data.py, ...) renaming it tomain.py
> ampy --port COMx put main.py
-
Connect to device and check if it's working using PuTTY
Ctrl + D soft resets device
Ctrl + C Stops currently running script
Summary
After all steps content of the device should look like below:
> ampy --port COMx ls
/LiveObjects
/boot.py
/main.py
/umqttrobust.py
/simple.py

> ampy --port COMx ls LiveObjects
/LiveObjects/Connection.py
/LiveObjects/__init__.py
/LiveObjects/hal.py
/LiveObjects/credentials.py
/LiveObjects/services.py
where COMx means port on your computer (e.g. COM8) with connected microPython board.
Example for LoPy / GPy
You can do the steps as above but better is to use Pymakr plug-in for Visual Studio Code or Atom delivered by Pycom. Plug-in supports code development, its upload to the board and communication with board.
VL6180X Sensor use-case
Sensor described in this section can be used on boards supporting microPython.
Prerequisites
Wiring
You need to connect I2C interface (SCL & SDA) and power lines on the board with corresponding pins on the sensor.
You need to be aware that boards can use different GPIOs for I2C purposes. Set of typical pairs is placed
in function get_i2c() in file hal.py. If your board uses other GPIO pins, you need to add them to the tuple typical_gpio.
def get_i2c():
    import machine
    typical_gpio = ([22, 23], [5, 4], [22, 21])
...

Example of wiring ESP32 board with GPIO22 and GPIO21 (source: https://randomnerdtutorials.com/esp32-pinout-reference-gpios/)

How to use
- You need to upload additional library for VL6180X support (it is placed in
micropythonfolder):
> ampy --port COMx put vl6180x_micro.py
- Copy
7_distance_and_light_sensor.pyasmain.pyand upload it into board.
After above operations you can see:
> ampy --port COMx ls
/LiveObjects
/boot.py
/main.py
/umqttrobust.py
/simple.py
/vl6180x_micro.py

> ampy --port COMx ls LiveObjects
/LiveObjects/Connection.py
/LiveObjects/__init__.py
/LiveObjects/hal.py
/LiveObjects/credentials.py
/LiveObjects/services.py
- Connect to device and check if it's working using PuTTY.
Troubleshooting
If you are getting 'MQTT exception: 5' check your api key


Download files
Download the file for your platform. If you're not sure which to choose, learn more about installing packages.
Source Distribution
Built Distribution
Filter files by name, interpreter, ABI, and platform.
If you're not sure about the file name format, learn more about wheel file names.
Copy a direct link to the current filters
File details
Details for the file LiveObjects-2.1.0.tar.gz.
File metadata
- Download URL: LiveObjects-2.1.0.tar.gz
- Upload date:
- Size: 12.8 kB
- Tags: Source
- Uploaded using Trusted Publishing? No
- Uploaded via: twine/4.0.0 CPython/3.8.10
File hashes
| Algorithm | Hash digest | |
|---|---|---|
| SHA256 |
585ba893c744c5e0c14ce8220ed4e9725bf4e8653deebfc33ef2278842330b55
|
|
| MD5 |
84a052009b699e11bedda2071a249c90
|
|
| BLAKE2b-256 |
fae4e28901703d04dd1e4601ac48284bdb908f1c75c45873aceda4b97dd77390
|
File details
Details for the file LiveObjects-2.1.0-py3-none-any.whl.
File metadata
- Download URL: LiveObjects-2.1.0-py3-none-any.whl
- Upload date:
- Size: 14.0 kB
- Tags: Python 3
- Uploaded using Trusted Publishing? No
- Uploaded via: twine/4.0.0 CPython/3.8.10
File hashes
| Algorithm | Hash digest | |
|---|---|---|
| SHA256 |
2ad6db65fbbad9e132cf35f0539edfe8f2a6b10d9e88ed8a339f237578e786ca
|
|
| MD5 |
b3a8361dc9b150d489cd0936a09b623d
|
|
| BLAKE2b-256 |
1606147c65a5c8961a6c3f47fddf802c044a0f41e6712ba82ed16029e1493ce6
|


