Adaptive P1 FEM algorithms
Project description
P1AFEM-PY
This package is the pythonic adaption of the p1afem Matlab package, whose code can be found here (ZIP) and whose details are described in the paper (open access) [1]. An example use case can be found further below.
Installation
This package can be installed using pip, i.e.
pip install p1afempy
The Python Package Index entry can be found here
What is (not) provided
In the following, we provide a list indicating which functions from P1AFEM are implemented in this repo as well (ticked boxes) and which are not (yet) (unticked boxes).
-
adaptiveAlgorithm.m -
coarsenNVB.m -
computeEtaH.m -
computeEtaR.m -
computeEtaZ.m -
example1/ -
example2/ -
provideGeometricData.m -
refineMRGB.m -
refineNVB.m -
refineNVB1.m -
refineNVB5.m -
refineRGB.m -
solveLaplace.m -
solveLaplace0.m -
solveLaplace1.m
Also, this repo includes some functionalities that were not provided in the original MATLAB code:
- Assembly of Mass Matrix along the same lines as assembly of stiffness matrix.
- Linear Interpolation of values on coordinates onto new nodes after refinement.
- Red-Green refinement algorithm, where (yet) only a single element can be marked.
Data structures
Regarding the underlying data structures used, we follow the original code as closely as possible, i.e.
elements, coordinates, and boundary conditions are all handled as simple numpy arrays.
We abstained from implementing any additional data structures,
e.g. classes like Mesh or BoundaryCondition, in order to remain the original "low-level" usability of the code.
In this way, any user can decide whether to implement additional data structures and, possibly, wrappers thereof.
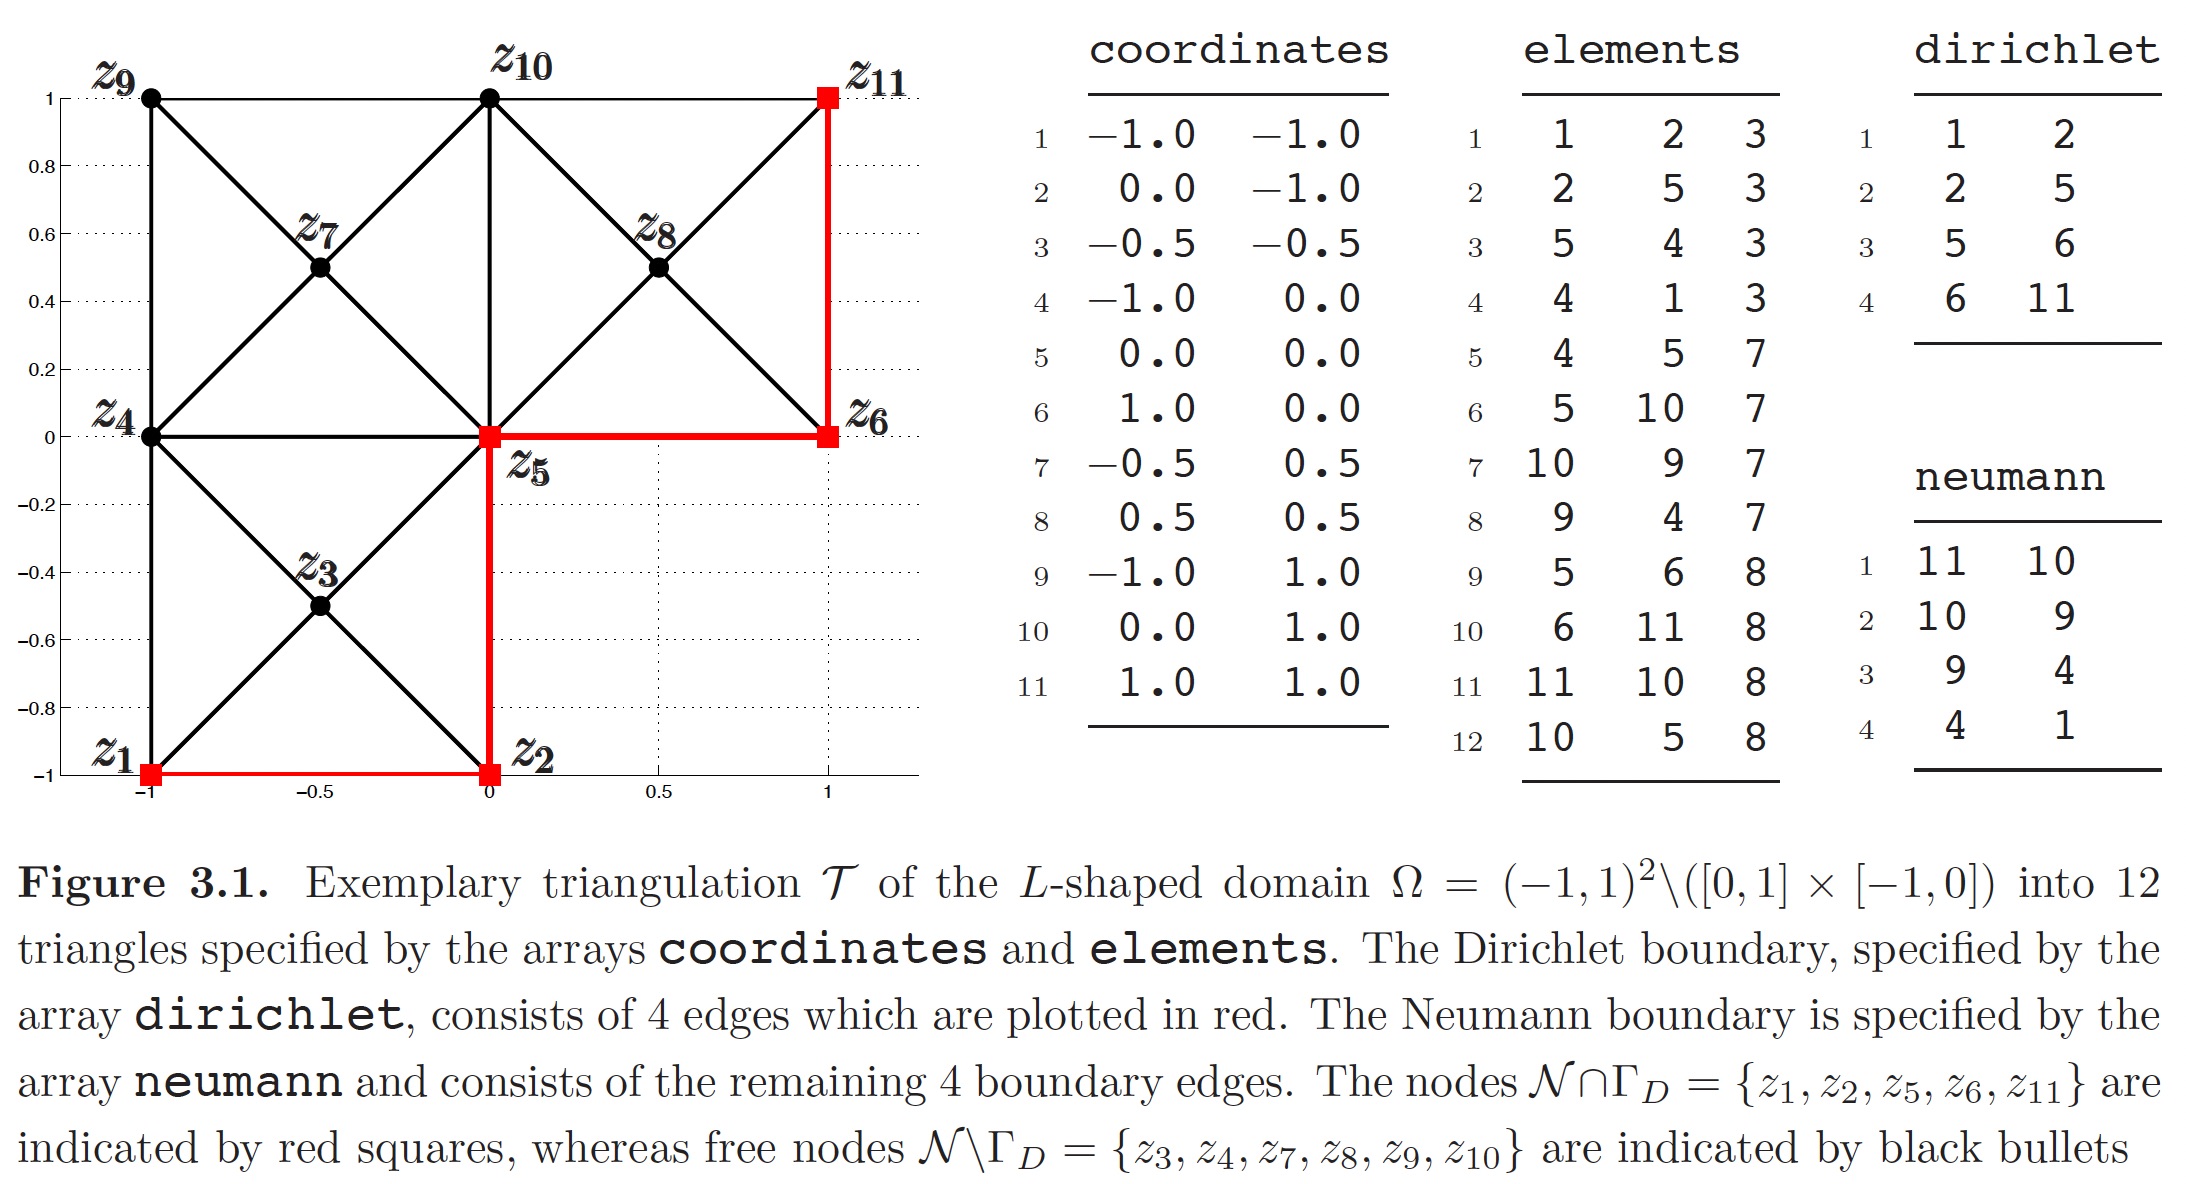
As a quick reference, we refer to figure 3.1 below (copied from [1]). For more details about the expected format of the data structures we refer to chapter 3.1 of [1].
Performance tests
In order to perform a profiled performance test, you can use the existing scripts in
the manual tests directory, i.e. p1afempy/tests/manual.
For example, to perform a profiled test, you can do
cd p1afempy
python -m cProfile -s time -m tests.manual.<script> > benchmark.out
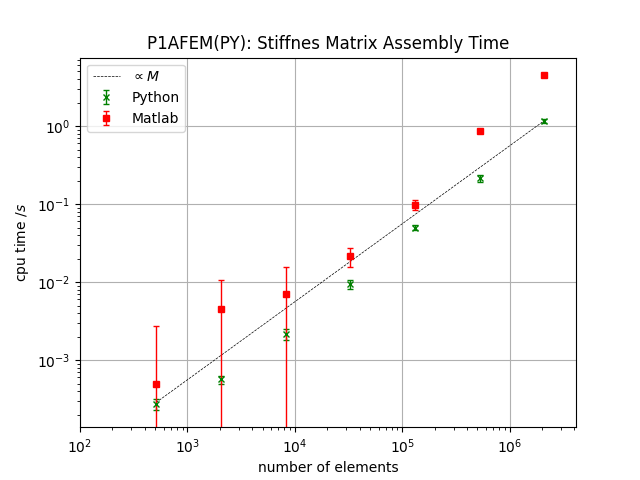
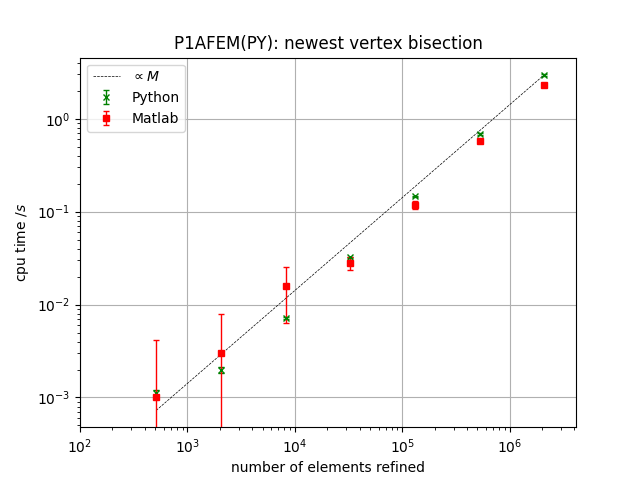
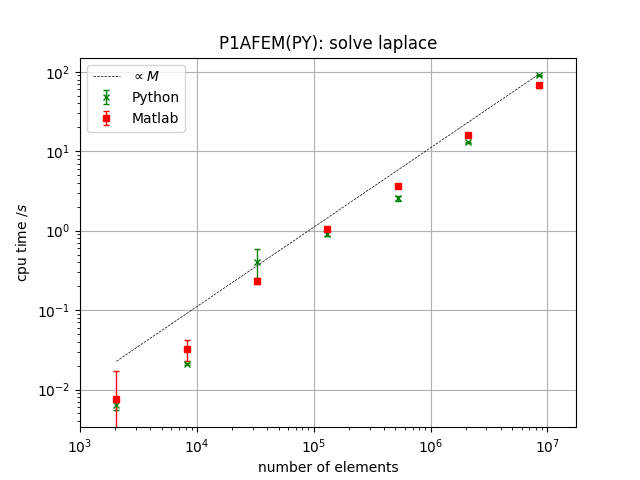
Below, you can find some performance test results found on a reference machine [2]. The error bars in the plots represent the standard deviation of measured CPU time.
Stiffness Matrix Assembly
The script used to measure and compare python performance is located at
p1afempy/tests/manual/performance_test_stiffnes_matrix.py.
On each mesh, we performed $20$ measurements.
For more information, see
p1afempy/tests/data/matlab_performance/stiffness_matrix_assembly/readme.md.
Newest Vertex Bisection
The script used to measure and compare python performance is located at
p1afempy/tests/manual/performance_test_refineNVB.py.
In every iteration, we marked all elements for refinement and measured the CPU time needed
for the refinement $10$ times.
For more information, see
p1afempy/tests/data/matlab_performance/newest_vertex_bisection/readme.md.
Solve Laplace
The script used to measure and compare python performance is located at
p1afempy/tests/manual/performance_test_solve_laplace.py.
In every iteration, i.e. on each mesh, we measured the CPU time needed for solving $4$ times.
For more information, see
p1afempy/tests/data/matlab_performance/solve_laplace/readme.md.
Example
In the following, we give an example on how to use this code.
Problem
Consider the domain (unit square) $\Omega := { (x,y) \in \mathbb{R}^2 | 0 < x,y < 1 }$ and a function $u : \Omega \to \mathbb{R}$. Moreover, we split the boundary in a Neumann and Dirichlet part, i.e. $\partial \Omega = \Gamma_{\text{N}} \cup \Gamma_{\text{D}}$.
Then, we aim to solve the weak form of the following BVP:
$$ \begin{align*} -\Delta u &= f(x,y) , \quad (x,y) \in \Omega \ u(x,y) &= u_{\text{D}}(x,y) , \quad (x, y) \in \Gamma_{\text{D}} \ \nabla u (x, y) \cdot \vec{n} & = g(x,y) , \quad (x, y) \in \Gamma_{\text{N}} \end{align*} $$
Input Data
As input data, we need a specification of the mesh (coordinates and elements) and its boundary (Neumann and Dirichlet).
coordinates.dat0 0 1 0 1 1 0 1
elements.dat0 1 2 0 2 3dirichlet.dat0 1 1 2
neumann.dat2 3 3 0
Solve Script
We proceed as follows.
- Define the BVP by defining the corresponding functions.
- Read the initial mesh (unit square).
- Refine it a few times to get a reasonable mesh (
refine_nvb). - Solve the problem on this mesh (
solve_laplace).
The script to do so may look like this.
import p1afempy
import numpy as np
from pathlib import Path


OMEGA = 7./4. * np.pi


def u(r: np.ndarray) -> float:
    """analytical solution"""
    return np.sin(OMEGA*2.*r[:, 0])*np.sin(OMEGA*r[:, 1])


def f(r: np.ndarray) -> float:
    """volume force corresponding to analytical solution"""
    return 5. * OMEGA**2 * np.sin(OMEGA*2.*r[:, 0]) * np.sin(OMEGA*r[:, 1])


def uD(r: np.ndarray) -> float:
    """solution value on the Dirichlet boundary"""
    return u(r)


def g_right(r: np.ndarray) -> float:
    return -2.*OMEGA*np.sin(OMEGA*r[:, 1])*np.cos(OMEGA*2.*r[:, 0])


def g_upper(r: np.ndarray) -> float:
    return OMEGA*np.sin(OMEGA*2.*r[:, 0]) * np.cos(OMEGA*r[:, 1])


def g(r: np.ndarray) -> float:
    out = np.zeros(r.shape[0])
    right_indices = r[:, 0] == 1
    upper_indices = r[:, 1] == 1
    out[right_indices] = g_right(r[right_indices])
    out[upper_indices] = g_upper(r[upper_indices])
    return out


def main() -> None:
    path_to_coordinates = Path('coordinates.dat')
    path_to_elements = Path('elements.dat')
    path_to_neumann = Path('neumann.dat')
    path_to_dirichlet = Path('dirichlet.dat')

    coordinates, elements = p1afempy.io_helpers.read_mesh(
        path_to_coordinates=path_to_coordinates,
        path_to_elements=path_to_elements)
    neumann_bc = p1afempy.io_helpers.read_boundary_condition(
        path_to_boundary=path_to_neumann)
    dirichlet_bc = p1afempy.io_helpers.read_boundary_condition(
        path_to_boundary=path_to_dirichlet)
    boundary_conditions = [dirichlet_bc, neumann_bc]

    n_refinements = 3
    for _ in range(n_refinements):
        # mark all elements for refinement
        marked_elements = np.arange(elements.shape[0])

        # refine the mesh and boundary conditions
        coordinates, elements, boundary_conditions = \
            p1afempy.refinement.refineNVB(
                coordinates=coordinates,
                elements=elements,
                marked_elements=marked_elements,
                boundary_conditions=boundary_conditions)

    # solve the example
    x, energy = p1afempy.solvers.solve_laplace(
        coordinates=coordinates, elements=elements,
        dirichlet=boundary_conditions[0],
        neumann=boundary_conditions[1],
        f=f, g=g, uD=uD)


if __name__ == '__main__':
    main()
Performance upgrade
In the following, we describe how to get more (the most) performance out of solve_laplace.
Use UMFPACK
TL;DR;
Make sure you have scikit.umfpack installed (can be found on pypi).
In the solve_laplace function, we make use of scipy.sparse.linalg.spsolve and explicitly set use_umfpack to True.
However, in the documentation (scipy==1.11.4) of this function, we read the following.
if True (default) then use UMFPACK for the solution. This is only referenced if b is a vector and
scikit.umfpackis installed.
Therefore, make sure you have scikit.umfpack installed (can be found on pypi).
In case your installation can not figure out where to find the UMFPACK (Suite-Sparse) headers and library
or you want to make use of your own Suite-Sparse version,
Do not link Suite-Sparse against OpenBLAS
TL;DR; Make sure the Suite-Sparse library your scikit-umfpack is pointing to does not link against OpenBLAS but rather against either Intel MKL BLAS or, if you are on a mac, the BLAS and LAPACK libraries under the Accelerate framework.
Note that Suite-Sparse makes use of BLAS routines. As can be read in this issue and this part of the readme, in a 2019 test, OpenBLAS caused severe performance degradation. Therefore, it is recommended that your Suite-Sparse library (used by scikit-umfpack) links against the corresponding BLAS library. Hence, you need to:
- Ensure that the Suite-Sparse library used by scikit-umfpack is pointing to the correct BLAS library. Instructions on how to link Suite-Sparse to a custom BLAS library can be found in the very same part of the readme as mentioned above.
- Make sure your installation of scikit-umfpack is using the correct Suite-Sparse library, i.e. one that points to the correct BLAS library. To install scikit-umfpack and make it use a custom Suite-Sparse library, follow the steps mentioned in the troubleshooting section below.
Troubleshooting
Installing scikit-umfpack on a mac
It seems that using the suite-sparse version shipped via Homebrew conflicts with the scikit-umfpack version installed via pip.
For reference, check the following issue on GitHub.
An easy way around this would be to install suite-sparse via conda, as it ships an older version that seems to be compatible.
However, conda comes with OpenBLAS, which causes a dramatic performance degredation (as mentioned above).
In order to resolve the issue and not fall into a performance degredation pitfall, make sure you have a compatible version of Suite-Sparse (as mentioned in this isse; at least v5.10.1 seems to work) available, linking against the correct BLAS library.
Finally, install scikit-umfpack making use of this Suite-Sparse installation (instructions on how to install scikit-umfpack with a custom Suite-Sparse are described below).
Installing scikit-umfpack with custom Suite-Sparse
In order to install scikit-umfpack pointing to a custom Suite-Sparse, you first create a nativefile.ini with the content as listed further below and then do:
pip install --config-settings setup-args=--native-file=$PWD/nativefile.ini scikit-umfpack
The nativefile.ini should look like this:
[properties]
umfpack-libdir = 'path/to/suite-sparse/lib'
umfpack-includedir = 'path/to/suite-sparse/include'
References
[1] S. Funken, D. Praetorius, and P. Wissgott. Efficient Implementation of Adaptive P1-FEM in Matlab. Computational Methods in Applied Mathematics, Vol. 11 (2011), No. 4, pp. 460–490.
[2] Reference Machine:
| Device | MacBook Pro 15-inch, 2018 |
|---|---|
| Processor | 2.6 GHz 6-Core Intel Core i7 |
| Graphics | Radeon Pro 560X 4 GB |
| Intel UHD Graphics 630 1536 MB | |
| Memory | 16 GB 2400 MHz DDR4 |
| Operating System | MacOS 13.6.3 (22G436) |
| Matlab Version | R2023b |
Project details
Download files
Download the file for your platform. If you're not sure which to choose, learn more about installing packages.
Source Distribution
Built Distribution
File details
Details for the file p1afempy-0.2.6.tar.gz.
File metadata
- Download URL: p1afempy-0.2.6.tar.gz
- Upload date:
- Size: 23.9 kB
- Tags: Source
- Uploaded using Trusted Publishing? No
- Uploaded via: twine/4.0.2 CPython/3.9.18
File hashes
| Algorithm | Hash digest | |
|---|---|---|
| SHA256 | f70a69eeee51971b3add6a83fe81aaf753b6dd34b426c056c471039e75344587 |
|
| MD5 | 926db4fe1e34a8c1cf8cf0c1ae63084c |
|
| BLAKE2b-256 | cb6fc6c4da910c7e7679514f5faf83173406a3884c5398f85bfbdcc83d2a85ee |
File details
Details for the file p1afempy-0.2.6-py3-none-any.whl.
File metadata
- Download URL: p1afempy-0.2.6-py3-none-any.whl
- Upload date:
- Size: 21.6 kB
- Tags: Python 3
- Uploaded using Trusted Publishing? No
- Uploaded via: twine/4.0.2 CPython/3.9.18
File hashes
| Algorithm | Hash digest | |
|---|---|---|
| SHA256 | 60b25b5c61790edc2dda64616634def82e32de32dd3128b98c83171085f17cbf |
|
| MD5 | 0a46298f7184ff79c699f0135240942b |
|
| BLAKE2b-256 | 16a6bd7ba146e014512adc65d8a1556ba7470eedf3de6f84537428deda1ced79 |


