
py2gmsh
Python wrappers to create gmsh files with object-oriented syntax.
The wrappers are made closest to actual gmsh syntax for .geo files, with the addition of convenience tools, object-oriented syntax for easy manipulation and extra functionalities.
Installation
When pip is present in your python installation, simply:
pip install py2gmsh
Usage
Creating a simple geo file
The following example shows how a simple geometry can created using a syntax close to the one used in .geo files
from py2gmsh import (Mesh, Entity, Field)

# create Mesh class instance
my_mesh = Mesh()

# create points
p1 = Entity.Point([0., 0., 0.])
# add point to mesh
my_mesh.addEntity(p1)
#create more points
p2 = Entity.Point([1., 0., 0.])
my_mesh.addEntity(p2)
p3 = Entity.Point([1., 1., 0.])
my_mesh.addEntity(p3)
# entities can also directly be added to a mesh:
p4 = Entity.Point([0., 1., 0.], mesh=my_mesh)

# create curves
l1 = Entity.Curve([p1, p2])
l2 = Entity.Curve([p2, p3])
l3 = Entity.Curve([p3, p4])
l4 = Entity.Curve([p4, p1])
# entities can also be added in a batch
my_mesh.addEntities([l1, l2, l3, l4])

# create curveloop
ll1 = Entity.CurveLoop([l1, l2, l3, l4], mesh=my_mesh)

# create surface
s1 = Entity.PlaneSurface([ll1], mesh=my_mesh)

# create fields
f1 = Field.MathEval(mesh=my_mesh)
grading = 1.1
he = 0.005
f1.F = '(abs(y-0.5)*({grading}-1)+{he})/{grading}'.format(grading=grading,
                                                          he=he)
# create minimum field
fmin = Field.Min(mesh=my_mesh)
fmin.FieldsList = [f1]  # could add more fields in the list if necessary

# set the background field as minimum field
my_mesh.setBackgroundField(fmin)

# set max element size
my_mesh.Options.Mesh.CharacteristicLengthMax = 0.1

# adding Coherence option
my_mesh.Coherence = True

# write the geofile
my_mesh.writeGeo('my_mesh.geo')
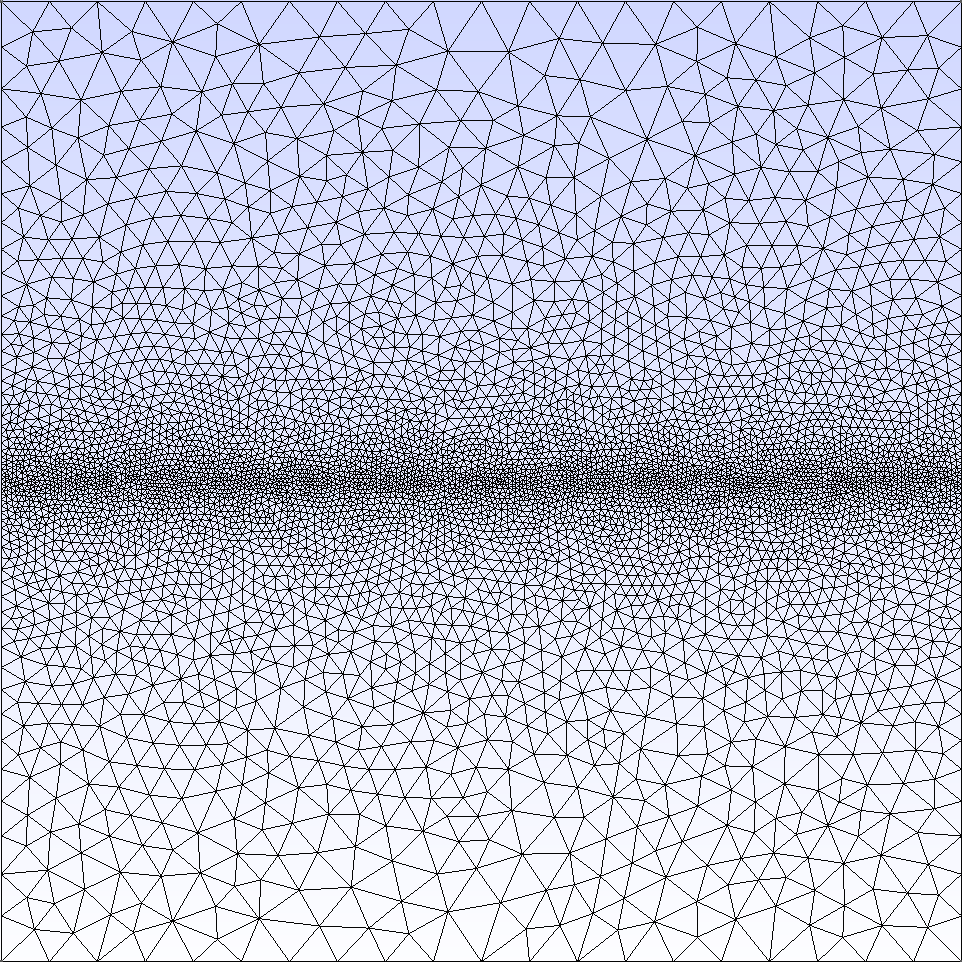
The .geo file my_mesh.geo can be opened directly in the gmsh GUI for visualisation and meshing. Alternatively, running gmsh to create a .msh file gives the following result for my_mesh.msh:
>> gmsh my_mesh.geo -2 -o my_mesh.msh
(!) for Fields using NodesList, VerticesList, EdgesList, FacesList,
RegionsList, or FieldsList, the lists must be a list of Entity instances, not
of the entity numbers, e.g. f2.NodesList = [p1, p2, p3]. Fields using IField,
FieldX, FieldY, FieldZ must also point to a field instance, not its number,
e.g. f2.IField = f1.
Using Physical Groups
Physical groups are used to tag certain entities with a group number and name (optional)
# creating physical groups and associating them with a mesh instance
g1 = Entity.PhysicalGroup(nb=1, name='group1')
g2 = Entity.PhysicalGroup(nb=2, name='group2')
my_mesh.addEntites([g1, g2])

# adding existing entities to different physical groups
g1.addEntity(p1)
g1.addEntity(p2)
g1.addEntity(l1)
g1.addEntity(l2)
g2.addEntities([p3, p4, l3, l4])

# write the geofile after changes
mesh.writeGeo('my_mesh.geo')
Modifying general mesh options
All gmsh options (General, Geometry, Mesh) can be written with the same syntax as writing directly in a geofile. The full list of options available is in py2gmsh/Options.py
# mesh options
my_mesh.options.Mesh.Algorithm = ...
my_mesh.options.Mesh.Format = ...
# general options
my_mesh.options.General.Color = ...
my_mesh.options.Geometry.OffsetX = ...
# geometry options
my_mesh.options.Geometry.Tolerance = ...

# write the geofile after changes
mesh.writeGeo('my_mesh.geo')
Accessing entities from mesh instance
Entities can be retrieved from the Mesh instance through their indexes
my_mesh.points[4]  # <-- returns Point instance number 4
my_mesh.getPointsFromIndex(4)  # <-- same as above
my_mesh.getPointsFromIndex([1, 2, 3, 4])  # <-- returns list of Point instances
# other functions
my_mesh.getCurvesFromIndex(...)
my_mesh.getSurfacesFromIndex(...)
my_mesh.getSurfaceLoopsFromIndex(...)
my_mesh.getVolumesFromIndex(...)
my_mesh.getFieldsFromIndex(...)
my_mesh.getGroupsFromIndex(...)
This can be used to create other entities, such as:
ll1 = Entity.CurveLoop(my_mesh.getCurvesFromIndex([1,2,3,4]))
my_mesh.addEntity(ll1)
Converting a geometry object to a Mesh instance
Certain objects can be directly converted to a py2gmsh.Mesh.Mesh instance. This has been used to convert geometries using the syntax of https://github.com/erdc/proteus domains for example.
from py2gmsh import geometry2gmsh

my_mesh = geometry2mesh(my_geometry)
The geometry variable my_geometry must be an object (e.g. class) containing the following attributes:
| entity | shape | opt | type |
|---|---|---|---|
| vertices | (np, 3) | no | array of point coordinates |
| vertexFlags | (np) | yes | array of point physical group numbers |
| segments | (ns, 2) | yes | array of curves |
| segmentFlags | (ns) | yes | array of segment physical group numbers |
| facets | (nf, nsf, npf) | yes | array of surfaces (loop of point numbers) |
| facetFlags | (nf) | yes | array of facets physical groups |
| volumes | (nv, nsv, nfv) | yes | array of volumes (list of facets) |
| regionFlags | (nv) | yes | array of volume physical group numbers |
| boundaryTags | dict | yes | dictionary of physical groups {'name': number} |
| holes_ind | (nh) | yes | list of holes index (facets in 2D / volumes in 3D) |
np: number of points; ns: number of segments; nf: number of facets; nsf: number of subfacets; npf: number of points per facet; nv: number of volumes; nsv: number of subvolumes; nfv: number of facets per volume; nh: number of holes
opt: optional. Optional argument can be empty (e.g. empty list) but must be present in the geometry object.
1 maintainer

Metadata
1 maintainer
Release files for py2gmsh 4.2.3.1
For a detailed explanation of source distributions (sdists) and built distributions (wheels), please see the package formats documentation.
Source distribution (sdist)
| File | Size | Uploaded | |
|---|---|---|---|
| py2gmsh-4.2.3.1.tar.gz | 14.0 kB | Details |
Built distribution (wheel)
| File | Interpreter | ABI | Platform | Reset |
|---|---|---|---|---|
| py2gmsh-4.2.3.1-py3-none-any.whl | Python 3 | none | any | Details |
Total release size: 26.3 kB
Release files / py2gmsh-4.2.3.1.tar.gz
| Download URL | py2gmsh-4.2.3.1.tar.gz |
|---|---|
| Size | 14.0 kB |
| Tags | Source |
|
SHA-256 checksum How to use checksums |
a8e48419027f4477e8b0ed5cd0690bc0b286375b52163d7d3b34d3b8672ac83f
|
|
BLAKE2b-256 checksum How to use checksums |
41b24b193ad78f78f6c6f37af160c7757b17c6dabb210227b5793b5a7f75154e
|
| Upload date | |
|
Uploaded using Trusted Publishing? What is trusted publishing? |
No |
| Uploaded via |
twine/1.13.0 pkginfo/1.4.2 requests/2.21.0 setuptools/41.0.1 requests-toolbelt/0.8.0 tqdm/4.25.0 CPython/3.7.3
|
Release files / py2gmsh-4.2.3.1-py3-none-any.whl
| Download URL | py2gmsh-4.2.3.1-py3-none-any.whl |
|---|---|
| Size | 12.3 kB |
| Tags | Python 3 |
|
SHA-256 checksum How to use checksums |
711348dd483712a9037c61fb93d4abf5cf0b7d7ed8f5929856ff7f42391c86d5
|
|
BLAKE2b-256 checksum How to use checksums |
7d21b8c74b9ec9db3cbb6da908d85bf74c5af08ee9296f56bfc72f538adfd9a4
|
| Upload date | |
|
Uploaded using Trusted Publishing? What is trusted publishing? |
No |
| Uploaded via |
twine/1.13.0 pkginfo/1.4.2 requests/2.21.0 setuptools/41.0.1 requests-toolbelt/0.8.0 tqdm/4.25.0 CPython/3.7.3
|














