
pyGCodeDecode










What is this repository for?
For the analysis of GCode, slicers or dedicated analyzer tools, such as Prusa Slicer or gCodeViewer, merely display target process parameters. The actual process velocity however is determined by the firmware of the printer. Velocities are expected to deviate significantly from the target velocity at times of acceleration and deceleration. pyGCodeDecode aims to model the machine's actual behavior and visualize its influence. A visual comparison between the simulated acceleration approach and the raw GCode target velocity is shown below.
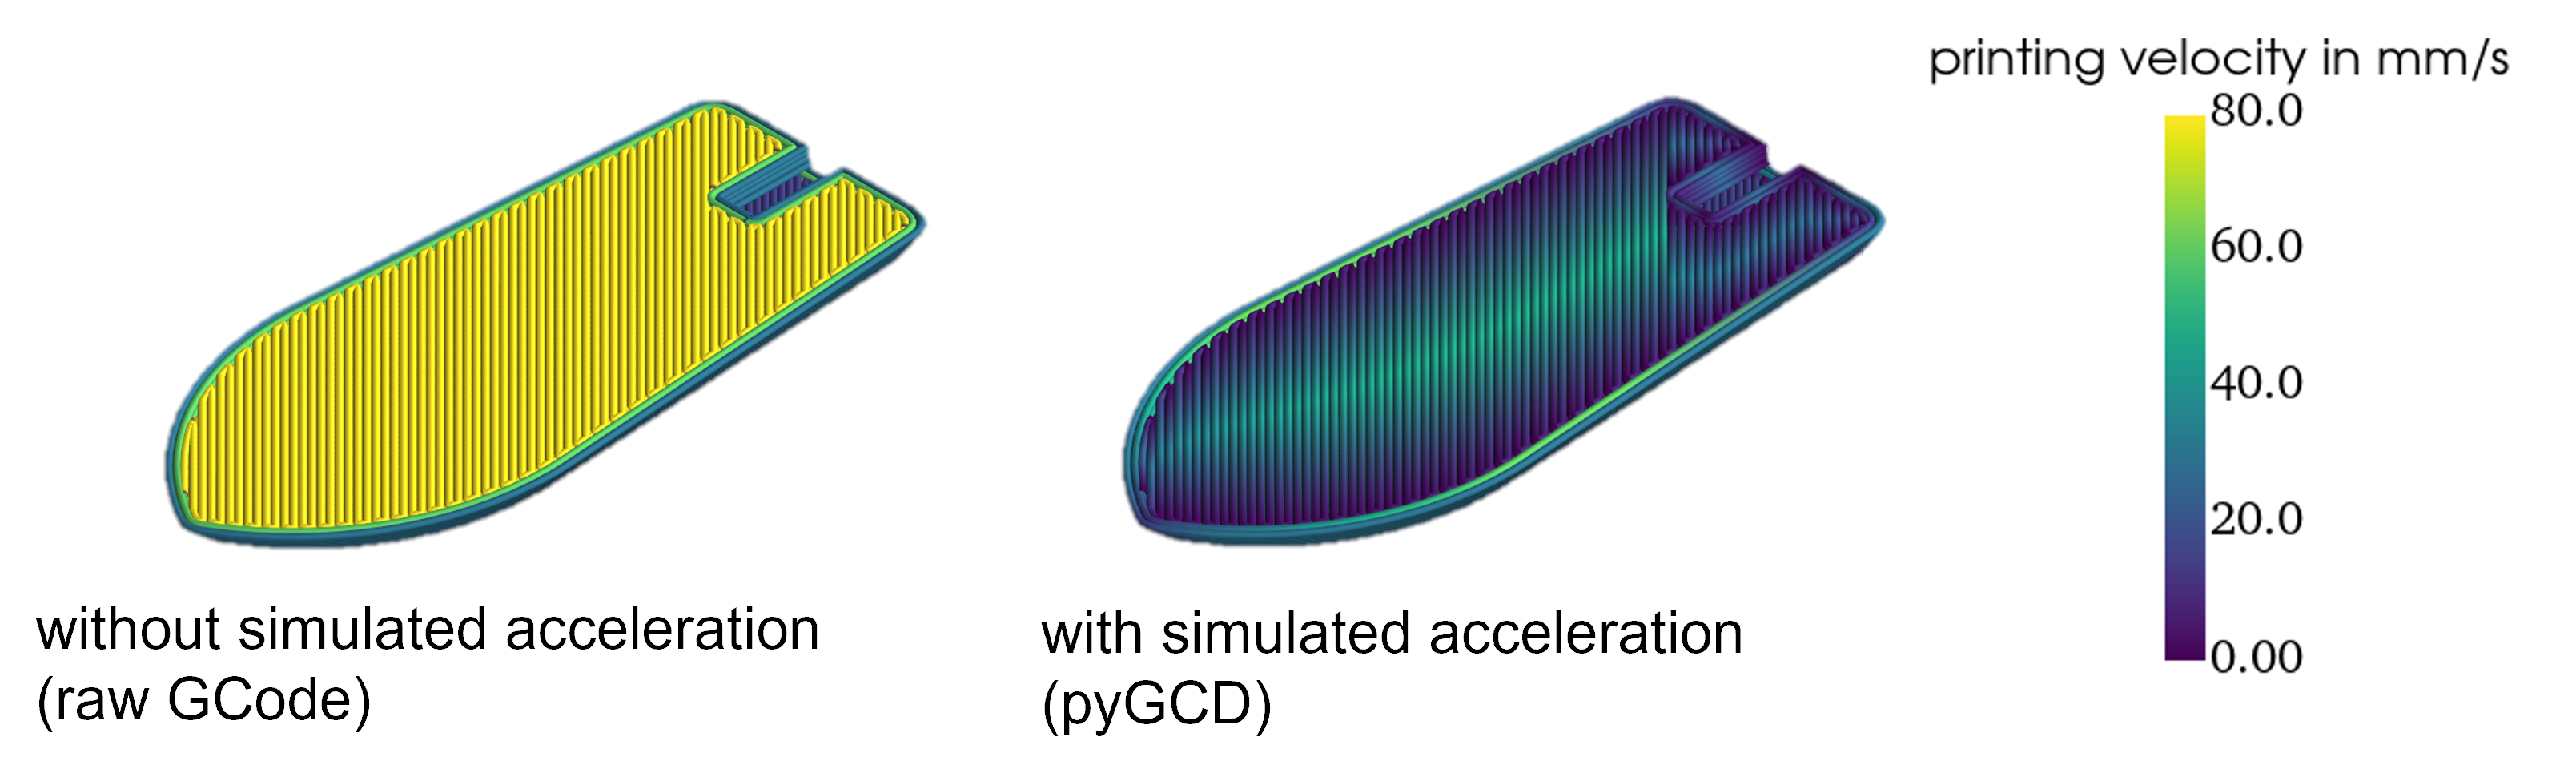
This package reads the target trajectory firmware settings changes from a GCode file. Subsequently, it simulates a motion planner with acceleration and jerk or junction control respectively. The more accurate modeling is achieved by replicating grbl's and its derivatives' firmware-specific movement planner solutions, such as "Classic Jerk" and "Junction Deviation", as an interpretation for Jerk. The simulation result is a description of the nozzle and extrusion axis position and velocity over time and is easily accessible for further analysis. For example it can be used to generate time dependent boundary conditions, needed in additive manufacturing simulations for the Fused Filament Fabrication (FFF) process. The package includes 3D plotting functions, so it can be used to visualize local velocities before printing to improve your process understanding.
Install pyGCodeDecode
It is recommended that you first create a virtual Python-environment, e.g. using the venv-module built into Python. You can clone the repository and run
pip install .
from inside the root directory. Alternatively you can simply install from PyPI:
pip install pyGCodeDecode
If you plan to contribute to the development, install in development mode and with the additional dependencies:
pip install -e .[DEVELOPER]
You may want to verify the installation and version. Inside your environment, just run:
python -c "import pyGCodeDecode
print(pyGCodeDecode.__version__)"
This should return the correct version.
Running the CLI
pyGCD comes with a simplistic CLI to quickly run the provided examples or plot some G-Code without writing a script first. If you want to see something quickly, activate the venv where pyGCD is installed and run:
pygcd run_example brace
You can also run and plot your own G-Code with:
pygcd plot --gcode <PATH>
Creating a script using pyGCD
Example simulations are provided in ./examples/ and can be modified to suit your needs. If you want to start from scratch, the following instructions will help you setup and run a simulation.
Define your printer defaults in a .yaml file
For example, the definition may look like this: ./pyGCodeDecode/data/default_printer_presets.yaml:
prusa_mini:
        # general properties
        nozzle_diam: 0.4
        filament_diam: 1.75
        # default settings
        p_vel: 35
        p_acc: 1250
        jerk: 8
        # axis max speeds
        vX: 180
        vY: 180
        vZ: 12
        vE: 80
        firmware: prusa
The default settings usually are machine specific and often can be read from the printer using a serial connection by sending a GCode command. You can use M503 for Marlin, Prusa and some other firmwares.
Use pyGCD to run a GCode Simulation
An easy way to use pyGCD is by creating a .py file to set up and run the simulation.
- Import the package and modules you want to use:
from pyGCodeDecode import gcode_interpreter
- Load your setup
.yamlfile through:
setup = gcode_interpreter.setup(
    filename=r"./pyGCodeDecode/data/default_printer_presets.yaml", printer="prusa_mini"
)
- You can optionally set or modify custom properties after loading the setup:
setup.set_property({"layer_cue": "LAYER_CHANGE"})
- Finally, run the simulation by providing a
GCodeand passing the setup defined before:
simulation = gcode_interpreter.simulation(
    filename=r"example\example.gcode", initial_machine_setup=setup
)
Access the Results
The simulation object contains the simulation results, you can access them through various methods:
Get the individual axis values (position and velocity) at a certain time (e.g. after 2.6 s) to use it in further simulation by:
simulation.get_values(t=2.6)
You can visualize the GCode by plotting it in 3D:
from pyGCodeDecode.plotter import plot_3d

plot_3d(simulation)
pyGCD can also be used to create files defining an event series for ABAQUS simulations.
from pyGCodeDecode.abaqus_file_generator import generate_abaqus_event_series

generate_abaqus_event_series(simulation=simulation, filepath="path/to/event_series.csv")
For more in depth information have a look into the documentation.
Supported GCode commands
Fully supported commands:
"G0": {"E": None, "X": None, "Y": None, "Z": None, "F": None},  # non extrusion move
"G1": {"E": None, "X": None, "Y": None, "Z": None, "F": None},  # extrusion move
"G4": {"P": None, "S": None},  # Dwell
"M82": None,  # E absolute
"M83": None,  # E relative
"G20": None,  # inches
"G21": None,  # millimeters
"G90": None,  # absolute positioning
"G91": None,  # relative positioning
"G92": {"E": None, "X": None, "Y": None, "Z": None},  # set position
";": None,  # comment
Only partially supported commands:
"M203": {"E": None, "X": None, "Y": None, "Z": None},  # max feedrate *read only
"M204": {"P": None, "R": None, "S": None, "T": None},  # starting acceleration *P only
"M205": {"E": None, "J": None, "S": None, "X": None, "Y": None, "Z": None},  # advanced settings *X only
"G10": {"S": None}, # read only
"G11": None, # read only
Known unsupported commands that may cause issues:
"G2" : {-}, # clockwise arc/circle move, please disable this command in your slicer's settings
"G3" : {-}, # counter-clockwise arc/circle move, please disable this command in your slicer's settings
1 maintainer

Metadata
1 maintainer
Release files for pyGCodeDecode 1.5.1
For a detailed explanation of source distributions (sdists) and built distributions (wheels), please see the package formats documentation.
Source distribution (sdist)
| File | Size | Uploaded | |
|---|---|---|---|
| pygcodedecode-1.5.1.tar.gz | 4.1 MB | Details |
Built distribution (wheel)
| File | Interpreter | ABI | Platform | Reset |
|---|---|---|---|---|
| pygcodedecode-1.5.1-py3-none-any.whl | Python 3 | none | any | Details |
Total release size: 8.3 MB
Release files / pygcodedecode-1.5.1.tar.gz
| Download URL | pygcodedecode-1.5.1.tar.gz |
|---|---|
| Size | 4.1 MB |
| Tags | Source |
|
SHA-256 checksum How to use checksums |
1ba0a998c19a29d777efa70e0608dc813ff482dc6f9bf9f354f5fe17f46351e8
|
|
BLAKE2b-256 checksum How to use checksums |
68a7bd87013aa3c23efba8fde3f17dcc2ce1124a21bb0bd1796ea3a7525b8031
|
| Upload date | |
|
Uploaded using Trusted Publishing? What is trusted publishing? |
Yes |
| Uploaded via |
twine/7.0.0 CPython/3.13.14
|
Provenance
Provenance describes where a file came from. On PyPI, provenance is shared via attestations, which provide a verifiable record of the build or publishing details. View details, limitations and caveats.


PyPI Publish Attestation
PyPI verified that this artifact, at this checksum, originated from the publisher listed below.
Signed by GitHub Actions, verified by PyPI on Aug 18, 2026.
Transparency logRelease files / pygcodedecode-1.5.1-py3-none-any.whl
| Download URL | pygcodedecode-1.5.1-py3-none-any.whl |
|---|---|
| Size | 4.2 MB |
| Tags | Python 3 |
|
SHA-256 checksum How to use checksums |
9df37b419f38208597213bb81e56f6802e69112ab237d06242f95aabc7dce9a7
|
|
BLAKE2b-256 checksum How to use checksums |
fd507651e53517ee39d8ed9d072b42db43d2a145d0511871898828dc2ba67b4b
|
| Upload date | |
|
Uploaded using Trusted Publishing? What is trusted publishing? |
Yes |
| Uploaded via |
twine/7.0.0 CPython/3.13.14
|
Provenance
Provenance describes where a file came from. On PyPI, provenance is shared via attestations, which provide a verifiable record of the build or publishing details. View details, limitations and caveats.
PyPI Publish Attestation
PyPI verified that this artifact, at this checksum, originated from the publisher listed below.
Signed by GitHub Actions, verified by PyPI on Aug 18, 2026.
Transparency log













