Digitized VHS Cassette Editing with Python

Project description


PyVHS is a Python library developed for editing of digitized VHS cassettes. This repository contains the PyVHS source code.
Introduction • Installation • Usage • Documentation • Issues • References
Introduction
PyVHS provides simple APIs/functions/methods to work with removing "blank" segments of digitized video files. When digitizing Video Home System (VHS) cassettes it is very common to have several segments of "blank" tape. The blank segments are portions of tape that have no recorded content. Typically, when recording on tape end users would start recording new content after passing the previous recordings on the tape. This ensured that content was not being overwritten. Also, its very common that the end of a tape is blank because it was never utilized by an end user (i.e., they didn't use all the tape).
This causes an issue, which is when digitizing VHS cassettes this can lead to several portions of blank segments that need be removed to: 1) reduce file size and 2) remove unwanted blank screens. It is also annoying when there are multiple tapes that have been digitized and the blank segments need to be removed.
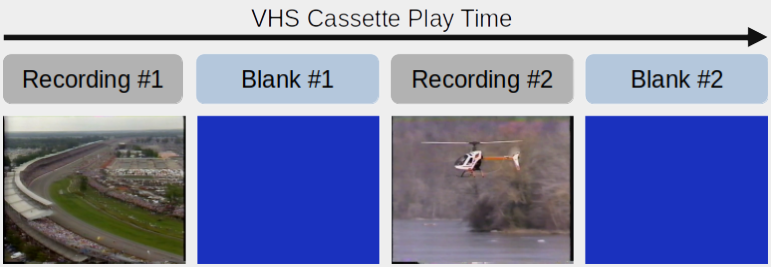
An illustration of this issue is shown below for a single VHS cassette. PyVHS will remove the blank segments from the digitized film.
PyVHS allows a user to:
- remove the "Blank" segments (e.g., Blank #1 and Blank #2) from video files,
- automatically remove blank segments from a single or multiple video files,
- save new video file(s) which will have a smaller file size,
- save new video files(s) with only footage and no more boring blank screens,
- execute using either the command-line interface (CLI), Python scripts, or Jupyter Notebooks.
NOTE: The original digitized video files are not altered with PyVHS.
A primary benefit of this package is that there is no need to manually remove blank segments from the digitized videos. This saves lots of time especially if there are multiple video files.
Installation
The following steps are required to use PyVHS:
- Install Python: Python can be installed on Windows, macOS, and Linux operating systems. Go to the official Python download page and install Python 3.9 or higher.
- If you are a Windows user and need help installing Python then there are many helpful online articles for this topic. For example, here is helpful step-by-step set of instructions from Digital Ocean.
- Once Python is installed open a command line shell (e.g. in Windows type
cmdin the lower-left search field). - A virtual environment is recommended for installing PyVHS. This is easily setup from the command line by typing:
Windows Users: using the cmd shell
pip install virtualenv
virtualenv myenv
myenv\Scripts\activate
pip install pyvhs
pyvhs -dir="PATH_TO_DIRECTORY_CONTAINING_VIDEO"
macOS and Linux Users: using the bash shell
pip install virtualenv
virtualenv myenv
source ./myenv/venv/bin/activate
pip install pyvhs
pyvhs -dir="PATH_TO_DIRECTORY_CONTAINING_VIDEO"
More information on setting-up and deactivating virtual environments can be found in this online Geeks for Geeks article.
pip
Available on PyPI
pip install pyvhs
Git Clone
Download the GitHub repository, create a Python Virtual Environment, and pip install PyVHS
git clone https://github.com/mddunlap924/PyVHS.git
cd PyVHS
python3 -m venv .venv
pip install .
For other dependency management tool, please visit
Usage
Use PyVHS as a command line tool from the terminal
Convert a single video
pyvhs -dir='./video_to_edit/video000.mp4'
File Structure for Editing a Single Video
Note: Set Folder and File Names to Your Choice

Input: video000.mp4
Output: video000_edited.mp4 (with blank segments removed)

├── ./video_to_edit
│   ├── video0.mp4
│   ├── video0_edited.mp4
Convert multiple videos
pyvhs -dir='./videos_to_edit'
File Structure for Editing Multiple Videos
Note: Set Folder and Files Names to Your Choice

Inputs: video000.mp4; video001.mpy; video002.mpy; ...
Outputs: video000_edited.mp4; video001_edited.mpy; video002_edited.mpy; ...

├── ./videos_to_edit
│   ├── video0.mp4
│   ├── video0_edited.mp4
│   ├── video1.mp4
│   ├── video1_edited.mp4
│   ├── video2.mp4
│   ├── video2_edited.mp4
│   ├── ...
Use PyVHS as a library
Refer to the Jupyter Notebook example showing how to edit a single video.
from pyvhs.utils.files import VideosToEdit
from pyvhs.utils.edits import EditVideo

# List video files
videos = VideosToEdit(path=PATH_VIDEO)
videos.list_videos()

# Create a video editing object
video_edit = EditVideo(path_original=videos.original[0],
                       path_edited=videos.edited[0],
                       templates=template_imgs,
                       interval=3,
                       )
print(f'Video Duration: {video_edit.duration:,.2f} seconds')
print(f'Check Video Frames Every: {video_edit.interval:,} seconds')
Documentation
PyVHS utilizes the excellent MoviePy library for video operations. Additional image processing was built into PyVHS to handle the unique requirements of editing digitized VHS video is described in the below section.
Identifying Blank Segments
Blank segments of a video are identified based on the images placed in the pyvhs/template_imgs folder. Users are welcomed to add as many images as they want within this directory. Based on my current experience of converting VHS cassettes to mp4 files there were two primary blank images found in the videos. These two images are shown below:
Example of Blank Images to Identify
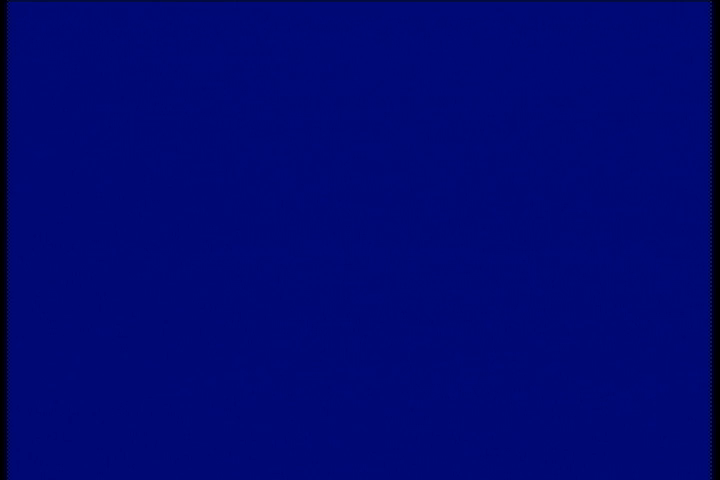

PyVHS identifies blank segments by taking an image (i.e., frame) from a video file at one second intervals across the entire video file. Every frame, taken at one second intervals, are compared to the template images. If at least 2 seconds of template images are found then that portion of video will be flagged as a blank segment for removal.
Template images are compared to video frames using Structural Similarity Index (SSIM) because this is a computationally fast and decently performing algorithm for image comparison. All operations are performed on a CPU as opposed to needing a high cost GPU. SSIM is implemented using Scikit-Image. This process is optimized to utilize all CPU cores via Python multiprocess.
VHS Cassette Digitization Process
All videos used in the testing of PyVHS were created by following this excellent YouTube tutorial: How to convert VHS videotape to 60p digital video (2023).
Extra Tip/Trick for Digitizing VHS Cassettes: Once everything is setup and the VHS cassette is ready to be digitized you can set a maximum recording time in OBS Studio. The upper recording time for a consumer grade VHS cassette tape is ~6 hours. Therefore, when using OBS Studio set a maximum recording time to 6 hours. This allows a user to walk away from the digitization process while ensuring the entire tape was digitized. A drawback of this approach is if a large segment of blank tape appears then the user is not present to stop the recording. Setting up a maximum record time can cause blank segments to be recorded particularly if the entire VHS cassette was not used/full. This digitization process is ideal when used with PyVHS because the blank segments can now easily be removed for multiple videos.
Issues
This repository is will do its best to be maintained, so if you face any issue please raise an issue or make a Pull Request. :smiley:
References
Liked the work? Please give the repository a :star:!


Download files
Download the file for your platform. If you're not sure which to choose, learn more about installing packages.


