Powerful SSH terminal manager
Project description
SSHTMux - Powerful SSH Terminal Manager
PyPi: https://pypi.org/project/sshtmux/
Source Code: https://github.com/scjorge/sshtmux
Links
- About
- Why? And who is it for?
- Features
- Requirements
- Installation
- SSH Config structure
- SSHTmux Config
- Usage
- License
About
This project is a fork from SSHClick. Thanks karlot!
Inspired by the idea of a terminal connection manager and powerful software such as MRemoteNG, SSHTMux brings several new features integrating with Tmux
SSHTmux is just a tool designed to work with existing SSH configuration files on your Linux/Windows/WSL terminal environment. It parses your SSH config, and can provide easy commands to list, filter, modify or view specific Host entries. Trough additional "metadata" comments it can add abstractions such as "groups" and various information that is both readable in the configuration file, and can be parsed and printed while using the tool.
Integrated with custom Tmux for better experience.
Separates from your machine's native Tmux socket. Each user will have their own independently. it means all settings in this project are separate from the native Tmux on your machine.
⚠️ Backup your SSH config files before using and test how it works!
SSHTMux can be used with "show" and "list" commands for hosts, without modifying your SSH Config in any way!
Only commands that modify configuration will edit and rewrite/restructure your SSH Config file. In that case, any added comment or infos that are not in form that SSHTmux understand will be discarded, and configuration will be re-formatted to match SSHTmux style

Why? And who is it for?
- SSH config is very feature-full with all options SSH client support, why inventing extra layer?
- For who needs something that works fast and great in terminal, and does not require complex setup.
- For who needs quick way to search, group and visualize all hosts inside SSH configuration (especially since it can grow huge)
- For who needs access a lot of SSH or SFTP connections and need a tool to organize and manage them.
- For who love terminal tools ❤️
Features
SSHTMux has a CLI to manage SSH config File and TUI interface for interacting with SSH Connections.
- Create hosts with SSH parameters validations based on ssh_config(5).
- Create Identities (It means save password to used as you need).
- Create Snippets/Playbooks (Organize many routine commands to execute on one or many hosts).
- Fast open a SFTP connection from active SSH Conection.
- Fast Connections (Open not registered host. Maybe you want to execute some snippet or open it with an identity).
- Multi Commands (Execute an comand in all host in the same session).
- Open a connection in
Fast Sessionmode (it helpful to execute a snippet in host from different groups).
Requirements
- Tmux 2.4+ how to install
- Python3.9+
- WSL (For Windows users)
Installation
It is preferable to not use system python version, try it on virtual venv first.
Install package:
-
from PyPI using pip
pip install sshtmux
-
(OR) from source using pip
git clone https://github.com/karlot/sshtmux
cd sshtmux
pip install .
Now sshm command should be available to access SSHTmux application
Shell autocompletion
TAB-TAB auto-completes on commands, options, groups, hosts and parameters
-
Bash:
echo 'eval "$(_SSHM_COMPLETE=bash_source sshm)"' >> ~/.profile && source ~/.profile
-
Zsh:
echo 'eval "$(_SSHM_COMPLETE=bash_source sshm)"' >> ~/.zshrc && source ~/.zshrc
-
Fish:
echo 'eval (env _SSHM_COMPLETE=fish_source sshm)' >> ~/.config/fish/config.fish && source ~/.config/fish/config.fish
Upgrade Package
-
Upgrade from new PyPI release:
pip install --upgrade sshtmux
-
Upgrade from source: Assuming installation is already done, and previous version is cloned in some local folder
cd sshtmux     # cd into existing previously cloned repo folder
git pull
pip install --upgrade .
Uninstall Package
Simply run:
pip uninstall sshtmux
In case you have installed from cloned source code, you can delete locally cloned repo.
rm -r sshtmux
SSH Config structure, and important note about comments
How SSH config works?
The ssh_config(5) file is a configuration file used by the OpenSSH client to specify custom settings for SSH connections. It allows users to define configurations globally or on a per-host basis, simplifying SSH usage and automating repetitive settings. This file can significantly enhance usability by avoiding the need to repeatedly type options or remember specific configurations.
Wildcards are special characters or symbols used to represent one or more characters in a pattern. In the context of SSH configuration (or generally in file systems, programming, and other tools), wildcards allow you to match multiple items without specifying each one explicitly. This is particularly useful for flexible and dynamic matching of hosts in the ssh_config file.
SSHTmux uses wildcards to create hosts and manager groups. When you create a group, automatic will create a pattern host with the name group_name-*. All parameters configured on this host will affect all hosts in this group. That's the reason all hosts are created with the prefix group_name-. If you want to update generic configs on group, use sshm host set "group_name-*".
If you want to set any config to all hosts, use * wildcard with sshm host <create|set> "*". This host will be on a special group called global_pattern.
NOTE: The hierarchy in the ~/.ssh/config is important, the most generic wildcards must be last. But don't worry, SSHTmux will do it for you.
Comment blocks and metadata in SSH Config
SSHTmux when editing and writing to SSH config file must use specific style, and is internally using comments to "organize" configuration itself. This means comments outside of what sshtmux is handling are unsupported and will be lost when SSHTmux modifies a file.
SSHTmux uses comments to add extra information which it can use to add concept of grouping and extra information to hosts. Special "metadata" lines start with #@ followed by some of meta-tags like group, desc, info. This are all considered group metadata tags, as they apply on the group level. Note that line separations above and below "group header" are added only for visual aid, they are ignored at parsing, but are included when modifying/generating SSH config file.
This "headers" can be added manually also in SSH config, or sshtmux can add them and move hosts under specific group, using sshm cli tool
Normally start of the "GROUP HEADER" inside SSH Config would look like below.
#@group:is KEY metadata tag, that during "parsing" defines that all hosts configured below this "tag" belong to this group#@desc:is optional tag that adds "description" to defined group, and will display in usual group display commands#@info:is optional tag that can appear multiple times, adding extra information lines tied to the group.
Additionally each "host" definition can have optional meta info:
#@host:is optional tag that can appear multiple times, that can hold some information about the host, this meta info when defined applies to next "host" definition that will appear. If this key is added after "host" keyword, it will be applied to next host, for that reason, keep this host meta info above the actual host definition.
Following is sample how group header is rendered by SSHTmux:
#-------------------------------------------------------------------------------
#@group: <GROUP-NAME>       [MANDATORY]   <-- This line starts new group
#@desc: <GROUP-DESCRIPTION> [OPTIONAL, SINGLE]
#@info: <GROUP-INFO-LINES>  [OPTIONAL,MULTIPLE]
#-------------------------------------------------------------------------------
Host ...    <-- this hosts definitions are part of the defined group
    param1 value1
    param2 value2

#@host: <HOST-INFO-LINES>   [OPTIONAL,MULTIPLE] <-- Adds info to following host
Host ...

<ANOTHER GROUP HEADER>
If there are no groups defined, then all hosts are considered to be part of "default" group. SSHTmux can be used to move hosts between groups and handle keeping SSH config "tidy" and with consistent format.
SSH Config demo
This is config sample file as input (located in ~/.ssh/config):
#<<<<< SSH Config file managed by sshtmux >>>>>

#-------------------------------------------------------------------------------
#@group: network
#@desc: Network devices in my lab
#@info: user='admin' password='password'
#@info: Not really, but for demo its ok :)
#-------------------------------------------------------------------------------
Host net-switch1
    hostname 10.1.1.1

Host net-switch2
    hostname 10.1.1.2

Host net-switch3
    hostname 10.1.1.3

Host net-*
    user admin


#-------------------------------------------------------------------------------
#@group: jumphost
#@desc: Edge-server / SSH bastion
#@info: Used for jump-proxy from intnet to internal lab servers
#-------------------------------------------------------------------------------
#@host: This host can be used as proxyjump to reach LAB servers
Host jumper1
    hostname 123.123.123.123
    user master
    port 1234


#-------------------------------------------------------------------------------
#@group: lab-servers
#@desc: Testing/Support servers
#@info: Some [red]important[/] detail here!
#@info: We can have color markups in descriptions and info lines
#-------------------------------------------------------------------------------
#@host: This server is [red]not[/] reachable directly, only via [green]jumper1[/]
Host lab-serv1
    hostname 10.10.0.1
    user admin

#@host: This server is [red]not[/] reachable directly, only via [green]jumper1[/]
Host lab-serv2
    hostname 10.10.0.2

#@host: This server is [red]not[/] reachable directly, only via [green]lab-serv1[/]
#@host: SSHTmux can represent how end-to-end tunels will be established
Host server-behind-lab
    hostname 10.30.0.1
    user testuser
    port 1234
    proxyjump lab-serv1
    localforward 7630 127.0.0.1:7630

#@host: This pattern applies to all hosts starting with 'lab-'
#@host: setting 'user' and 'proxyjump' property
Host lab-*
    user user123
    proxyjump jumper1
SSHTmux Config
All app configs and files are save on ~/.config/sshtmux/
- config.toml (All App, Identity, Snippets, SSH, SFTP and Tmux settings)
- identity.json (All passwords/Identities encrypted)
- identity.key (The Key to decrypted identity.json. This Key can be removed from config.toml and set on env var
SSHTMUX_IDENTITY_KEY) - snippets (Dir to save all your snippets. Can be a simple text file with your saved commands)
- tmux.config (A Custom Tmux config for the best experience with this project. Include keybinds and custom commands)
Config.toml file
This is the main file config that SSHTmux use.
[sshtmux]
SSHTMUX_IDENTITY_KEY_FILE = "~/.config/sshtmux/identity.key"
SSHTMUX_IDENTITY_PASSWORDS_FILE = "~/.config/sshtmux/identity.json"
SSHTMUX_SNIPPETS_PATH = "~/.config/sshtmux/snippets"
SSHTMUX_HOST_STYLE = "panels"

[ssh]
SSH_CONFIG_FILE = "~/.ssh/config"
SSH_COMMAND = "ssh -o ConnectTimeout=10 -o StrictHostKeyChecking=no ${hostname}"
SFTP_COMMAND = "sftp -o ConnectTimeout=10 -o StrictHostKeyChecking=no ${hostname}"
SSH_CUSTOM_COMMAND = false

[tmux]
TMUX_CONFIG_FILE = "~/.config/sshtmux/tmux.config"
TMUX_SOCKET_NAME = "sshtmux_local_user"
TMUX_TIMEOUT_COMMANDS = 10
SSHTMUX Config Session
SSHTMUX_IDENTITY_KEY_FILE-> File with a key (Fernet key - 32 url-safe) to decrypted passwords.SSHTMUX_IDENTITY_PASSWORDS_FILE-> File with all passwords encrypted in json format.SSHTMUX_SNIPPETS_PATH-> Directory where SSHTmux will search for files and open in snippets mode.SSHTMUX_HOST_STYLE= Style used for group or host show commands.
| Style | Description |
|---|---|
panels |
Display data in several panels |
card |
Add data to single "card" |
simple |
Simple output with minimal decorations |
table |
Flat table with 3 columns |
table2 |
Nested table with separated host SSH params |
json |
JSON output, useful for binding with other tools |
⚠️ For security reasons, you can remove the SSHTMUX_IDENTITY_KEY_FILE line and use SSHTMUX_IDENTITY_KEY env var with the key. If you feel more comfortable creating a new key, you can use sshm identity generate-key but remember that passwords are encrypted with a symmetric key, so only the same key is used to decrypt.
SSH Config Session
SSH_CONFIG_FILE-> Your SSH config file.SSH_COMMAND-> The command used when open a new SSH connection.SFTP_COMMAND-> The command used when open a new SFTP connection.SSH_VALIDATE_SSHCONFIG-> Setfalseif you want to disable all ssh_config(5) validations.SSH_CUSTOM_COMMAND-> SSHTmux do some internal negotiations to open connections. If you want to use only the flow of this project and use your custom command to connect, SSHTmux will not do anything anymore. In this case, you can use special strings to represent the hostname and the password comes from identity. You can use${hostname}and${passwor}`
TMUX Config Session
TMUX_CONFIG_FILE-> Your Tmux config file. NOTE: This file is optimized for this project, but you can change if you wantTMUX_SOCKET_NAME-> Socket used by Tmux. Separates from your machine's native socket, so each user will have their own independentlyTMUX_TIMEOUT_COMMANDS-> Timeout to execute each SSH or SFTP command. This does not have any effect if you useSSH_CUSTOM_COMMAND
Usage
CLI
Manager Hosts
Manager Groups
Manager Identities
Manager Snippets
TUI
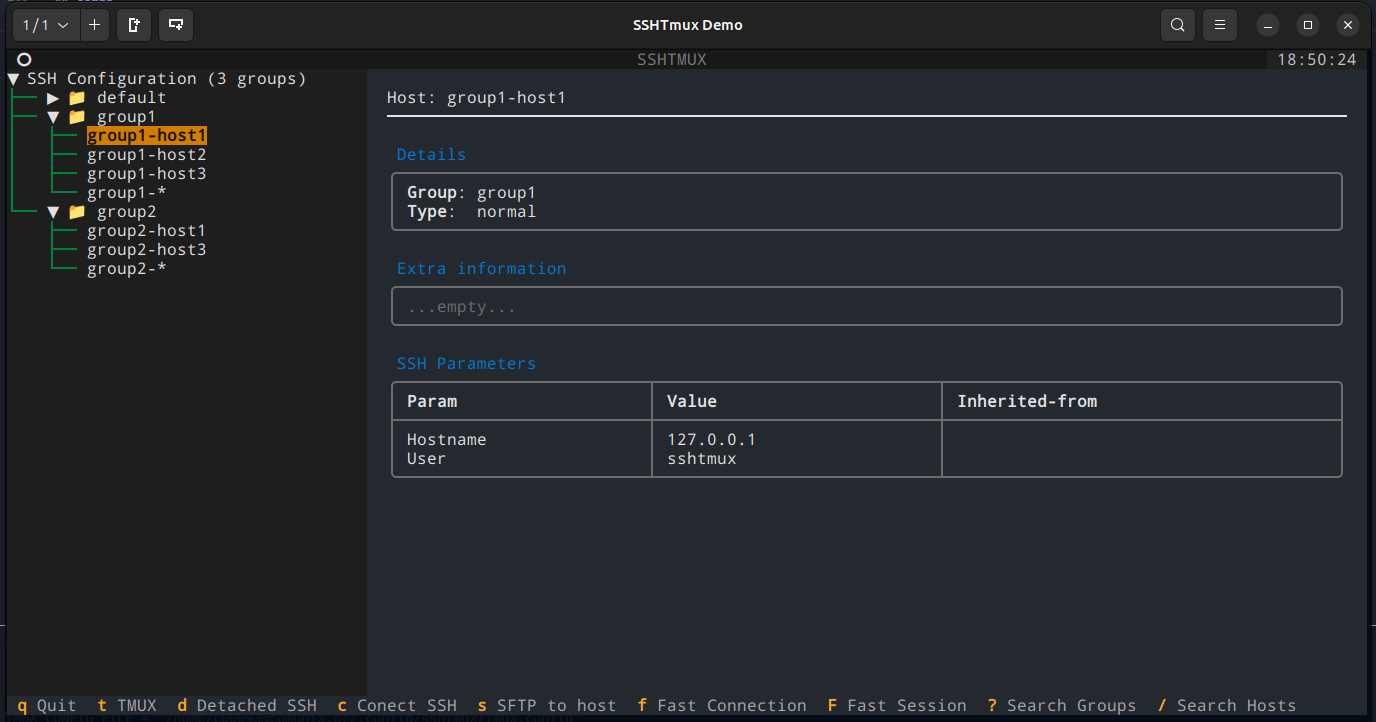
Open TUI interface for interacting with SSH Configuration.
Open with sshm tui or just ssht command.
TUI Keybinds
| Action | Keybind |
|---|---|
| Move down | j |
| Move up | k |
| Collapse | h |
| Expand | l |
| Search hosts | / |
| Search groups | ? |
| Open Tmux | t |
| Connect SSH | c |
| Connect SSH Detached (open many connections before open Tmux) | d |
| Connect SFTP | s |
| Open SSH in Fast Connection (write user and hostname) | f |
| Open SSH in Fast Session (hosts from different groups for multi-command) | F |
| Close Inputs selections | escape |
Tmux
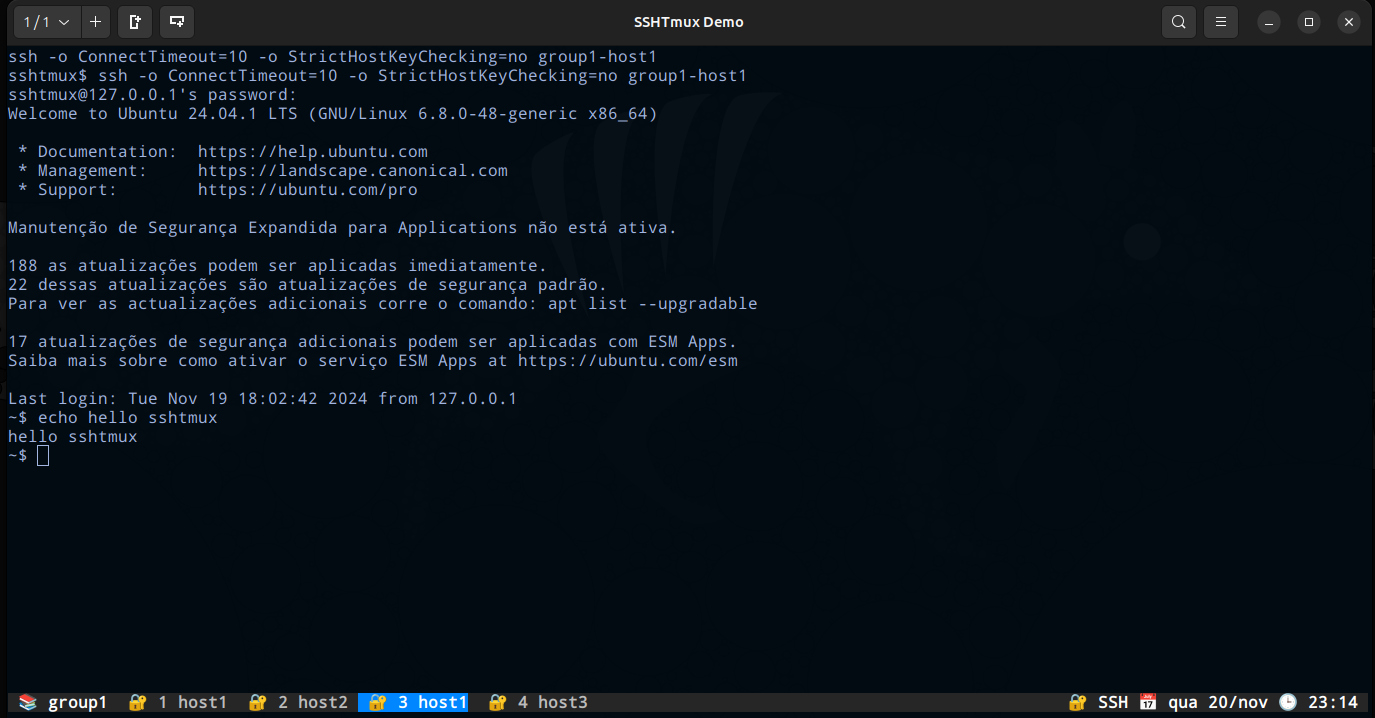
Tmux (Terminal Multiplexer) is a powerful command-line tool that allows users to manage multiple terminal sessions within a single window. It enables the creation, organization, and navigation of multiple panes and windows, making it ideal for multitasking and remote work.
See the basic concepts here.
SSHTmux uses Tmux to manager connections.
So it means that:
- Tmux Session -> Group of hosts
- Tmux Window -> Host connection
⚠️ Do not rename Tmux Sessions. Internally, it used to manage connections, commands and key binds.
Tmux Keybinds
The prefix key in Tmux is a special key or key combination that serves as a "command trigger" for all tmux commands.
By default, Tmux uses Ctrl+b (C-b) as the Prefix key.
If you want to change the Prefix key, just change the first line on ~/.config/sshtmux/tmux.config file at:
# Prefix
set -g prefix C-b
Then close all your windows and sessions and open again.
You can see all available Tmux key mapping running tmux list-keys on your terminal.
SSHTmux custom keybinds
| Action | Keybind |
|---|---|
| Open Snippet | Prefix + Shift + S |
| Open SFTP connection | Prefix + Shift + F |
| Open Identity | Prefix + Shift + I |
| Open Multi Session Commands | Prefix + Shift + M |
| Jump to tab index connection | Alt + (0-9) |
| Jump to next and preview tab | Alt + q, Alt + w |
| Jump to next and preview session | Alt + e, Alt + r or Alt + o, Alt + p |
| Move Window/Tab index | Alt + n, Alt + m |
| Choose Session | Alt + s |
| Choose Window/Tab | Alt + t |
Shortcut for Default session |
Alt + d |
Shortcut for Fast Connections session |
Alt + f |
Shortcut for Fast Sessions session |
Alt + g |
Helpful Tmux native keybinds
| Action | Keybind |
|---|---|
| Detach Tmux (Back to TUI Interface) | Prefix + d |
| Close Session or active Window | Prefix + x |
| Split Pane Horizontally Prefix | Prefix + " |
| Split Pane Vertically Prefix | Prefix + & |
| Jump to tab index connection | Prefix + 0-9 |
Tmux Mouse
The mouse is activated to improve the navigation experience.
SSHTmux copies the mouse selection to OS clipboard like PUTTY does. To do this work correctly, the proper CLI clipboard needs to be installed.
SSHTmux will find any available option:
| Utility | Operating System | Interface | How to Install | Notes |
|---|---|---|---|---|
| xclip | Linux | X11 | sudo apt install xclip (Debian/Ubuntu) sudo yum install xclip (RHEL/CentOS) |
Copies to the system clipboard. Limited support on Wayland without XWayland. |
| xsel | Linux | X11 | sudo apt install xsel (Debian/Ubuntu) sudo yum install xsel (RHEL/CentOS) |
Similar to xclip but more flexible in scripts. Does not work directly on Wayland. |
| wl-copy | Linux | Wayland | sudo apt install wl-clipboard (Debian/Ubuntu) sudo yum install wl-clipboard (RHEL/CentOS) |
Specific to Wayland. Requires the Wayland compositor to be properly configured. |
| pbcopy | macOS | Cocoa | Already included in macOS. No installation required. | Works only on macOS. Copies to the native system clipboard. |
How I know my system and interface?
uname -s
If Darwin you are on macOS, and pbcopy is supposed to already be installed.
If Linux you can check your interface with:
echo $XDG_SESSION_TYPE
It will return x11 or wayland.
Tmux Navegation
License
MIT License
Copyright (c) 2024 Jorge Silva
Permission is hereby granted, free of charge, to any person obtaining a copy of this software and associated documentation files (the "Software"), to deal in the Software without restriction, including without limitation the rights to use, copy, modify, merge, publish, distribute, sublicense, and/or sell copies of the Software, and to permit persons to whom the Software is furnished to do so, subject to the following conditions:
The above copyright notice and this permission notice shall be included in all copies or substantial portions of the Software.
THE SOFTWARE IS PROVIDED "AS IS", WITHOUT WARRANTY OF ANY KIND, EXPRESS OR IMPLIED, INCLUDING BUT NOT LIMITED TO THE WARRANTIES OF MERCHANTABILITY, FITNESS FOR A PARTICULAR PURPOSE AND NONINFRINGEMENT. IN NO EVENT SHALL THE AUTHORS OR COPYRIGHT HOLDERS BE LIABLE FOR ANY CLAIM, DAMAGES OR OTHER LIABILITY, WHETHER IN AN ACTION OF CONTRACT, TORT OR OTHERWISE, ARISING FROM, OUT OF OR IN CONNECTION WITH THE SOFTWARE OR THE USE OR OTHER DEALINGS IN THE SOFTWARE.
Project details
Release history Release notifications | RSS feed
Download files
Download the file for your platform. If you're not sure which to choose, learn more about installing packages.
Source Distribution
Built Distribution
File details
Details for the file sshtmux-0.1.12.tar.gz.
File metadata
- Download URL: sshtmux-0.1.12.tar.gz
- Upload date:
- Size: 52.7 kB
- Tags: Source
- Uploaded using Trusted Publishing? No
- Uploaded via: poetry/1.8.3 CPython/3.12.3 Linux/6.8.0-48-generic
File hashes
| Algorithm | Hash digest | |
|---|---|---|
| SHA256 | 06f709d0acde867905bb56940efe203f4c617549a32526d017fbc89dfb200f75 |
|
| MD5 | a6010295581cb720895ea0200847c5d3 |
|
| BLAKE2b-256 | e092fa6d0e678e692d24bc46dfb2c3e4db32a73b4ef7a5a17c8b9b51970e627b |
File details
Details for the file sshtmux-0.1.12-py3-none-any.whl.
File metadata
- Download URL: sshtmux-0.1.12-py3-none-any.whl
- Upload date:
- Size: 64.3 kB
- Tags: Python 3
- Uploaded using Trusted Publishing? No
- Uploaded via: poetry/1.8.3 CPython/3.12.3 Linux/6.8.0-48-generic
File hashes
| Algorithm | Hash digest | |
|---|---|---|
| SHA256 | 6e309d42276055d488686a8ef6659d8f31e01510ae1ae901a57dfeab6593ad8a |
|
| MD5 | 0d136737cf63b294647632f14ef3269f |
|
| BLAKE2b-256 | cf657baa189ff5a404420f37dbbb3e3a8e718b78b37e990596891738973c5da1 |


