
stentFIT



Semi-automated virtual stent implantation with mixed-dimensional modelling
Full documentation, including the API reference and workflow diagrams, is hosted at stentfit.readthedocs.io.
stentFIT turns a stent surface mesh (.stl) into a 1D beam-element model and then into a runnable simulation. It samples the stent surface, detects its rings, extracts a 2D skeleton from each ring, wraps that skeleton back onto the 3D mid-surface, fits a B-spline to each strut curve, and meshes the result into Simo–Reissner beams with BeamMe. From that mesh it writes a schema-validated 4C input file, solves it in Docker, and measures what came out.
Extracting the 1D wireframe is semi-automated, so the intermediate steps can be checked and edited by hand. Ring detection and 2D skeletonisation are the two steps where that matters most, and both write their own inspectable files as they go.
Installation
You need Python 3.13, which is pinned to match BeamMe's supported range, and Git on your PATH. BeamMe calls git to write commit metadata into the generated 4C input files, so it fails at runtime without it. Both steps below install Git with conda.
Option A: just use the package
The steps are the same on macOS, Linux, and Windows (PowerShell). On Windows, use python and pip, not the py launcher:
conda create -n stentfit-env python=3.13
conda activate stentfit-env
conda install -c conda-forge git
pip install stentfit
pip installs the core dependencies for you, such as beamme (stent beam meshing and artery solid meshing), gmsh (artery solid meshing) and fourcipp. Solving the generated input files needs 4C, which is not part of this package and comes from Docker instead, as described below.
Option B: clone the repo and start developing
git clone https://github.com/VuralAktas/stentFIT.git
cd stentFIT
conda env create -f environment.yml   # Python 3.13 + pip + git
conda activate env_stentfit
poetry install                        # installs stentfit + all dependency groups
This way git comes in automatically through environment.yml. You also get the example notebooks and the locked dependency versions (poetry.lock) that match the rest of the project.
To run the simulations you also need Docker
The skeletonisation needs nothing beyond the package. Solving does, because 4C is Linux-only, and stentFIT runs it inside a pinned container so there is no 4C to install and nothing to compile:
| Docker Desktop 4.x (macOS / Windows) or Docker Engine (Linux) | 4C runs inside it |
| about 6 GB of free disk | the image, which lives in Docker's VM and not in this repo |
| Rosetta, on Apple Silicon | the image is amd64-only, so it runs emulated |
python -m stentfit.run doctor checks all of it before you spend a solve finding out something is missing. If you already have 4C compiled, on Linux or on a cluster, you can skip Docker with RunnerConfig(backend="local", local_executable="/path/to/4C").
What it does & How to use it
from stentfit import Simulation, Stent
from stentfit.sim import StentOnlySettings

# 1. STL -> 1D spline wireframe
stent = Stent(stl_file="stent01.stl", stent_name="stent01", output_dir="outputs/stent01")
stent.skeletonize()

# 2. Build a 4C input for it
sim = Simulation(stent, sim_type="stent_only", settings=StentOnlySettings(),
                 output_dir="outputs/simulation")
sim.build_input()
sim.check()

# 3. Solve it and measure what came out
sim.run()
sim.postprocess()
This is a simplified version of the full workflow. Each call runs a fixed sequence of steps, and every step can also be called on its own. See Workflows for the breakdown.
1. Stent skeletonisation (examples/stent_skeleton.ipynb)
- Sample a point cloud from the stent STL and align it to its centreline axis.
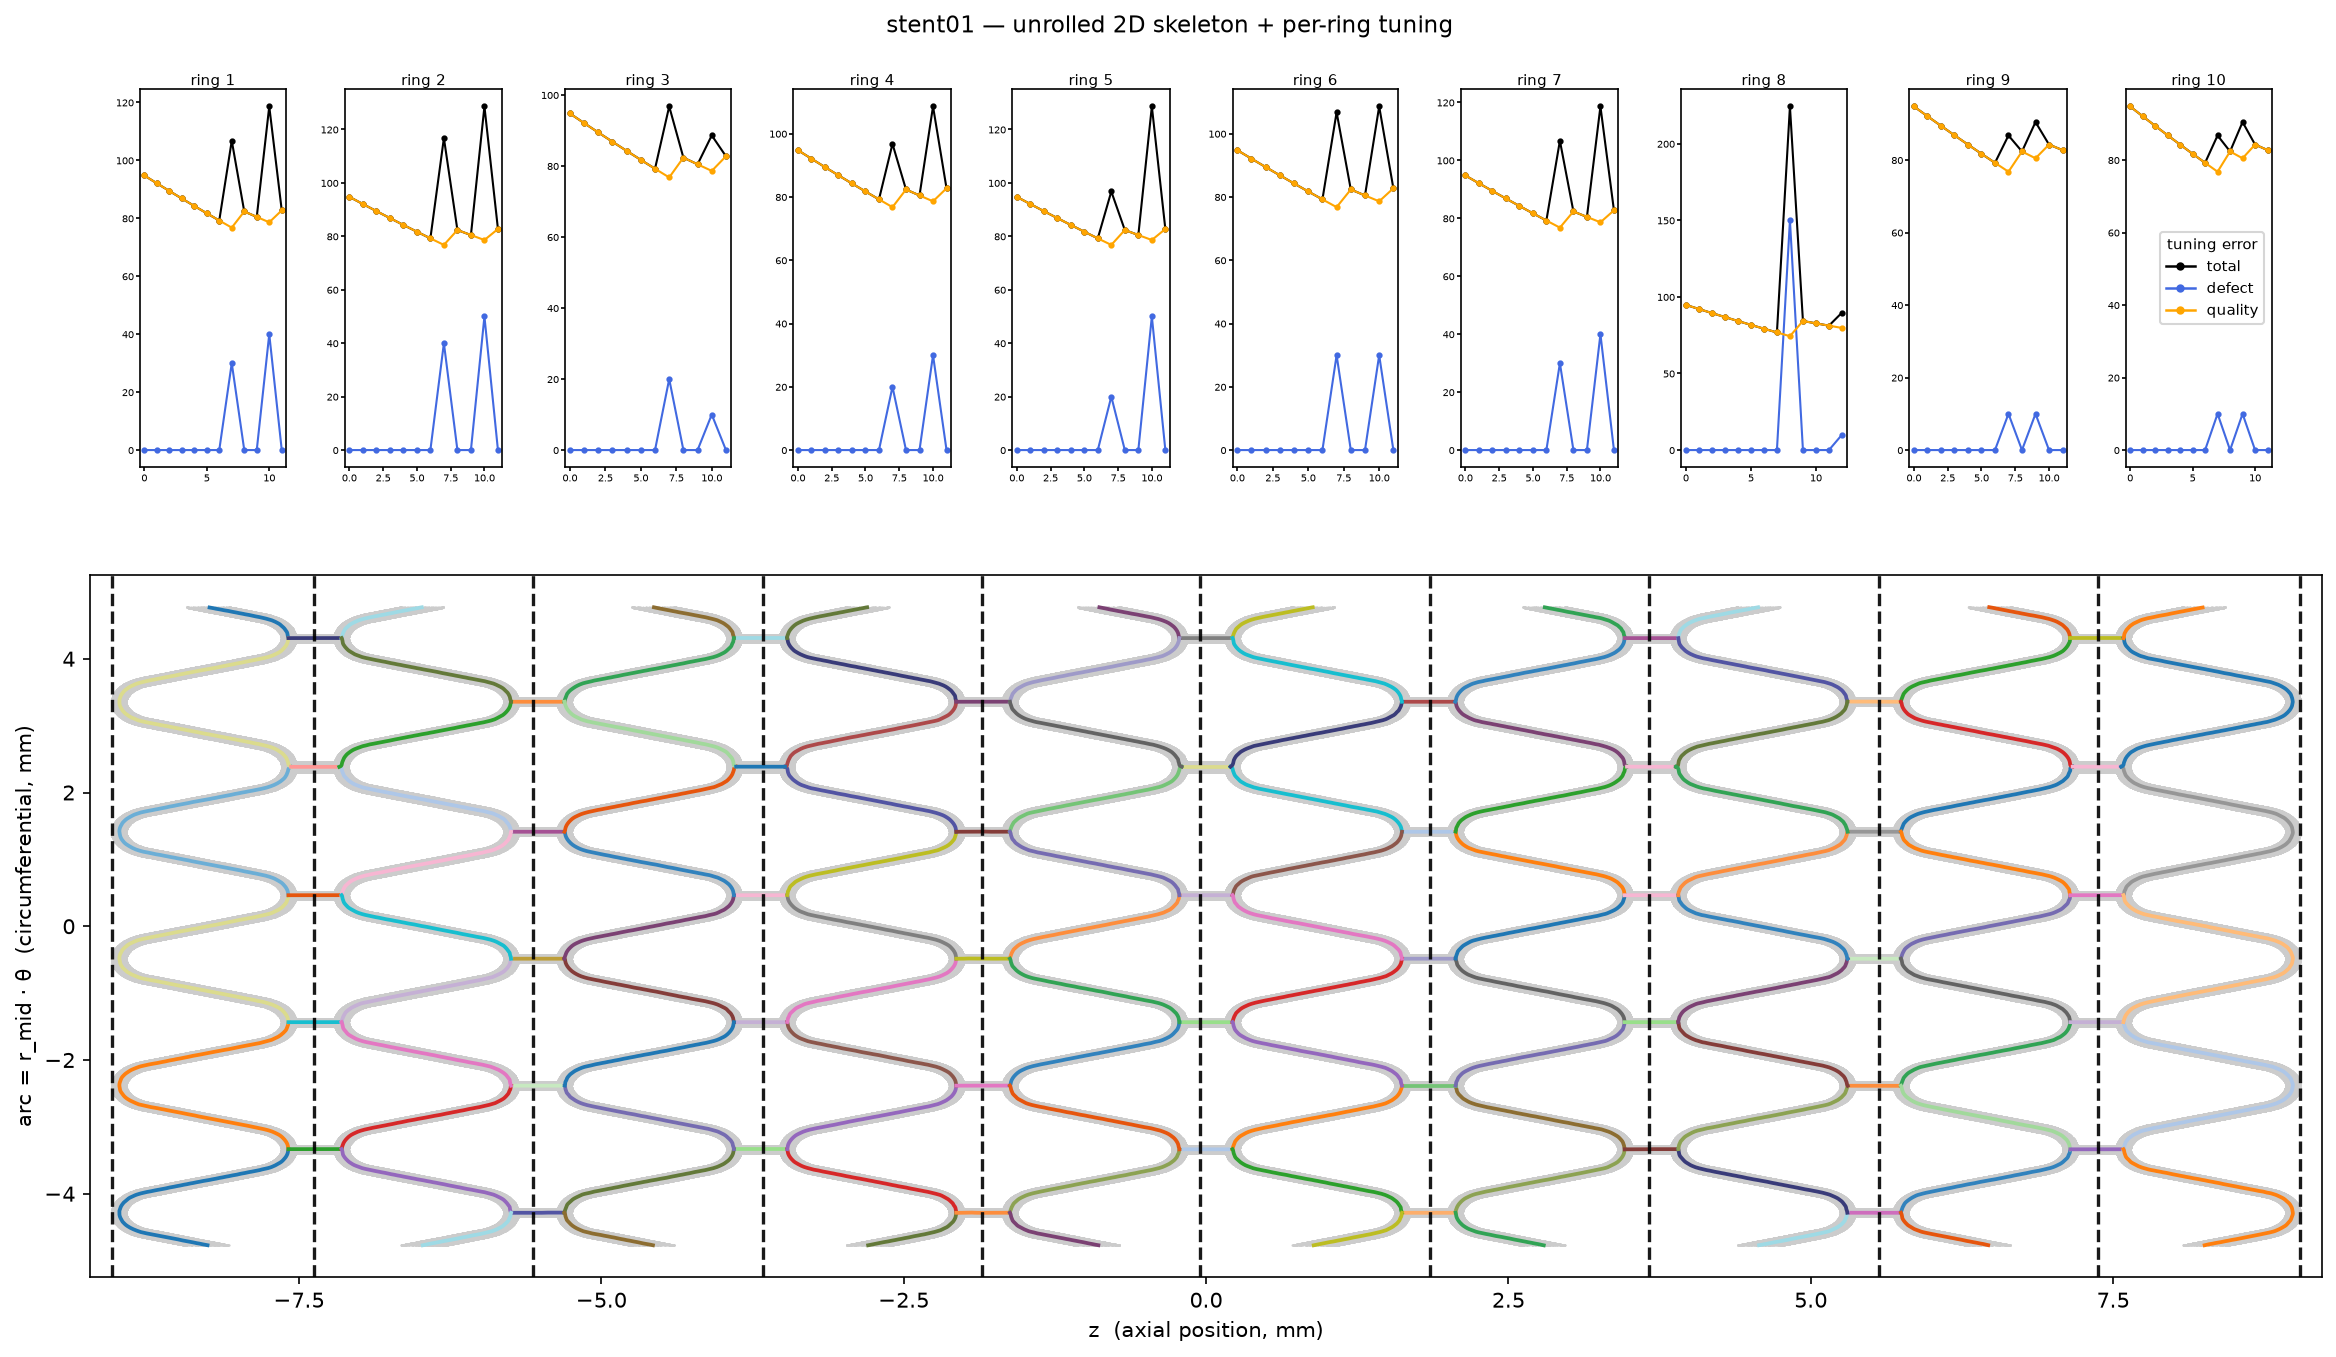
- Detect rings and skeletonise each ring in 2D (optional auto-tuning + manual edits).
- Wrap the 2D skeleton onto the local mid-surface, clean up the graph, and fit a B-spline per strut.
- Mesh the fitted splines into a 1D Simo–Reissner beam mesh with BeamMe.
Every stage writes its own files into the output directory, so you can check the sampled cloud, the detected rings and each ring's 2D skeleton as you go. The final results are skeleton_points.csv, skeleton_splines.json and stent_features.json, together with interactive HTML views.
2. Simulation (examples/simulation_stent_only.ipynb, examples/simulation_stent_and_balloon.ipynb, examples/simulation_stent_and_artery.ipynb)
Three simulation types are built from the same beam mesh. They differ in what the second body is and in how the stent is loaded:
| type | second body | how the stent is loaded | interaction |
|---|---|---|---|
stent_only |
none | prescribed displacement | self-contact |
stent_balloon |
balloon, solid elements | pressure through contact | beam-to-solid contact |
stent_artery |
test artery | radial point force | meshtying |
Every type follows the same four steps, and each one writes into its own numbered run folder:
build_input() -> check() -> run() -> postprocess()
build_input()meshes the stent, welds its crowns, adds the second body and the boundary conditions, and writes a.4C.yamlthat is validated against 4C's own schema. Alongside it goes arun_parameters.yamlrecording every parameter behind that input, written at build time so a run that later fails is still identifiable.check()reports the beam-to-solid coupling, following Steinbrecher et al. A build that breaks those rules is refused rather than written, because the run would still complete and only the answer would be mesh-dependent.run()solves it in the container. Output goes to the screen and torun.log, and each run locks its own folder so several can be launched at once.postprocess()reads the results back and reduces every load step to the numbers that mean something for a stent: diameter, length, foreshortening, peak strain, recoil, and how close the struts came to yielding.
Long solves belong in a terminal rather than in a notebook cell, so there is a command line for them:
python -m stentfit.run doctor                              # check the toolchain
python -m stentfit.run build  stent_balloon stent01        # write the input
python -m stentfit.run solve  stent_balloon stent01        # solve the newest run
python -m stentfit.run report stent_balloon stent01 run001 # measure that one
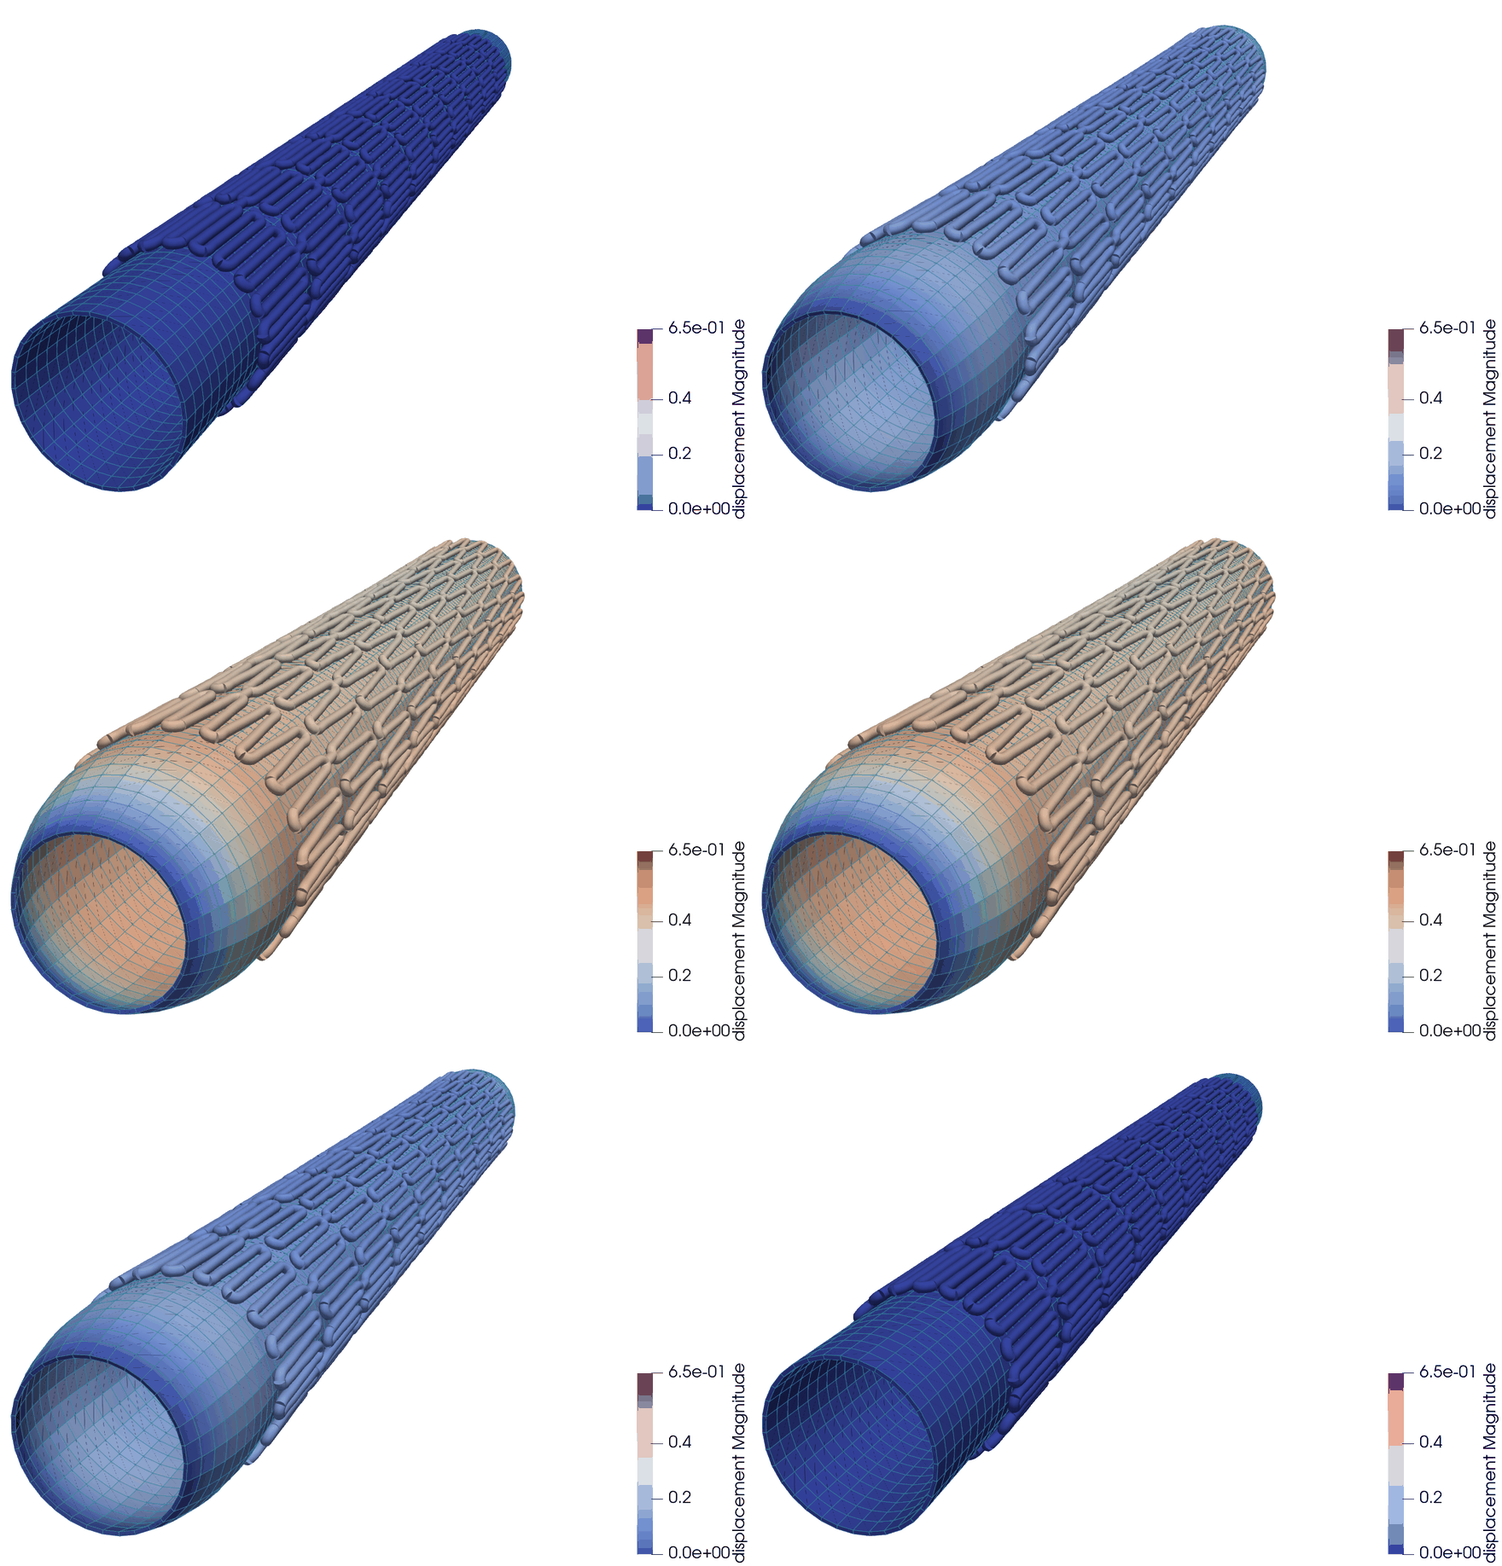
The animation below is a stent_balloon run at 0.6 MPa, over a full inflate-deflate cycle, coloured by displacement magnitude. The balloon opens the stent through contact and both return to their starting shape once the pressure is removed, because these runs use an elastic strut material and an elastic stent cannot keep its new shape.
Tests
Run pytest from the repository root. It checks that the pipeline produces the same results as a reference run and that the results are consistent with the stent design.
The tests are grouped by the question they answer.
1. Did the answer change? (tests/test_reference.py)
The files in tests/reference/stent01/ come from an earlier run that was checked by hand. These tests run the pipeline again and compare. They do not check that the results are correct, only that they are the same as before. If a test in this group fails, either the new results are better than the reference and the reference should be updated, or the code has a bug since it doesn't match the reference anymore.
2. Does the answer make sense? (tests/test_consistency.py)
These check things that must be true for any correct skeleton of any stent:
- The skeleton is a proper graph. Connections go both ways, no point links to itself, and the stored degree matches the real number of neighbours.
randthetaagree withxandy, and no point lies outside the stent wall.- The measured numbers agree with their own definitions, such as
strut_thickness == r_outer - r_inner. - Every fitted curve is a valid B-spline, meaning
knots == control points + degree + 1.
These use no reference file. Deleting tests/reference/ would not change a single one of them.
3. Is it the right stent? (tests/test_design.py)
The stent01 design has 10 rings and 135 struts. Those two numbers live in tests/reference/stent01/design.json and come from inspecting the design, not from the pipeline. They are the only expected values in the suite that do not depend on the code being right.
4. Does the simulation input come out right? (tests/test_simulation.py)
Nothing here solves anything, because 4C runs for hours. What is checked is that every simulation type builds an input 4C's own schema accepts, that the shared rules hold, and that the numbers a solved run is measured with mean what they say:
- Every type builds and validates.
dump(validate=True)is what makes this worth running, since a wrong key fails there instead of being ignored by the solver. - The strut section and the coupling limits agree with values worked out by hand, and each coupling rule fails on its own and names itself.
- The balloon mesh is not inside out, closes without a seam, sits at the radii it was asked for, and its two fibre families are perpendicular.
- Settings round-trip through a record, including one written by an older version, and setting one field does not move another.
- Run folders are claimed atomically and locked, so several terminals can build and solve at once without colliding.
Whether the physics is right is a different question, and that needs solved runs compared against the literature rather than a test suite.
License
stentfit was created by Vural Aktas. It is licensed under the terms of the GNU General Public License v3.0 or later (GPL-3.0-or-later). See LICENSE for the full text.
Releases up to and including v0.1.2 were published under the MIT license and remain available under those terms.
Citation
Author: Vural Aktas, RWTH Aachen University — ORCID 0009-0000-3181-7695
If stentFIT contributes to work you publish, please cite it. GitHub's Cite this repository button (repo sidebar) generates APA and BibTeX entries from CITATION.cff, or use:
@software{aktas_stentfit,
  author  = {Aktas, Vural},
  title   = {{stentFIT}: Semi-Automated Virtual Stent Implantation with
             Mixed-Dimensional Modelling},
  year    = {2026},
  version = {0.2.0},
  url     = {https://github.com/VuralAktas/stentFIT}
}
Contributing
Interested in contributing? Reach out at vural.aktas@rwth-aachen.de.
Credits
The beam meshing and the 4C input files are built with BeamMe, a beam finite element input generator by the BeamMe authors. The artery wall is meshed with GMSH, and the generated input files are meant to be solved with 4C.
stentfit was created with cookiecutter
and the py-pkgs-cookiecutter template.
1 maintainer

Download files
Download the file for your platform. If you're not sure which to choose, learn more about installing packages.
Source Distribution
Built Distribution
Filter files by name, interpreter, ABI, and platform.
If you're not sure about the file name format, learn more about wheel file names.
Copy a direct link to the current filters
File details
Details for the file stentfit-0.2.0.tar.gz.
File metadata
- Download URL: stentfit-0.2.0.tar.gz
- Upload date:
- Size: 171.4 kB
- Tags: Source
- Uploaded using Trusted Publishing? No
- Uploaded via:
poetry/2.4.1 CPython/3.14.5 Darwin/25.5.0
File hashes
| Algorithm | Hash digest | |
|---|---|---|
| SHA256 |
d780d316dd20705986329a3eba6b4d98354af7c3ac9437e88243c8d347ca47da
|
|
| MD5 |
818094caf8bacf15ea11605cd6fae335
|
|
| BLAKE2b-256 |
60609f0114972a4279323d42033b19449235e8d38a128c24caa423b3a2057253
|
File details
Details for the file stentfit-0.2.0-py3-none-any.whl.
File metadata
- Download URL: stentfit-0.2.0-py3-none-any.whl
- Upload date:
- Size: 186.8 kB
- Tags: Python 3
- Uploaded using Trusted Publishing? No
- Uploaded via:
poetry/2.4.1 CPython/3.14.5 Darwin/25.5.0
File hashes
| Algorithm | Hash digest | |
|---|---|---|
| SHA256 |
025c6f085759d0ad8cf43891d1e47defe6cb6223bc8f757b82e8143cd1c03d2f
|
|
| MD5 |
d771750134fd3ba0d152adc9d2ad8eb5
|
|
| BLAKE2b-256 |
00230e37d1e21882f31fdeafc7bc896b0fe5f51359929a6773bfe7425ef318e3
|














