Create and explore isolated tracks from music files

Project description
unmixer - create and explore isolated tracks from music files


unmixer is a graphical utility and Python package for creating isolated tracks
(drums, bass, vocals, etc.) from music files.
unmixer is a frontend for demucs,
an excellent command-line utility for music source separation from the
Meta Research team. The creation of isolated tracks
is handled entirely by demucs; unmixer provides a graphical interface for
viewing, playing, and exporting the isolated tracks in any combination.
Installation
The easiest way to install the package is to download it from PyPI using pip.
Note that unmixer depends on Python 3.11 or newer; please
ensure that you have a recent version of Python installed before proceeding.
Run the following command in a shell (Linux or macOS is assumed):
$ pip install --upgrade unmixer
The package does depend on a few external Python packages available on PyPI. If you wish to sandbox your installation inside a virtual environment, you may choose to use virtualenvwrapper or a similar utility to do so.
When successfully installed, a program called unmixer will be placed on your PATH. See the
Usage section below for details about how to use this program.
Dependencies
- The utility expects
ffmpegto be installed for mixing isolated tracks. See the project's Downloads page for instructions on downloading and installingffmpeg.
Usage
The unmixer program is a graphical utility for exploring isolated tracks extracted
from a music file.
At any time, you can use the -h or --help flags to see a summary of options that
the program accepts.
$ unmixer -h
usage: unmixer [-h] [music_file_or_track_dir]

create and explore isolated tracks from music files

positional arguments:
  music_file_or_track_dir
                        path to the file to unmix, or path to a directory containing isolated tracks

options:
-h, --help            show this help message and exit
Creating Isolated Tracks
To create isolated tracks for a specific song, pass the path to the song to unmixer.
For example:
$ unmixer /path/to/Limelight.mp3
When invoked with no arguments, unmixer will open a Song Importer window containing
a button labeled Explore isolated tracks... and another button labeled Choose a song...
(see the screenshot below). The Song Importer window may also be opened at any time using
the keyboard shortcut Ctrl+0 (Cmd+0 on macOS).
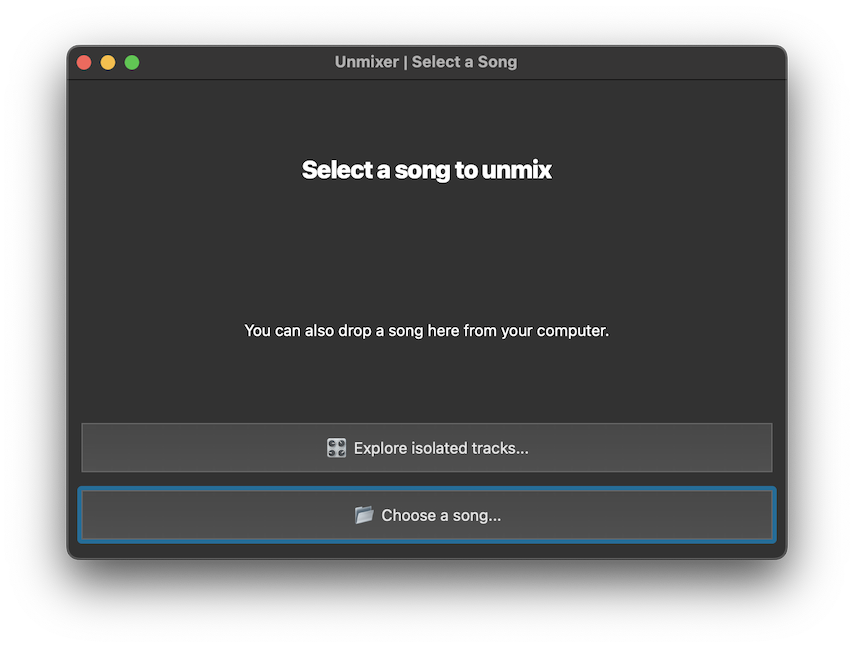
Press the Choose a song... button and select a music file that you want to create
isolated tracks from. Alternatively, you may drag a music file from elsewhere on your computer
and drop it on the Song Importer window. When a song has been selected, the interface will
change to reflect that the song is ready to be processed (see the screenshot below).
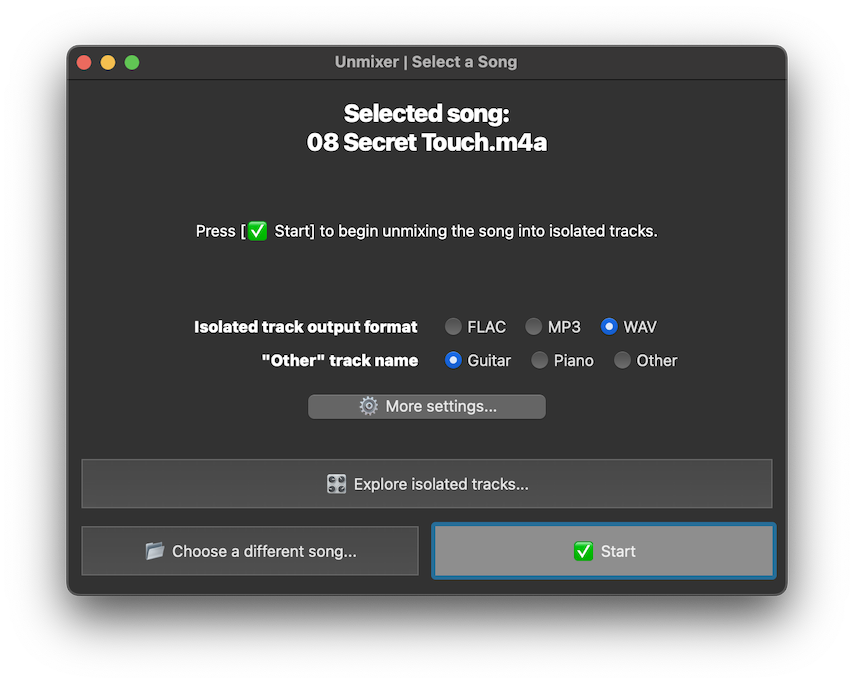
Use the radio buttons to set the desired output format for the isolated tracks (MP3 or WAV)
and the name of the "other" track (see Customizing the "Other" Track Name, below). Press
More settings... to customize additional settings such as the output directory, prediction
model, and so on.
If you selected the wrong song by mistake, press Choose a different song... to select a
different file. When you are ready to unmix the song into isolated tracks, press the Start
button at the bottom right of the Song Importer window. The interface will change to reflect
that the song is being processed (see the screenshot below).
Once processing has started, the Start button will change to a Cancel button; use this
button to abandon processing of the song.
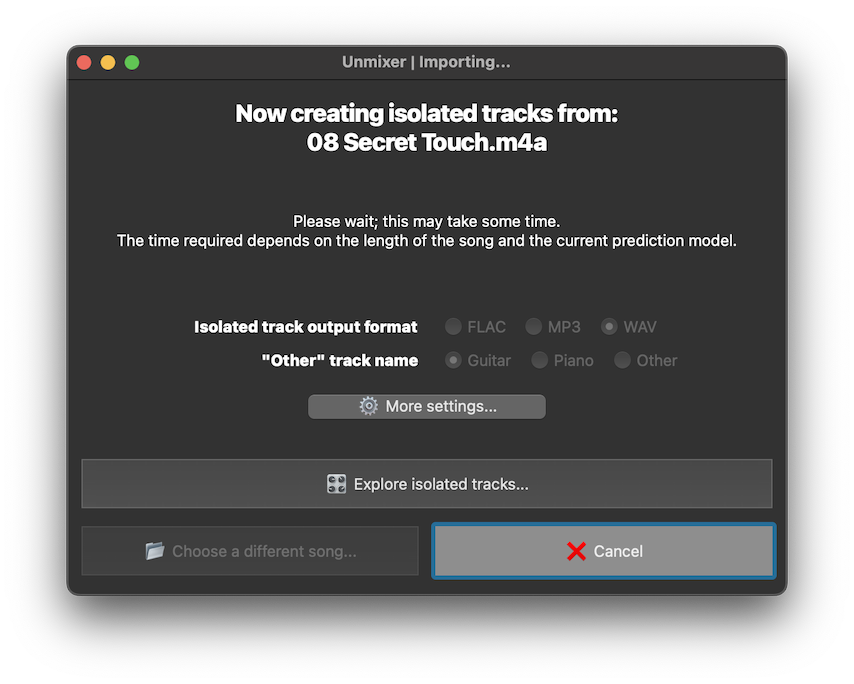
Please be patient during the process of creating the isolated tracks, as it will take some time to complete! The time required largely depends on the length of the source song, the selected prediction model, and other factors such as whether your device supports GPU acceleration or the configured parallelism. As a baseline, with no GPU acceleration and a single CPU process, it typically takes about as long as the source song itself (or a bit longer) to create the isolated tracks for a song. For example, if a song is 5 minutes long, it will likely take roughly 5 minutes to create isolated tracks for that song.
NOTE: Although unmixer does not display a progress bar in its graphical interface
showing the status of processing the song, the progress will be shown in the process's
standard output (assuming the standard output is not redirected to a file). Check the
shell or terminal from which you launched the unmixer UI to get a better approximation
of how long it will take to process the song. A visual progress bar may be added in
a future version.
Output Format
By default, isolated tracks are created as WAV files for the highest quality. To create FLAC or MP3 files instead, use the Isolated track output format radio buttons in the Song Importer window to select the desired format.
NOTE: Mixes exported using the Track Explorer (see below) will use the same format as the source isolated track files.
NOTE: If you selected an output format other than WAV, replace the .wav file extension
in the following sections with the appropriate extension (.flac or .mp3).
Output Tracks
The following isolated tracks are created by default:
bass.wavdrums.wavother.wavvocals.wav
These are the sources that are supported by demucs; unfortunately, there is currently
no specific source available for guitar, piano, or any others besides bass, drums, and
vocals. Any part of the song's audio that is not identified as bass, drums, or vocals
will be found in the other.wav file.
NOTE: demucs does include one pre-trained model, htdemucs_6s, which includes guitar
and piano as additional sources. This model is still in an experimental stage and does not
perform reliably at separating all sources.
Customizing the "Other" Track Name
In some cases, the isolated track other.wav may contain primarily a single instrument,
such as a guitar or piano. In these cases, it may be useful for the resulting output track
to have a corresponding name such as guitar.wav or piano.wav instead of the
default other.wav.
To change the name of the "other" track to guitar.wav or piano.wav, use the
"Other" track name radio buttons in the Song Importer window to select the desired name.
It is not currently possible to customize the name of the "other" track to be any arbitrary name,
although this feature may be added in a future version.
Output Directory
By default, unmixer creates isolated tracks in subdirectories of the directory ~/unmixer.
Each song's isolated tracks will be placed in a new subdirectory of the output directory
named based on the selected prediction model and the song's filename. For example, isolated tracks
for a song named Subdivisions.mp3 created using the model htdemucs would be placed in the
directory ~/unmixer/htdemucs/Subdivisions by default (note that the subdirectory does not include
the .mp3 file extension).
NOTE: Creating isolated tracks for multiple songs with the same filename using the same model will result in any previous songs' isolated tracks being overwritten! If you need to process multiple distinct songs with the same filename, be sure to rename the created directories (or rename the song files themselves) to avoid conflicts!
To customize the output directory for isolated tracks, press More settings... in the Song
Importer window and adjust the Output directory setting in the Unmixer Preferences window
that opens. You may also enable or disable creation of a subdirectory named for the selected
prediction model. A subdirectory of the selected output directory will be created for each
song's isolated tracks, as described above.
Other Settings
To see all customizable settings, press More settings... in the Song Importer window after
selecting a song. The Unmixer Preferences window will appear (see the screenshot below).
Hover over each setting's label to see a description of that setting in the status bar at
the bottom of the Unmixer Preferences window. See the
demucs docs for
details about settings such as clip mode, segmentation of input songs, and so on.
Changes made to the settings are saved automatically; however, changes made to settings while
a song is being processed will not take effect until the next time a song is imported. Press
Restore Defaults at the bottom of the Unmixer Preferences window to revert all settings
to their default values.
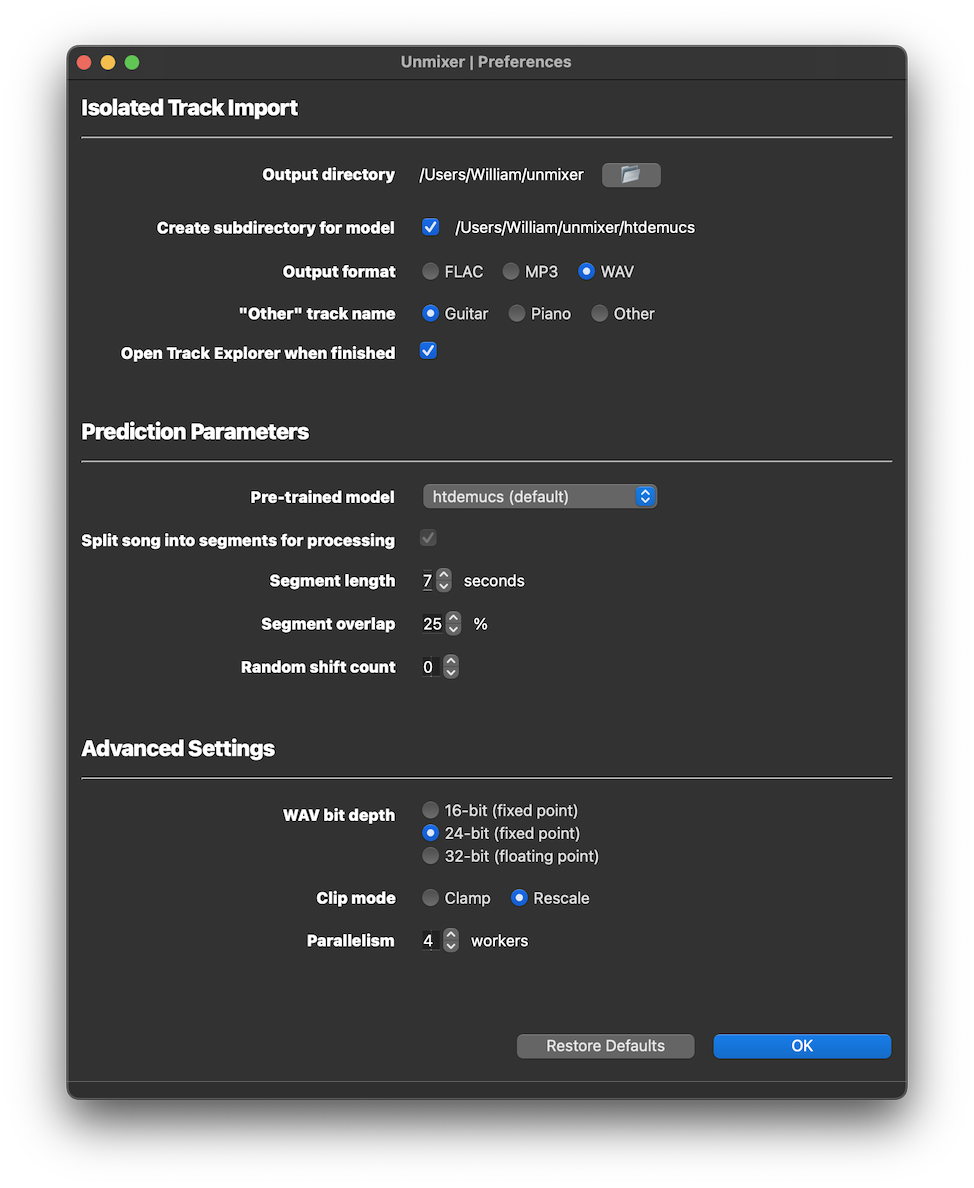
NOTE: Some settings may not be available or have limited configurability depending on the
selected prediction model. For example, the htdemucs family of models has a maximum segment
length of 7.8 seconds, so unmixer requires that songs processed using this model be split into
segments with a maximum segment length of no more than 7 seconds (since demucs accepts the
segment length as an integer). Similarly, unmixer does not allow customizing the "other"
track name when using the htdemucs_6s model because this model already includes guitar and piano
as distinct sources.
Exploring Isolated Tracks
To explore isolated tracks located in a specific directory, pass the path to the directory to
unmixer. For example:
$ unmixer ~/unmixer/YYZ
Alternatively, press the Explore isolated tracks... button in the Song Importer window
(see above) and select a directory containing isolated tracks. You may also drop a directory
containing isolated tracks onto the Song Importer window to open a Track Explorer window for
that directory.
NOTE: If you used unmixer to create isolated tracks for a song, the Track Explorer window
will open automatically when the song is finished processing, unless you disabled that setting.
(Again...please be patient!)
The Track Explorer window displays the name of the song at the top, a set of playback controls at the bottom, and a waveform and a set of controls for each isolated track found in the input directory (see the screenshot below).
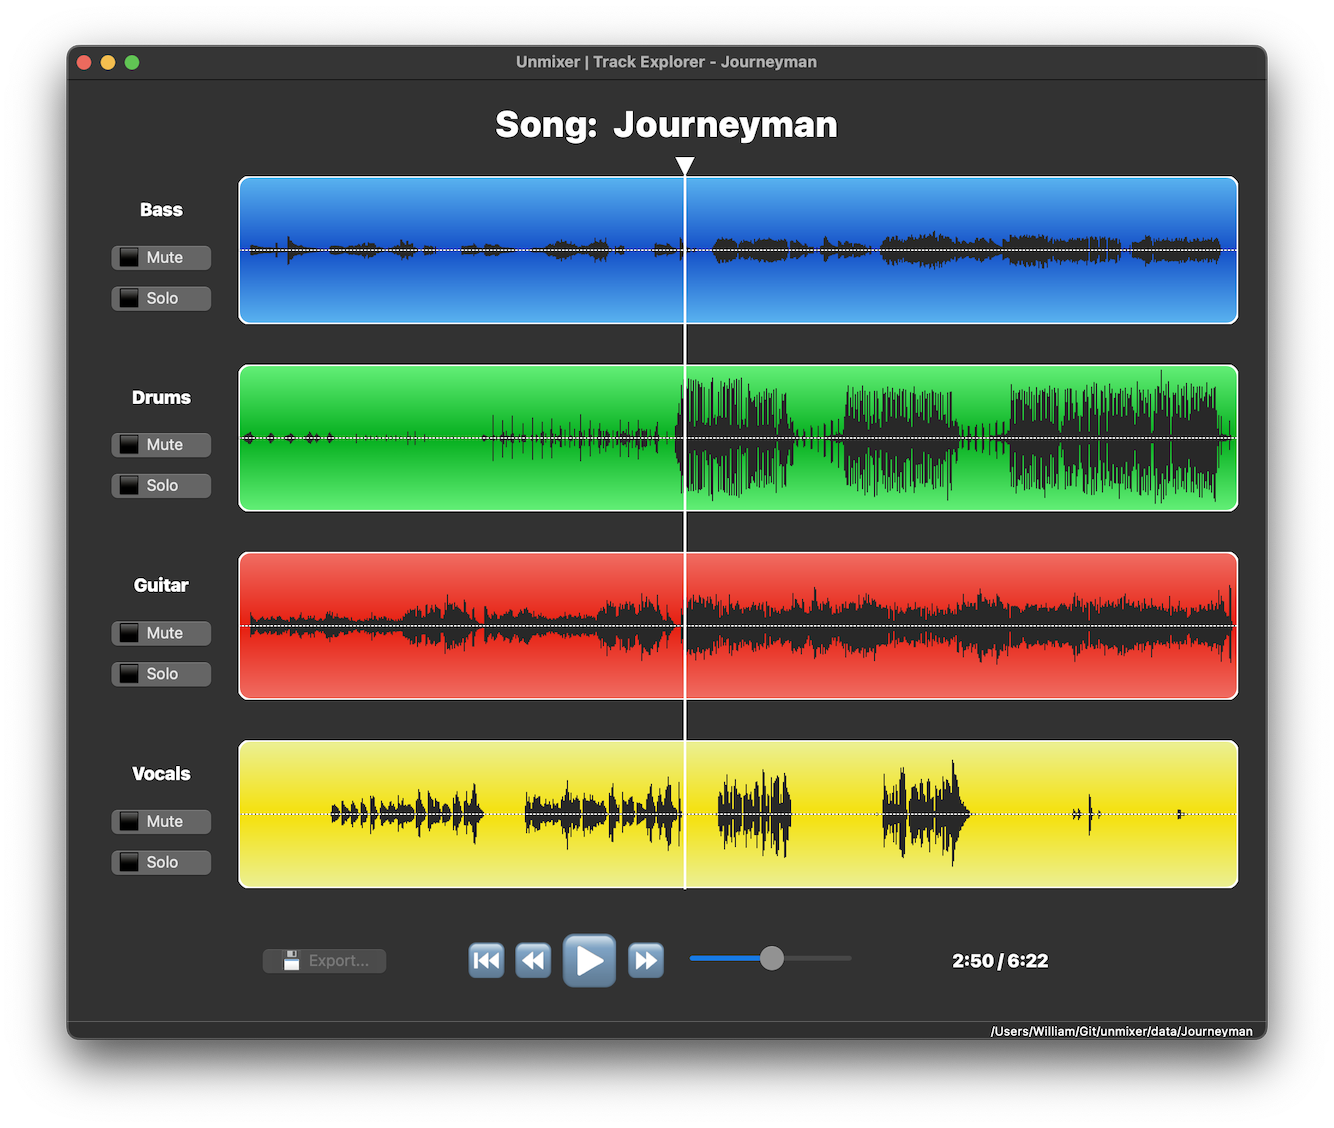
Playback Controls
Use the ▶️ (Play) / ⏸️ (Pause) button found in the playback controls at the bottom of the Track Explorer window (or press the Space bar) to control playback of the currently selected track(s). Press the ⏮️ (Restart) button to start playback at the beginning of the song. Press the ⏪️ (Skip Back) button to skip back one second at a time; press and hold the button to repeatedly skip back until the button is released. Press the ⏩️ (Skip Forward) button to skip forward one second at a time; press and hold the button to repeatedly skip forward until the button is released. The left and right arrow keys may also be used to skip back and forward, respectively.
Use the volume slider to the right of the playback controls to adjust the playback volume of the
currently selected tracks. Alternatively, the keyboard shortcuts Ctrl+Up and Ctrl+Down
(Cmd+Up and Cmd+Down on macOS) may be used to raise and lower the volume, respectively.
Note that the underlying isolated track files themselves are NOT modified. unmixer does not
currently provide a way to adjust the relative volume levels of the various isolated tracks in the
overall mix, although this feature may be added in a future version.
When the song is playing, you can drag the triangular playhead (displayed above the very topmost track, with a white line extending down over all of the waveforms) to skip to a specific part of the song. Dragging the playhead while the song is paused is not currently supported.
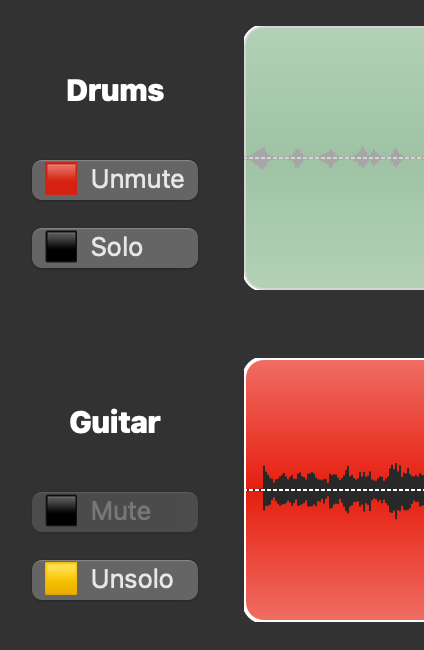
Track Controls
Each track has its own Mute button and Solo button displayed to the left of the track's
waveform. Use a track's Mute button to remove that track from the mix you hear when playing
the song. Inversely, use a track's Solo button to hear only that track when playing
the song. As the name implies, only one track may have the Solo button active at a time.
A track may not be both soloed and muted at the same time; soloing a muted track will unmute
the track automatically. Playback will pause automatically if all tracks are muted at the
same time.
Exporting a Custom Mix
Use the Export... button found in the playback controls at the bottom of the Track Explorer
to export the currently selected (i.e., unmuted) tracks as a new file. A dialog box will open,
allowing you to select a destination for the file and press Save. For example, to create an
instrumental mix of a song, mute the Vocals track and export the remaining tracks as a new mix.
NOTE: Exporting is disabled when only a single track is selected, since that single track is already a self-contained file that does not need to be re-exported. Similarly, exporting is also disabled when all tracks are selected, since the resulting mix is the same as the original song file that produced the isolated tracks in the first place.
If you export custom mixes in the same directory where the isolated tracks are located, the
custom mixes will also be loaded if you reopen the same directory using unmixer in the future.
If you want to avoid this, save any custom mixes to a different directory, such as a remixes
subdirectory of the directory where the isolated tracks are located.


Download files
Download the file for your platform. If you're not sure which to choose, learn more about installing packages.


