v(irtual)MCP - Extend, Compose, Customize MCP servers


Project description
vMCP - Virtual Model Context Protocol


An open-source tool for aggregating, extending and managing multiple MCP servers with a unified interface.
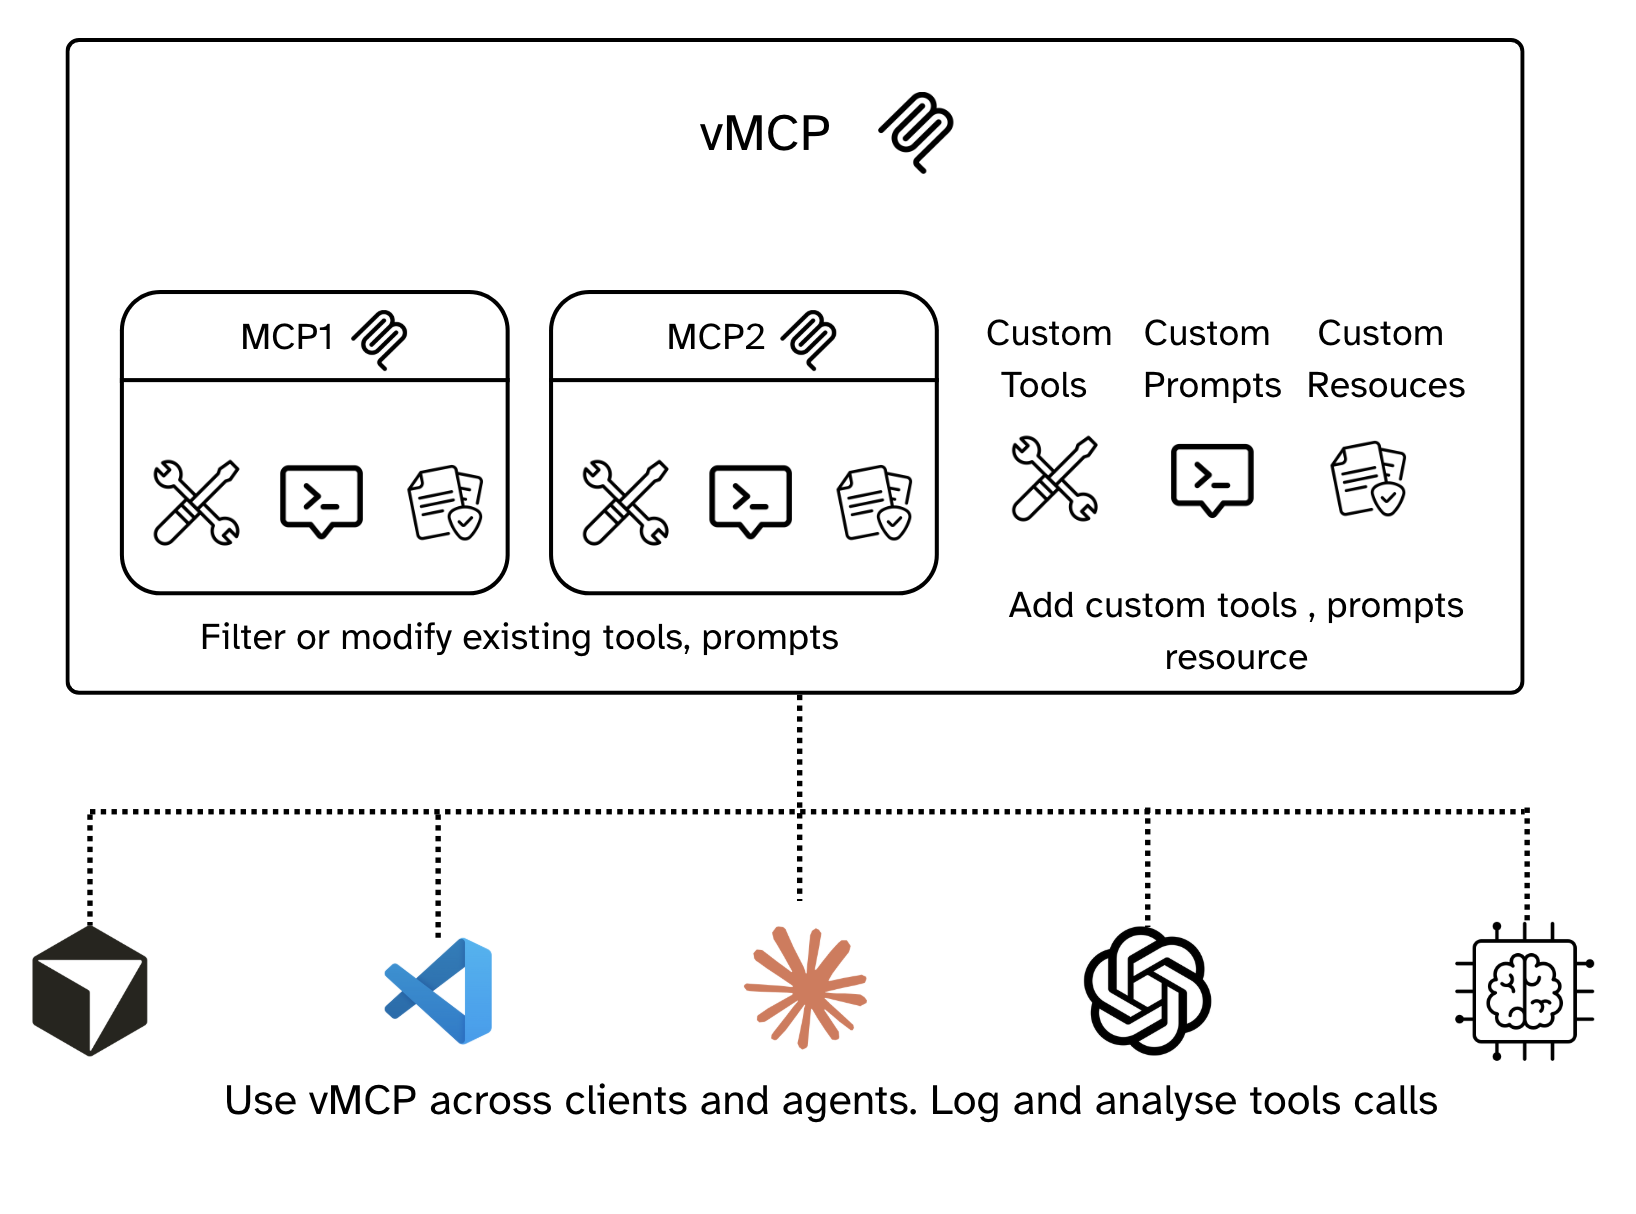
vMCP (virtual Model Context Protocol) is an AI configuration and management platform built on top of the Model Context Protocol. Lego blocks for AI workflows and agents - allowing you to compose, customize and extend multiple MCPs into powerful, reusable (virtual) MCPs. Connect vMCPs to your AI clients (Claude, Chatgpt, VSCode) or to your agents built with any SDK and get the power of vMCPs.
vMCP is both
- a specification that builds on and extends MCPs vMCP.json
- a platform to create and deploy vMCPs
Why We Built This
The Model Context Protocol has unlocked incredible possibilities for AI integrations, but users and developers quickly hit limitations:
- Configuration Hell: Managing MCP configs across multiple clients (Claude, ChatGPT, VSCode, Cursor, Gemini) is tedious
- Auth: Each mcp client needs its own auth for all the MCPs. vMCPs gives a standard auth for all MCPs
- Lack of Customization: Can't modify or extend existing MCPs for specific workflow needs
- No Composition: Building complex workflows requires piecing together multiple tools manually in code
vMCP solves these problems by providing a layer of abstraction and a no-code configuration interface on top of MCPs.
Highlight Features
- ✅ Flexible vMCP Creation: Compose different MCP servers into a unified MCP server with a no-code interface.
- 𝌞 Context Engineering with MCPs:
- 🛠️ Customizable Tools: Select and override tool names/descriptions and prefill tool arguments.
- ✨ Extensible Tooling: Create new tools using Python, REST APIs or plain text.
- 🗣️ Programmable Prompts: Define prompts that can invoke other tools and resources, enabling user-controlled tool chaining.
- 🔗 Add files as resources: Add
- 🔐 MCP Server Authentication: OAuth 2.0 support for MCP servers that require it
- 📊 Usage Statistics: Track and analyze vMCP usage patterns
- 🐳 Docker Ready: Official Docker images for easy deployment
🚀 Quickstart
Prerequisites
vMCP requires Python 3.10 to 3.13 and uv.
Installation
To install vMCP, run:
Option 1: Using uvx (Recommended)
uvx --from 1xn-vmcp vmcp run
Or using uv
Option 2: Using pip
pip install 1xn-vmcp
vmcp run
Option 3: Using Docker
docker pull onexn/vmcp:latest
docker run -it onexn/vmcp:latest vmcp run
This will start the vMCP server on http://localhost:8000.
🛠️ Development
Project Structure
vmcp/
├── src/vmcp/              # Main package
│   ├── backend/           # FastAPI backend
│   │   ├── mcps/          # MCP server management
│   │   ├── vmcps/         # Virtual MCP management
│   │   ├── storage/       # Database models
│   │   ├── proxy_server/  # Main app
│   │   └── utilities/     # Logging & tracing
│   └── cli/               # CLI commands
├── frontend/              # React frontend (Vite)
Setup Development Environment
# Clone the repository
git clone https://github.com/1xn-labs/1xn-vmcp
make build-frontend
make run
📊 Usage Examples
Creating a vMCP
This guide walks you through the process of creating and managing virtual MCP servers with vMCP. Follow these steps to get started with aggregating multiple MCP servers into a unified interface.
Step 1: Access the vMCP Home Page
After starting vMCP with vmcp run, navigate to http://localhost:8000 in your browser. The vMCP home page provides a centralized dashboard where you can manage your virtual MCP configurations
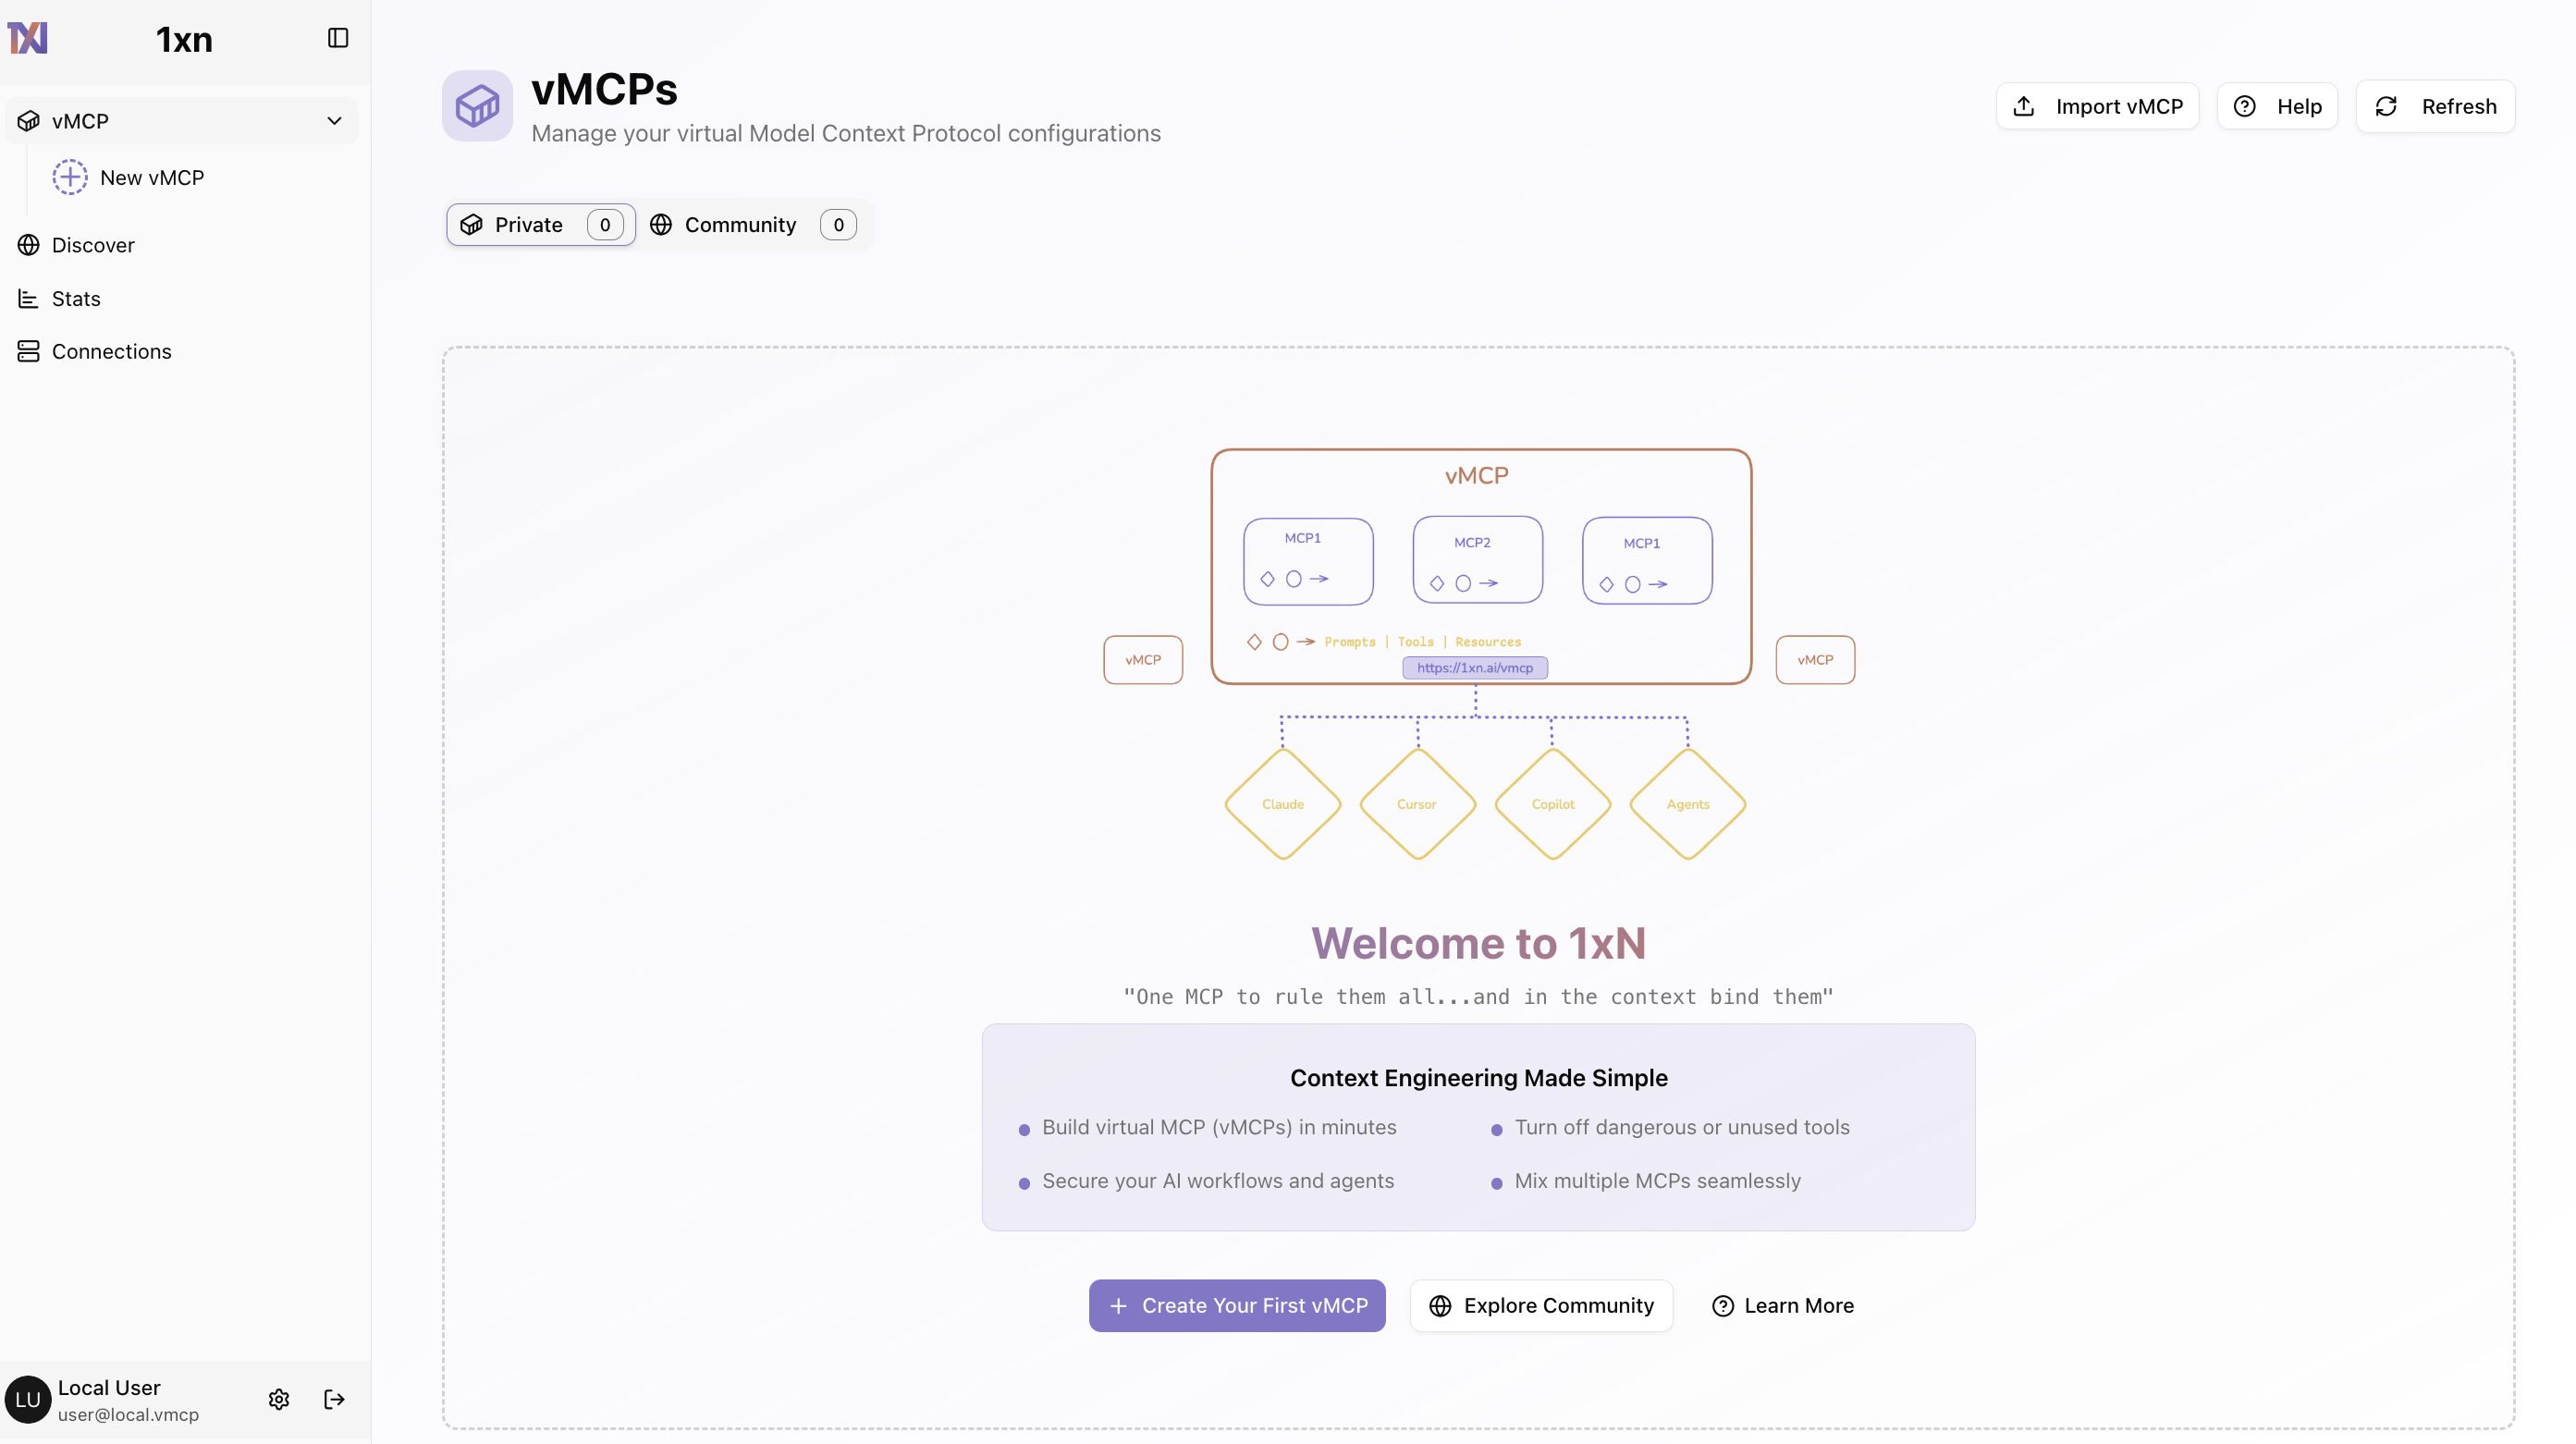
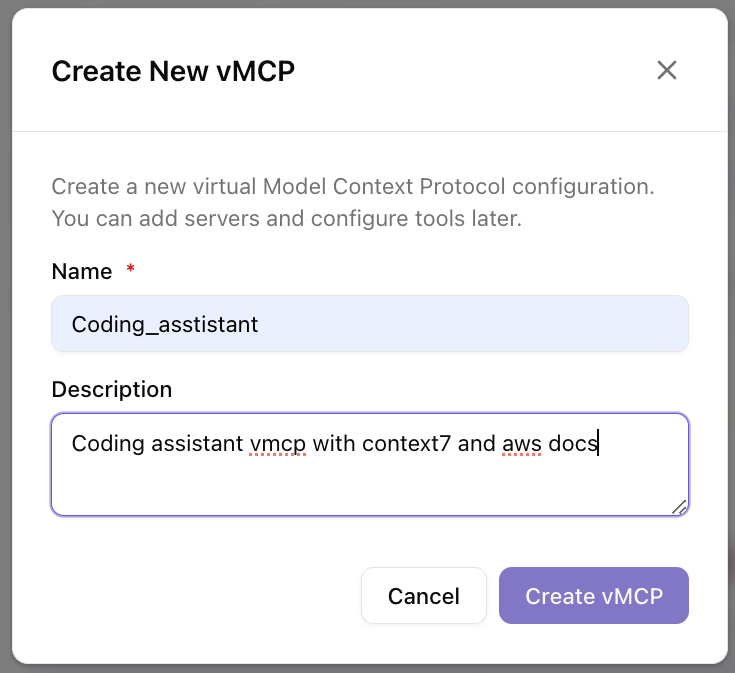
Step 2: Create a New vMCP
Click the "+ Create Your First vMCP" button to start building your virtual MCP. In the creation dialog, provide a name and description for your vMCP. A vMCP allows you to combine tools, resources, and prompts from multiple MCP servers into a single unified endpoint. You can add servers and configure tools later, so start with a descriptive name like "Coding_assistant" for a development-focused vMCP.
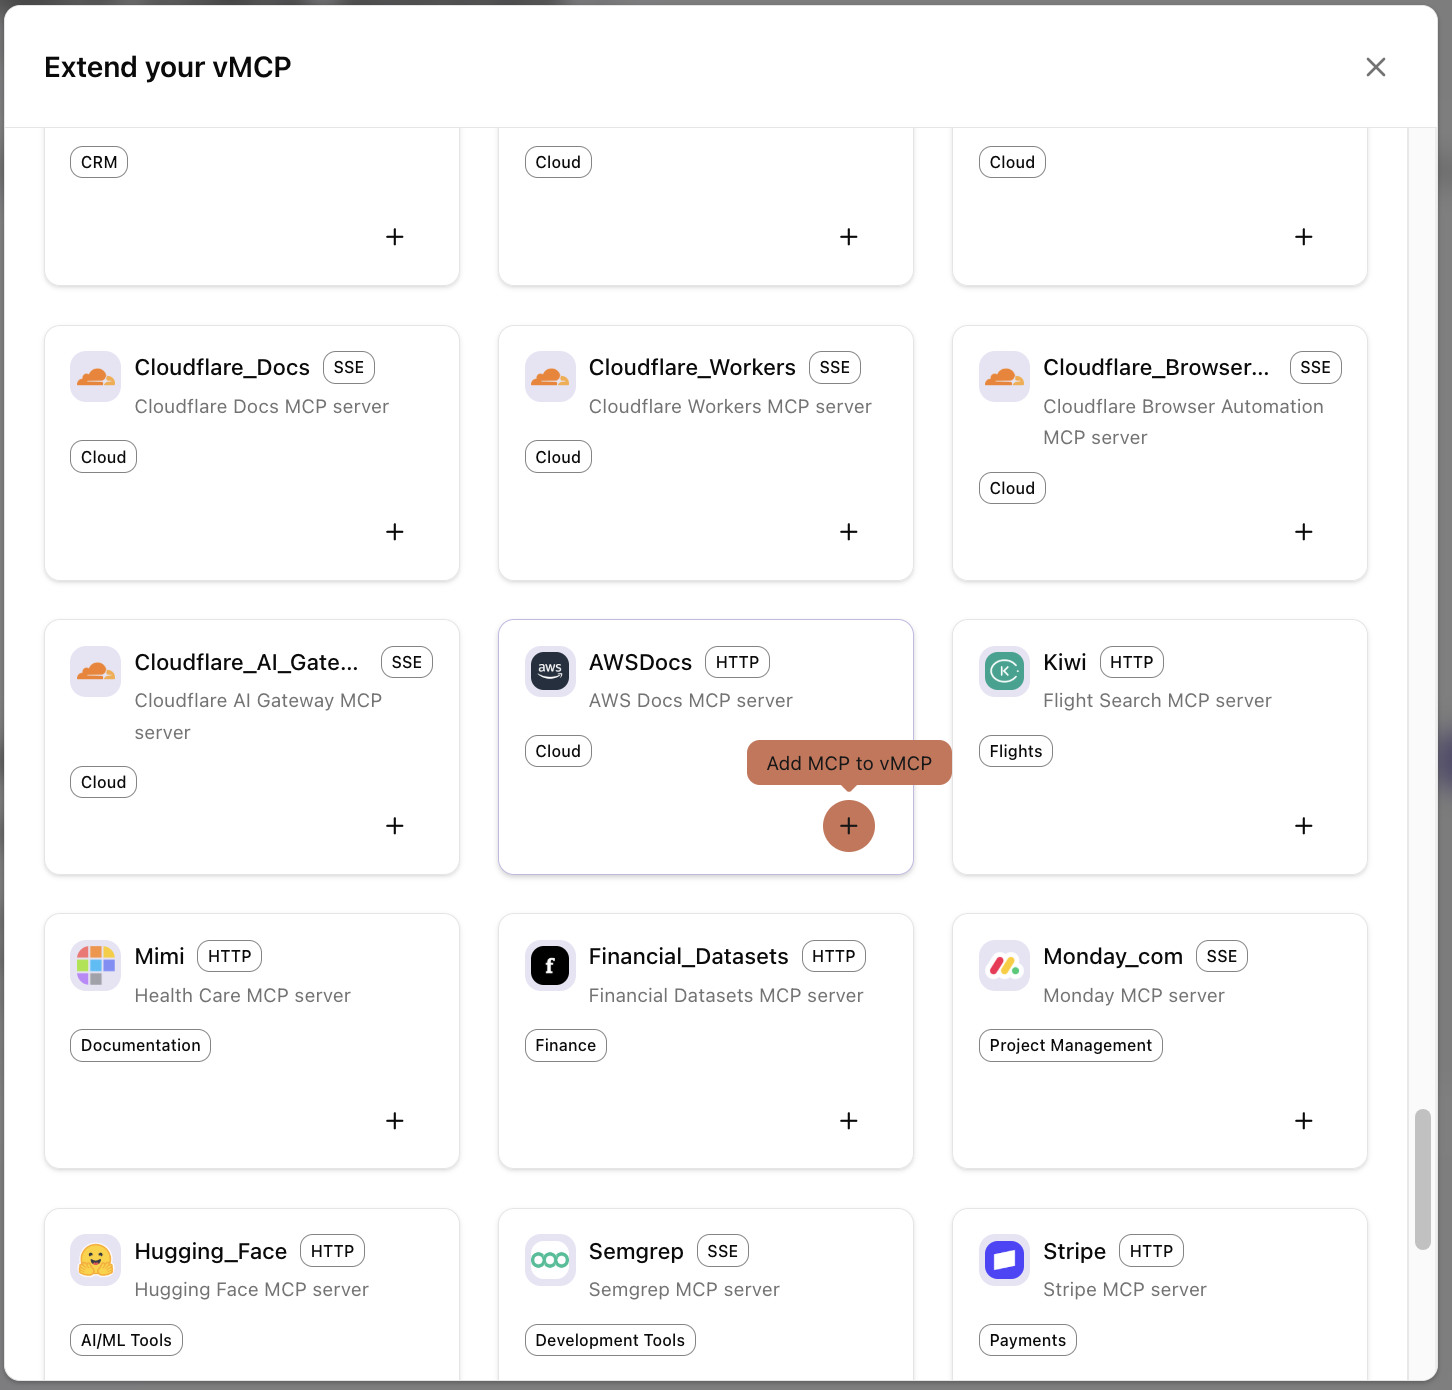
Step 3: Extend Your vMCP with MCP Servers
After creating your vMCP, you'll see the "Add MCP Connector" button which displays a grid of well known remote mcp servers. You can browse and add the servers to Vmcp
Step 4: Add a Custom Server
If you need to connect to a custom MCP server that's not in the community library, click "Add Custom Server" or use the custom server option. In the dialog, provide the server name, select the transport type (HTTP, SSE), enter the server URL, and optionally add environment variables and headers. This allows you to connect to any MCP-compatible server, including your own custom implementations.

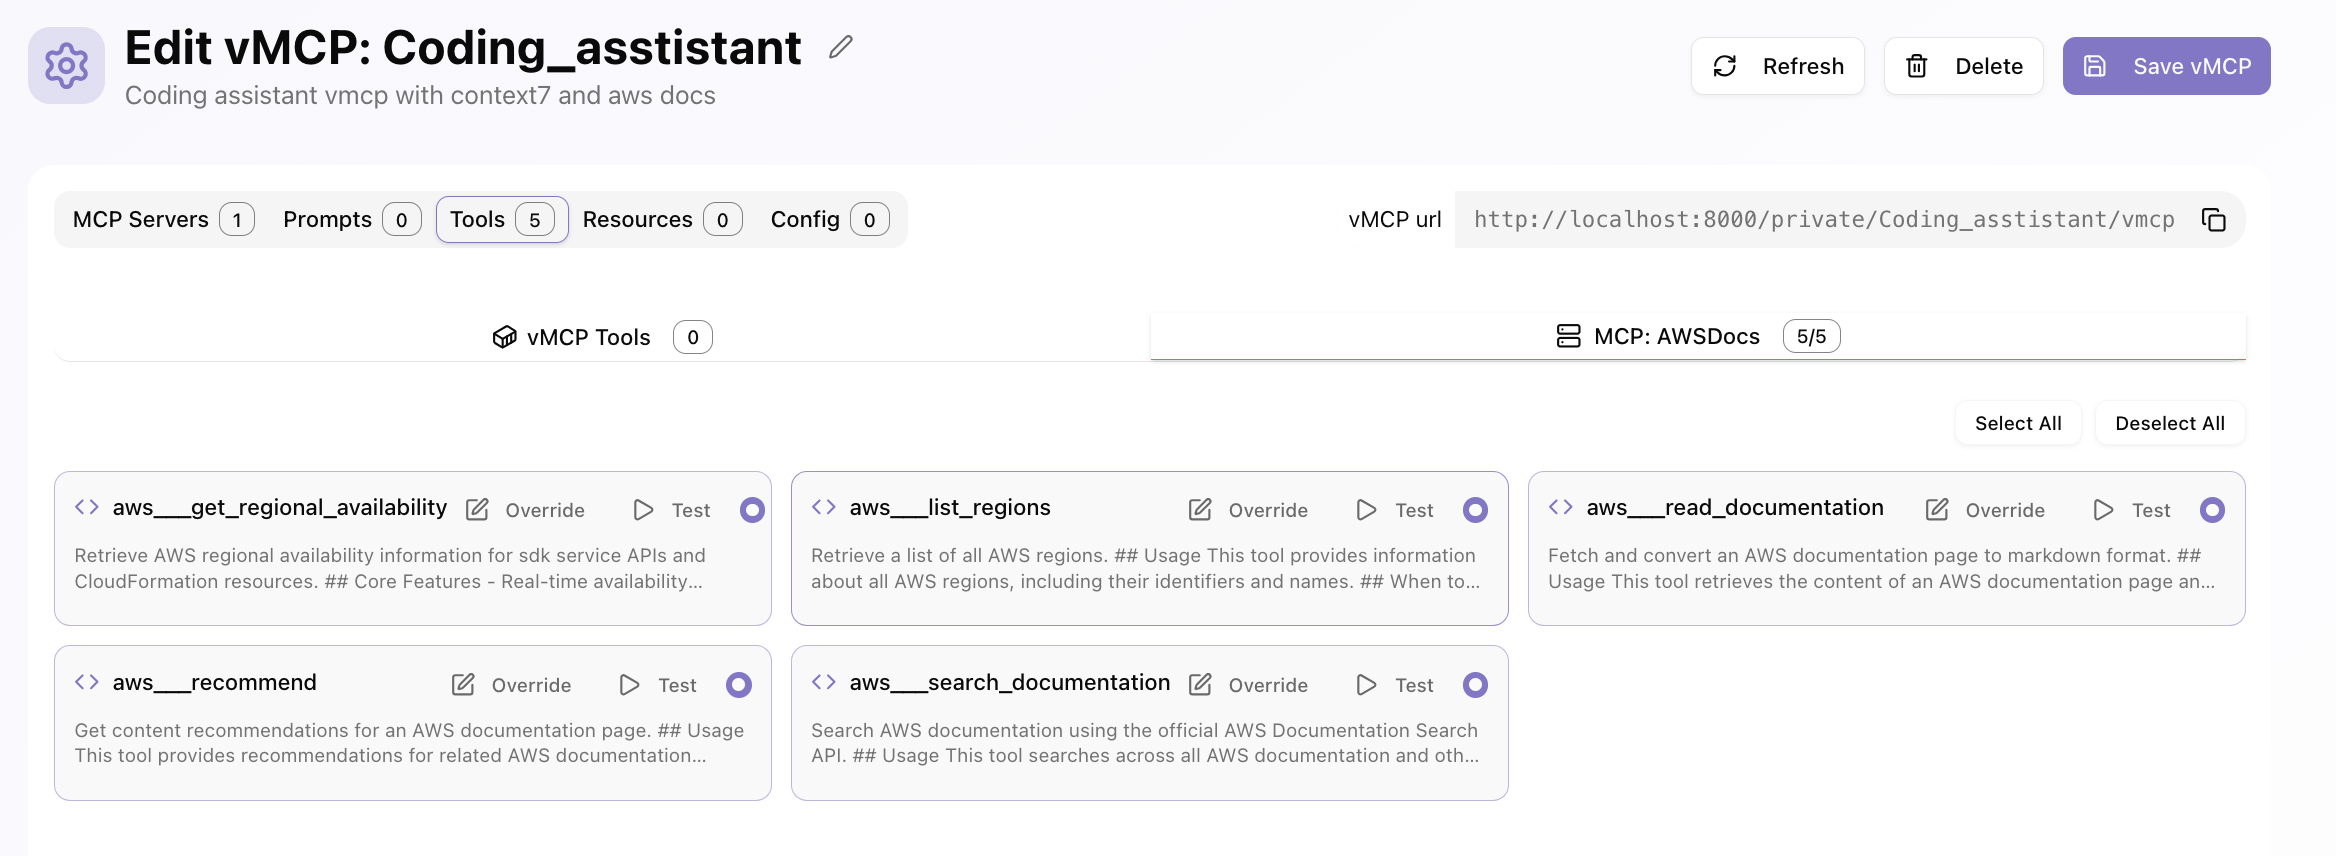
Step 5: Filter and Edit Existing Tools
Once MCP servers are added to your vMCP, navigate to the "Tools" tab in the vMCP editor. Here you can view all available tools from your connected MCP servers. Use the search and filter options to find specific tools, enable or disable them, and override tool names and descriptions. You can also test individual tools or select/deselect all tools from a specific MCP server at once.
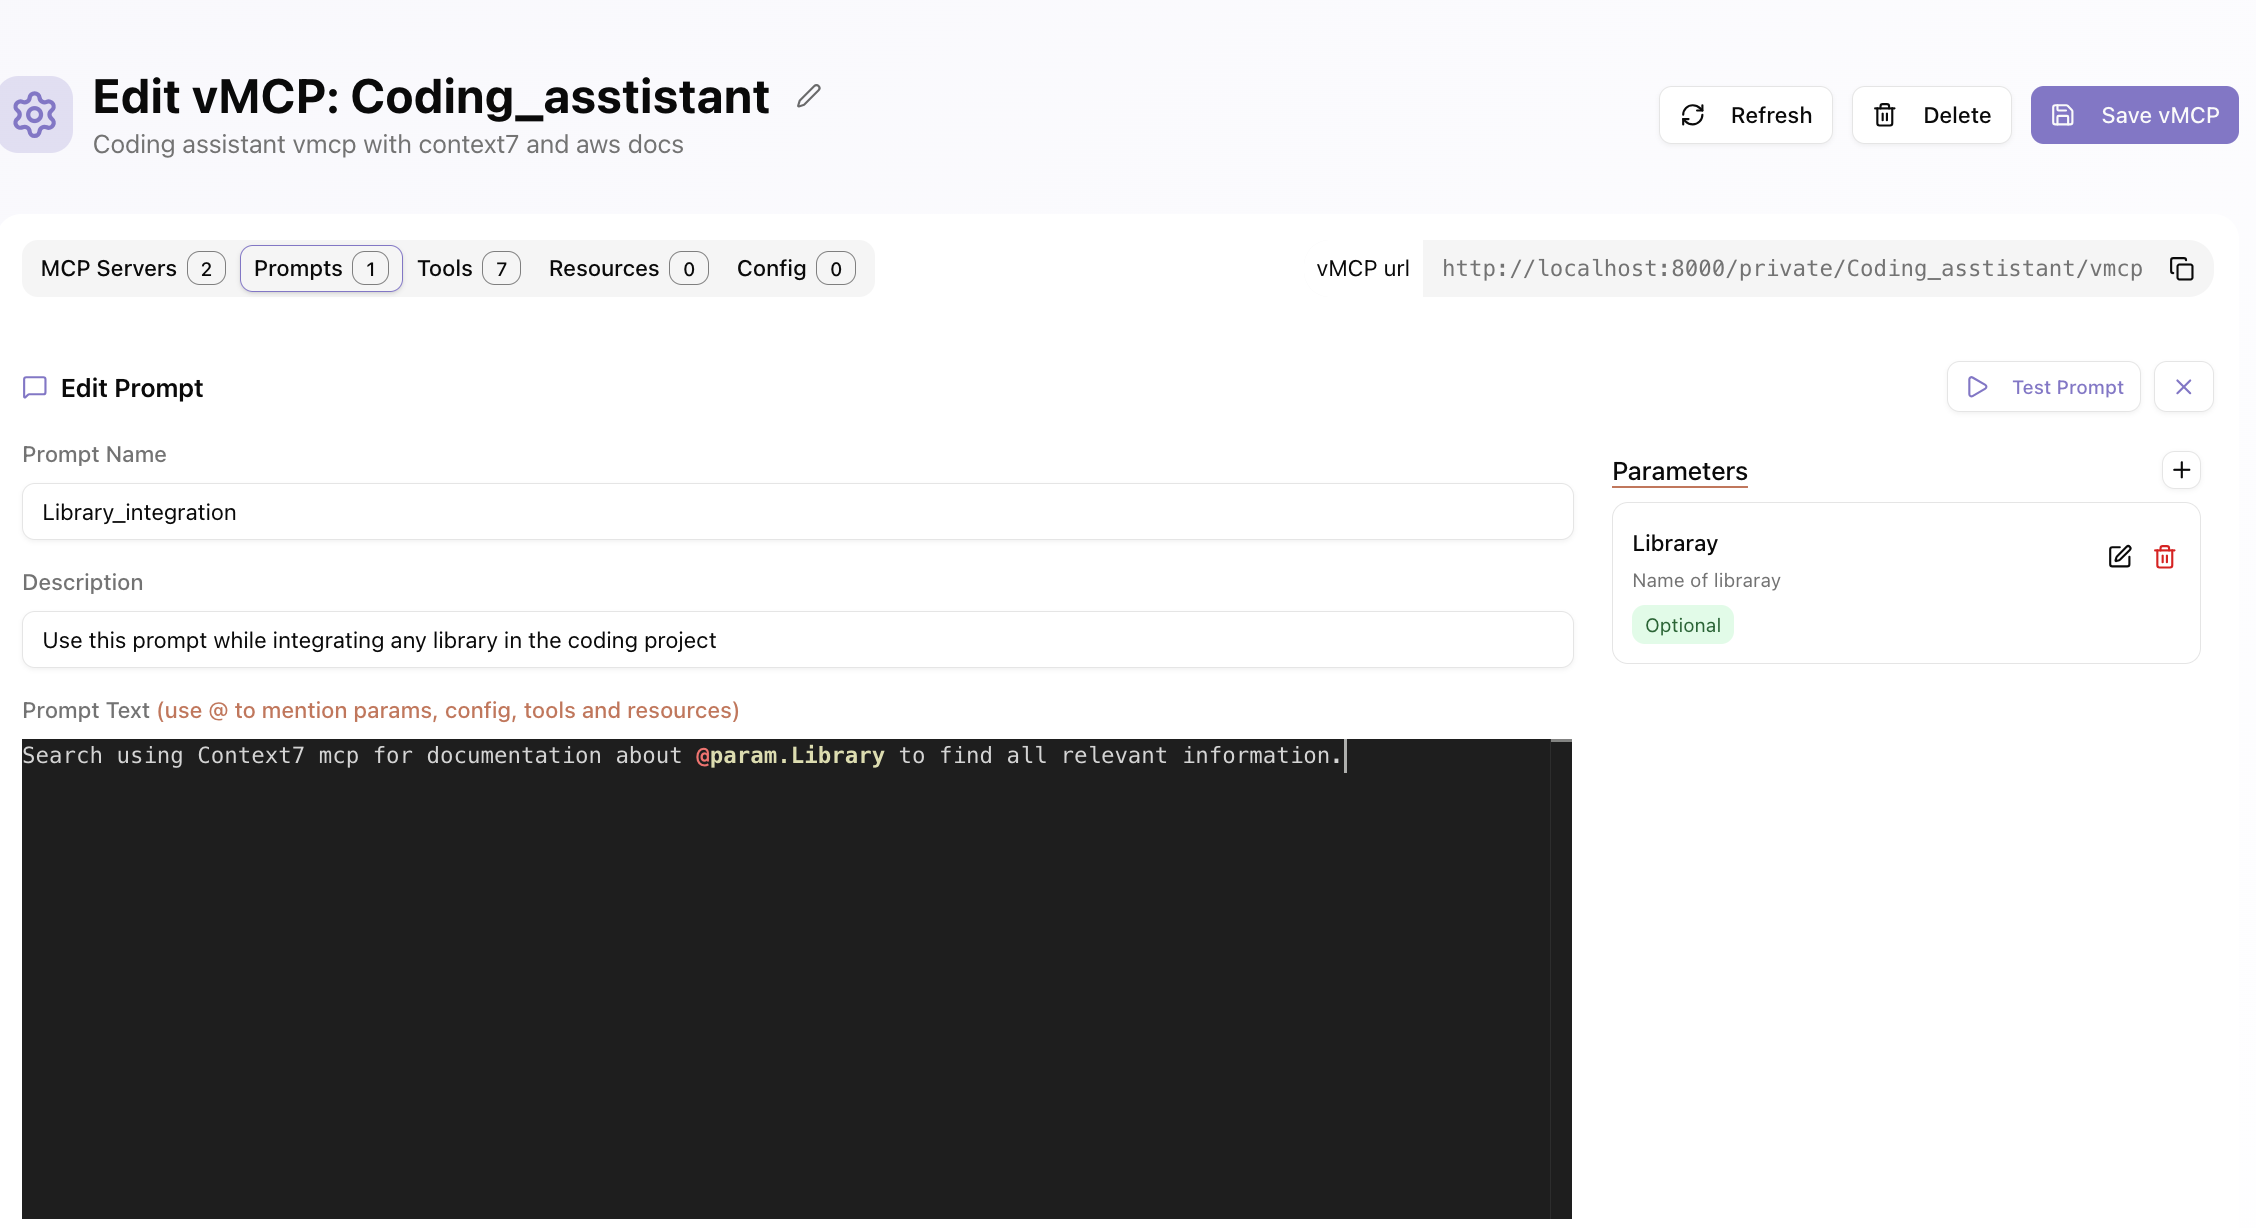
Step 6: Add Custom Tools and Prompts
In addition to tools from MCP servers, you can create custom tools and prompts directly in your vMCP. Navigate to the "Prompts" tab to create programmable prompts that can invoke other tools, enabling user-controlled tool chaining. You can define prompt parameters, descriptions, and use the @ syntax to mention params, config, tools, and resources. Similarly, you can create custom tools using Python snippets or REST APIs.
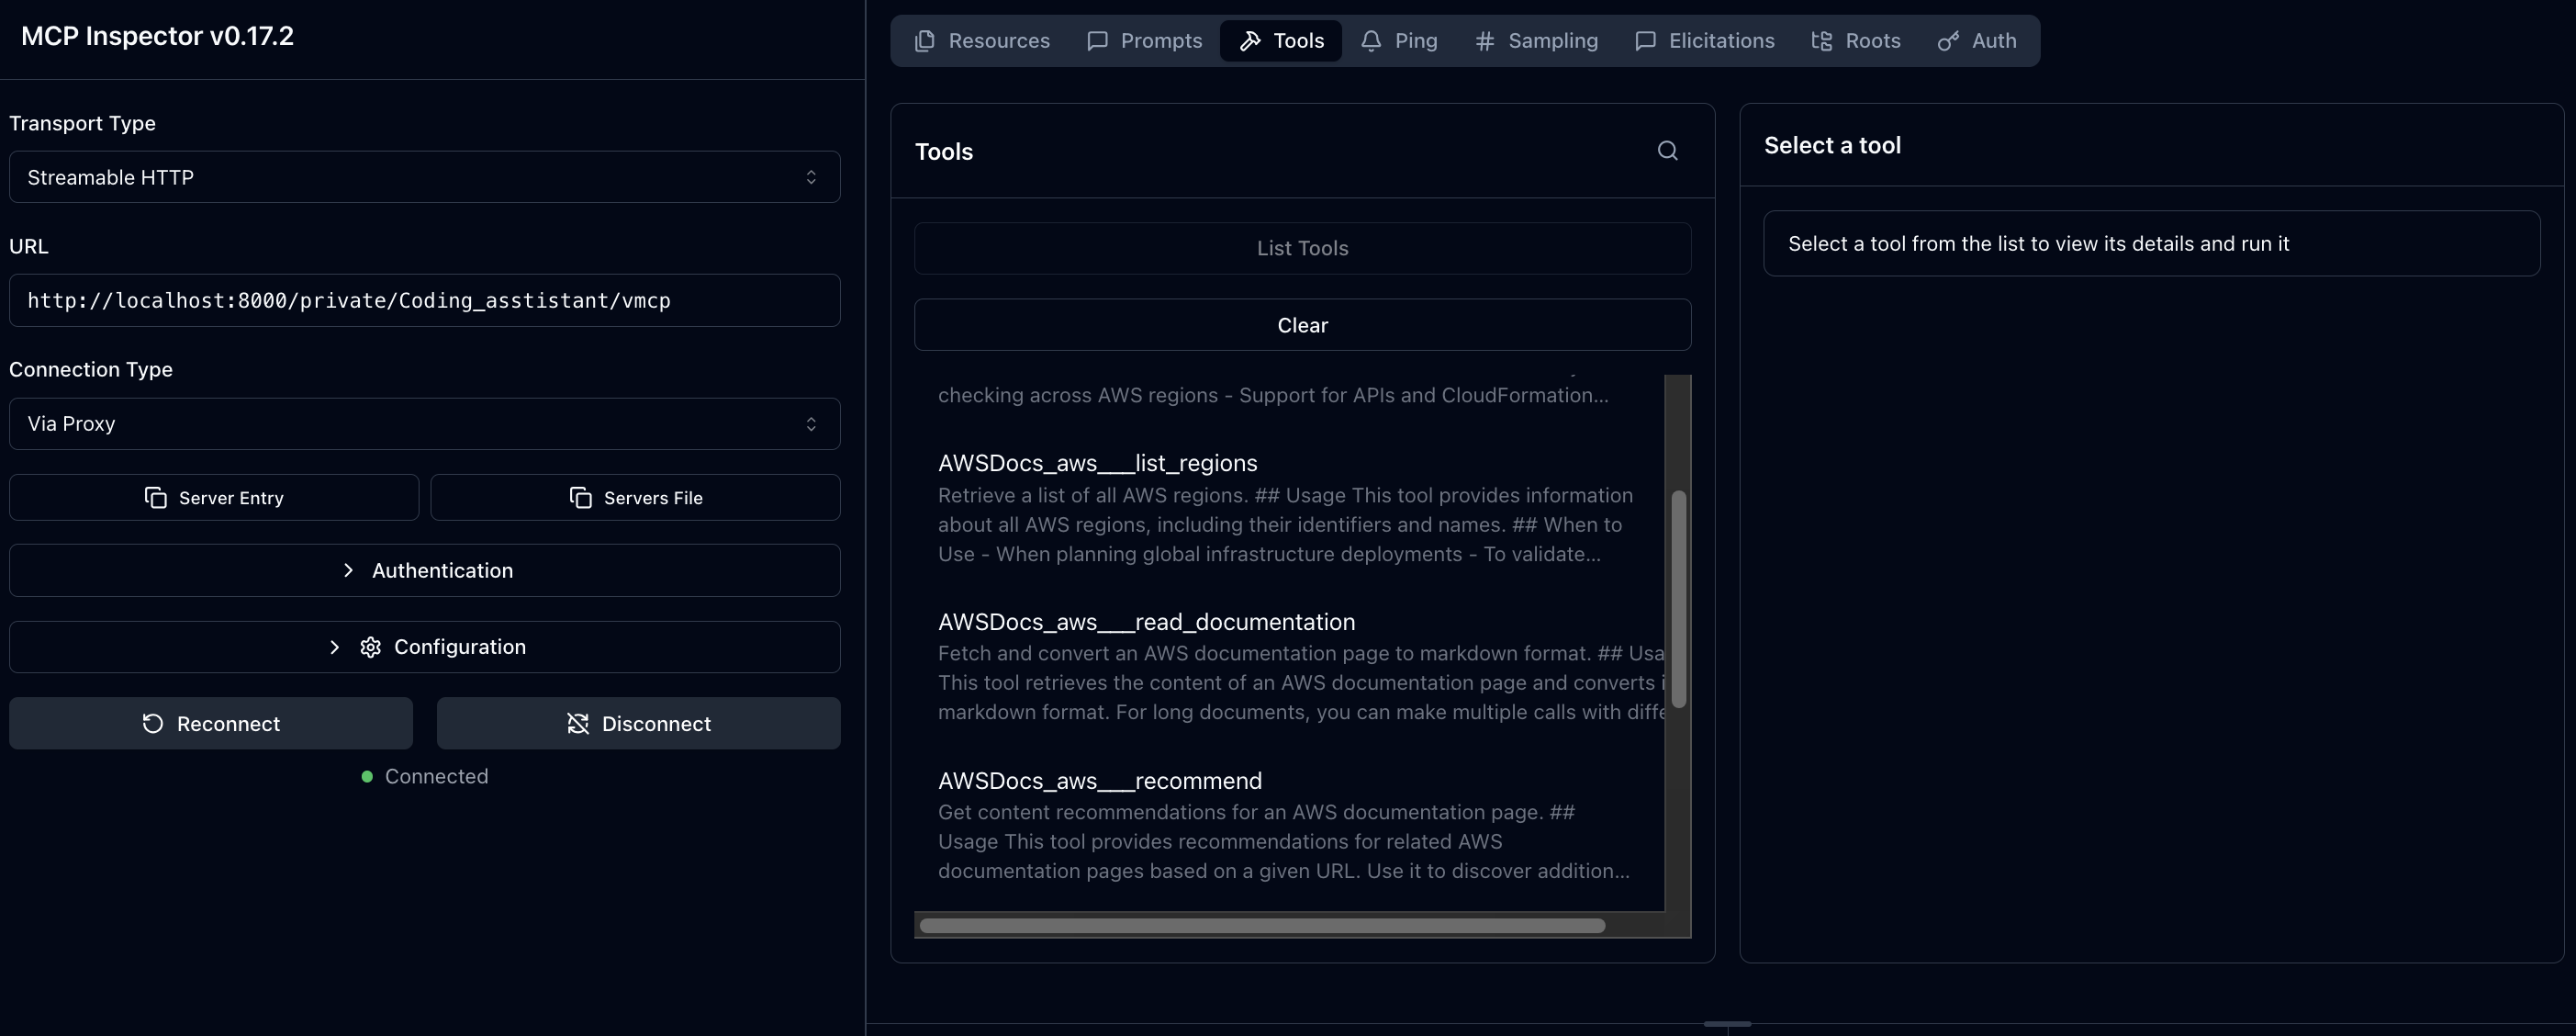
Step 7: Use Your vMCP
Once your vMCP is configured and saved, you can use it with any MCP-compatible client. Copy the vMCP URL from the editor (e.g., http://localhost:8000/private/Coding_asstistant/vmcp) and connect to it using tools like MCP Inspector or directly from AI applications like Claude, Cursor, or Copilot. The vMCP will aggregate all your selected tools, resources, and prompts into a single unified endpoint.
📚 Documentation
For comprehensive documentation, guides, and API references, visit the vMCP Documentation.
🤝 Contributing
We welcome contributions! Please see CONTRIBUTING.md for guidelines.
Running Tests
# start test mcp server and rest api server.
make test-servers

# run test with pytest
make run-tests
📄 License
vMCP is open-source software licensed under the MIT License.
🙏 Acknowledgments
📞 Support
- 🐛 Report Issues
- 📧 Email: contact@1xn.ai
Made with ❤️ by the 1xn Team
Release history Release notifications | RSS feed


Download files
Download the file for your platform. If you're not sure which to choose, learn more about installing packages.
Source Distributions
Built Distribution
Filter files by name, interpreter, ABI, and platform.
If you're not sure about the file name format, learn more about wheel file names.
Copy a direct link to the current filters
File details
Details for the file 1xn_vmcp-0.4.9-py3-none-any.whl.
File metadata
- Download URL: 1xn_vmcp-0.4.9-py3-none-any.whl
- Upload date:
- Size: 4.7 MB
- Tags: Python 3
- Uploaded using Trusted Publishing? No
- Uploaded via: twine/6.2.0 CPython/3.13.3
File hashes
| Algorithm | Hash digest | |
|---|---|---|
| SHA256 |
8bdafa9315cd90dfeb8746f51b61bb371081644b5be9a9dfde207bffeaa8b402
|
|
| MD5 |
09e60126389e424f55cb17780340a9cc
|
|
| BLAKE2b-256 |
5801410673121e60e486441c8e856fa004dfbb1aa36ee2061bf125580c1a49fb
|


