A package for incorporating Gaussian Process Active Learning (GPAL) in psychology experiments.

Project description
GPALexp
GPALexp is a user-friendly Python package that implements Gaussian Process Active Learning (GPAL, Chang et al., 2021).
What is GPAL?
GPAL is a nonparametric Bayesian optimization technique that can approximate a wide range of underlying continuous functions.
It is an active learning algorithm because the algorithm adaptively selects, based on an objective meatures, the data to learn in each iteration of function estimation. This is in contrast to conventional passive learning, where the model is given with the data to learn without any spontaneous control on them.
This is beneficial in the sense that it spends relatively less resources while maintaining comparable performances.
In psychology experiments, GPAL enables to optimize experimental stimuli for a given participant in every trial and therefore obtain maximal information in the most efficient way.
Moreover, due to its innate flexibility, we can model a wide variety of functions without the target function being restrained to a certain predefined form. This is a unique advantage of GPAL, when compared to existing Bayesian optimization algorithms including Adaptive Design Optimization (ADO, Myung et al., 2013).
GPAL can be adopted not only in psychological experiments but in various domains as well, including manifold learning, dynamics learning, object detection, and others.
What are the benefits of using GPALexp?
GPALexp built-in functions can readily be incorporated in existing Python experiment codes, thereby efficiently capture varying patterns of individual data.
Since GPALexp has integrated a long sequence of executions required to conduct GPAL into 3 functions, we can easily apply GPAL optimization in the existing experiment codes.
This will help us effectively discover underlying functions of individual data in a concise manner.
Features of GPALexp
- Adaptive Design Selection with internal functions:
GPRInstance(),argsConstructor(), andgpal_optimize() - Various built-in plotting functions for visualization
- Supports GPAL optimization for arbitrary number of feature stimuli
Example Code
We've implemented an example code file for applying GPALexp into existing experiment code files. This example shows how to apply GPALexp package in 1-dimensional number line task (Lee et al., 2022) example.
The compressed version can be downloaded in this link. Please unzip the file and execute gpal_nlt.py for an example scenario. Note that our step-by-step guide in the main text is based on gpal_nlt.py, and we provide detailed comments and guidelines through the whole code file.
Tutorial
This tutorial is written for the researcher who wishes to use GPAL in experiments, providing practical guidance on implementation and data analysis and evaluation. It assumes a working knowledge of Python programming and provides a step-by-step guide for embedding GPAL in code using GPALexp to reduce the programming required to a few function calls. Technical details on the implementation are provided in GPALexp Wiki
Installation
GPALexp is built upon Python 3.10.18, so Python 3.10 is recommended. The Anaconda distribution of Python [link] can help us create a virtual environment for GPALexp, avoiding potential conflicts and providing tailored dependencies.
Install GPALexp from the Python Package Index (PyPI) via the following pip command in a terminal (or Command Prompt on Windows).
# Installing from PyPI
pip install gpalexp
Or we can install the developmental version directly from this github repository.
# Installing directly from github
pip install git+https://github.com/KAIST-PAI-lab/GPALexp.git@main
To confirm successful installation of GPALexp, run the following command in a terminal.
python -m pip show gpalexp
The above command will display the current version of GPALexp if it is installed correctly.
The tutorial experiment code was implemented using PsychoPy [link]. To reproduce and execute the code, users must install PsychoPy version 2025.1.1, which can be installed via the following command:
pip install psychopy==2025.1.1
Note that additional dependencies, such as a compatible C++ compiler (e.g., Microsoft C++ Build Tools), may be required depending on the system configuration.
Package Structure
GPALexp has two core functions: GPRInstance() and gpal_optimize(). GPRInstance() initializes a Gaussian process regressor object for performing Gaussian process regression. gpal_optimize() fits the regressor object to participant data and selects the optimal stimulus for presentation on the next trial. Users can customize the properties of GPAL using a third, helper function argsConstructor(), described below. Include the following line of code near the beginning of your Python script where imports are declared.
from gpalexp import GPRInstance, gpal_optimize, argsConstructor
Additional details on the files and functions included in the package are provided in the corresponding Wiki page.
Usage Guide
The repository also contains the PsychoPy script to run the number-line task experiment above. The summary code below contains the most important parts, with line numbers corresponding to those in gpal_nlt.py.
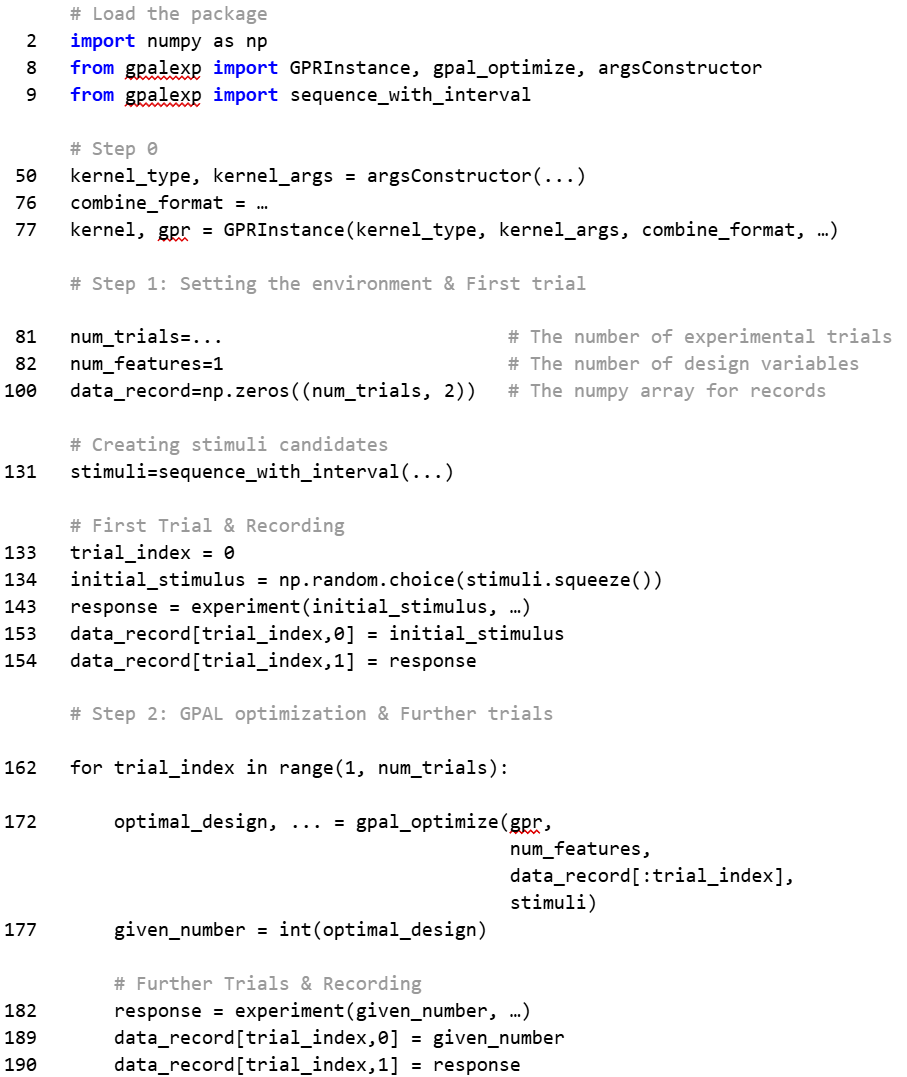
Step 0. Initialize a GP Regressor
The first step is to initialize a GP regressor for the experiment using GPRInstance() and argsConstructor() functions. This step will determine the general properties of the functions estimated by GP regression during the experiment.
In GP regression, a kernel (also called a covariance function) defines how similar two input points are, which in turn determines the shape and smoothness of the function the GP can model to connect them. GPALexp supports nine types of kernels, each assigned a numerical index. Different types of kernels (e.g., RBF, Linear) represent distinct assumptions about the underlying patterns in the data. Full information on the available kernel types and their associated indices are provided in this Wiki page.
The radial basis function (RBF) kernel (Index 6) predicts smooth and continuous functions while accommodating a wide variety of functional forms. This kernel is well suited for GPAL’s purpose of exploratory modeling unless the user has strong prior assumptions about the underlying pattern (e.g., linear function). The following code shows how to define an RBF kernel using argsConstructor().
kernel_type, kernel_param = argsConstructor([6], [[1.0, (1e-5, 1e5)]])
The two inputs to argConstructor() specify the kernel type and its hyperparameters. The first input [6] is the numerical index of the RBF kernel. The second input [[1.0, (1e-5, 1e5)]] specifies the initial value (1.0) and the range ((1e-5, 1e5)) of the kernel’s hyperparameter. In the RBF kernel, the hyperparameter is called length_scale, which determines the smoothness of the function. The larger the length_scale, the smoother the estimated function. If the second input is omitted, the function applies the default values, which are quite suitable in most cases.
GPALexp supports combining multiple kernels, providing additional flexibility in model formulation. In practice, a Gaussian process represented by a single kernel can be restrictive. It is common to employ compounded kernels to capture more complex patterns in the data. In this tutorial, we used a product of a constant kernel (index 0) and a RBF kernel (index 6), combined with a Gaussian noise kernel (index 8).
kernel_type, kernel_param = argsConstructor([0,6,8], [[1.0, (1e-5, 1e5)], [1.0, (1e-5, 1e5)], [0.01, (1e-5, 1e5)]])
kernel, gpr = GPRInstance(kernel_type, kernel_param, ‘k1*k2+k3’)
The list [0, 6, 8] passed as a first argument specifies the indices of the kernels to be combined, with the subsequent list defining the hyperparameter configuration associated with each kernel. The kernel specified by argsConstructor() is then passed to GPRInstance(), with an additional input that defines the kernel composition. In the present example, the expression ‘k1*k2+k3’ indicates that the constant kernel (k1, index 0) is multiplied with the RBF kernel (k2, index 6), and the Gaussian noise kernel (k3, index 8) is then added to the resulting product. In this formulation, the constant kernel serves as a global scaling parameter, the RBF kernel captures smooth functional relationships with flexibility, and the noise kernel models stochastic variability in the observed responses.
Step 1. Set up the experiment and run the first trial
Before starting the experiment, lines 81 and 82 in gpal_nlt.py set the number of trials (num_trials) and number of stimulus features (num_features) in the experiment. These values should be modified depending on the task being used. The current number-line task consists of 20 trials with a single stimulus feature: the number of dots in the central box (i.e., given number; see Figure 1a). This stimulus feature is what GPAL selects on each trial. For more complex tasks, GPALexp supports optimization with multiple stimulus features. An example can be found in this wiki page.
Because GPAL requires participant responses to guide stimulus selection, the first trial is initialized with a randomly chosen stimulus as follows (Lines 131-134).
stimuli=sequence_with_interval(5, 500, 5)
initial_stimulus=np.random.choice(stimulus_list, size=1)
The variable stimulus_list specifies the full set of candidate stimuli. In this example, the values (i.e., number of dots) range from 5 (start) to 500 (end) with an interval of 5. The initial_stimulus, which defines the stimulus for the first trial, is randomly sampled from this set of candidates. When prior knowledge suggests a useful starting point, the user can fix the initial stimulus by adjusting the initial_stimulus variable at line 143 (e.g., initial_stimulus = 5).
The selected stimulus is then passed to show_and_get_response(), which is a task-specific function that displays the stimulus and records the participant’s response (Line 143). This function should be customized for each task using PsychoPy or an equivalent experimental software.
response = show_and_get_response(initial_stimulus, visuals, max_number, …)
After obtaining the participant’s response, the selected stimulus and the corresponding response are stored in a placeholder named data_record, which is created as follows (Line 100). The code indicates that we will record 2 values for each trial, which is the single feature of the stimulus and the associated response.
data_record = np.zeros((num_trials, 2)
The data from the first trial are stored in the first row of the data_record. The trial index (trial_idx), which is 0 on the first trial, specifies the row in which to store the data (Lines 153-154).
data_record[trial_idx][0] = initial_stimulus
data_record[trial_idx][1] = response
data_record will be iteratively updated on each trial, and saved as a CSV file upon completion of the task (Lines 198-202).
Step 2. Opitmize experimental design using GPAL
Once the response from the participant is observed, gpal_optimize() function performs GPAL optimization (Line 172). It fits a GP regressor to the observed data, estimates the uncertainty of the responses to the stimulus candidates, and selects the stimulus with the highest uncertainty for the next trial. The function uses objects gpr, stimuli, and num_features specified in Step 0, and data_record explained in Step 1 as inputs. Note that the function uses only a subset of data_record up to the current trial (data_record[:trial_idx]), because placeholders for unobserved trials are filled with zeros.
result, gp_mean, gp_std, lml = gpal_optimize(gpr, num_features, data_record[:trial_idx], stimuli)
given_number = int(result)
The main output is result , which contains the stimulus (given_number in the current example) selected by GPAL for the next trial. The selected stimulus is then passed to show_and_get_response(), yielding the participant’s response for the next trial. These two values (selected stimulus and the response) will be recorded in record_data as well, following the steps explained in Step 1 (Lines 189-190). This process is repeated until the end of the experiment. Further descriptions on other output values (e.g., gp_mean, gp_std, lml) are provided in this Wiki page.
GPALexp Wiki
We've provided explanatory materials in the github Wiki of this repository.
Please refer to this Wiki page for further details.
For Linux and Mac OS
All functions defined inside src/gpalexp directory works properly, regardless of OS types. However, the example experiment code in the downloaded file (nlt_example.zip) does not support Linux OS. This is due to the compatibility with the experiment-related functions supported by PsychoPy package. We've tried to specify appropriate dependencies to make it executable in Linux, but we were not able to. Therefore, please note that there might be unexpected outcomes when running nlt_example/gpal_nlt.py in Linux-based OS (e.g. CentOS, Ubuntu, ...)
For Mac OS, we've tested the example experiment code file and confirmed it running without any problems.
Contacts
If there are any things that the maintainer should be noticed (bug reports, update requests, questions, future suggestions, etc), please feel free to contact Junyup Kim (ytrewq271828@kaist.ac.kr).
Release history Release notifications | RSS feed


Download files
Download the file for your platform. If you're not sure which to choose, learn more about installing packages.
Source Distribution
Built Distribution
Filter files by name, interpreter, ABI, and platform.
If you're not sure about the file name format, learn more about wheel file names.
Copy a direct link to the current filters
File details
Details for the file gpalexp-0.1.11.16.tar.gz.
File metadata
- Download URL: gpalexp-0.1.11.16.tar.gz
- Upload date:
- Size: 3.9 MB
- Tags: Source
- Uploaded using Trusted Publishing? No
- Uploaded via: twine/6.2.0 CPython/3.10.18
File hashes
| Algorithm | Hash digest | |
|---|---|---|
| SHA256 |
42857b03ea1abf648fb98b3f8772a18cd23a61d23dfe22e373987e7806761037
|
|
| MD5 |
31794b865661e15fa272f82590346201
|
|
| BLAKE2b-256 |
bdab9b66718caed279d5c992492caf9a583d44f319ef23b3d44d2ad4e5b33239
|
File details
Details for the file gpalexp-0.1.11.16-py3-none-any.whl.
File metadata
- Download URL: gpalexp-0.1.11.16-py3-none-any.whl
- Upload date:
- Size: 47.8 kB
- Tags: Python 3
- Uploaded using Trusted Publishing? No
- Uploaded via: twine/6.2.0 CPython/3.10.18
File hashes
| Algorithm | Hash digest | |
|---|---|---|
| SHA256 |
04f10417f5c8e7b5e9c88f6d8de2707f545b207e7dd5a5eaf378a30f0efbdede
|
|
| MD5 |
60dd6d2d6197cc875b049769349b93ff
|
|
| BLAKE2b-256 |
e81dc8908057a2bc298fef2600d9a8d946d513205ce9cbc7b6380dd05d20dcf6
|


