Platform for High Energy Diffraction Microscopy (HEDM) Analysis, also known as 3D X-ray Diffraction (3DXRD)
Project description
An AI-Integrated Framework for Advanced Data Processing in High Energy Diffraction Microscopy (HEDM)
High Energy Diffraction Microscopy (HEDM) is an advanced, non-destructive method that allows for in-situ analysis of the internal changes in materials under various environmental conditions and loads. This technique is particularly adept at detailing morphology, the positions and orientations of grains, and the strain tensor of individual grains. HEDM's ability to simultaneously track the evolution of thousands of grains during loading processes marks a significant advancement in material science. Its compatibility with current trends in big data and AI further amplifies its potential, paving the way for groundbreaking discoveries and applications in the future.
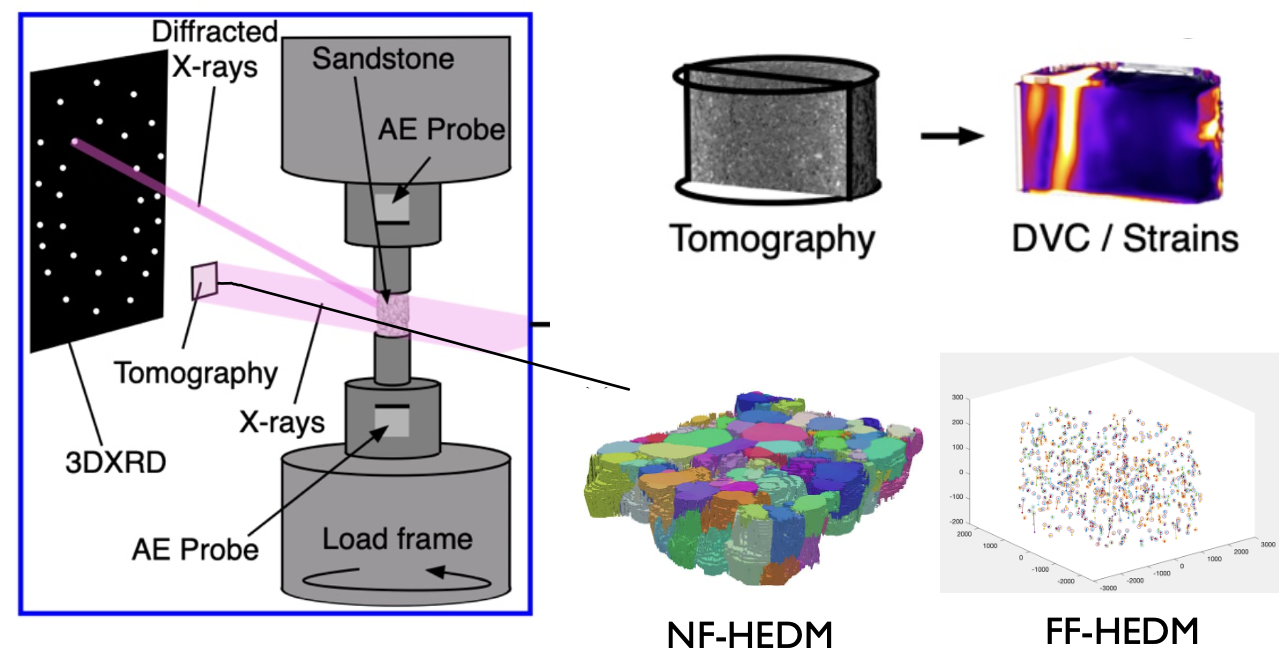
HEDM stands as a formidable technique, uniquely capable of characterizing strain tensor, grain orientation, and morphology in granular materials, emphasizing its three-dimensional and in-situ analysis capabilities.
HEDM-Platform represents a holistic and integrated framework designed to consolidate the finest HEDM resources available globally. As an all-encompassing platform, its primary goal is to offer a seamless workflow, encompassing the pre-processing, intermediate processing, and post-processing stages of HEDM data. Crafted with the insights of seasoned professionals, HEDM-Platform addresses the disparities in data standards across various synchrotron radiation sources, including APS, CHESS, SOLEIL, DESY, and more. Beyond just being a toolkit, it serves as a unified platform that empowers users to juxtapose and discern the merits and demerits of predominant software in the field. A standout feature of the platform is its embrace of AI capabilities, leveraging tools like ilastik, with an eye on future integrations and expansions into deep learning realms.
The journey of refining diffraction patterns is riddled with challenges. Confronted by a broad dynamic range, the simultaneous recognition of varying intensity spots becomes an arduous task. The task becomes even more formidable when diffraction spots cluster densely or when high strain produces streak-like spots. To navigate these intricacies, initial efforts were heavily rooted in rule-based methods, primarily using singular decision trees. However, these rules, while effective for overlapping spots, were inadequate for broader dynamic ranges. The cumulative addition of rules inadvertently led to biases, each rule potentially excluding specific spots. This prompted a pivotal shift in perspective: the core challenge was the differentiation of these spot types, sidelining the need for rule interpretability. Embracing this revelation, AI was integrated, steering the focus towards attaining precision and accuracy, superseding mere rule interpretability.
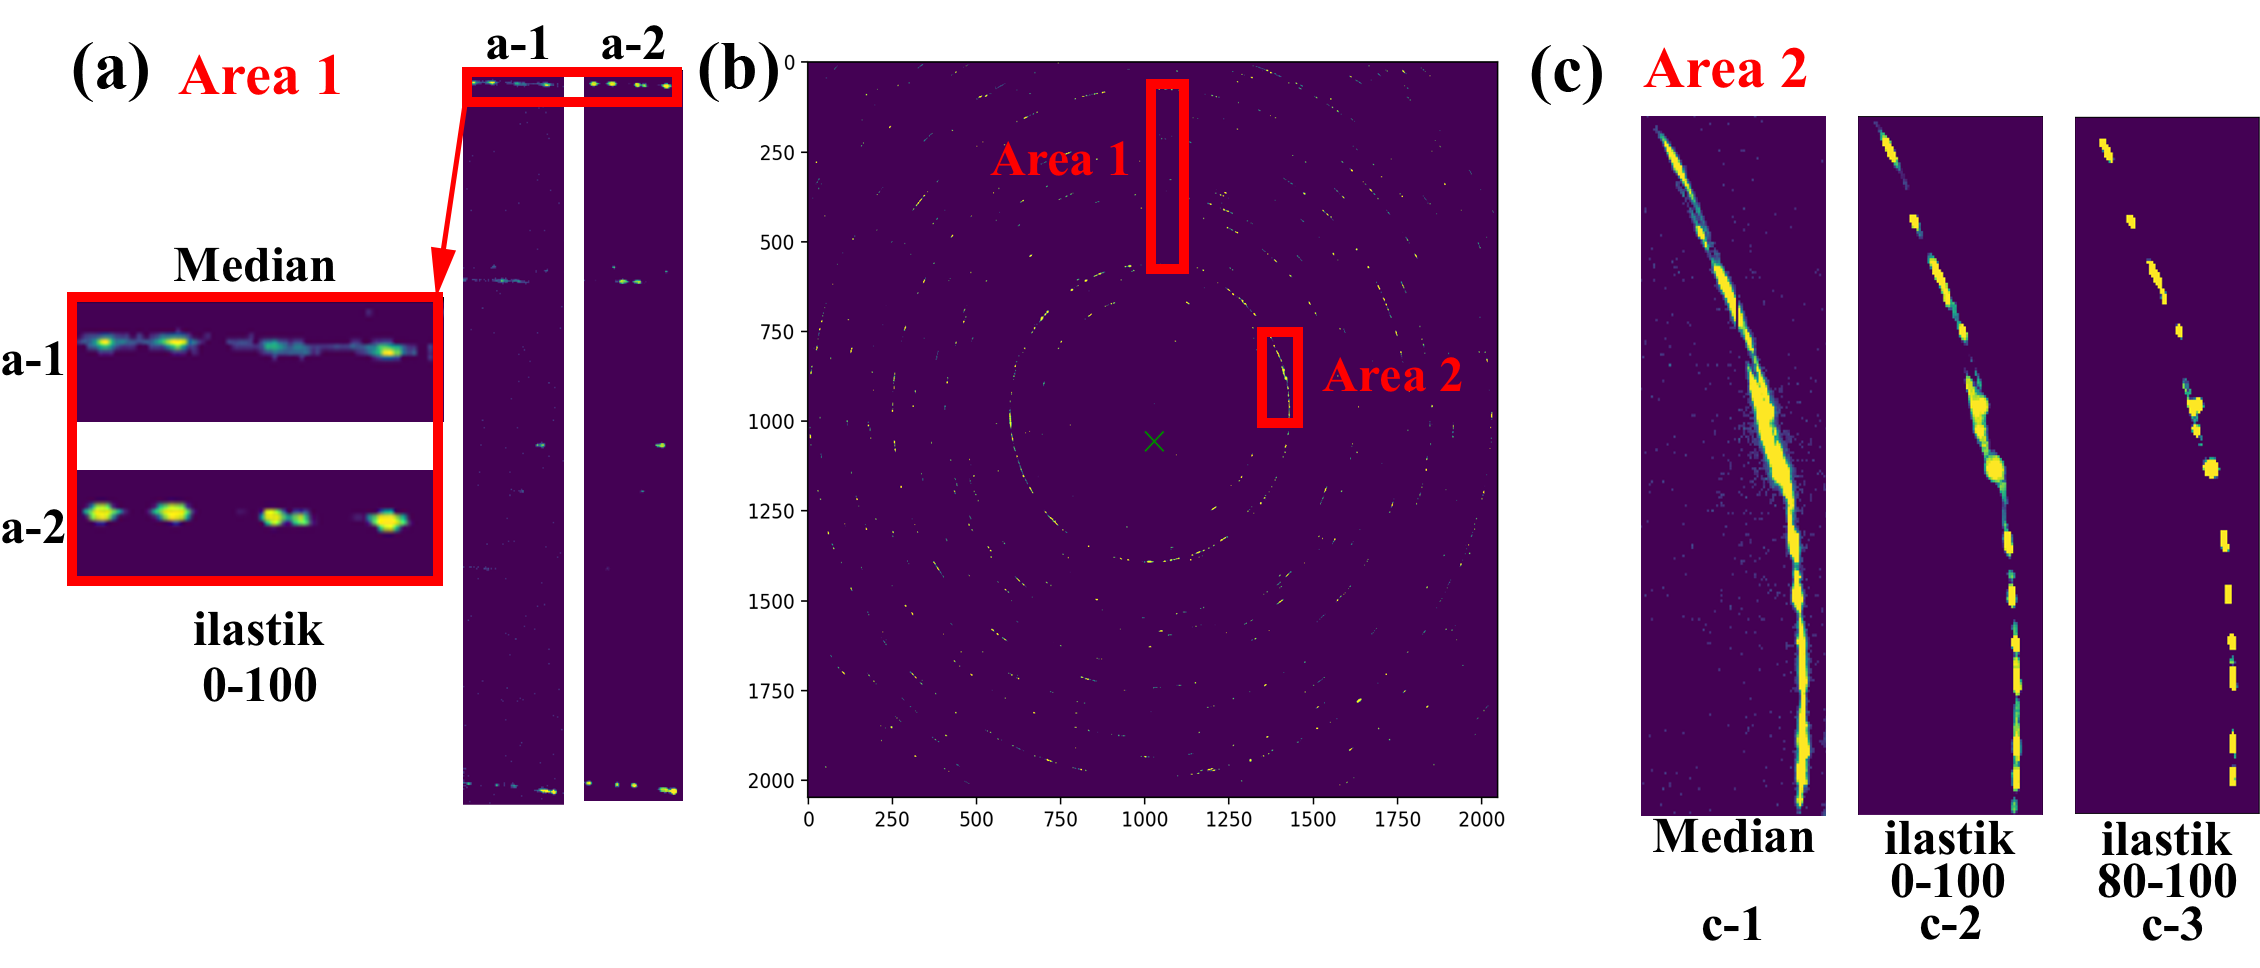
The image below illustrates the transformative power of our processing techniques. In panel 'b', we see a single frame of nugget sandstone's FF-HEDM diffraction pattern. When we extract area 1 and juxtapose the results of a simple median filter ('a-1') with the outcome post-ilastik processing ('a-2'), the distinction is palpable. The spots post-ilastik are not only discernible but also well-separated, ready for subsequent calibration software which requires only a rudimentary intensity filter. In fact, post-ilastik, the intensity essentially represents a spot's probability, ranging from 0-100. Panel 'c' portrays a more intricate scenario. A basic median filter falls short, evident in 'c-1'. However, after processing with ilastik across the full range of 0-100 ('c-2'), spot calibration becomes feasible. Elevating the probability value further to 80-100 in 'c-3' refines the distinction, effectively resolving the area's spots.
Currently, the platform amalgamates and builds upon various open-source software, including HEXRD, ImageD11, HEXOMAP, and ilastik. The corresponding links are:
Prerequisites
Before installing HEDM-Platform, you must install HEXRD, ImageD11, hdf5plugin and ilastik (advanced usage; optional, can be skipped if not needed). For detailed information, please refer to the respective URLs provided above. It's recommended to create a conda environment, e.g., HEDM-Platform.
First, create the HEDM-Platform conda environment using the following command:
conda create --name HEDM-Platform
conda activate HEDM-Platform
Next, you can install the required software using the following steps:
-
Install HEXRD:
conda install -c hexrd -c conda-forge hexrd
-
Install ImageD11:
python -m pip install ImageD11
-
Install hdf5plugin:
pip install hdf5plugin
-
For ilastik installation: Please refer to its official website for detailed installation instructions.
Installing HEDM-Platform
You can easily install the HEDM-Platform using pip:
pip install HEDM-Platform
Getting Started
Demo Setup
To begin with the platform, first, create a working directory where you intend to process your data. This should be an empty folder dedicated to subsequent data processing. Once you've set up your working directory, navigate to it and execute the copy_demo command within the HEDM-Platform environment. Upon execution, you'll notice the addition of several files in your directory, including:
config.yml
nugget_2_frames_for_test.h5
nugget_layer0_det0_for_test.flt
nugget_layer0_det0.par
Au_ff_demo.npz
hexrd_Au_detector.yml
HEXRD_Materials.h5
Note: Due to the need for manual completion of the ilastik project file within the ilastik visual interface, and the large size of the project file making it unsuitable for packaging within this platform, users are required to export it on their own and place it in the appropriate directory. Make sure to update the necessary paths in the config.yml file accordingly.
Testing Main Features
- Standardizing Original Files:
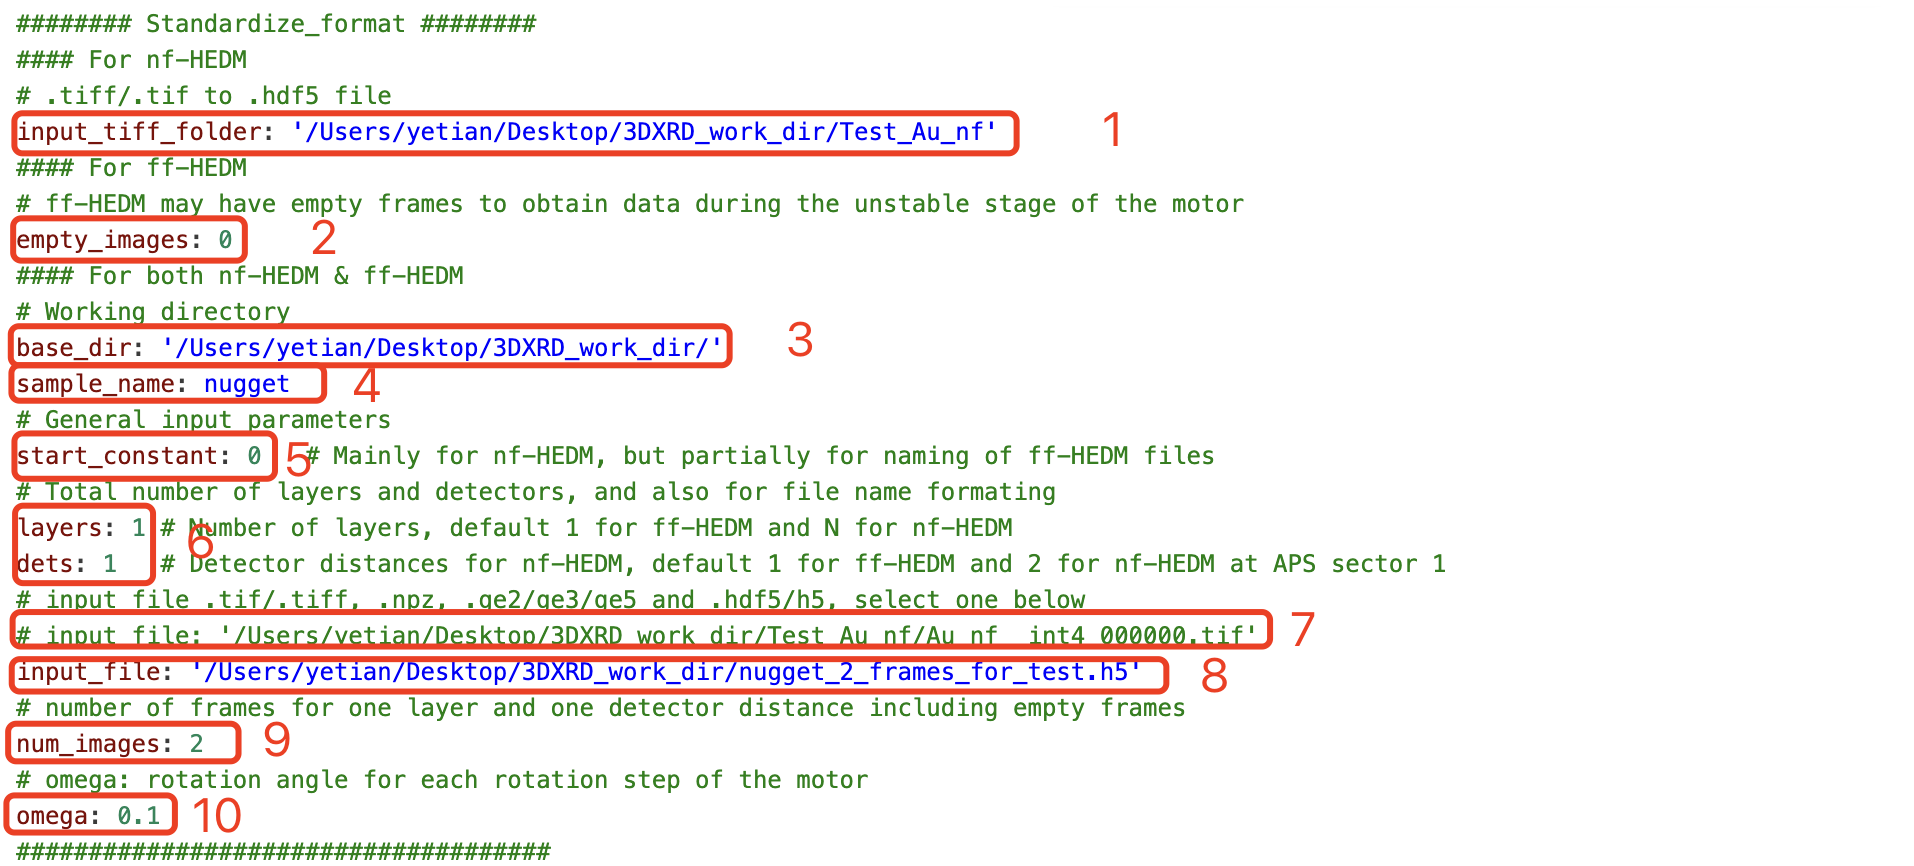
Firstly, modify the config.yml file as shown below before executing the subsequent command:
-
Area 1: This is the input folder for standardized processing of NF HEDM TIFF files, corresponding to Area 7. To process NF files, comment out Area 8 and uncomment Area 7.
-
Area 2: This refers to the number of empty frames in the dataset which will be removed during the standardization process.
-
Area 3: This designates the working directory.
-
Area 4: This is the name of the sample being processed, which is related to file naming in subsequent processes.
-
Area 5: Indicates the first frame of the NF HEDM TIFF files to start processing. If processing FF, this can be disregarded.
-
Area 6: FF HEDM is only related to naming conventions, while NF is related to batch processing.
-
Area 7: Sample input file format for NF HEDM.
-
Area 8: Sample input file format for FF HEDM.
-
Area 9: The total number of frames in the dataset.
-
Area 10: The motor rotation step size during the data collection process.
After updating these ten sections, execute the following command to standardize the data:
hedm-platform stand config.yml
-
Background Noise Reduction on Standardized Files:
Begin by modifying the
config.ymlfile as illustrated below:-
Area 1: Indicates the number of frames to be used for background subtraction, which is essential for enhancing data quality by removing unwanted static signals from the images.
-
Area 2: Specifies the filter to apply for background subtraction. The number represents the statistical percentile, with 50 corresponding to the median filter which is voxel-based and effective for a variety of datasets.
-
Area 3: This area is dedicated to the flip option, requiring users to employ trial and error to determine the right setting. Users at APS beamline 1-ID can opt for the 'h' setting for their experiments.
After configuring these settings, run the designated command to perform background subtraction and reduce noise in your dataset.
-
hedm-platform sub config.yml
-
Machine Learning Processing:
Process the noise-reduced files through machine learning to extract key spots information. Note: Manual extraction of *.ilp files from ilastik output is necessary.
Begin by modifying the
config.ymlfile as illustrated below:
-
Area 1: This represents the executable path for ilastik. For more details on its installation and path retrieval, refer to the official ilastik website's installation guide.
-
Area 2: Represents the .ilp project file generated within ilastik. The method to produce this will be detailed further below.
-
Area 3: If you decide to bypass ilastik's machine learning data processing, you can directly input the file path and name here. This will instruct the system to use the specified file for subsequent steps by default. If you opt for processing through ilastik, you should comment out this section.
To generate the ilastik project file:
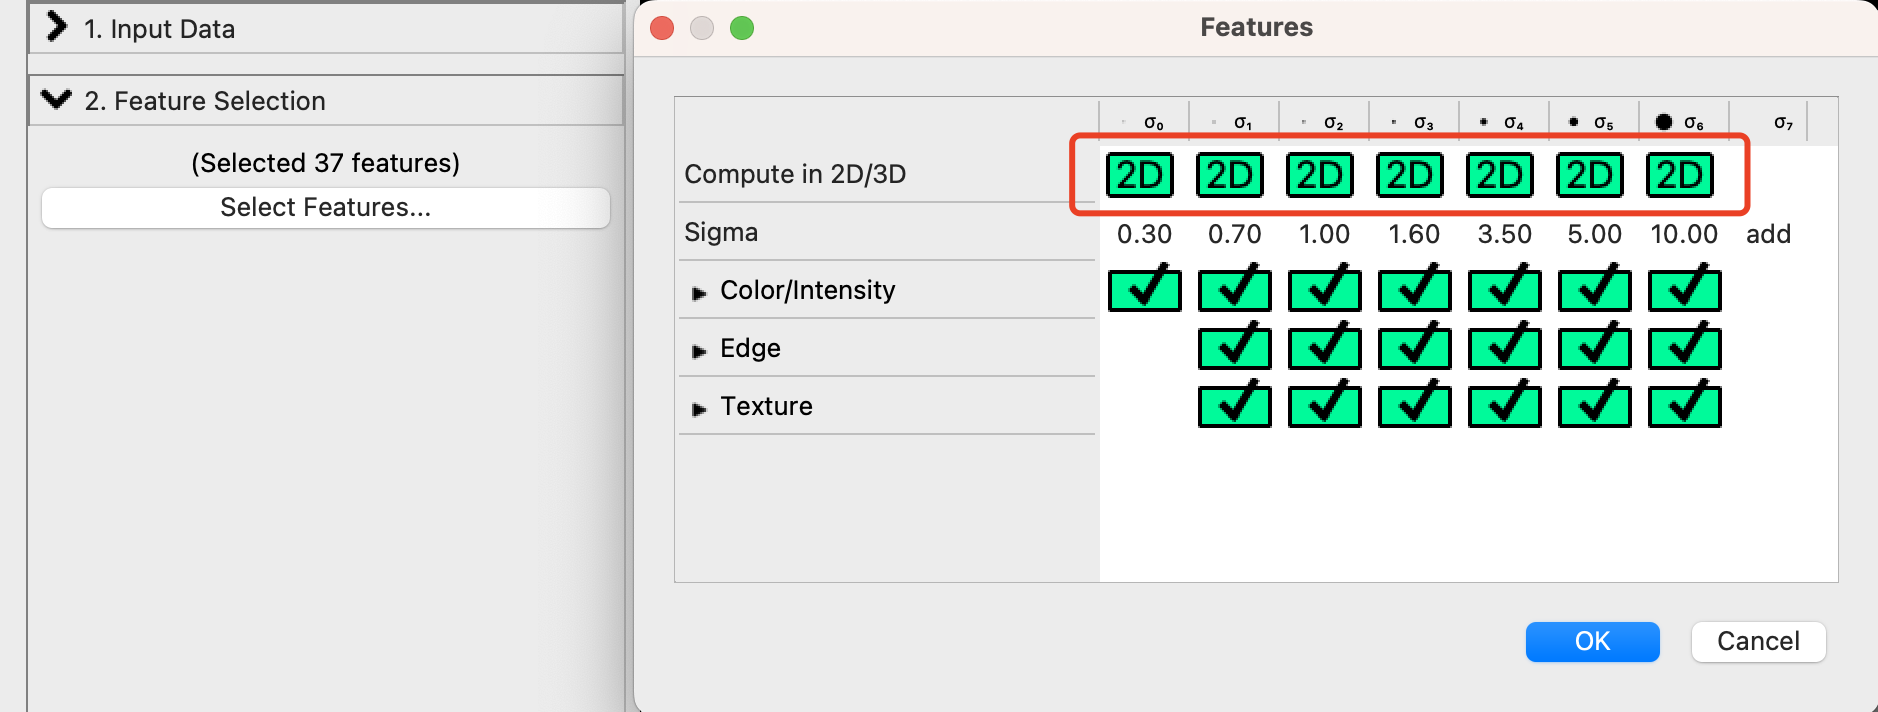
- Launch ilastik and import the sliced file into the pixel clarification section. For project file creation, you can manually train the data using several dozen frames.
- In the feature selection section (shown in the image on the left), ensure you set it to 2D. This step is crucial to avoid excessive computational overhead during subsequent processing.
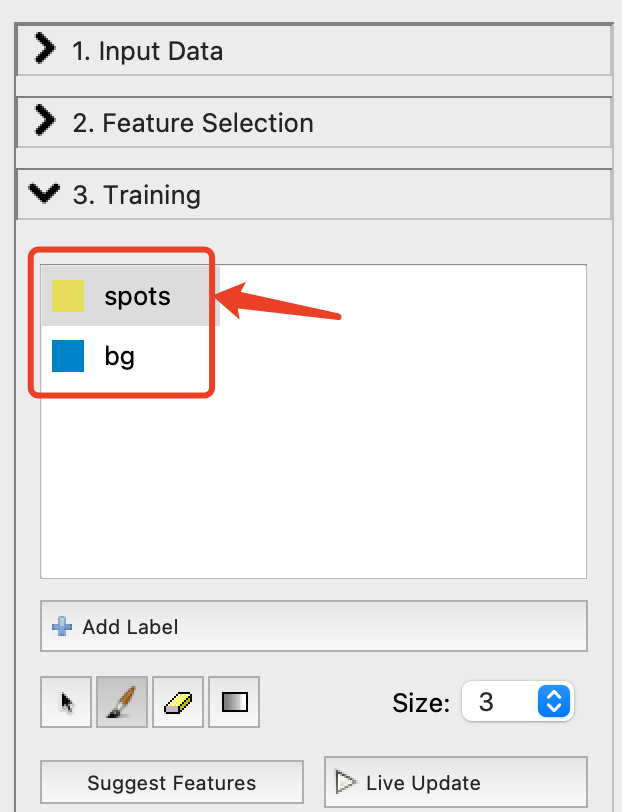
- Finally, refer to the image on the right to configure spots and background settings. Engage in manual adjustments and training. Ensure you follow the sequence shown in the image.
Once you have made the necessary adjustments, execute the following command:
hedm-platform ilastik config.yml
-
Format Conversion:
Convert files obtained from the two previous steps (either Background Noise Reduction or Machine Learning Processing) to formats suitable for subsequent HEDM software import and calibration.
Begin by modifying the
config.ymlfile as illustrated below:-
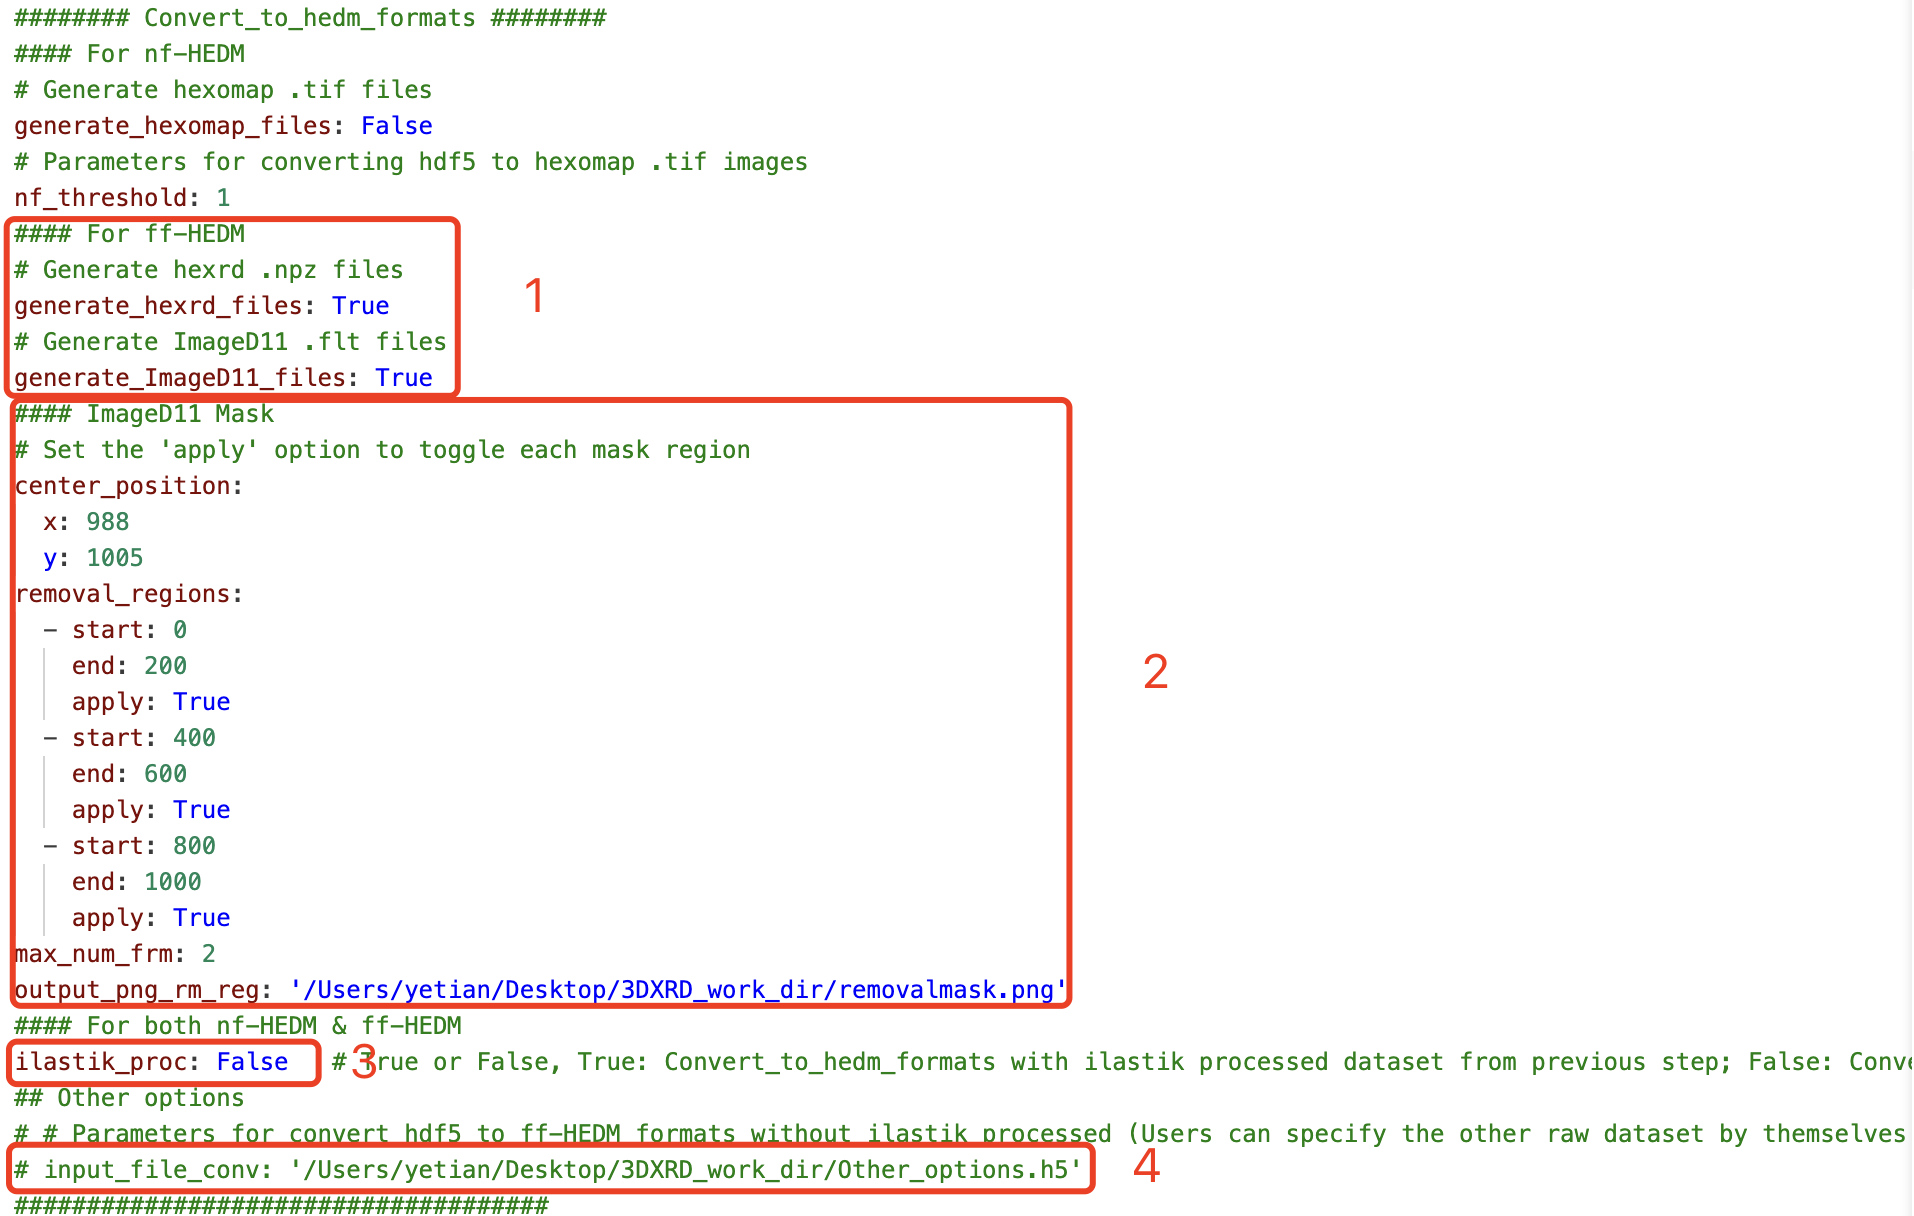
Area 1: This allows users to choose the generated file format related to HEDM. Selecting the appropriate format here is essential for subsequent analysis steps.
-
Area 2: Indicates the mask for ImageD11 processing. To apply a mask to FLT files, run the
hedm-platform rm_mask config.ymlcommand prior to this step. Executing this command will create aremovalmask.npyfile for programmatic use. Users can also fine-tune the mask's parameters by trial and error withremovalmask.png, where data in the red annular regions will be excluded from the analysis. -
Area 3: Choose
Falseif bypassing ilastik processing, which will prompt the system to automatically import the corresponding files, such as*_50bg.h5. IfTrueis selected, you must perform the ilastik steps to generate*_ilastik_proc.h5files. If there's a need to process other file names beyond these two formats, you can uncomment Area 4 to accommodate this.
After setting these areas as needed, proceed with the command to process your data accordingly.
hedm-platform hedm_formats config.yml -
-
Preparation for testing Indexing Grains: As the original files are quite large, previous steps utilized a slice file with only 2 frames for testing. Depending on whether the ilastik step was executed, there are two scenarios:
- If you executed the ilastik step (Machine Learning Processing), rename the
nugget_layer0_det0_for_test.flttonugget_layer0_det0_50bg_ilastik_proc_t1.fltand replace the existing file. - If you did not execute the ilastik step and used the noise-reduced files directly for the subsequent indexing step, rename the
nugget_layer0_det0_for_test.flttonugget_layer0_det0_50bg_t1.fltand replace the existing file.
-
Index Grains and Fit:
This test is designed to locate grains and fit them to retrieve essential details such as the strain tensor, position, orientation, and more.
Begin by modifying the
config.ymlfile as illustrated below:-
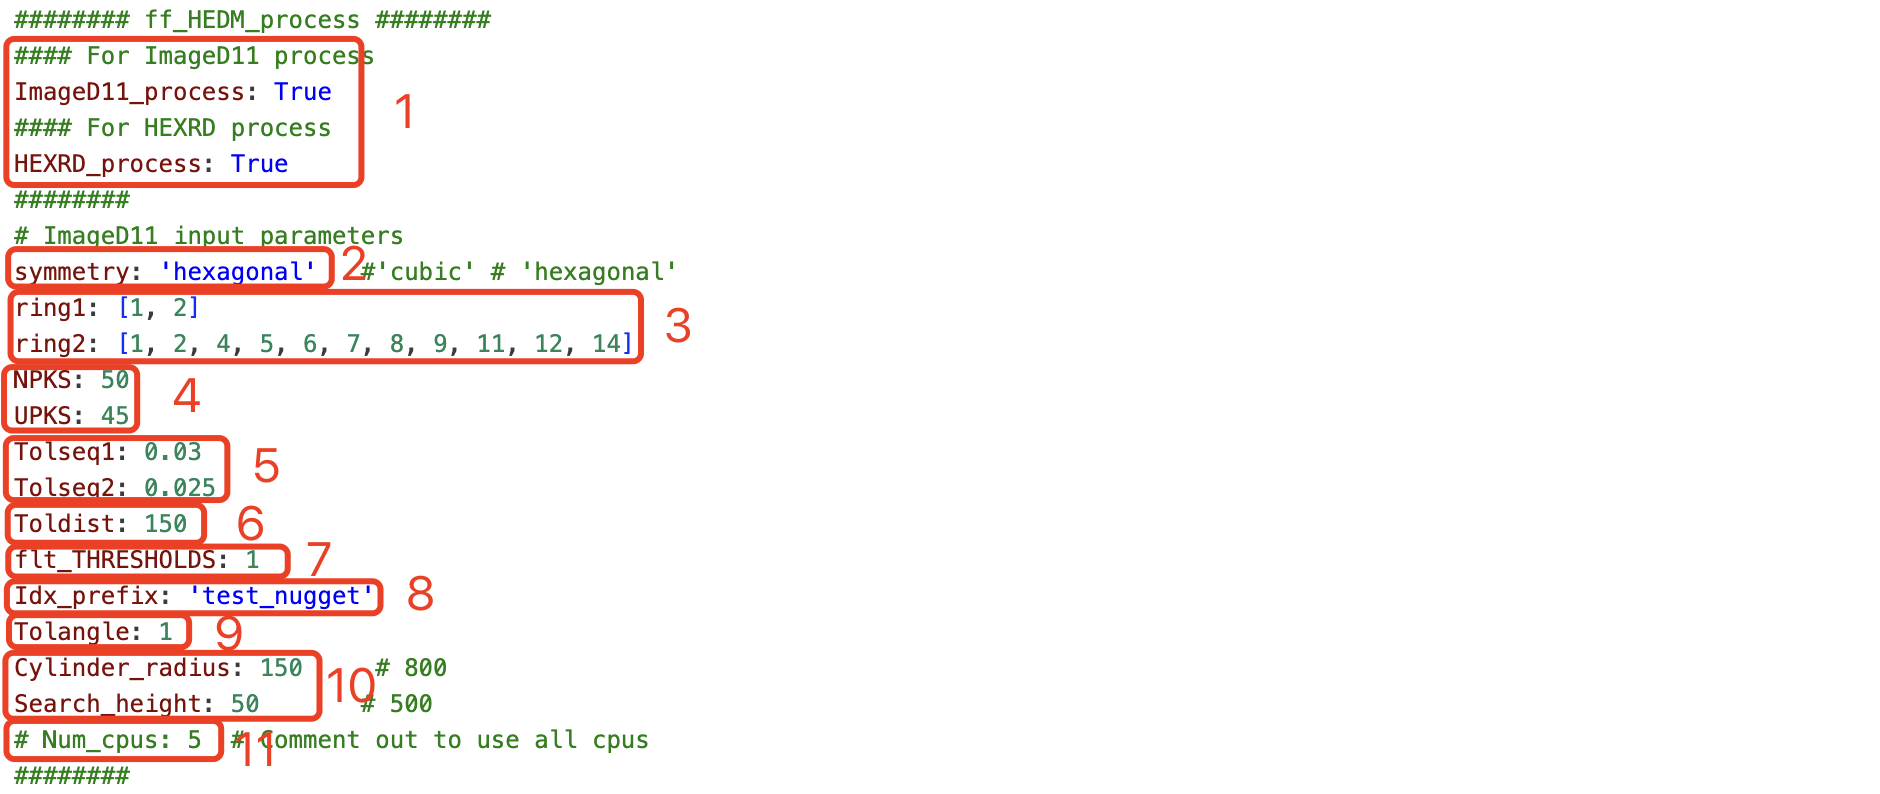
Area 1: Select the ff-HEDM analysis software. This includes index (imaged11) / find-orientation (hexrd) primarily for identifying grains and their corresponding orientations and translations (for imaged11, hexrd only includes orientation; translation is obtained subsequently during fitting) and fit primarily for fitting to obtain more accurate translations (positions) and strain tensors.
-
Area 2: Crystal structure.
-
Area 3: Indexing to find grains' hkls.
-
Area 4: Number of peaks and number of unique peaks found in grains.
-
Area 5: Tolerance sequence during indexing.
-
Area 6: Tolerance distance between grains.
-
Area 7: Threshold for generating .flt files. This needs adjustment; if the intensity is processed by ilastik, it ranges from 0 to 100, which is quite standard. If not processed by ilastik, the intensity's dynamic range may be vast, and trial and error are needed to experiment.
-
Area 8: File name prefix.
-
Area 9: Orientation angle tolerance.
-
Area 10: Search cylinder radius and search height.
-
Area 11: Number of CPUs to use for parallel processing.
-
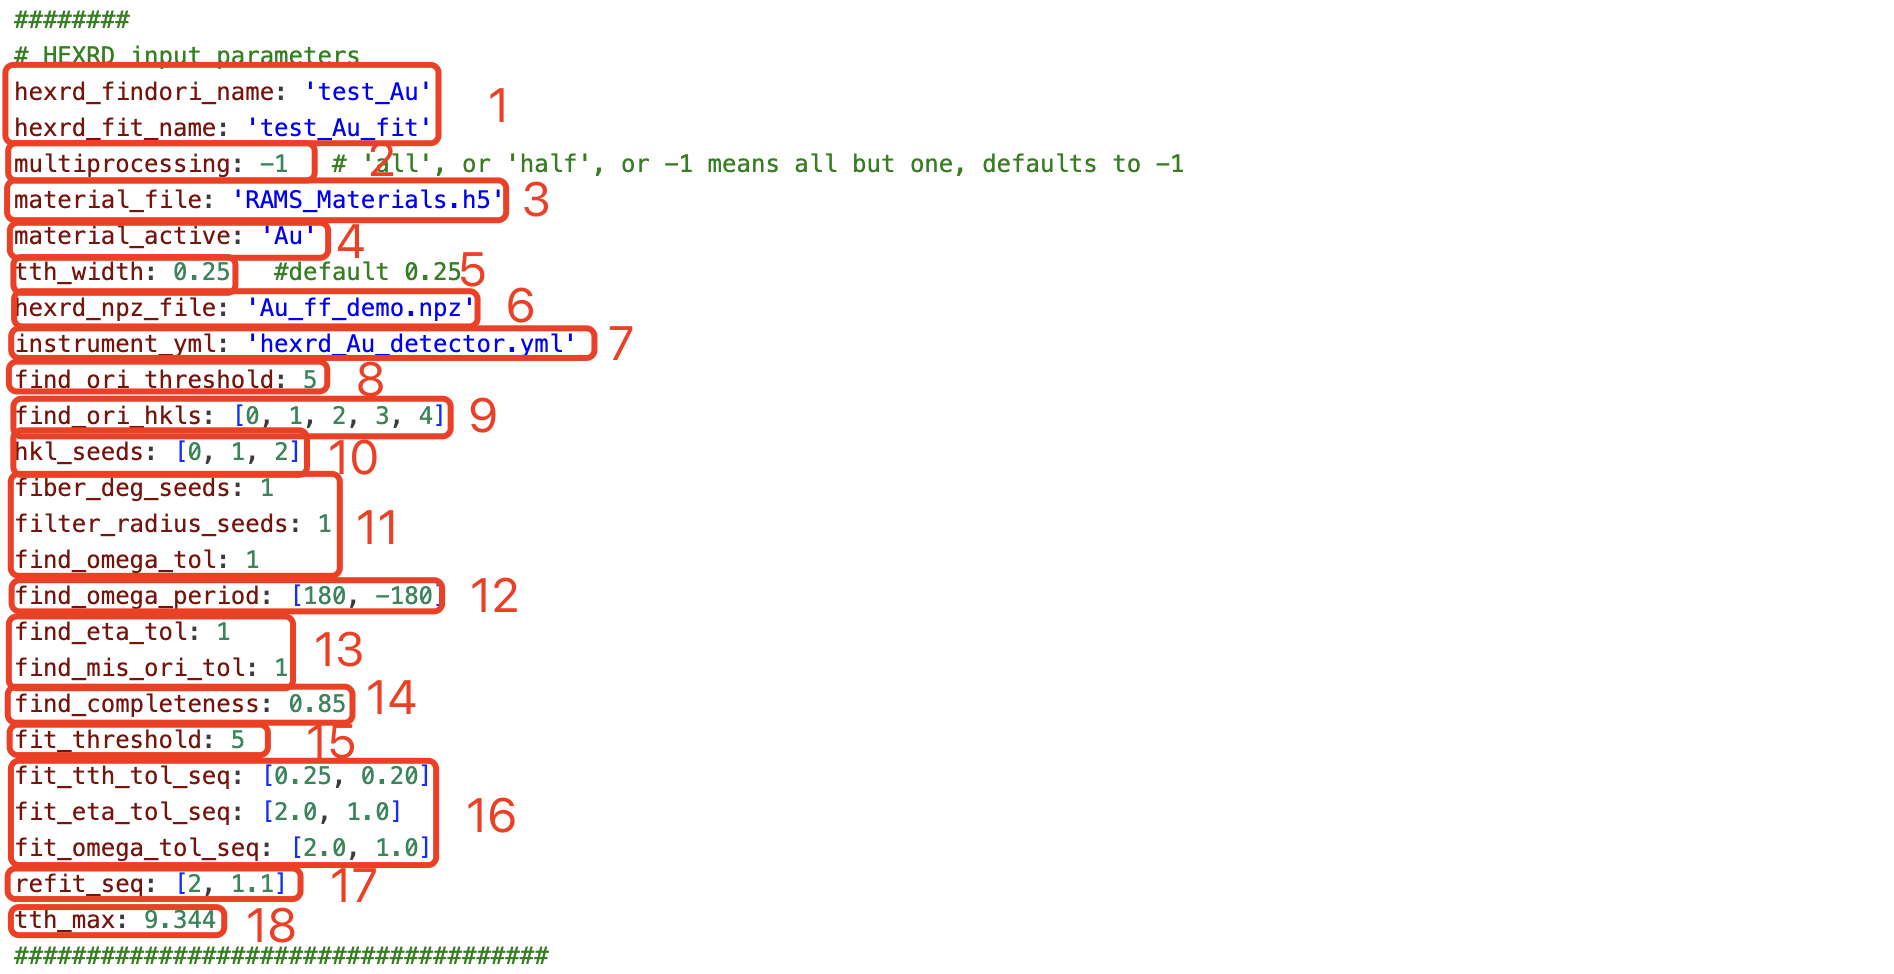
Area 1: Names for the find-orientation and fit-grains analyses. These should have distinct names to avoid conflicts as they involve operations like folder generation.
-
Area 2: Parameters for resource usage.
-
Area 3: Contains a multitude of crystallographic information pertaining to various materials.
-
Area 4: Selection of the material to analyze from the list provided in the file above.
-
Area 5: The two-theta search range. During the find-orientation process, it's necessary to specify the two-theta width for hkls, which is best verified in the GUI version to prevent overlap.
-
Area 6: The input npz file.
-
Area 7: Detector parameters that include tilt and beam energy, among others. These should be exported from the GUI version after calibration.
-
Area 8: A constant threshold added on top of the npz file.
-
Area 9: The hkls for find-orientation.
-
Area 10: Preliminary first-level screening.
-
Area 11: Tolerances for several angles, usually 1 degree is adequate and doesn't require adjustment.
-
Area 12: The range of data scanning, with the entire rotation angle being of utmost importance.
-
Area 13: Eta and misorientation tolerance, typically 1 degree is sufficient without needing changes.
-
Area 14: This is the ratio of the found spots within the search range to the expected number of spots, with a ratio of 1 indicating all spots were found.
-
Area 15: The threshold for the subsequent fit-grains process, which can generally be lower since fitting will be based on all spots and includes a peaks fitting process.
-
Area 16: Tolerance sequence for narrowing down the three key parameters during the fit-grains process: two-theta (tth), and the others being self-explanatory.
-
Area 17: Initially, it's better to have a larger range, especially for natural sandstone.
-
Area 18: The maximum two-theta value, which should not exceed the usable area on the detector; this should be checked with the GUI version.
Once you have tailored the
config.ymlfile with the above parameters, executing the following command will generate the requisite yml files for hexrd software automatically, which are then utilized by the software for analysis.hedm-platform ff_HEDM_process config.yml -
Additional Useful Features
- Check File Info:
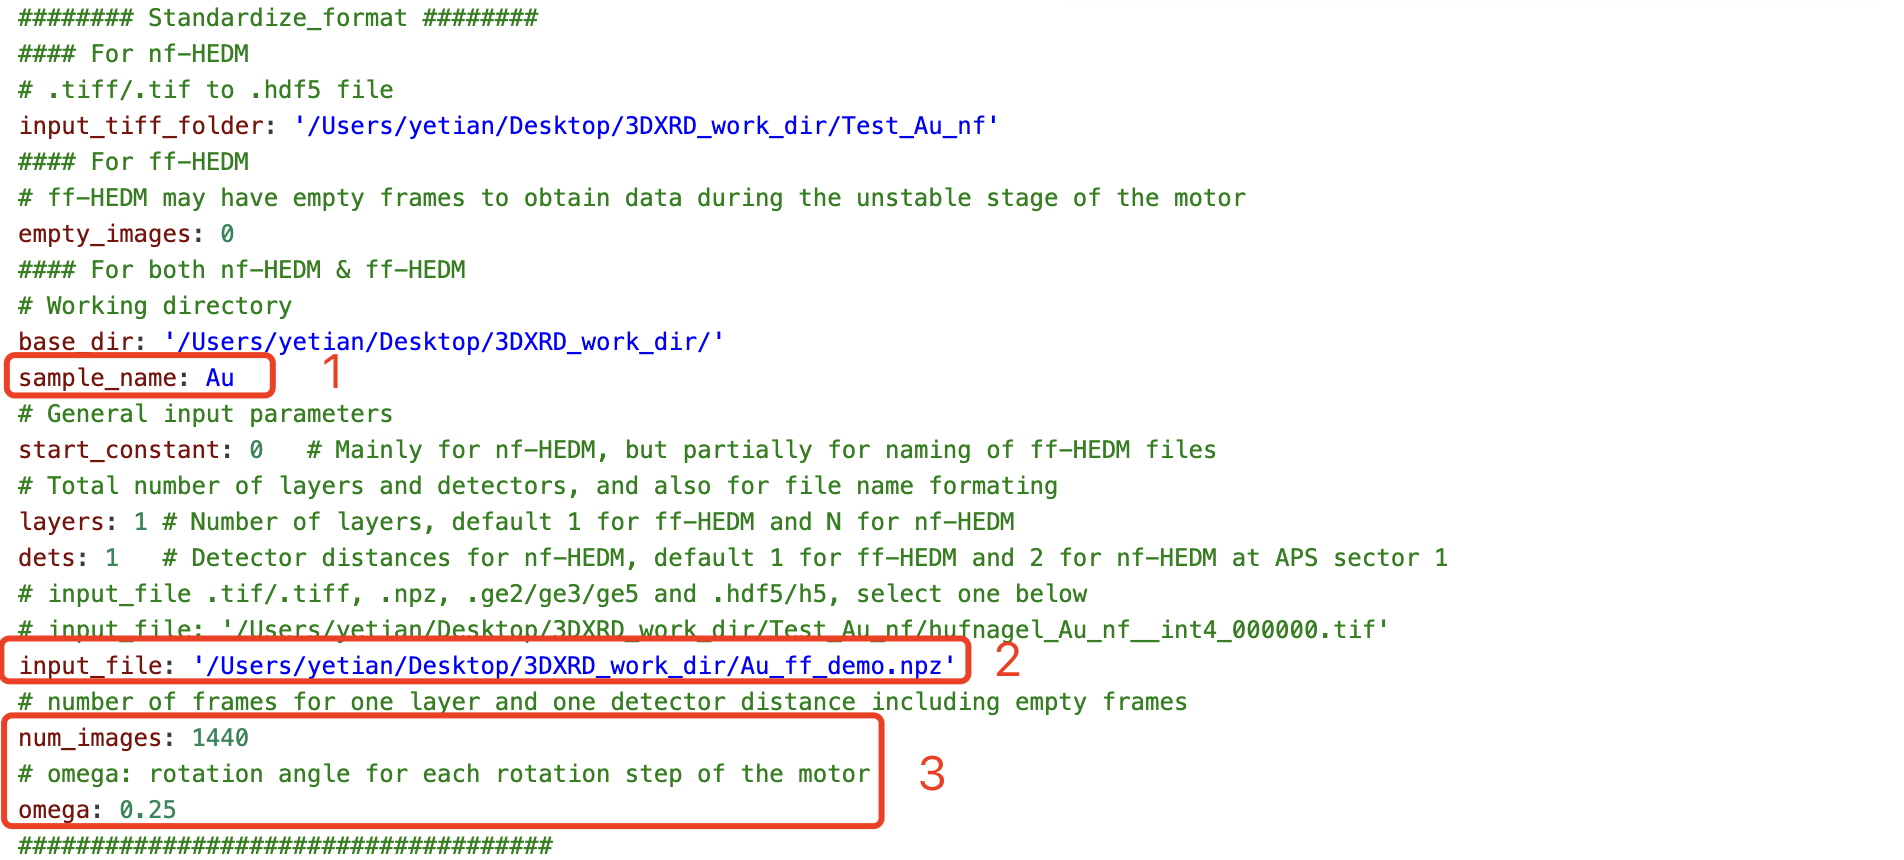
This function is utilized to check relevant file information, primarily focusing on file formats and the number of frames they contain. For HDF5 files, it also displays path information.
Let's take the example of the gold npz file included in the copy_demo to illustrate the use of this function. The primary modification required is in the input_file, corresponding to Area 2. Areas 1 and 3 should also be adjusted according to the content shown in the above image to facilitate testing of subsequent function capabilities.
npz files are sparse files, a type of lightweight file format that is highly portable and suitable for data storage. We can generate npz files for storage using the hedm_formats step. Later, as per the settings shown in the image, the stand can be used to convert them back into h5 files if necessary (for instance, for processing with ilastik). After making these modifications, please execute the following command to generate Au_layer0_det0.h5 for further function testing:
hedm-platform stand config.yml
This approach ensures efficient handling and processing of data files in the HEDM analysis workflow.
- Integrate images in hdf5:

The image above shows the configuration for the int_images function.
-
Area 1: This is the input file, which in this case is the newly generated standardized HDF5 file containing 1440 frames.
-
Area 2: Here, you specify the output file name. The addition of '1degree' in this example signifies that every 4 frames integrate to cover 1 degree of rotation, a common practice in this type of analysis.
-
Area 3: This area is for setting the integration coefficient. The setting is flexible and primarily utilized in NF HEDM processes. Often, due to objective factors in experimental setups that lead to low angular resolution, an integration of 1 degree is sufficient to save on computational costs. This feature can also be applied in FF HEDM for comparative purposes.
In essence, this function plays a crucial role in handling and analyzing NF HEDM data, optimizing the integration process to balance resolution and computational efficiency. By adapting these areas as needed, researchers can tailor the process to their specific experimental conditions and requirements.
hedm-platform int_images config.yml
3. NF HEDM Format Export:
To effectively process nf-HEDM data, it's advisable to first convert .tif files into HDF5 format for pre-processing. After processing the data, you should select 'True' in the options shown in the image below (Area 1) to export .tif files.

-
Area 1: Choose 'True' to enable the export of .tif files. This setting triggers the creation of a new folder based on the
sample_nameand the conversion of HDF5 files into Hexomap-compatible .tif files. -
Area 2: An option for applying a simple threshold to .tif files. This feature is particularly useful when fine-tuning the data for specific analysis requirements.
Note: When initially inputting .tif files, you can set the 'Generate ff-HEDM Formats' option to 'False' if you are only dealing with nf-HEDM data. This helps streamline the processing by bypassing unnecessary format conversions.
For any questions or suggestions, please contact ytian6688@hotmail.com/ytian37@jhu.edu or rhurley6@jhu.edu.
License: HEDM-Platform is distributed under the BSD 3-Clause license, with all new contributions adhering to this license.
The HEDM-Platform software package was chiefly developed by Ye Tian during his postdoctoral stint in Prof. Ryan Hurley's research group at Johns Hopkins University (JHU). This phase was characterized by significant advancements and contributions to the project. Additionally, the insights gained from Ye Tian's time with Prof. Todd Hufnagel's group also played a part in shaping the development of the software.
Project details
Release history Release notifications | RSS feed
Download files
Download the file for your platform. If you're not sure which to choose, learn more about installing packages.
Source Distribution
Built Distribution
Hashes for HEDM_Platform-0.4.1-py3-none-any.whl
| Algorithm | Hash digest | |
|---|---|---|
| SHA256 | 72a279680358cdcd7202c84b07cf177df0fcfe370a1f937949ba7cc5fbc861c3 |
|
| MD5 | 1167a4567b50ad5734cea4336d0d2f66 |
|
| BLAKE2b-256 | cda2386f8910ebf20b738a11d57ba82bd7346d9b44437b8f697b3c9fac8a2257 |


