Simple and powerful cross-platform script to control your pc and share statistics using communication protocols like MQTT and home control hubs like HomeAssistant.
Project description
IoTuring
Simple and powerful cross-platform script to control your pc and share statistics using communication protocols like MQTT and home control hubs like HomeAssistant.
Like his predecessor - PyMonitorMQTT - IoTuring allows you to choose which data are sent and which command are expected to be given.
Why should you use this ? You don't have to write your configurations manually, entities are updated asynchronously and multiple warehouses can be used with one single run (and this is not deprecated obviously!).
But the most important thing: works on all OSs and all architectures ! Windows, Linux, macOS, openBSD; x86, amd64, ARM and so on...
Install
You can easily install IoTuring through pip. Although the version is os-specific, so follow the instructions below to install the right version for your operating system.
Requirements
Some platforms may need other software for some entities.
Install all requirements on ArchLinux
pacman -Syu base-devel git python python-pip
Install and update all requirements on Debain
apt install git python3 python3-pip libdbus-glib-1-dev
pip install --upgrade pip
Install and update all requirements on Ubuntu
apt install git python3 python3-pip libdbus-glib-1-dev meson patchelf
pip install --upgrade pip
Windows
Download and install with pip
On Linux:
pip install IoTuring[linux]
On Windows:
py -m pip install IoTuring[win]
Note: on Windows you have to prefix every command with py -m as here.
On MacOs:
pip install IoTuring[macos]
Configure
The first time you run IoTuring you need to specify which entities and warehouses you want to enable. To run in configuration mode, you only need to specify the '-c' argument along the script execution command:
IoTuring -c
A simple menu will show and you will be able to configure your entities and warehouses ! Once you have selected your preferred settings, you're ready to run IoTuring.
You will be able to enter the configuration menu whenever you want (with the same command as above) to edit your choises.
Run
You can simply run IoTuring using this command
IoTuring
HomeAssistant demo
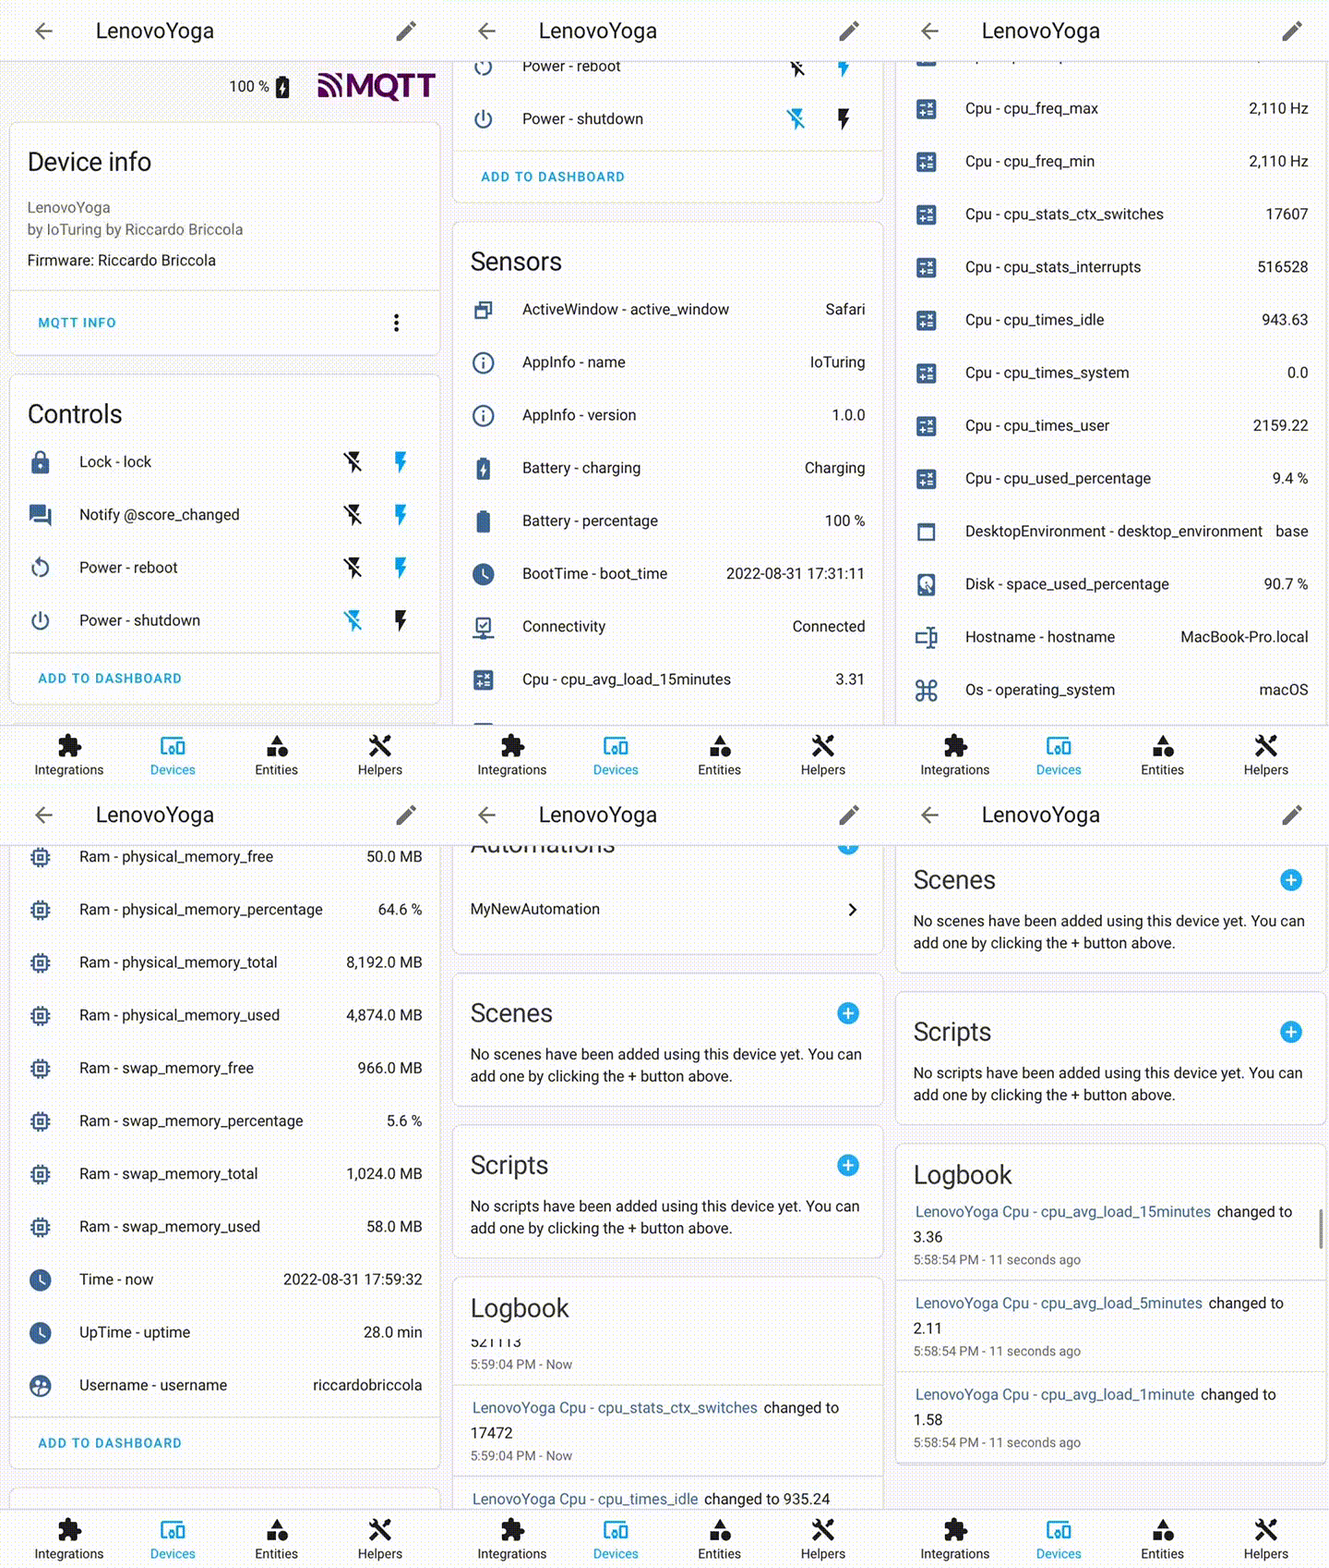
Your computer will show up in HomeAssistant as a single Device, so all your entities will be grouped together. The device will also have some properties like connectivity and battery status.
You can see how your device will appear under the Devices section in Home Assistant in the following GIF (wait until it's loaded):
All sensors and switches will be available to be added to your dashboard in your favourite cards !
Available entities
- ActiveWindow: shares the name of the window you're working on
- AppInfo: shares app informations like the running version
- Battery: shares the battery level and charging status
- BootTime: shares the machine boot time
- Cpu: shares useful information about cpu usage (times, frequencies, percentages)
- DesktopEnvironment: shares the running desktop environment (useful only for Linux)
- Disk: shares disk usage data
- Hostname: shares the machine hostname
- Lock: permits a remote lock command to lock the machine
- Monitor: permits remote monitors control commands
- Notify: permits remote notify show on your machine
- Os: shares the operating system of your machine
- Power*: permits remote poweroff, reboot and sleep commands
- Ram: shares useful information about ram usage
- Time: shares the machine local time
- Uptime: shares the time since the machine is on
- Username: shares the name of the user who is working on the machine
* To use the features from Power entity on Linux and macOS you need to give permissions to your user to shutdown and reboot without sudo password. You can easily do that by adding the following line at the end of the "/etc/sudoers" file (you can use the following command: sudo nano /etc/sudoers):
YOURUSERNAMEHERE ALL=(ALL) NOPASSWD: /sbin/poweroff, /sbin/reboot, /sbin/shutdown
Change YOURUSERNAMEHERE with the user that runs the script.
Available warehouses
- HomeAssistant: shares sensors and switches to HomeAssistant. The machine is shown as a Device and all the entites are grouped together. recommended
- MQTT: sends data to MQTT broker and subscribes to commands topics.
- Console: prints data to the console
Development
Editable install
git clone https://github.com/richibrics/IoTuring
cd IoTuring
pip install -e .
Then run it like in the non-editable mode.
Versioning
The project uses calendar versioning:
YYYY.0M.n:
YYYY: Full year: 2022, 2023 ...0M: Zero-padded month: 01, 02 ... 11, 12n: Build number in the month: 1, 2 ...
Project details
Release history Release notifications | RSS feed
Download files
Download the file for your platform. If you're not sure which to choose, learn more about installing packages.
Source Distribution
Built Distribution
Hashes for IoTuring-2022.12.2-py3-none-any.whl
| Algorithm | Hash digest | |
|---|---|---|
| SHA256 | 58573ed3470c4328a9db7637fe7ff1b67a6394b35ff22b1e2cca051d04e99d48 |
|
| MD5 | eb6e51b2fb31ba70016e9399e20f4342 |
|
| BLAKE2b-256 | 3fb467fb7ec452de4880f43fb587b17262453e9209e23c2b806ecd17a5443974 |


