A Python library for the QA40x audio analyser (int2code fork)

Project description
Note: This repository is a fork of the original PyQa40x project and may include custom changes specific to this fork.
PyQa40x allows you to run Python code to communicate with the QA40x hardware. No intermediate program is needed, as the PyQa40x lib understands how to use the calibration data stored inside the QA40x hardware.
The library is very much in flux, and support might be sporadic. The PyQa40x lib is one of several ways to use the QA40x hardware. There are now 5 ways to interact with your QA40x hardware:
- Using the QA40x application. This is the most-supported path. An addition to making a host of basic audio measurements, the QA40x app can also do swept plots, which is useful for plotting thinks like THD versus Level, for example. The application is located here
- Tractor. Tractor allows you create scripts to drive automated testing. You can establish pass/fail limits, allowing an operating with limited skills to test products in a production environment. Tractor works in conjuction with the QA40x application to "drive" your tests. The application is located here
- REST. REST is a common way of interacting with other entities on the internet, and every modern language provides support for implementing REST. The QA40x application handles the REST communication, and allows you to use GET/PUT/POST to control the measurements. A test program in C# is located here. More info on the Wiki is located here
- Bare Metal. If you'd like to see how to communicate with the QA40x hardware directly with c#, you could look at the repo located here
- ASIO. An ASIO driver for the QA403/QA402/QA401 is available here, allowing you to use the QA40x hardware with common audio-processing applications.
- PyQa40x. This library is an attempt to streamline a lot of common processing operations, while handling some of the more difficult topics such as normalization and windowing. The aim here is to facilitate an environment to digital signal processing development using absolute values instead of relative values. What this means is if you specify a 1Vrms sine way, the output of of the QA40x hardware will be 1Vrms.
The rest of this document focuses on running the PyQa40x examples under Jupyterlab Desktop.
Getting up and running
If you are looking for a simple starting point for running Python, Jupyterlab Desktop is probably it. It delivers a nice editing environment, includes its own Python installer, and delivers beautiful plots.
Install JupyterLab Desktop
There are a lot of flavors of Jupyter. JupyterLab Desktop is the cross-platform desktop application for JupyterLab, and it is probably the quickest and easiest way to get started with Jupyter notebooks on your local machine.
Go to the JupyterLab Desktop page on Github located here
Scroll down to the Installation section and select the installer for your particular operating system.
Once the application has installed, upon first run, you'll see an option to install Python at the base of the Jupyter home screen.
Once Python has installed, go to the Github page for the PyQa40x lib and locate the green Code button. Click that and download a zip of the library. Unzip that into the directory of your choice.
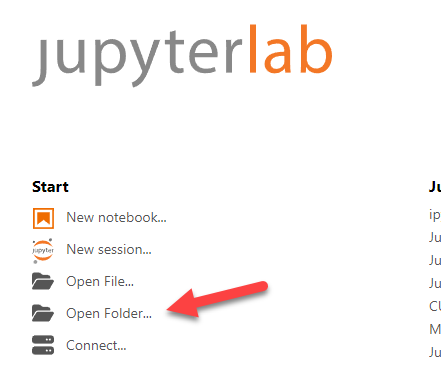
Re-launch the JupyterLab Desktop app, and from the main screen, select "Open Folder." Create a new folder on your drive off of MyDocs, and name it JupyterLabAudioTest or similar.
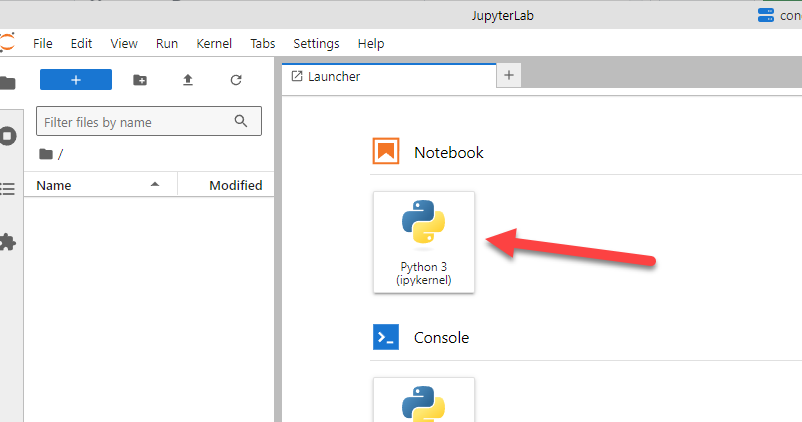
Open a Notebook using Python 3.
You will be greeted with an Untitled.ipynb file. Go to the cell and enter
!pip install git+https://github.com/QuantAsylum/PyQa40x.git
as shown below. After entering, you can push the "Run this Cell" button, or just enter SHIFT + ENTER
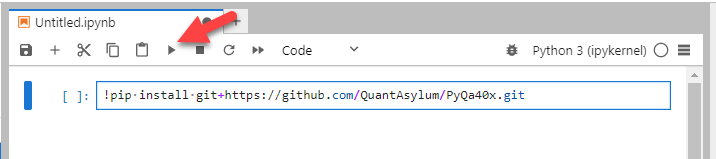
This will install the library.
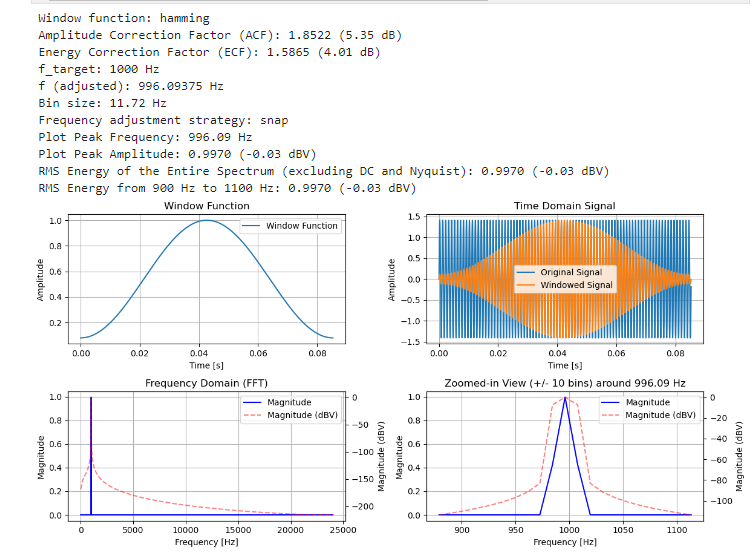
Next, go to the PyQa40x directory you unzipped, and look in the LibTest subdirectory and open and copy the FirstPrinciples.py code. And then, paste that in the next cell in JupyterLab Desktop and run it. That should produce a graph similar to below:
Next, copy the contents of the file PyQa40x_thdn.py into the next cell in JupyterLab Desktop and run that. At some point, you will run into errors telling you that libraries are missing. When you encounter an error message that a library is missing, you will need to add that library. For example, if you see the error on the line
import usb1 # pip install libusb1
the comment after the import error will indicate how to install the library. For example, pip install libusb1. Just remember that if you want to run that command from a cell, you need to preface it with an exclaimation point such as !pip install libusb1.
Release history Release notifications | RSS feed


Download files
Download the file for your platform. If you're not sure which to choose, learn more about installing packages.
Source Distribution
Built Distribution
Filter files by name, interpreter, ABI, and platform.
If you're not sure about the file name format, learn more about wheel file names.
Copy a direct link to the current filters
File details
Details for the file pyqa40x_i2c-0.1.0.tar.gz.
File metadata
- Download URL: pyqa40x_i2c-0.1.0.tar.gz
- Upload date:
- Size: 44.6 kB
- Tags: Source
- Uploaded using Trusted Publishing? No
- Uploaded via: twine/6.2.0 CPython/3.12.13
File hashes
| Algorithm | Hash digest | |
|---|---|---|
| SHA256 |
dc092f9ad72e030c21e126aae01213a54fb69d8e0fcec911f896652bb051b786
|
|
| MD5 |
aa8ac9af156669a77fb94eb4a1ce8bfc
|
|
| BLAKE2b-256 |
7f425919785481e6dbaf3250d1f208b0b9cc438e732f138bbcde0b86b25de30f
|
File details
Details for the file pyqa40x_i2c-0.1.0-py3-none-any.whl.
File metadata
- Download URL: pyqa40x_i2c-0.1.0-py3-none-any.whl
- Upload date:
- Size: 35.0 kB
- Tags: Python 3
- Uploaded using Trusted Publishing? No
- Uploaded via: twine/6.2.0 CPython/3.12.13
File hashes
| Algorithm | Hash digest | |
|---|---|---|
| SHA256 |
0022848064114890c32509b9fe1534d8a774a083e7cf7730ecfe69b4dc855cbc
|
|
| MD5 |
5fb4a25fed23293fd9bf55b2e6e41985
|
|
| BLAKE2b-256 |
31b0ec817553d2be2ff2252ba7d505f43a36cd71bc80a0b975021fe5a940484a
|


