A Simple fast lightweight webframework lib for python

Project description

Slime – A Rust + Python Hybrid Web Framework
Slime is a high-performance web framework that combines Rust and Python
It is designed for developers who want Python developer experience with a Rust-powered server core. Slime is ideal for building:
- API
- Real-time applications
- Web backends
- Microservices
- Streaming Services
Why Slime?
Slime isn’t just another Python framework, it’s built for developers who want speed, control, and simplicity without compromise.
-
Rust Performance, Python Simplicity: Write clean, expressive Python code while Slime handles execution on a high-performance Rust core.
-
No-GIL Execution (True Concurrency): Break free from Python’s GIL limitations.Run highly concurrent workloads efficiently without complex workarounds.You can still use with-GIL (Refer Slime Cli section).
-
Minimal Yet Powerful: No bloated abstractions. No unnecessary magic.Slime keeps things simple, predictable, and fast to learn.
-
Extensible by Design: Create your own middleware, plugins, and request pipelines with ease.
-
Built for Real-Time Systems: Streaming and WebSocket support are built-in, making Slime ideal for real-time applications like chats, dashboards, and live data systems.
-
Flexible Handler Model: Write both sync and async handlers seamlessly. Choose what fits your use case without being forced into one style.
-
Clean and Simple API Design: A straightforward and intuitive API that avoids unnecessary complexity, making development faster and more enjoyable.
-
Scales with Your Needs: Start small and scale to high-performance workloads without switching frameworks or re-architecting your application. Slime performance scales by cpu cores
-
Production-Ready by Default: Minimal setup, powerful features, and a smooth developer experience from start to finish.
Features
- Python handler functions
- Rust powered HTTP server
- Single Process & Multiple worker pool model
- Sync & async handler
- Multipart form support
- File uploads
- Streaming Response
- Cookie signing
- Custom headers
- JSON / HTML / raw responses
- Templates rendering with context
- Static serving
- Hot reload
- WebSocket
- App state
- Compression
- Middleware plugin
- Generate docs
- Dynamic body read size constraint
Installation
    pip install slimeweb
    slime new ProjectName
    cd ProjectName
    slime run ProjectName
After running these commands, open your browser and navigate to
http://localhost:3000
You'll see this message displayed:
Hello World from slime
Project Structure
Projects are created and initialized using uv after using below command, by default it runs in python no-gil mode, for max performance.
slime new ProjectName
root/
│
├── .venv/                 # Virtual environment
├── static/                # Static files (CSS, JS, images)
├── templates/             # HTML templates
│
├── .gitignore             # Git ignore rules
├── .python-version        # Python version specification
├── main.py                # Main application entry point
├── pyproject.toml         # Project configuration and dependencies
├── README.md              # Project documentation
└── uv.lock                # Locked dependency versions
Getting Started
Use the below code to create simple GET request in dev environment
from slimeweb import Slime

app = Slime(__file__)

@app.route(path="/", method="GET")
def home(req, resp):
    return resp.plain("Hello World from slime")

if __name__ == "__main__":
    app.serve(dev=True)
Slime Cli
    slime new projectName    -> Create new project
    slime run main           -> Run slime without GIL
    slime rung main          -> Run slime with GIL
    slime runw main          -> Run slime without GIL and watch (auto-reload)
    slime rungw main         -> Run slime with GIL and watch (auto-reload)
    slime add packageName    -> Add lib to the project deps
    slime remove packageName -> Remove lib from the project deps
    slime version            -> Show slime version
Basic Application
To create a route in slimeweb, Use route() method. Route method contains
- path ('/' as default)
- method ('GET' as default)
- stream (content-type)
- ws (create websocket for this path)
- compression (SlimeCompression.NoCompression as default)
- body_size (10MB as default)
NOTE: You can define only one handler per unique route-method combination, defining multiple handlers for the same path and method will raise an error.
@app.route(path="/", method=["GET","POST"])
def index(req, resp):
    if req.method == "GET":
        return resp.plain("Hello from Slime")
    else:
        return resp.json({
            "status": "ok",
            "message": "Hello from Slime"
        })
Handlers in slimeweb can be written as either regular synchronous functions or asynchronous ones. Async handlers run using Python's asyncio event loop for efficient, non-blocking execution.
Every handler receives exactly two arguments:
-
SlimeRequest: The incoming request object, containing details like headers, body, and query parameters.
-
SlimeResponse: The response object you'll use to build and send the output back to the client.
The exact way you handle and populate the response depends on the route type (e.g., HTTP,Streaming or Websocket). Check the API & Examples reference below for type-specific details.
To start the Slime server we should use server() method.
app.serve()
serve() has few optional argument you can pass
- host (default 127.0.0.1)
- port (default 3000)
- secret_key (default None, used for cookie sign)
- dev (default False)
- app_state (default {})
- workers
Worker:
You can control the number of workers using the SLIME_WORKER environment variable.
- In development mode, it defaults to 1 worker
- In production, it automatically uses the number of CPU cores
 export SLIME_WORKER=3

 OR

 $ENV:SLIME_WORKER="3"
You can also set numbers of workers by passing it in serve() method.
app.serve(workers=3)
Request Body Handling
Slime supports multiple types of request bodies:
@app.route(path="/test", method="POST")
def hello(req, resp):
    print("query", req.query)
    print("params", req.params)
    print("body", req.body)
    print("json", req.json)
    print("form", req.form)
    print("text", req.text)
    print("bytes", req.bytes)
    print("file",req.file)
    return resp.json({"status": "ok"})
If the request body size limit is exceeded in Slime, it returns a 400 BAD REQUEST response. To fix this, increase the body_size parameter in your route(body_size=1024 X 1024 X 30) it's 10MB by default.This applies to route(),stream(),websocket().
LifeCycle
The lifecycle of a Slime application describes the order in which events occur during execution.
@app.start() -> Request Lifecycle(Refer Middleware) -> @app.end()
- It starts by calling app.start()
- Then it process request lifecycle
- Finally it call @app.end()
@app.start()
def start_app():
    print("app has been started")

@app.end()
def end_app(args):
    print("app has been ended with error => ",args)
Both app.start() and app.end() are optional. When app.end() runs, it receives one argument, it can be None or an exception. If the app stops because of server shutdown, that exception is passed in, so you can handle cleanup or run any final logic before the app closes.
NOTE: @app.start can also support async function but not @app.end()
App State
App state allows you to maintain shared data across requests during your app's lifecycle.
Initialize app state when starting your server
app.serve(app_state={"counter": 0})
Within each handler, the current app state is automatically injected into the SlimeRequest object. Use these methods to interact with it:
- req.get_state(key), To retrieve the current value for a given key.
- req.update_state(key,value), To update the value for a given key.
NOTE: SlimeState is not atomic. In concurrent scenario with multiple simultaneous request, race condition may occur during state updates, Potentially leading to incorrect values. For production when working with high concurrency, consider implementing your own synchronization or use external state store.
Template Render
@app.route(path="/", method="GET")
def land(req, resp):
    html = req.render("hello.html", **{"name": "abilash", "slimeVersion": "0.0.1"})
    return resp.html(html)
Few examples on rendering
<h1>Hello {{ name }}!</h1>
above will result like
<h1>Hello abilash!</h1>
Logic
{% if user %}
  Hello {{ user }}
{% else %}
  Hello Guest
{% endif %}
Loops
<ul>
{% for item in items %}
  <li>{{ item }}</li>
{% endfor %}
</ul>
You can also generate
- Markdown
- SQL
- Custom Code
- YAML
- JSON
- Config File
- HTML & etc..
File Upload
In your Slime file handler, access uploaded files via the req.file attribute, it returns a list of SlimeFile objects (Refer below for SlimeFile API).
Note: For security, Slime automatically strips the original file extension and assigns a unique filename to each uploaded file.
@app.route(path="/test", method="POST")
def hello(req, resp):
    file = req.file[0] # use can upload multiple files
    print(file.filename)
    print(file.content_type)
    print(file.file_path)
    print(file.file_size)
    print(file.extension)
    file.save(f"testing_file.{file.extension}")
    return resp.json({"status": "ok"})
Compression
Slime supports response body compression to reduce payload size and improve performance.
from slimeweb import SlimeCompression
@app.route(path="/",method="GET",compression=SlimeCompression.Gzip)
def land(req,resp):
    resp.plain("hello" * 5000)
In this example, Gzip compression is enabled for the route. If the client requested for compression, Slime will automatically compress the response body before sending it. Refer API for types of compression available.
You can also specify the compression level by passing comp_level=9, By default its set as level 1. Each compression has different range, Refer API for the range
from slimeweb import SlimeCompression
@app.route(path="/",method="GET",compression=SlimeCompression.Gzip,comp_level=9)
def land(req,resp):
    resp.plain("hello" * 5000)
NOTE: Compression body has a threshold slime will compress the body if the content size is above the threshold, to prevent unnecessary CPU cycle.
Middleware
Middleware should be declared after declaring route handler
LifeCycle of request handler
Middle before request -> Router handler -> Middle after request
@app.middle_before(path="/", method="GET")
def land_before(req, resp):
    resp.set_header("AFTER", "REQUEST")


@app.middle_after(path="/", method="GET")
def land_after(req, resp):
    resp.set_header("BEFORE", "Request")
NOTE: Middleware handlers must match the route handler's type. If your route handler is asynchronous, the middleware must also be async (and vice versa for sync).
Middleware Plugin
Slime allows you to create your own middleware plugins using the use() method. To build one, simply create a class that extends SlimeMiddleware which is available in slimeweb package, and then define the middle_before and middle_after methods. After defining the class pass the instance of the class to the app.use().
from slimeweb import SlimeMiddleware

class SimpleMiddle(SlimeMiddleware):
    def middle_after(self, req, resp):
        resp.set_header("PluginAfter","CustomPlugin")
    def middle_before(self, req, resp):
        resp.set_header("PluginBefore","CustomPlugin")


if __name__ == "__main__":
    app.use(SimpleMiddle())
    # or
    app.use(SimpleMiddle(),method=["POST","GET"],path="/home")
This example builds a custom middleware plugin named SimpleMiddle with both middle_after and middle_before methods. To apply the plugin, we are using use() method, which targets all routes and HTTP methods by default. We can limit the scope of the plugin by specifying the route and the path.
we can also set plugin in route(), by passing the instance of the class to the plugin argument
@app.route(path="/json", plugin=Cors())
# OR
@app.route(path="/json", plugin=[Cors(),SimpleMiddle()])
NOTE: Plugin use() should be used after declaring the routes, otherwise error will be raised.
Streaming
Streaming in slime is simple and straightforward. When declaring your route, specify the stream's content-type. You can add any headers to the response before calling start_stream(). Once start_stream is called, streaming begins to the user. Use send() to stream data chunks and slime automatically serializes them before sending. Call close() when done to end the connection.
NOTE: Updating headers after start_stream() will cause an error.
@app.route(path="/stream", method="GET", stream="text/plain")
def stream_me(req, resp):
    resp.start_stream()
    for i in range(5):
        resp.send(i)
    resp.close()

    # OR you can use @app.stream

@app.stream(path="/stream", method="GET", content="text/plain")
def stream_me(req, resp):
    resp.start_stream()
    for i in range(5):
        resp.send(i)
    resp.close()
WebSocket
WebSockets in Slime are event-driven, meaning Slime calls specific callback methods when key events happen.
You'll typically need two optional callbacks (not required):
- One for when data is received from the client
- One for when the client disconnects
In the echo example below, the read_me() callback first checks if the client is still connected. If yes, it echoes back the exact message it received.
NOTE: The on_message() callback must accept 1 argument which is the data sent by the client.
@app.websocket(path="/chat", method="GET")
def chatty(req, resp):

    def read_me(msg):
        if not resp.is_closed():
            resp.send(msg)

    def close_me():
        print("Connection closed")
    def error_me(err):
        print("Got Error: ",err)

    resp.on_message(read_me)
    resp.on_close(close_me)
    resp.on_error(error_me)
Pydantic Validation
Slime has simple wrapper around pydantic model so you can able to validate your json body using pydantic.
from pydantic import BaseModel

class Student(BaseModel):
    name: str
    age: int
    marks: int

@app.route(path="/", plugin=Cors())
async def land(req, resp):
    req.validate(Student)
In above example we are extending the BaseModel from pydantic and passing the custom class to validate. Pydantic will check the json body and raise error if not valid or you can return the validation error result by passing raise_err=False
@app.route(path="/", plugin=Cors())
async def land(req, resp):
    req.validate(Student)
    #  => this will raise error and return 500 as response
@app.route(path="/", plugin=Cors())
async def land(req, resp):
    err = req.validate(Student,raise_err=False)
    #  => this will return the pydantic error.
Swagger Docs
Slime can automatically generate Swagger documentation and serve it at the /docs endpoint when your server is running in development mode (dev=True).
To enable this, you simply need to define your documentation using the @docs() decorator.
class SubItem:
    is_item: bool
    how_long: int


class User:
    name: str
    age: float
    sub: dict[str, SubItem]


 @app.docs(
    title="just checking",
    description="Simple landing page",
    response_type=SlimeResponseType.PlainResponse,
    schema=SlimeSchema(
        body=BodySchema(schema_name=User), query=[QuerySchema(name="name", type=str)]
    ),
)
@app.route("/", method=["GET","POST"])
def land(req, resp):
    print(req.header)
    if req.method == "GET":
        resp.plain("hello" * 3000)
    else:
        resp.json({"status": "ok"})
In this example, documentation is attached to a route by providing details like title, description, response_type, and schema through the @docs() decorator.
For the schema, you can define both:
- BodySchema (Request payload)
- QuerySchema
These are available from the slimeweb package. Please check the API reference for more details on how to define schemas.
NOTE: You can define only one @docs() to route only, more than one can raise error.
Api
Slime Request
  req.method -> str
  req.path -> str
  req.client -> str # client address
  req.header -> Dict[str,str]
  req.body -> Bytes
  req.bytes -> [Bytes] (u8)
  req.form -> Dict[str,str]
  req.file -> [SlimeFile]
  req.json -> Any
  req.query -> Dict[str,str]
  req.params -> Dict[str,str]
  req.text -> str
  req.secret_key -> str
  req.get_cookies() -> Dict[str,str]
  req.get_signed_cookie(key: str) -> str|None
  req.render(template_name: str,Dict[str,any]|None)
  req.no_of_files_available() -> int
  req.get_state(key: str) -> Any
  req.update_state(key: str,value: Any)
  req.validate(obj: BaseModel,raise_err=True) -> None |dict[str, list[dict[str, str]]]
HTTP Slime Response
  resp.set_cookie(key: str,value: str) -> None
  resp.set_sign_cookie(key:str,value: str,secret: str) -> None
  resp.set_header(key: str,value: str) -> None
  resp.status -> int
  resp.set_status(status_id: int) -> None
  # Here status is optional parameter
  resp.plain(data: str,status=200)
  resp.json(data: any,status=200) # any Pyobject which we can serialize
  resp.html(data: str,status=200)
Stream Slime Response
  resp.content_type ->  str
  resp.headers -> Dict[str,str]
  resp.set_header(key: str,value: str)
  resp.start_stream() # to start the stream
  resp.send(data: any) # any Pyobject which we can serialize

  #send has optional parameter strict_order which is default as True
  #if your streaming doesn't need to be in order it will create task for each send and run in async internally.
  # NOTE: If strict_order=False and send() is failed it will return silently with error in terminal.

  resp.close() # close stream
Websocket Slime Response
   resp.id -> str
   resp.on_message(handler: Callable) -> None
   resp.on_close(handler: Callable) -> None
   resp.on_error(handler: Callable) -> None
   resp.send_text(data: any)
   resp.send_bytes(data: any)
   resp.send_json(data: any) # any Pyobject that we can serialize
   resp.is_closed() -> bool
SlimeFile
    slimefile_obj.filename -> str
    slimefile_obj.content_type -> str
    slimefile_obj.file_path -> str
    slimefile_obj.file_size -> int
    slimefile_obj.extension -> str
    slimefile_obj.save(new_filename: str) -> None
    slimefile_obj.clean() -> None # remove temp file
SlimeCompression
from slimeweb import SlimeCompression #Enum

    SlimeCompression.NoCompression  (default)
    SlimeCompression.Gzip
    SlimeCompression.Brotli
    SlimeCompression.Zstd
    SlimeCompression.All  # based on the request slime will pick the best compression
SlimeCompressionLevel
    SlimeCompression.Gzip   => [1,9]
    SlimeCompression.Brotli => [1,11]
    SlimeCompression.Zstd   => [1,22]
This is the range limit for passing the comp_level for each compression
SlimeDocs
from slimeweb import SlimeResponseType,SlimeSchema,BodySchema,QuerySchema

@docs(
    title: str= "",
    description: str="",
    response_type: SlimeResponseType = SlimeResponseType.JSON
    schema: SlimeSchema =SlimeSchema()
)
SlimeResponseType
from slimeweb import SlimeResponseType #Enum
    SlimeResponseType.PlainResponse
    SlimeResponseType.JsonResponse
    SlimeResponseType.HTMLResponse
    SlimeResponseType.StreamResponse
    SlimeResponseType.WebSocketResponse
    SlimeResponseType.CsvResponse
    SlimeResponseType.XmlResponse
    SlimeResponseType.BinaryResponse
SlimeSchema
from slimeweb import SlimeSchema

SlimeSchema(
    query: list[QuerySchema]|None,
    body: BodySchema|None
)
QuerySchema & BodySchema
from slimeweb import QuerySchema,BodySchema

  BodySchema(schema_name: class)

  QuerySchema(
      name: str,
      type: str|int|bool,
      required: bool =True
  )
SlimeServer
 app.serve(
     host: str,
     port: int,
     secret_key: str,
     dev: bool,
     app_state: Dict[str,Any],
     workers: int,
     static_path: str  # it first check relative path and then consider as absolute path.
 )
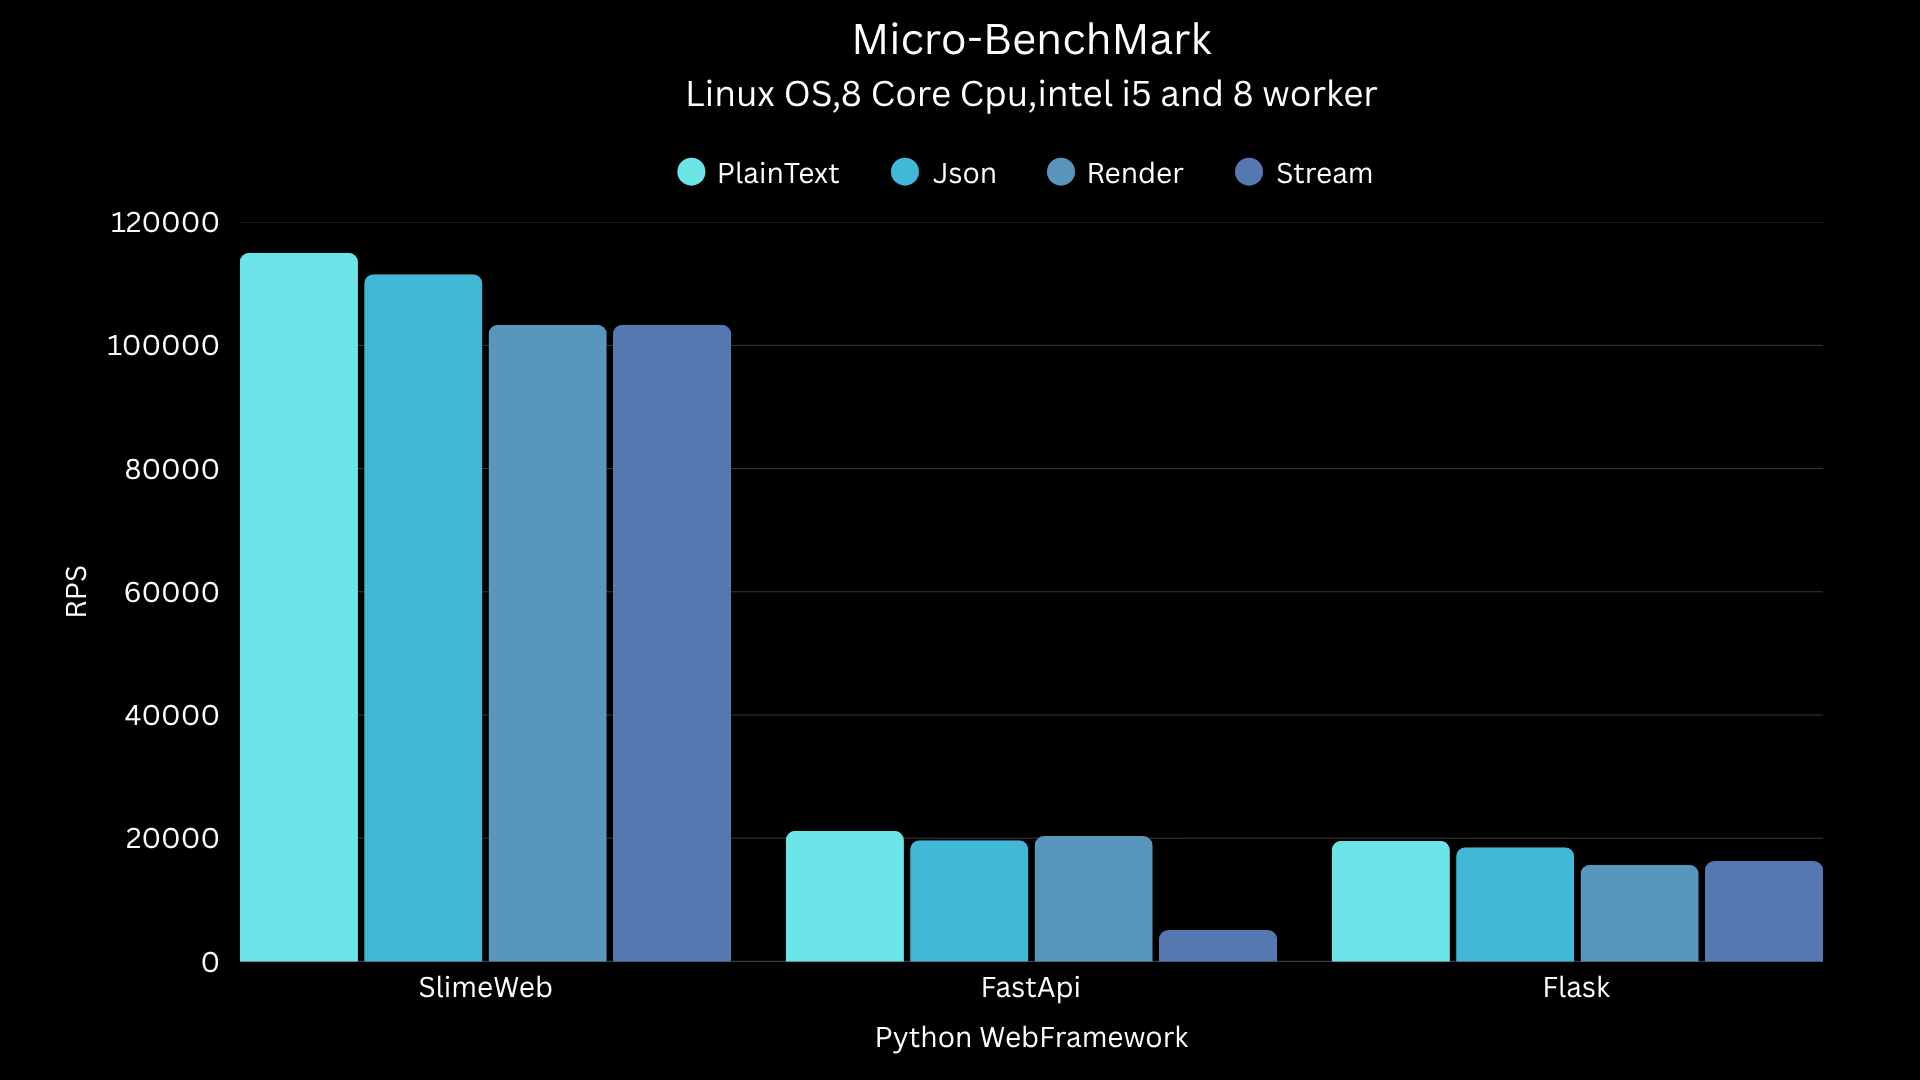
Benchmark
BenchMark Code with no-gil example:
License
This project is licensed under the terms of MIT license
Thank you & enjoy using SlimeWeb ❤️ ~ Abilash Suresh
Release history Release notifications | RSS feed


Download files
Download the file for your platform. If you're not sure which to choose, learn more about installing packages.
Source Distribution
Built Distribution
Filter files by name, interpreter, ABI, and platform.
If you're not sure about the file name format, learn more about wheel file names.
Copy a direct link to the current filters
File details
Details for the file slimeweb-0.2.3.tar.gz.
File metadata
- Download URL: slimeweb-0.2.3.tar.gz
- Upload date:
- Size: 5.5 MB
- Tags: Source
- Uploaded using Trusted Publishing? No
- Uploaded via: twine/6.2.0 CPython/3.12.3
File hashes
| Algorithm | Hash digest | |
|---|---|---|
| SHA256 |
5599894321a1386599ffa7a23186fbce26d8774197d026870e333d9267c2a91d
|
|
| MD5 |
8d3e8b15ff0a91018e25ce91310cbe1f
|
|
| BLAKE2b-256 |
4f7b20f5633ee5eba6bdd29f8730712432d9a53f9e6850af2cd87a0bd13d7423
|
File details
Details for the file slimeweb-0.2.3-py3-none-any.whl.
File metadata
- Download URL: slimeweb-0.2.3-py3-none-any.whl
- Upload date:
- Size: 5.5 MB
- Tags: Python 3
- Uploaded using Trusted Publishing? No
- Uploaded via: twine/6.2.0 CPython/3.12.3
File hashes
| Algorithm | Hash digest | |
|---|---|---|
| SHA256 |
10431cbff792e9a061692c54580ef4cfc53837f749e963d00b927ac88c9ceee5
|
|
| MD5 |
4ef9bbaff54b7dc209e82c702a7110bd
|
|
| BLAKE2b-256 |
84c3b97bab5b128371209d5acc7a58c95df84383edabbb95fe41269ccd34e0f1
|


