
[=] AbstractIntegratedModule, Specialized-AI-Agent-framework for Non-LLM Continual-learning edge AI Models.
[~] Introduction:
- AbstractIntegratedModule or IntegratedPipeline in short, is a standalone Specialized AI Agent Framework for Non-LLM memory Augmented Local Agentic orchestrator - Specifically designed to provide Local Agentic capability for any Autonomous Agentic Framework as single Instance or Coordinatively that runs efficiently from consumer based machine to High-end embedded systems, where the Model Can directly and continously learn, with minimal and efficient compute, built-in augmented memory, Secure Peer-To-Peer (Multi-Agent) Coordination with security layers as an option, And Explainability capability based on proof from in it's internal metrics, reducing Black-Box condition necessary for reliability.
- AbstractIntegratedModule Contains specialized MLP using Its Own specialized geometric Weight encoding (AWE) that is used for Quantization-Aware-Training (QAT) for lower memory Usage, Specialized efficient Transformer and LSTM (Long-short term memory) architecture for Scarce Data training/prediction with Alpha-based computation, specifically designed for low-amount samples environment or Messy environments.
- IntegratedPipeline Use-Case:
- Tabular Data Prediction: Finding patterns in structured spreadsheets or rows of numerical and categorical features.
- Classification Tasks: Separating data into groups, such as spam detection, customer churn, or disease diagnosis.
- Regression Tasks: Predicting continuous numerical values like house prices, sensors output, sales numbers, or weather metrics.
- IntegratedPipeline Use-Case:
[+] Framework's Purpose
- This framework is intended for Engineers who is early in ML Engineering in order to provide a Clearer picture of How edge AI Should operate, Low memory management, and Also how it can be Made continuously learn using Pragmatic solution by using SQLite to save Weights to prevent continuous catasthropic forgetting, IntegratedPipeline source code is open-sourced and can be found in our github repository, Meaning you can modify the Source code however You liked it to be, and help Us Grow the first Community!
Important Note:
- All of the files provided here can be found in the main Github repository, if You are seeing this on PyPi and wanted to try out the provided .py, .sh or Dockerfile scripts below, consider visiting the official github repository:
- link: https://github.com/Micro-Novelty/IntegratedPipeline-Specialized-Non-LLM-AI-Agent-Framework
Library Short Description
- Development Stage on PyPi: 1.2.7 Official Release.
- Author and Maintainer: Micro-Novelty and EpsitronNet-bot.
- library Source-Code is Open-sourced with MIT License.
- Purpose: Specifically Designed for providing Non-LLM AI Agent Framework for edge Devices, Optimized for ARM64 architecture.
- Library installation:
pip install AbstractIntegratedModule
python -m install AbstractIntegratedModule
Github Link (for Visiting and cloning)
-
https://github.com/Micro-Novelty/IntegratedPipeline-Specialized-Non-LLM-AI-Agent-Framework
-
The library also includes precompiled binaries for:
-
aarch64 manylinux (accepts version 2.17+) architecture, accepts python version 3.10, 3.11 only.
-
aarch64 musllinux (accepts version 1.2+) architecture, accepts python version 3.10, 3.11 only.
-
Windows 64 bit architecture (python 3.10, 3.11, 3.12, 3.13 only)
-
single tarball file for Users who want to test the library up to Python version 3.12 or 3.13+.
-
Library installation if you dont have aarch64 setup, you can download the correct wheel for your setup in this repository or by using pip:
- ✨ use pip for downloading the correct wheels for your setup:
-
pip install abstractintegratedmodule --extra-index-url https://Micro-Novelty.github.io/abstract-modules/whl/ --break-system-packages
# ensures proper installation by bypassing pip strict external download setup.
- Note: Using the above installation --extra-index method provides Python Wheels for:
- x86_64 and aarch64 with manylinux (v. 2.17+) and musllinux (v. 1.2+) architecture.
- macOS with aarch64 and x86_64 architecture. (v. 10.9+)
- All of this Wheels provided in the Repository Only Provides Wheels for python with version 3.10 3.11 and 3.12.
- This setup will automatically download the correct wheel Based on your python/pip version and OS / hardware architecture setup.
-
- ✨ use pip for downloading the correct wheels for your setup:
-
For specific module in Rust for handling and loading Weights and Parsing JSON values with reduced memory lookup overhead.
-
Consider using this Optimization library by using:
-
pip install abstract-weights-core
- Note: This Optimization would help AbstractIntegratedModule with faster JSON parsing and much more flexible database handling handled efficiently using Rust programming language.
-
-
Proven Capabilities:
- The library has been thoroughly tested in Multiple Environments from Windows to ARM64 Environment. The library is now Robust for Wider use and Deployment.
- Proven Works on ARM64 Environment, Training and Prediction works efficient on Docker ARM64 environment with QEMU, good parallelizing behavior is guaranteed.
- P2P Works efficiently in ARM64 Docker + QEMU, No conflicting socket and all prediction works efficiently.
- AWE setup Proven Efficient on Hard-uncontrolled dataset such as Activity Recognition from the given Database.
- LSTM is Optimized efficiently for scarce data with AWE method.
- Robust Advanced prediction capabilities proven effective on ARM64 Using MLP + LSTM Architectures.
- Transformer Optimized using Cython, reduced Memory overhead and Reduce CPU Usage, With Reduced Training Time is guaranteed.
- Reworked Prediction and Training method for User convenience in controlling the Model's capabilities and reducing Black-boxness
- Changelog:
-
v1.2.5 [MAJOR REWORKS]:
- Reworks Advanced Prediction method to separate Training and prediction to provide User's control.
- Reworks Regression Training for MLP, and LSTM.
- Fixed numerous bugs that can appear in edge cases during Advanced prediction method.
- New Quantization-Aware-Training method only for MLP to reduce Memory usage during Continuous Training.
- Reworks P2P functions to handle regression Tasks.
- Reworks Asynchronous function to predict chunked X samples instead of all X samples to prevent Memory overflow for edge devices.
- Reworks Numerous important Functions inside IntegratedPipeline that handles number of classes, dataset creation from test titles.
- Saving and Loading Weights as memory to SQLite database is now separated, meaning you can handle Continuous Training or stop Training when memory is present and not present.
-
v1.2.6:
- Separate SNN initialization from train SNN function
- added Regression based training and prediction for SNN
-
v1.2.7:
- test_titles and rules is not a must required samples for Asynchronous prediction.
-
Note: if you want to see the Changelog history of the library Older versions consider visiting this link:
-
[>] Full Documentation Features
-
Consider checking:
- ROADMAP.md
- SECURITY.md
- Contributing.md
- changelog.md
- requirements-For-Dev for contributors requirements.
- architecture_diagram.js.
- steps_to_use_integratedpipeline to use IntegratedPipeline
- Separated README contents for better understanding: split-READMEs
[+] MANN Intro
[=] Memory augmented Neural network (MANN) is a neural network architecture coupled with an external, dynamic memory module, allowing it to store, retrieve, and update information similarly to a computer's RAM. Unlike traditional networks that store knowledge only in weight parameters, MANNs excel at fast learning, long-term dependency handling, and episodic recall, In IntegratedPipeline, Its memory is stored in a custom database inside your local machine, then later used for memory retrieval, transfered to the Model Dictionary where it can finnaly recall its memory when input condition matched with memory.
[+] Abstract Weight Encoder (AWE) Intro
[=] AWE is a specialized custom weight shaping or encoding method Specifically designed for MLP Architecture that excels in Quantization-Aware-Training method in MLP dense Layers, using eigenvalue and spectral methods as base equations to calculate covariance inside a given input data, and calibrate the correct Weight from the given eigenvalue, AWE Works by processing input and then captures the necessary eigenvalue to shape a properly initialized Weight that aligns with input data complexity, With this approach, MLP training will be much more consistent especially during Quantization-Aware-Training.
[+] LSTM And Transformer Intro:
A. LSTMs (Long Short-Term Memory) and Transformers are foundational deep learning architectures built to process sequential data (like text or time series). While both handle the flow of time and context, they do so using completely different mechanisms.
- LSTM (Long Short-Term Memory):
- LSTMs are an advanced class of Recurrent Neural Networks (RNNs) introduced to solve the problem of traditional RNNs forgetting earlier data.
- How it works: LSTMs process data sequentially—one word or time-step at a time. They regulate information using "gates" (forget, input, and output) that determine what information from the sequence to keep or discard.
- Use Cases: Ideal for tasks with strictly continuous chronological data like time-series forecasting (e.g., stock market or weather prediction) or speech recognition.
- Limitations: Because they process data in a strict chain, it is difficult to parallelize training, making them slow and prone to forgetting long contexts.
B. Transformer: Transformers are the modern standard for AI, introduced in 2017 with the famous "Attention Is All You Need" paper.
- How it works: Instead of reading sequences linearly, Transformers read the entire sequence all at once. They utilize a self-attention mechanism, which calculates how much "attention" or weight every part of the sequence should give to every other part, understanding the global context instantly.
- Use Cases: The backbone of Large Language Models (LLMs) like ChatGPT or BERT, making them perfect for machine translation, text generation, and summarization.
- Limitations: Transformers require massive amounts of training data and computing power to work effectively.
- Data Hungry when Analyzing Images.
[~] For a much In-Depth Explanation You can visit This repository to learn more about AWE and its performance results:
[+] Why IntegratedPipeline?
[~] IntegratedPipeline is a great choice for a sophisticated Non-LLM AI Model Program for The Main Orchestrator of a Distributed MANN-Type Model Agent Working in Edge-device/Consumer-Based machine Where LLM isn't a great fit for Messy, Unpredictable environments. while still run efficiently on High-end Embedded systems in single-instance or as a distributed network during multi Agent cooperation.
[=] IntegratedPipeline offers:
-
Local-Based AI Orchestrator:
- IntegratedPipeline Creates its own SQLite Database inside Your Computer once the library is executed, This database is used directly to store the AI Memory, Attention weights, predicted Output, and identified peer, all without leaving the machine, The Database will be created Automatically once you run the library, database name saved as activity_log.db.
-
Continously Learning behavior for an Agent:
-
different from LLM that is static and cannot improve beyond its given training condition, AI Models using IntegratedPipeline has a dynamic, flexible continously learning behavior with conditional training algorithms included in the library that has both supervised and unsupervised learning present, The learned input and predicted Output will be stored in the database as a Memory, allowing it to recall its memory during processing and find matching known prediction given if input matched with the stored input inside the database. User can control this behavior such as:
-
Ex. pseudocode:
-
memory_name = 'agent1_memory'
memory_loaded = load_memory(memory_name)
if memory_is_loaded:
   stop_training()
else:
   continue_training()
-
Benefit of this approach:
-
Allow flexible Training and model task allocation better:
-
Deterministic behavior for Pragmatic Continual learning behavior for MANN type Models.
-
Example 1: Workflow (Single model):
-
agent_1 with memory_name 'A' -> task A (Classification task)
change memory_name to 'B"
agent_1 with memory_name 'B" -> task B (Regression task)
regression task requires slight modification to match the required samples and argument (Easy modification)
-
Example 2: Worflow (Multiple models):
-
agent_1 with memory_name "A" -> task A (Classification)
agent_2 with memory_name "C" -> task C (Regression)
-
-
Note: this Continous learning behavior is efficient because its not relying on weights saved in RAM for memory, allowing flexible and predictable behavior inside a given environment.
-
Tradeoff: This approach is deterministic and Memory modification or removal requires Manual audit directly to the Model's SQlite database (Named activity_log.db).
-
-
Robust Specialized MLP, Transformer and LSTM Architecture with ensemble weighting architecture:
- IntegratedPipeline usually used 1 Model for regular advanced prediction, but in some Conditions, it used 2 Different type's of AI Architecture stacked together, and one architecture to weight their confidence and probability fairly (ensemble method) to get the final prediction for the problem it faced, Specialized MLP for Noise robustness And Specialized Transformer that used Alpha-based Computing algorithm for contextual reasoning, LSTM architecture to provides proof-of-credibility over a certain output, acting as a support mechanism rather than Main orchestrator like MLP and Transformer. The reason why those Models complement and used together:
-
Specialized MLP Provides synchronous robust classification Against noise with its specialized Weight Encoder (AWE) to handle noise using eigenvalue based computing that is lightweight and efficient. This allows MLP performance to improve Even during Quantization-Aware-Training, This Method can't be replicated Inside Transformer FFN (Feed-forward-network) because of Transformer dynamic brute force computing where AWE-Based generated weight's get diluted over time by Transformer dynamic projection embedding, making AWE Generated weight causes inefficient inside Transformer dynamic FFN/QKV projection.
-
Specialized Transformer provides robust synchronous advanced contextual relationships, efficient data processing using Alpha based computing, The Transformer is tuned towards to be as flexible as possible to provide dynamic projection or fixed FFN projection training with minimal head's and dimension's to reduce computational power.
-
Our library also provides setup for kNN (k-Nearest-neighbor) Augmented Transformer for Users who Wants to use a much More Advanced Transformer, This Transformer is'nt used in the Main prediction flow inside IntegratedPipeline due to it being Memory heavy to run, instead this Transformer can be used separately if You have Larger Dataset and wants A small Transformer Model that can Remember longer contexts Using HNSW (Hierarchical Navigable Small World) Architecture and apply it on edge Devices.
- Honest Limitation: Our Transformer can still analyze Images, by receiving Input that is an Image converted into X samples, its accuracy is expected to be much lower since Analyzing images requires larger datasets -> more computation -> more memory usage.
-
LSTM doesn't act as a Main orchestrator, instead it Provides coherent Short-term memory for the Ensemble architecture, acting as a support mechanism to provides proof-of-credibility of a given answer from past previous context input, this allows flexible and achievable Aggreement between Transformer and MLP over a short period of time.
-
Specialized SNN helps for sensor based motion prediction, and Neuromorphic computing.
-
Ensemble weighting provides the model a much more robust classification best from both worlds perspective, weighting both MLP and Transformer confidence and probability, combined with Attention quality from the transformer to get the final prediction of an input if transformer is allowed and permitted to be in use.
-
-
flexible and secure Peer-to-Peer Coordination (Multi-Agent):
- IntegratedPipeline offers Peer to Peer communication capabilities asynchronously, Where IntegratedPipeline directly checks for other Peer presence directly to the local database present in the local computer or system (Synchronous prediction from peer previous data in the database), or externally, by using asynchronous request for initiating prediction, P2P is secured Using:
- secure socket using user provided SSL CERT. on both client and server,
- API key for requesting,
- Alpha rate limiting,
- HMAC secret key for authentication,
- and IP validation.
[~] Each agent has double roles during P2P:
- Server provider: the peer Agent can start a server to listen for peer client's
- Connecting Agent: the peer Agent which happens to connect to other peer that has or have opened and provided a server listener to act as a receiver.
-
Cross-Session memory availability:
- IntegratedPipeline offers share-able Memory capability, included capability below:
- Exportable memory: this allows a flexible memory saving for later use, such as cross transfer memory between model, the memory is saved as .json file after exporting.
- Importable Memory: allowing to import memory from the exported .json file directly for the model to use.
- syncing with other model: socket-based communication to export memory to other external machine.
- [=] Note: socket Syncing is unsecure witout additional security layer wrapped, For a safer syncing, directly transfer the .json file memory to the target machine via other ways such as manual send.
- list sessions: listing available sessions using model's memory name.
- IntegratedPipeline offers share-able Memory capability, included capability below:
[=] With its Specialized Multi-Layer-Perceptron (using AWE Encoder) and Optimized Transformer module with optimized Embedding, IntegratedPipeline can directly improve overtime, including in ambiguous data, using Weighted Confidence assembling from both specialized MLP and Transformer for better reliability during training and prediction over Unpredictable environments, such as:
[1.] User data's : User data is often messy and ambiguous, Specialized MLP with AWE will do the job for shaping and calibrating the necessary Weight to complement for the Ambiguous pattern, AWE MLP is proven to help in Quantization-Aware-Training in MLP that helps reduce Memory usage -> proven in synthetic Environment such as scikit-learn Make-Classification scarce and Noisy Input robustness during generalization test. making it a great fit for messy, Scarce data.
[2.] Small Dataset's : We often don't have enough Dataset to train a Transformer Model, Thats Why IntegratedPipeline Offers a Highly optimized Transformer that supports scarce dataset processing, Using Alpha-Based computing as a Warm-up for training, it provides a direct Boost for the transformer to be efficient during training in scarce-data Environment.
[3.] Non-Representative data (Undersampled) : IntegratedPipeline Support's ambiguous data that come's from file with format such as CSV Format to extract title's and label's necessary to create automatic Dataset for Later use in Training, making it optimized for specific task's and easier dataset creation with lower overfitting rate for reliability.
[=] Architectural-Overview
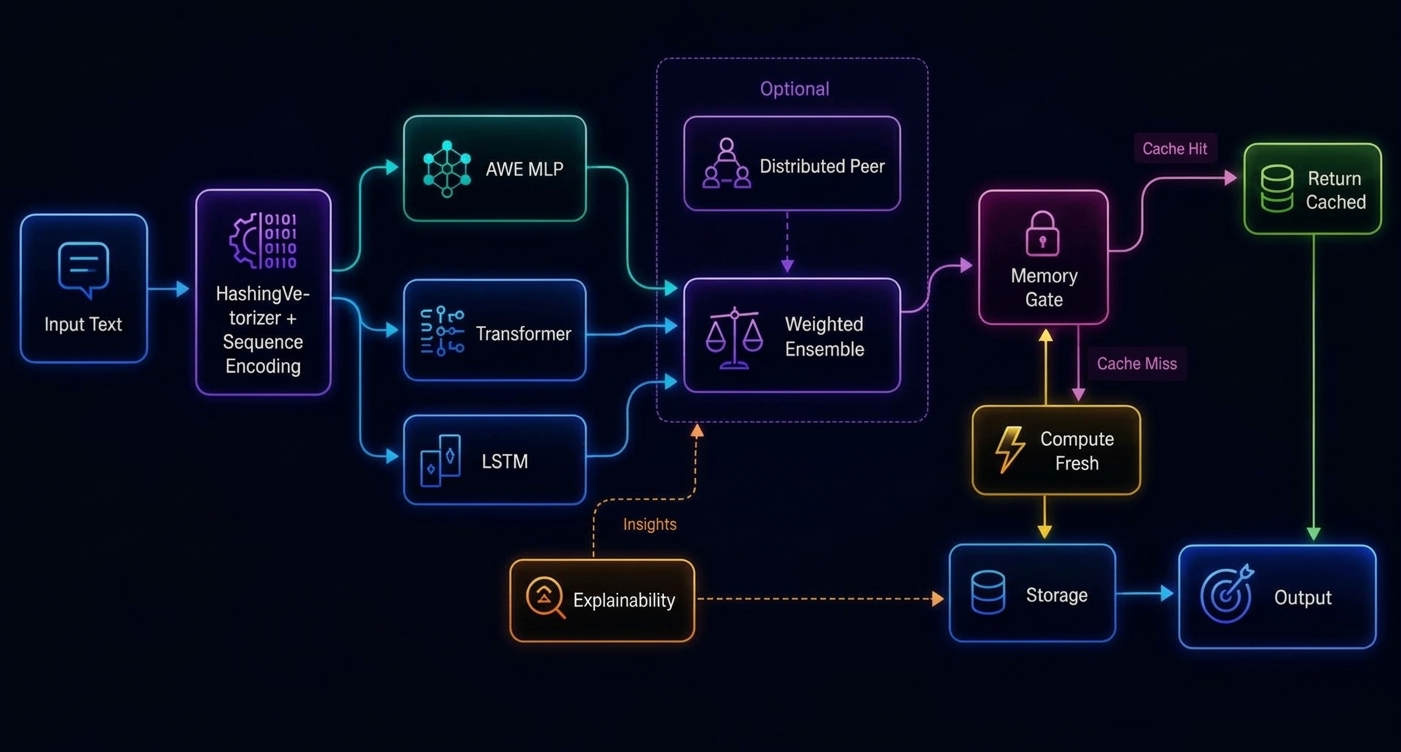 ---
[=] Contextual meaning:
1. - Sequence encoding is a machine learning technique that transforms a sequential input (like text, time-series data, or audio) into a compact, fixed-length numerical vector, often called a context vector
2. - HashingVectorizer is a text feature extraction tool in scikit-learn that converts a collection of text documents into a numerical sparse matrix. It uses the hashing trick (applying a hash function like Murmurhash3 to map token strings directly to feature indices) rather than building and storing an explicit vocabulary dictionary.
3. - Explainability provides deeper transparency of why a model thought about a detail by showing its internal metrics like attention quality, from distributed peer memory or Ensemble prediction result's.
---
[=] Contextual meaning:
1. - Sequence encoding is a machine learning technique that transforms a sequential input (like text, time-series data, or audio) into a compact, fixed-length numerical vector, often called a context vector
2. - HashingVectorizer is a text feature extraction tool in scikit-learn that converts a collection of text documents into a numerical sparse matrix. It uses the hashing trick (applying a hash function like Murmurhash3 to map token strings directly to feature indices) rather than building and storing an explicit vocabulary dictionary.
3. - Explainability provides deeper transparency of why a model thought about a detail by showing its internal metrics like attention quality, from distributed peer memory or Ensemble prediction result's.
Introduction and demo
- Video Documentation:
- Quick demo start: main.py
- purpose: let you demonstrate the advanced prediction method and asynchronous prediction directly.
- Quick test of P2P:
- multi_agent_client.py
- multi_agent_server.py
- P2PDirectTest.py
- Purpose: let you demonstrate simple P2P using AbstractIntegratedModule quickly, there may be bugs in this P2P setup so feel free to share it in issues.

[=] Requirements
[~] To run and execute IntegratedPipeline, Requirement's include Or see Requirements:
-
pip install for quick usage:
-
pip install AbstractIntegratedModule # or
python -m pip install AbstractIntegratedModule
-
(Optional) Download AbstractIntegratedModule Compiled Binary file extension manually in the repository for Users who can't use pip install (Choose one minimal, specified for your needs):
- AbstractOptimizedModules for Optimizing Transformer using Cython (Optional)
- AbstractIntegratedModule (Main library)
- Compiled Binaries can be downloaded from release section in the Main repo or You can use this link:
- Release section: https://github.com/Micro-Novelty/IntegratedPipeline-Specialized-Non-LLM-AI-Agent-Framework/releases
- Supported OS: Mac-Os, linux x86-64 and Windows.
-
NOTE: for Mac-OS or linux x86-64 Users, consider downloading the correct python wheel for your setup in here for a much flexible installation:
-
pip install abstractintegratedmodule --extra-index-url https://Micro-Novelty.github.io/abstract-modules/whl/ --break-system-packages
Note: using this installation method grants you a much safer, predictable behavior, and more secure AbstractIntegratedModule library rather than a pure binary file.
-
(Optional) Libraries needed (For using Compiled binary, not python wheels):
- Pandas
- aiohttp
- scikit-learn
- numpy
- psutil
- cryptography
-
(Optional) Install AbstractIntegratedModule Compiled binaries from release section:
-
[=] for labels assignation:
- CSV file that contains training labels and titles used for training and prediction label map, example will be provided below, Go to Step's for in-depth Usage below.
[=] Requirements for Docker container
- Dockerfile (For Container assembler)
- Python scripts (Such as main.py for Dockerfile usage).
- entrypoint.sh (for smart entry point for Dockerfile container usage).
[=] System-Specific Notes
-
Windows:
- Requires Visual C++ Build Tools for compatibility
- Use PowerShell or CMD (not WSL bash for best results)
-
Linux:
- Ensure gcc and build-essential are installed
- Different distributions may require different package managers
-
ARM64 - Raspberry Pi
- Installation may take 30+ minutes due to ARM architecture
- Monitor system resources during installation
- Consider using faster storage (USB SSD) for better performance
[=] Docker Container Application
-
See Docker_installation_Section for an in-depth explanation, or Quick_Docker_start for a quick start.
- Note Consider checking:
- Dockerfile contains all the instructions need to assemble a Docker container.
- start.sh for Quick single agent start in Docker container.
- entrypoint.sh for a Smart entrypoint used in Dockerfile (Must be downloaded too along with Dockerfile and put in the same folder with Dockerfile after its downloaded)
- start-multi-agent-cluster.sh for Multi-agent cluster start in Docker container, What it does:
- Starts a multi-agent Docker cluster — runs docker-compose up -d in detached mode (background), scaling the agent-client service to 5 simultaneous instances, alongside whatever server is defined in the docker-compose.yml.
- Tails the logs — runs docker-compose logs -f which streams live logs from all containers (server + all 5 clients) to your terminal until you hit Ctrl+C.
- main.py for executing a python script in the Docker container that used main.py, like in this code:
-
docker run -it -v $(pwd):/app/data integrated-pipeline:latest python /app/data/main.py
-
- To use a .dockerignore file, place it in your build context directory (the same location as your Dockerfile) to specify which files and folders should be excluded when building your image.
- .env is used for environment setup in entrypoint.sh, this file must be in the same folder with Dockerfile and entrypoint.sh after its downloaded.
- Note Consider checking:
-
Build Image:
-
Clone repository:
-
git clone https://github.com/Micro-Novelty/IntegratedPipeline-Continous-Learning-AI-Agent-library-framework.git
cd IntegratedPipeline-Continous-Learning-AI-Agent-library-framework
-
Download:
-
In the code or release section.
- If the downloaded Dockerfile or .dockerignore or .env has .txt extension, remove the extension:
-
# remove .txt extension
mv Dockerfile.txt Dockerfile
mv env.txt .env
mv dockerignore.txt .dockerignore
-
Navigate to the folder: Use the cd command to enter the directory containing the Dockerfile and entrypoint.sh file.
-
cd /path/to/your/folder -
build image:
-
sudo docker build -t integrated-agent.
-
-
Download library dependencies for binaries usage:
- [Optional]: Required libraries (when using binary, not python wheel provided in the library):
- Numpy
- Scikit-learn
- pandas
- aiohttp
- psutil
-
Run IntegratedPipeline in a Container:
-
Install AbstractIntegratedModule via PIP or Compiled binaries:
-
pip install AbstractIntegratedModule # or
python -m pip install AbstractIntegratedModule
-
docker run -it --name ai-agent integrated-agent:latest python
-
In python shell:
-
from AbstractIntegratedModule import IntegratedPipeline, PipelinePredictionManager
model = IntegratedPipeline('agent_memory')
print("✓ IntegratedPipeline initialized successfully!")
-
-
-
Run script:
# Mount your local directory and run a script
docker run -it -v $(pwd)/data:/app/data integrated-agent:latest python main.py # main.py could be replaced
-
For Single Agent and Multi-Agent P2P: [=] Single agent:
# Build image
docker build -t integrated-agent:latest .

# Run single agent
docker run -it -v $(pwd)/data:/app/data integrated-agent:latest python
[=] Multi agent P2P (Consider docker-compose) :
- Note: Use the provided docker-compose.yml for Quick multi-agent.
- Navigate to the folder: Use the cd command to enter the directory containing the docker-compose.yml file.
-
cd /path/to/your/folder - run this command to run docker-compose.yml:
-
# Start multiple agents
docker-compose up -d

# View logs
docker-compose logs -f

# Stop all agents
docker-compose down
Performance in linux ARM64 Docker Environment/Container
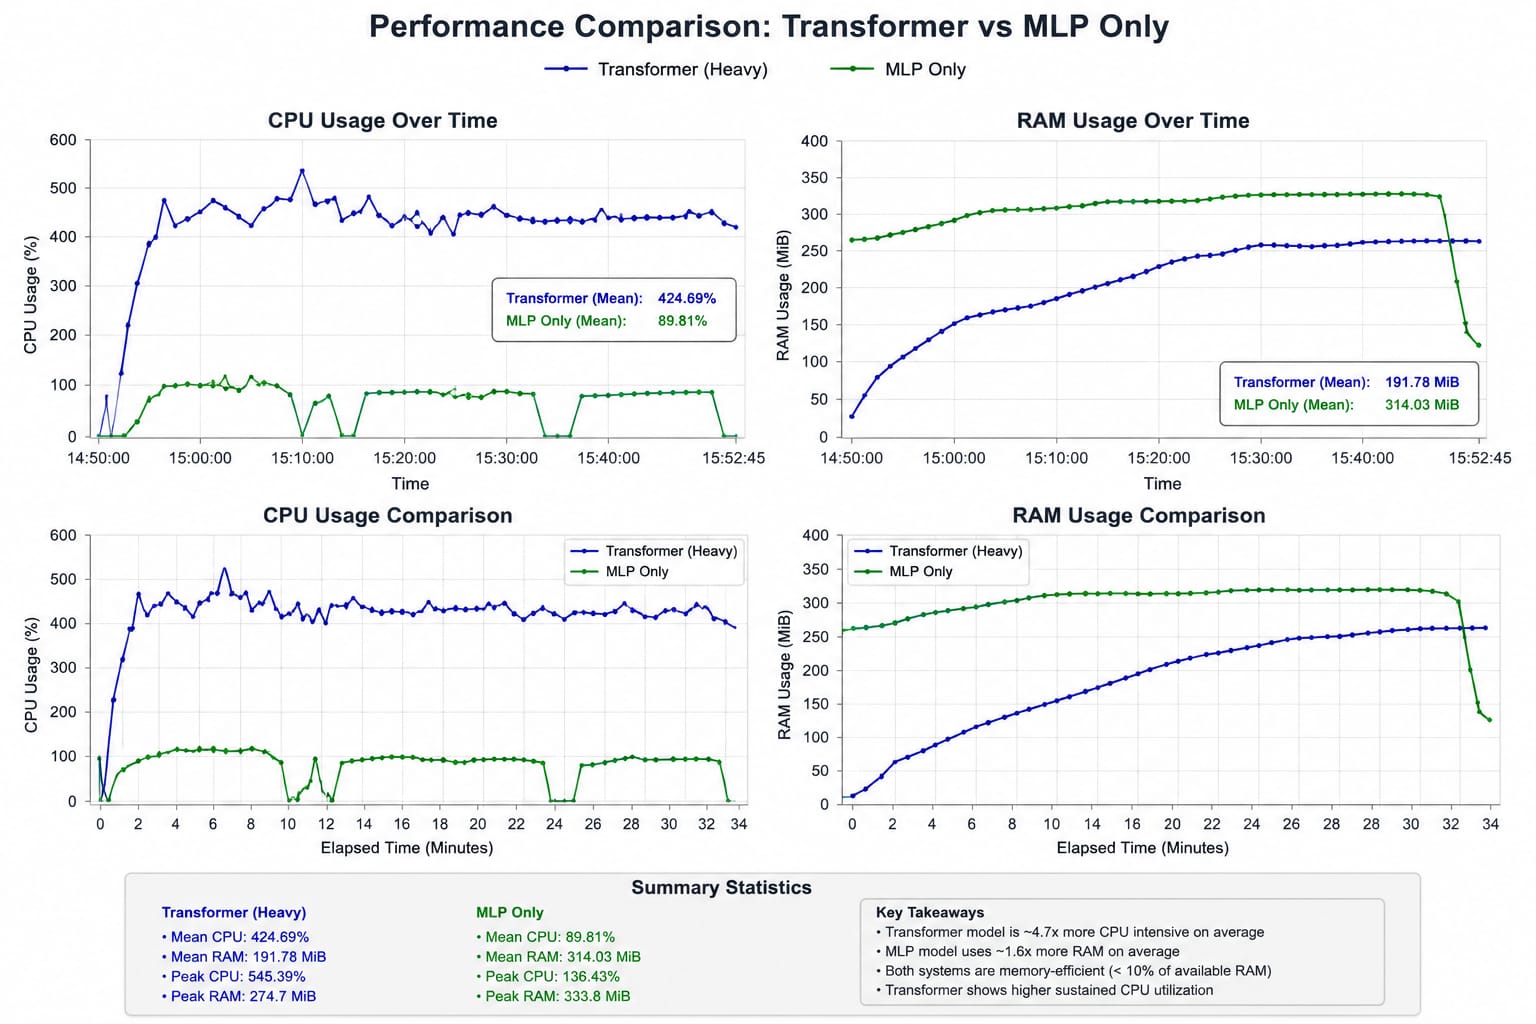
A. [=] [OLD DATA] Computational performance results during Training with Transformer included in regular classification tasks (Not regression).
== TIME == | CPU % | RAM / RAM LIMIT ||

14:50:08.762  0.00%  25.52MiB / 3.71GiB
14:50:10.339  5.56%  25.52MiB / 3.71GiB
14:50:12.428  0.17%  25.52MiB / 3.71GiB
14:50:15.835 103.60% 38.8MiB / 3.71GiB
14:50:17.844 438.11% 60.15MiB / 3.71GiB
14:50:19.896 419.36% 68.32MiB / 3.71GiB
14:50:22.022 434.15% 73.2MiB  / 3.71GiB
14:50:23.969 436.47% 78.18MiB / 3.71GiB
14:50:25.966 435.85% 80.22MiB / 3.71GiB
14:50:28.018 430.47% 92.12MiB / 3.71GiB
14:50:30.029 450.55% 99.5MiB / 3.71GiB
14:50:32.065 438.06% 105.4MiB / 3.71GiB
14:50:34.100 469.52% 115.2MiB / 3.71GiB
14:50:36.109 449.89% 116.8MiB / 3.71GiB
14:50:38.123 423.56% 119MiB   / 3.71GiB
- [=] Note: To read the full logs (For included Transformer performance): performance_log_with_TF
- [=] Explanation:
- Average CPU Usage = 420% - 430% , Sustained roughlt 4.20 - 4.30 CPU Cores
- Meaning = - Compute-Intensive workload - reduced guaranteed of experiencing deadlocks, thread starvation, and major stalls - numerical backend is parallelizing efficiently
- Average RAM Usage = 180 - 195 Mib, Roughly 4.5 - 5% usage of available RAM
- Meaning = - Very efficient RAM Usage - Repeated 269 MiB suggests allocator settled, ndarray pools stabilized, workload reached steady state - gradual, safe and steady batch accumulation, reduced possibility of leak explosion.
- Average CPU Usage = 420% - 430% , Sustained roughlt 4.20 - 4.30 CPU Cores
B. [=] Advanced Prediction without Transformer, Only Specialized MLP + LSTM using AWE during Training.
== TIME == | CPU %  | RAM \ RAM LIMIT |
10:01:37.456 100.44% 269.8MiB / 3.71GiB # initial round 1 training started
10:01:38.686 101.93% 279.8MiB / 3.71GiB
10:01:40.694 101.94% 293.2MiB / 3.71GiB
10:01:42.703 99.90%  302.9MiB / 3.71GiB
10:01:44.712 99.34%  319.8MiB / 3.71GiB
10:01:46.721 100.15% 319.7MiB / 3.71GiB
10:01:48.727 101.91% 319.7MiB / 3.71GiB
10:01:50.734 100.86% 319.7MiB / 3.71GiB
10:01:52.742 136.43% 322.9MiB / 3.71GiB
10:01:54.751 101.91% 324.9MiB / 3.71GiB
10:01:56.758 100.29% 324.9MiB / 3.71GiB
10:01:58.769 102.42% 327.1MiB / 3.71GiB
10:02:00.775 0.00%   329.6MiB / 3.71GiB # First Training and prediction round 1 finished
10:02:02.788 19.55%  330.1MiB / 3.71GiB # round 2 training
10:02:04.798 134.23% 332.2MiB / 3.71GiB
10:02:06.803 108.80% 332.2MiB / 3.71GiB
10:02:08.811 107.85% 332.2MiB / 3.71GiB
10:02:10.857 104.43% 332.2MiB / 3.71GiB
10:02:12.854 101.14% 332.2MiB / 3.71GiB
10:02:14.858 0.00%  332.3MiB / 3.71GiB
10:02:16.873 98.84% 333.8MiB / 3.71GiB
10:02:18.869 0.00%  132.7MiB / 3.71GiB # container stopped and round 2 finished
- [=] Note: See full performance log in here: performance_log_only_MLP
- [=] Explanation:
- Average CPU Usage = 85-90% Used, sustained roughly 1 CPU Core saturated on average
- Meaning: - Very efficient computation
- Much lighter CPU Usage than Transformer.
- Stable and less parallelizing behavior (Efficient computation)
- 4.7x lower CPU usage than transformer included - Average RAM usage = 314 MiB / 3.71 GiB, Roughly 8.5% usage of available RAM. - Meaning: - Slightly larger MiB used than Transformer. - Model allocation growth is stable, - training buffers stable - temporary ndarray growth.
- Meaning: - Very efficient computation
- Much lighter CPU Usage than Transformer.
- Stable and less parallelizing behavior (Efficient computation)
- Average CPU Usage = 85-90% Used, sustained roughly 1 CPU Core saturated on average
Both performance Overview
 _______________________________________
- Note:
- This performance metric was calculated in older versions, With newer Transformers that has more, newer modules, The resulting cpu consumed may Increase 1.5 - 2x much more in Docker ARM64 Environment + QEMU,
MLP And LSTM stays the same and still fully optimized.
_______________________________________
- Note:
- This performance metric was calculated in older versions, With newer Transformers that has more, newer modules, The resulting cpu consumed may Increase 1.5 - 2x much more in Docker ARM64 Environment + QEMU,
MLP And LSTM stays the same and still fully optimized.
Source code of AbstractIntegratedModule
- Note: The source code is provided in the repository.
- [=] Full Monolithic extensively-documented source code (12K+ Lines): AbstractIntegratedModule.py
- [=] Separated Modules of AbstractIntegratedModule With proper Documentation: separated_module
- [=] up-to-date Source code: AbstractIntegratedModule.pyx and AbstractOptimizedModules.pyx files for independent compilation or direct compiling on real ARM64 device or if you want to see the up-to-date, undocumented version of AbstractIntegratedModule library.
- lib.rs that contains Rust optimization for Models weight handling.
- [~] Note:
- The source code is open and Free to anyone who:
- Use it: Run the software for any personal, academic, or commercial purpose.
- Modify it: Change the source code to fit their needs.
- Distribute it: Share the original or modified code with others.
- Commercialize it: Package, brand, and sell the software for profit.
[=] Step's for library in-depth Usage
-
Download via PIP:
-
Clone repository first:
 # Clone immediately for Windows and x86_64 only without prerequisites
 git clone https://github.com/Micro-Novelty/IntegratedPipeline-Continous-Learning-AI-Agent-library-framework.git
 cd IntegratedPipeline-Continous-Learning-AI-Agent-library-framework
-
Install the library via pip:
pip install AbstractIntegratedModule #or
python -m pip install AbstractIntegratedModule
-
-
Clone repository:
-
# prerequisites (for Raspberry pi OS Only)
# Update system
sudo apt-get update
sudo apt-get upgrade -y

# Install Python 3.x and development tools
# Version 3.x means you can install python 3.10 to 3.13 only,
# choose one version specified for your needs (3.10 or 3.11 or 3.12 ...).
sudo apt-get install python3.x python3.x-dev python3.x-venv -y

# Install additional build tools
sudo apt-get install build-essential libatlas-base-dev libjasper-dev -y

# Clone immediately for Windows and x86_64 only without prerequisites
git clone https://github.com/Micro-Novelty/IntegratedPipeline-Continous-Learning-AI-Agent-library-framework.git
cd IntegratedPipeline-Continous-Learning-AI-Agent-library-framework
-
Install System Dependencies (for x86_64 installation):
# Ubuntu/Debian # example with Version 3.10: sudo apt-get update sudo apt-get install python3.10 python3.10-dev python3.10-venv # CentOS/RHEL sudo yum install python310 python310-devel # Fedora sudo dnf install python3.10 python3.10-devel -
Create a virtual environment:
-
# Create virtual environment (windows)
# example with python 3.10
python -m venv venv
# Activate virtual environment
venv\Scripts\activate

# Create virtual environment (x86_64) (ARM64 / raspberry pi)
python3.10 -m venv venv
# Activate virtual environment
source venv/bin/activate
-
-
Verify Installation:
-
python -c "from AbstractIntegratedModule import IntegratedPipeline; print('✓ Installation successful!')"
-
-
Run main.py for quick test of successful imports:
- Download main.py in our repository code section: main.py
-
# run this for quick import test.
python main.py
-
Create CSV file that contains training labels and titles (Optional for training using texts):
- Example format:
window_title,label
"Thesis.docx",focused_work
"Microsoft Excel",work
"YouTube -> Google Chrome",distracted
"Slack",communication
"VSCode", focused_work
"netflix.com -> Google Chrome",break
"Outlook",work
"System Settings",system designing
"GitHub",creating-and-editing-repo
"README.md -> VS Code",focused_work
"Amazon.com -> Chrome",personal-work
Note = window_title is target_title and label is target_label, check step below to use it.NOTE:
- There must be no space between ',' and words to prevent missing labels during label_map extraction.
- Example format:
-
A. Use IntegratedPipeline as in this example:
from AbstractIntegratedModule import IntegratedPipeline
from AbstractIntegratedModule import PipelinePredictionManager
import numpy as np

# SETUP BLOCK.
# NOTE:
# if you want the Model to continuously learn from every input, Consider changing the memory name to match the exact input where the Model has been trained on that specific input, This allows Flexibility while making the Model deterministic in behavior.
memory_name = 'agent_memory'
# example:
# if model is trained in Input B, change memory name to 'sec_agent_memory', or whatever memory name you want.

cert_file = <your_cert_file_dir> # your .crt file
key_file = <your_key_file_dir> # your .key file

# SSL Setup for users who used Lets encrypt / Public CA cert:
# Server context
server_ctx = ssl.create_default_context(ssl.Purpose.CLIENT_AUTH)
server_ctx.load_cert_chain('your_server.crt', 'your_server.key') # No load_verify_locations needed — OS trust store handles public CA

# Client context
client_ctx = ssl.create_default_context(ssl.Purpose.SERVER_AUTH)
client_ctx.load_cert_chain('your_client.crt', 'your_client.key') # no load_verify_locations — OS trust store handles it

# for enterprise and internal CA:
'''
server_ctx = ssl.create_default_context(ssl.Purpose.CLIENT_AUTH)
server_ctx.load_cert_chain('their.crt', 'their.key')
server_ctx.load_verify_locations('company_ca.crt')  # internal CA not in OS store
server_ctx.verify_mode   = ssl.CERT_REQUIRED
server_ctx.check_hostname = False

client_ctx = ssl.create_default_context(ssl.Purpose.SERVER_AUTH)
client_ctx.load_cert_chain('their.crt', 'their.key')
client_ctx.load_verify_locations('company_ca.crt')
client_ctx.verify_mode   = ssl.CERT_REQUIRED
client_ctx.check_hostname = False
''' # uncomment to use

# Note: The Above setup is Important for Users who wants to do Secure P2P In deployment case, for local P2P the above setup is optional and automatic self-signed CERT will be used for local-device P2P.


main_model = IntegratedPipeline(
   memory_name=memory_name,  # memory name for the AI you already initialized
   use_async=True, # local asynchronous prediction is permitted, if not PipelineAsyncManager wont start asynchronous prediction.
   agent_port=5001, # this port is used to set AgentDistributedInference server (optional)
   ssl_cert_file=cert_file, ssl_key_file=key_file,# provide your cert_file path or key_file path (optional)
   ssl_context=server_ctx, # used by the Agent server. (optional)
   client_ssl_context=client_ctx # used by the client. (optional)
   )

main_prediction = PipelinePredictionManager(
   main_model, # your initialized pipeline
   label_csv='example_manual_training.txt',
   # your filename that contains the .txt file and contains the CSV format.
   # the Agent will automatically searched the nearby folder like: downloads, data, and desktop folder.
   target_title='window_title', label='label')

# example_manual_training is a .txt file that contain csv format like above example.

# rules will be used to create automatic dataset for IntegratedPipeline.
example_rules = [
                     # === WORK / PRODUCTIVITY ===
                     (r'code|programming|develop|debug|compile|script', 'focused_work'),
                     (r'vscode|visual_studio|ide|terminal|shell', 'focused_work'),
                     (r'notion|evernote|onenote|notes|todo|task', 'productive'),
                     (r'slack|teams|discord|zoom|meeting|call', 'communication'),
                     (r'email|gmail|outlook|inbox|mail', 'communication'),

                     # === ENTERTAINMENT ===
                     (r'youtube|netflix|twitch|stream|video', 'entertainment'),
                     (r'music|spotify|soundcloud|audio|player', 'entertainment'),
                     (r'game|gaming|steam|epic|play', 'gaming'),
                     (r'facebook|instagram|tiktok|social|post', 'social_media'),

                     # === BROWSING ===
                     (r'chrome|firefox|edge|safari|browser', 'browsing'),
                     (r'google|search|wiki|wiki|article', 'information'),
                     (r'stackoverflow|github|docs|documentation', 'research'),

                     # more rules
                 ]

# Samples:
X = None # <your_x_samples>
y = None # <your_y_samples>


# activate explainability capability to explain uncertainty:
main_model.show_explainability_details = True
main_model.distribution.predict_manager = main_prediction # set PipelinePredictionManager to AgentDistributedInference for asynchronous prediction later (Very important for asynchronous prediction)
# main_model.use_transformer = True if you want to use transformer, this will notify all modules that used advanced_prediction_method will initiate prediction with both transformer and MLP.

# set IntegratedPipeline Penalty rate when it output wrong answer:
main_model.error_decay = 0.75
# error_rate > 0.5 means old errors fade quickly — a class that was wrong 3 predictions ago matters less than one wrong just now, making the model less likely to output repetitive wrong answer.
# this a flexible tunable-knob for the model judgement regarding wrong answer, this will propagate through prediction layers to inform about the model repetitive answer and calibrate it immediately.

main_model.autonomous = True
# Autonomous mode makes the Model autonomous to prevent any EOF Error during Github CI workflow usage, or etc, this will prevent the Model from requesting input from you.

# NOTE:
# (OPTIONAL) You can also define your own QuantConfig for quantization-aware training (QAT),
# this is useful for reducing the model size and improving inference speed,
# especially for deployment on edge devices.
qcfg = QuantConfig(enabled=True, w_bits=7, a_bits=7)

# Set up the main model with the specified configurations you wants, this will override the default configurations of the IntegratedPipeline,
# you can change the parameters to suit your dataset and requirements.
# tf -> Transformer, lr -> learning rate.
main_model.model_setup(mlp_train_epochs=1000, tf_train_epochs=10, tf_lr=0.1, mlp_lr=0.5,
                     lstm_train_epochs=50, lstm_lr=5e-1, lstm_hidden_dim=64, tf_heads=4, tf_d_model=32,
                     error_decay=0.75)

# test samples with more sophisticated rules and more complex titles for prediction
# (title, intent)
test_titles = [
 ("Opening Thesis.docx", "slight_work"),
 ("Watching YouTube and Google Chrome", "distracted"),
 ("Watching Slack", "communication"),
 ("Programming in Visual Studio Code", "focused_work"),
 ("Watching netflix.com - Chrome", "break"),
# more titles
 ]

# Load label_map from your .txt file for Training and Prediction (Important)
titles, _, label_map = main_prediction.load_labels_from_csv(
   <your_filename.>,  # the name of your .txt file with CSV format.
   <target_title>, <target_label>)

# NOTE:
# INITIALIZATION BLOCK: This is where you initialize the MLP, Transformer, and LSTM models with the specified configurations you want.

# MLP Initialization: This is where you initialize the MLP model with the specified configurations you want.
# titles: the titles you want to use for training and prediction, in this case we use None (Optional).
# rules: the rules you want to use for training and prediction, in this case we use None (Optional).
# label_map: the label map you want to use for training and prediction, in this case we use the label_map we created earlier.
# input_dim: the input dimension you want to use for creating MLP Dense layers, in this case we use the input_dim we created earlier (can be set to None if task is classification, or you can set input_dim=X.shape[-1]).
# output_dim: the output dimension you want to use for creating MLP Dense layers, in this case we use the num_classes we created earlier(can be set to None if your task is classification, if regression you must pass the output dim (ex: output_dim=num_classes))
# hidden_layers: the hidden layers you want to use for creating MLP Dense layers, The layers are free to change to how much you want. (changeable).
# use_qat: whether to use quantization-aware training (QAT) or not, in this case we use True (can be set to False).
# qcfg: the quantization configuration you want to use for QAT, in this case we use the qcfg we created earlier (can be set to None).

# NOTE: input_dim and output dim can be set to None if your samples are only titles, rules and label_map, but you can still set your hidden_layers however you want.
main_model.initialize_mlp_model(titles=titles, rules=rules, label_map=label_map, input_dim=None, output_dim=None, hidden_layers=[26, 64, 85], use_qat=True, qcfg=qcfg)

# Transformer Initialization: This is where you initialize the Transformer model with the specified configurations you want.
# vocab_size: the vocabulary size you want to use for the Transformer, set vocab_size to 1 if your task is regression, set to your own vocab size / set to None if your goal is classification (if set to None, this function below will automatically determine your vocab size from the given test_titles).
# num_classes: the number of classes you want to use for creating Transformer weights, in this case we use the num_classes we created earlier.
# d_model: the total dimension for creating Transformer layers, this layer is crucial for the Models learning capacity, in this case we use 128 (changeable).
# n_heads: the number of attention heads you want to use for creating Transformer layers, in this case we use 4 (Lower head means less computational power and complexity) (changeable).
# n_features: the number/length of features you have, if your task is classification, n_features MUST be None, if your task is regression, you MUST need to use the len(feature_cols) of your dataset and pass it as n_features=len(feature_cols) here.
# attn_dropout: the dropout rate you want to use for the Transformer layers, in this case we use 0.1 (changeable).
# ffn_dropout: the dropout rate you want to use for the Transformer feed-forward network, in this case we use 0.05 (changeable).
# weight_decay: the weight decay you want to use for the Transformer layers, in this case we use 1e-4 for smaller and more deterministic decay (changeableand useful for testing the model capability).
# task: the task you want to use for the Transformer model, set to 'regression' for regression task, or "classification" for classification task (changeable).
main_model.initialize_transformer_model(titles=test_titles, rules=rules, label_map=label_map, vocab_size=None, num_classes=None, d_model=128, n_heads=4, n_features=None,
attn_dropout=0.1, ffn_dropout=0.05, weight_decay=1e-4, task='classification')

# LSTM Initialization: This is where you initialize the LSTM model with the specified configurations you want.
# input_size: the input size you want to use for creating LSTM layers, in this case we use 1 (changeable and flexible, meaning you can set to whatever input size you need).
# hidden_size: the hidden size you want to use for creating LSTM layers, in this case we use 32 (changeable and flexible, meaning you can set to whatever hidden size you need).
# output_size: the output size you want to use for creating LSTM layers, in this case we use 1 (changeable and flexible, meaning you can set to whatever output size you need).
# dropout_rate: the dropout rate you want to use for the LSTM layers, in this case we use 0.1 (changeable and flexible, meaning you can set to whatever dropout rate you need).
# seed: the random seed you want to use for the LSTM layers, in this case we use 42 (changeable and flexible, meaning you can set to whatever seed you need).
main_model.initialize_lstm_model(input_size=1, hidden_size=32, output_size=1, dropout_rate=0.1, seed=42)


# Memory Loading Block: This is where you load the model memory if you have previously saved it, this will allow you to continue training or prediction from where you left off.
# This function will automatically adds the loaded weights to the current model, so you can continue training or prediction without losing any progress.
memory_loaded, lstm_weights, transformer_weights, mlp_weights, = main_model.load_model_memory()

# TRAINING BLOCK: This is where you train the MLP, Transformer, and LSTM models with the specified configurations you want.

# MLP Training: This is where you train the MLP model with the specified configurations you want.
# titles and rules are optional, you can set them to None if you don't want to use them for training, but label_map must NOT be None.
# X and y are the training samples you want to use for training the MLP model, in this case we use the X and y we created earlier.
# pass your task, train_epochs however you like.
# momentum: the momentum you want to use for the MLP optimizer, higher momentum leads to faster convergence/better learning, in this case we use 0.75 (changeable).
# learning rate (lr): the learning rate you want to use for the MLP optimizer, higher learning rate leads to faster convergence/better learning, in this case we use 0.5 (changeable).

# EXAMPLE WORKFLOW:
# Train when weight memory is not loaded (fresh start)
if not memory_loaded:
   main_model.train_mlp_model(titles=test_titles, rules=rules, label_map=label_map, X=X, y=y, task='classification', train_epochs=500, momentum=0.9, lr=0.01)

   # Transformer Training: This is where you train the Transformer model with the specified configurations you want.
   # titles and rules are optional, you can set them to None if you don't want to use them for training, but label_map must NOT be None.
   # X and y are the training samples you want to use for training the Transformer model, in this case we use the X and y we created earlier.
   # pass your task, train_epochs however you like.
   # mode: the training mode you want to use for the Transformer model :
      # in this case we use 'dynamic_backward': use dynamic_backward for training if you have large samples,
      # use 'fixed_backward' for training if you have small samples (such as only titles and rules are present, or very small length of X samples (ex: <100)),
   # batch_size: the batch size you want to use for the Transformer training, in this case we use 2 (changeable, based on how many batch you want, smaller batch means more memory usage).
   # learning rate (lr): the learning rate you want to use for the Transformer optimizer, higher learning rate leads to faster convergence/better learning, in this case we use 0.5 (changeable).
   main_model.train_transformer(titles=test_titles, rules=rules, label_map=label_map, X=X, y=y,  task='classification', d_model=128, train_epochs=10,
      mode='fixed_backward', lr=0.5, batch_size=2)

   # LSTM Training: This is where you train the LSTM model with the specified configurations you want.
   # titles and rules are optional, you can set them to None if you don't want to use them for training, but label_map must NOT be None.
   # raw_X and raw_Y are the training samples you want to use for training the LSTM model, in this case we use the X and y we created earlier.
   # n_display: display what the LSTM previously thoughts about each sample after training, this will inform the LSTM uncertainty, intervals.
   # n_train: the percentage of training samples you want to use for training the LSTM model, in this case we use 0.8 or 80% of Training samples is used (changeable).
   main_model.train_lstm(titles=test_titles, rules=rules, label_map=label_map, raw_X=X, raw_Y=y, n_train=0.8, n_display=5, train_epochs=10, lr=0.1)
else:
   print('[>] memory is loaded, skipping Training...)')


# NOTE:
# PREDICTION BLOCK:
# the below section called advanced_prediction_method(...) is a prediction method that will output a single answer based from numerous predictions and how frequent it was predicted by a single model (This is called majority-based answer choosing method), it will output a single answer from the label_map you have given as its final prediction.
# meaning advanced_prediction method is only used to predict an answer based on the given label_map and only output a single answer, the entire predictions the model has made was saved in 'results' variable below, so you can see how the model predicts each batch of the given sample.
# titles and rules are optional, label map must not be None, but both label_map, X, y, titles and rules cannot be all empty.
# Use case: - classification and both regression problems that requires a model to only output a single answer.
# top_k : meaning, the model will only prints 3 labels it has predicted in the terminal (This will be used when titles and rules is not None, otherwise this argument will not be used.)
# batch_size : the batch size you want to use for the prediction, in this case we use 2 (changeable, based on how many batch you want, smaller batch means more memory usage).
results, chosen_label, confidence = main_prediction.advanced_prediction_method(
   titles=test_titles, label_map=label_map, rules=rules, # titles and rules can be set to None (Optional samples), but label_map must NOT be None.
      X=X, y=y, # you could create your own X and y samples and put it here (Optional, y sample must already be one hot encoded first).
      top_k=3, batch_size=2)

# Important Note: If you set titles and rules to None, you must provide X and y samples for prediction, otherwise the models cant predict anything.
# batch size=2 is needed during transformer training for batching, if you have larger samples consider using batch_size > 8, for medium amount of samples (>10 -> <50 samples) consider using 2 or 4 batch_size.
# the returned 'results' here returns all the predicted labels over each batch inside the given sample, so you can get the full picture of How the models predicts label over each batch in X sample.

# save Weights as a memory when previous memory isn't present to the SQLite database, this will allow you to load the model memory later for further prediction.
# model_type must be 'Pipeline'.
if not memory_loaded:
   main_model.save_weights(memory_name, model_type='Pipeline')


# SIMULATION BLOCK (OPTIONAL):
# This function below allows you to create A continuous Training simulations using K-fold split to evaluate MLP Training performance using your provided X and Y samples, This function helps to diagnose if Your samples are appropriate for MLP and make It generalize instead of severely Overfitting.
# This function will create a fresh instance of MLP every k-amount you have set (the k=5), and also prints a Confusion matrix that helps diagnose Your MLP Training Accuracy Performance.
# This function is great to help you diagnose Further degradation of MLP performance and also Its consistency, And also helps validate our AWE Method at how well it makes MLP Training performance Consistent Accross different Seeds for better Reliability performance.
main_model.evaluate_mlp_performance(X, y, label_map, k=5, seed=42)

# (OPTIONAL):
# This setup below would allow you to save the Accurate answer (if the model guessed a specific problem correct) directly to the database,
# without initiating prediction over the sample repeatedly.
input_ids = main_model.model2.cache['input_ids'] # input indices the transformer used as input (model2 is Transformer).
index = results.get('index') # predicted index where the Model have chosen the label.
confidence = results.get('confidence') # the model confidence over the predicted Output from advanced prediction method.
main_model.accurate_cache_lookup.add_verified(X, input_ids, chosen_label, confidence, index,
                  source='Correctly-Answered') # You can modify the the source with "Answered-Correctly" (fit to your needs)

# ... more features you can add
# Here we used a dataset specifically predicting how much Electricity is used (You can see and inspect this .csv in kagglehub):
# the dataset MUST be in .csv format like in example below, The Framework doesnt accept .txt, or any other format (Safety restriction to avoid Data Scraping):

# Load dataset (Change to Your own dataset here, just make sure to change the column names and features accordingly)
df = pd.read_csv("PJME_hourly.csv", parse_dates=["Datetime"], index_col="Datetime")
df = df.sort_index() #s sort index
daily = df.resample("D").sum()


# calender features (day of week, month, is weekend) (suit to what your dataset actually has)
daily["dayofweek"] = daily.index.dayofweek     # 0=Monday, 6=Sunday
daily["month"] = daily.index.month
daily["is_weekend"] = (daily.index.dayofweek >= 5).astype(int)

# lag features (in days, not hours) (suit to what your dataset actually has)
daily["lag_1"] = daily["PJME_MW"].shift(1)      # yesterday (lag_1 will be used in feature_cols)
daily["lag_7"] = daily["PJME_MW"].shift(7)      # last week (same day) (lag_7 will be used in feature_cols)
daily["lag_14"] = daily["PJME_MW"].shift(14)    # 2 weeks ago (lag_14 will be used in feature_cols)

# Rolling statistics (suit to what your dataset actually has)
daily["rolling_mean_7"] = daily["PJME_MW"].rolling(7).mean() # (rolling_mean_7 will be used in feature_cols)
daily["rolling_std_7"] = daily["PJME_MW"].rolling(7).std()   # (rolling_std_7 will be used in feature_cols)

# delete the first row that contains NaN values due to lag and rolling calculations
daily = daily.dropna()

# Feature columns: a set of list thatcontains the features you want to use for training and prediction,
# you can add or remove features based on your own dataset and requirements.
# so change this list to suit your dataset and requirements, but make sure the features you choose are actually present in your dataset.
feature_cols = ["PJME_MW", "dayofweek", "month", "is_weekend",
               "lag_1", "lag_7", "lag_14", "rolling_mean_7", "rolling_std_7"]
# example of other feature_cols:
# ["Global_active_power", "Global_reactive_power", "Voltage",
            #    "Global_intensity", "Sub_metering_1", "Sub_metering_2",
            #   "Sub_metering_3", "dow_sin", "dow_cos"]
# feature_cols = ["daily_sales", "is_promo", "is_holiday", "dow_sin", "dow_cos",
               #  "lag_7", "lag_14", "rolling_mean_7"]

main_model = IntegratedPipeline(
memory_name=memory_name,  # memory name for the AI you already initialized
use_async=True, # local asynchronous prediction is permitted, if not PipelineAsyncManager wont start asynchronous prediction.
agent_port=5001, # this port is used to set AgentDistributedInference server (optional)
ssl_cert_file=None, ssl_key_file=None,# provide your cert_file path or key_file path (optional)
ssl_context=None, # used by the Agent server. (optional)
client_ssl_context=None # used by the client. (optional)
)


main_prediction = PipelinePredictionManager(
   main_model, # your initialized pipeline
   label_csv='energy_training.txt',
   # your filename that contains the csv and contains the CSV format.
   # the Agent will automatically searched the nearby folder like: downloads, data, and desktop folder.
   target_title='window_title', label='label')

# Prepare dataset using prepare_dataset() method, this will create the X and y samples for training and prediction.
# argument description:
# daily: the dataset you want to use for training and prediction, in this case we use the daily dataset/dataframe we created earlier.
# feature_cols: the list of features you want to use for training and prediction, in this case we use the feature_cols list we created earlier.
# target_col_name: the name of the target column you want to predict, in this case we use "PJME_MW" as the target column.
# window_size: the number of past days you want to use for training and prediction, in this case we use 30 days.
# horizon: the number of days you want to predict into the future, in this case we use 5 days.
X, y, config = main_prediction.prepare_dataset(daily, feature_cols, target_col_name="PJME_MW",
                                    window_size=30, horizon=5)
# NOTE:
# the total horizon must match the total labels you have in your label_map, if your label_map is 5, you need to set the horizon=5.

# activate explainability capability to explain uncertainty:
main_model.show_explainability_details = True
main_model.distribution.predict_manager = main_prediction # set PipelinePredictionManager to AgentDistributedInference for asynchronous prediction later (Very important for asynchronous prediction)
# main_model.use_transformer = True if you want to use transformer, this will notify all modules that used advanced_prediction_method will initiate prediction with both transformer and MLP.

main_model.autonomous = True
# Autonomous mode makes the Model autonomous to prevent any EOF Error during Github CI workflow usage, or etc, this will prevent the Model from requesting input from you.

# set IntegratedPipeline Penalty rate when it output wrong answer:
main_model.error_decay = 0.75
main_model.use_lstm = True
main_model.use_transformer = True
# error_decay > 0.5 means old errors fade quickly — a class that was wrong 3 predictions ago matters less than one wrong just now, making the model less likely to output repetitive wrong answer.
# this a flexible tunable-knob for the model recovery after error regarding wrong answers, this will propagate through prediction layers to inform about the model repetitive answer and the model calibrate its prediction immediately.


# load your label_map from your .txt file that contains CSV format, this will be used for training and prediction.
# window_title: the column name in your .txt file that contains the window title,
# label: the column name in your .txt file that contains the label.
titles, _, label_map = main_prediction.load_labels_from_csv(
   'energy_training.txt',  # the name of your .txt file with CSV format.
   'window_title', 'label')

# NOTE:
# set input_dim and num_classes based on the shape of X and the number of unique labels in label_map.
# this are important for the MLP and Transformer model to know how many input features and output classes it has to handle.
input_dim = X.shape[1] if X.ndim > 1 else 1
num_classes = max(len(label_map), int(np.max(y)) + 1)

main_model.model_setup(mlp_train_epochs=1000, tf_train_epochs=10, tf_lr=0.1, mlp_lr=0.5,
lstm_train_epochs=50, lstm_lr=5e-1, lstm_hidden_dim=64, tf_heads=4, tf_d_model=32,
error_decay=0.75)

# use_qat argument set to False because Quantization distorts regression samples.
# MLP Initialization is important.
main_model.initialize_mlp_model(titles=None, rules=None, label_map=label_map, input_dim=input_dim, output_dim=num_classes, hidden_layers=[12, 17, 35], use_qat=False, qcfg=None)

# set task to regression
# vocab_size MUST be 1,
# n_features is passed with len(feature_cols) of your dataset
main_model.initialize_transformer_model(titles=None, rules=None, label_map=label_map, vocab_size=1, num_classes=num_classes, d_model=128, n_heads=4, n_features=len(feature_cols),
      attn_dropout=0.1, ffn_dropout=0.05, weight_decay=1e-4, task='regression')

# LSTM input, hidden sizes and output remains flexible in regression task.
main_model.initialize_lstm_model(input_size=1, hidden_size=32, output_size=1, dropout_rate=0.1, seed=42)

# Memory Loading Block: This is where you load the model memory if you have previously saved it, this will allow you to continue training or prediction from where you left off.
# This function will automatically adds the loaded weights to the current model, so you can continue training or prediction without losing any progress.
memory_loaded, lstm_weights, transformer_weights, mlp_weights, = main_model.load_model_memory()

# EXAMPLE WORKFLOW
if not memory_loaded:
   # MLP Training can be skipped
   main_model.train_mlp_model(titles=None, rules=None, label_map=label_map, X=X, y=y, task='regression', train_epochs=500, momentum=0.9, lr=0.01)

   # Use dynamic_backward for regression task for better learning capabilities.
   main_model.train_transformer(titles=None, rules=None, label_map=label_map, X=X, y=y,  task='regression', d_model=128, train_epochs=10,
      mode='dynamic_backward', lr=0.5, batch_size=4)

   main_model.train_lstm(titles=None, rules=None, label_map=label_map, raw_X=X, raw_Y=y, n_train=0.8, n_display=5, train_epochs=10, lr=0.1)
else:
   print('[>] Memory is loaded -> skipped Training')

results, chosen_label, confidence = main_prediction.advanced_prediction_method(
titles=None, label_map=label_map, rules=None, # titles and rules can be set to None (Optional samples), but label_map must NOT be None.
   X=X, y=y, # you could create your own X and y samples and put it here (Optional, y sample must already be one hot encoded first).
   top_k=3, batch_size=4)
# NOTE:
# MLP Prediction results will not be Showed in the Terminal, MLP Training can be skipped, but MLP MUST be initialized first to avoid any Errors.

# save Weights as a memory to the SQLite database, this will allow you to load the model memory later for further prediction.
main_model.save_weights(memory_name, model_type='Pipeline')
- Note:
- Classification Task workflow script setup can be downloaded here: classification_usage_script
- Regression task workflow example can be downloaded here: regression_usage_script
-
B. Using Standalone IntegratedPipeline Transformer:
# if you want to use the IntegratedPipeline Transformer only, you can use this setup:
# ideal when you want blazing Fast Transformer Training and prediction, and the Transformer weights are loaded using JSON, this made Transformer Training much more feasible and easily intuitive for Beginners who wants Complex abstraction models that can run on cheap Edge devices.

vocab_size = main_model.vocab_size# <your actual vocab size>.
model_transformer = Transformer(
               vocab_size=vocab_size
               d_model=main_model.transformer_d_model,
               n_heads=pipeline.transformer_heads,
               num_classes=num_classes
               n_features=None, # set to len(feature_cols) for regression.
               task='classification'
           )
# or just get your old Transformer:
# model_transformer = main_model.model2

sequence_inputs = main_model._features_to_sequence(X, d_model=pipeline.transformer_d_model) # Converts X samples into sequences that the Transformer can recognize.
# embedded=True will ensure that Transformer forward method will put a correct mask for the samples.
# mode='dynamic_backward' helps Transformer to gains better accuracy for Complex vocabularies.
model_transformer.train(sequence_inputs, y, epochs=100, mode='dynamic_backward', lr=0.1, embedded=True, batch_size=2)

# save Transformer weights
tf = model_transformer
json_data = {
     'token_embedding': tf.token_embedding,
     'pos_embedding': tf.pos_embedding,
     'W_q': tf.W_q,
     'W_k': tf.W_k,
     'W_v': tf.W_v,
     'W_q_fixed': tf.W_q_fixed,
     'W_k_fixed': tf.W_k_fixed,
     'W_v_fixed': tf.W_v_fixed,
     'W_o': tf.W_o,
     'ffn1': tf.ffn1,
     'ffn2': tf.ffn2,
     'ln1_scale': tf.ln1_scale,
     'ln1_shift': tf.ln1_shift,
     'ln2_scale': tf.ln2_scale,
     'ln2_shift': tf.ln2_shift,
     'output': tf.output,
     'output_bias': tf.output_bias
 }
 serializable_data = {key: val.tolist() for key, val in json_data.items()}
 with open("transformer_weights.json", "w") as file:
     json.dump(serializable_data, file, indent=4)  # indent adds readable formatting

 #load Transformer weights
 # in here transformer_model a new IntegratedPipeline Transformer instance:
 with open('transformer_weights.json', 'r') as file:
     loaded_data = json.load(file)
 transformer_model.W_q = loaded_data['token_embedding']
 ... # and so on until output_bias.
- Note: script setup can be downloaded here: transformer_usage
-
C. Use kNN-Augmented Transformer: Note: kNN-Augmented Transformer doesn't have its own Prediction pipeline flow, meaning after the Transformer forward method is called, the probabilities of the kNN Transformer will be returned and no prediction is made, We decided to be better this way because it grants Flexibility over how Prediction will be made in your favour:
- Example Code:
-
 # Initialize kNN Transformer:
 knn_tf = sec_main_prediction.initialize_knn_transformer(
  vocab_size=1, task='<your_task>', num_classes=num_classes, d_model=32,
  n_heads=4, n_features=len(feature_cols), # pass len(feature_cols) if your task is regression, set to None if classification
  memory_capacity=10000,
  memory_k=5, memory_metric='euclidian')
# NOTE:
- vocab_size and num_classes is a MUST, meaning you have to pass the number of classes of your samples, and vocab_size of your data (can be set to vocab_size=1 for regression task)
- memory_capacity = the amount of memory for the kNN to hold
- memory_k = "K" is the central hyperparameter that defines the number of nearby training data points the algorithm looks at to make a prediction, more memory_k => more nearby training points the model can look up.


# knn_forward_inference() lives inside PipelinePredictionManager, so you need to call this class to initiate the knn_forward_inference() function.
losses, accs, _ = main_prediction.knn_forward_inference(X, y,
label_map=None, # Label map can be safely set to None during Training phase.
memory_metric='euclidean', training=True, batch_size=2,
train_mode='dynamic_backward', lr=0.1) # for Training kNN Transformer only

transformer_probs, attn_weights, prediction = main_prediction.knn_forward_inference(X, y,
label_map=label_map, # Label map can be inserted in here, or you Can set this to None,
                       if set to None this function will only returns Transformer prob and attn_weights.
memory_metric='euclidean',
training=False) # for returning kNN Transformer probabilities and attention weights only.
# Note: - train_mode can be set to 'dynamic_backward' if you have very large dataset, this makes Transformer Q, K, V be much more dynamic and grants flexible learning behavior for large dataset.
       # - train_mode can be set to 'fixed_backward' if you have small dataset, this makes Transformer Q, K, V to stay frozen so the FFN flow will handle the Training, making Learning in very little samples possible and deterministic in behavior.
       # - y sample must be one-hot encoded manually before its passed to the function, since the function above will not automatically one-hot encode the y-sample.

 # ==== SAVING MEMORY BLOCK =====
 main_prediction.pipeline.storage.save_hnsw_memory(memory_name) # This function saves the HNSW setup inside KNNAugmentedTransformer class to the the same database (activity_log.db) so it can be retrieved as Retrievable Memory later.
 main_prediction.pipeline.storage.save_memory_head(memory_name) # This function saves the Per-Head memory setup inside KNNAugmentedTransformer class to the the same database (activity_log.db) so it can be retrieved as Retrievable Memory later.

 # Get binary blob to save target memory:
 blob = main_model.model2.target_memory_to_bytes()
 main_model.storage.save_target_memory_row(memory_name, blob) # Save target memory row for kNN Transformer usage later


 # === LOADING MEMORY BLOCK ===
 main_prediction.pipeline.storage.load_hnsw_setup(memory_name) # This function is used to load the saved HNSW Memory inside your (activity_log.db) database, and automatically apply the Old Memory back to the knn-augmented Transformer.
 main_prediction.pipeline.storage.load_head_memory_setup(memory_name) # This function is used to load the saved HNSW Memory inside your (activity_log.db) database, and automatically apply the Old Memory back to the knn-augmented Transformer.
 main_model.storage.load_target_memory_row(memory_name) # load target memory row for kNN Transformer

# .... # your own custom kNN prediction block.
-
To use IntegratedPipeline prediction without Transformer, Only Specialized MLP: Note: IntegratedPipeline without Transformer is'nt recommended due to it being weak at certain contextual prediction's, excel's at classification task's.
- Example without transformer:
prediction_result = main_prediction.advanced_prediction_method(
         [t[0] for t in test_titles],  # titles is enough for MLP Classification.
         label_map,
         example_rules,
         show_proba=True
         )
-
Asynchronous prediction:
- Asynchronous prediction request is important and is critical because it keeps prediction interfaces responsive, maximizes local hardware efficiency, and enables apps to handle background tasks seamlessly without waiting on remote server responses,
- for asynchronous prediction handling, consider using this setup
# Step 2
from AbstractIntegratedModule import PipelineAsyncManager
from AbstractIntegratedModule import SecurityConfig
from AbstractIntegratedModule import SecurityLevel

# NOTE:
# All the three Models (MLP, Transformer, LSTM MUST be Initialized, Trained before initiating Asynchronous Prediction, the Initialization workflow can be seen above.)
# Replace the regular advanced_prediction_method() with this asynchronous setups:


print(" = TESTING ASYNCHRONOUS PREDICTION MANAGER = ")
# Set discovery secret (in production, use environment variable)
secret_key = 'my-ultra-safe-secret-key-for-authentication' # you can customize this key

# max_text_length: the maximum length of the text you want to allow for prediction, in this case we use 10000 (changeable).
# max_queue_size: the maximum number of requests you want to allow in the queue, in this case we use 100 (changeable).
# rate_limit_requests: the maximum number of requests you want to allow per minute, in this case we use 60 (changeable).
# require_api_key: whether to require an API key for prediction or not, in this case we use True for safety (changeable).
security_config = SecurityConfig(
      max_text_length=10000, # can be extended
      max_queue_size=100, # can be extended
      rate_limit_requests=60,  # 60 per minute
      require_api_key=True, #
      max_pending_tasks=50,
      request_timeout=60.0,

      # Start with no IP restrictions, you can add allowed IPs for asynchronous prediction externally, boothstrap_auth for better security
      allowed_ips=[],
      blocklisted_ips=[],
      require_bootstrap_auth = False # true for better security (Not recommended, cause less flexibility)
  )

# NOTE:
# Asynchronous Prediction Block: This is where you set up the PipelineAsyncManager for asynchronous predictions, this will allow you to make predictions without blocking the main thread and allows you to handle multiple requests concurrently.
# pass the PipelinePredictionManager of yours (main_prediction in this case), and the IntegratedPipeline of yours (here its main_model),
# the SecurityConfig as config, and the api_key as api_key, and the max_workers of 4, more worker, means more concurrent requests (changeable),
# the task_timeout as 30 (changeable), and the max_retries as 3 (changeable).
async_manager = PipelineAsyncManager(main_model,
        main_prediction, # your previous initialized PipelinePredictionManager
        config=security_config,
        state_file=None, # state file is used to load known security logs ex: ip used, ip blacklisted, etc.
        security_level=SecurityLevel.PRODUCTION, # production level security initiated
        api_key=secret_key  #set secret key you initialized
        max_workers=4, # workers to initiate asynchronous tasks, more workers, lower memory usage.
        task_timeout=30,
        max_retries=3) # retries after failure during prediction

async_manager.start(method='Transformer_included', bootstrap_token=None) # boothstrap token is optional for better security


# NOTE:
# Asynchronous Prediction Example: This is where you make an asynchronous prediction using the PipelineAsyncManager, this will allow you to make predictions without blocking the main thread and allows you to handle multiple requests concurrently.
# payloads: this is the dictionary of payloads you want to send to the PipelineAsyncManager for prediction, in this case we use the test_titles, label_map, rules, and use_transformer as True (changeable).
# pass X and y samples for prediction, in this case we use the X and y we created earlier (Not changeable and X and y samples are must be passed here).
# api_key can be passed or set to None, if you set require_api_key to True in the SecurityConfig, then you must pass the api_key here.
# chunk_size: this is the chunk size you want to use for the prediction, in this case we use 1000 because our sample is large, and we require larger chunks to save memory and prevent memory overhead (changeable).
# client_ip (optional): this is the client IP you want to use for the prediction, in this case we set it to None (changeable, client_ip is a string, not listsor dicts).
# max_predictions: this is the maximum number of predictions you want to allow for the model to predict on each samples you have provided, in this case we use 3 max predictions, after that the model will abort all predictions (changeable).
# stop_on_error: this is the boolean flag you want to use for the prediction, in this case we set it to False, meaning if its False, when the model encounters an error during prediction, it will continue to predict the next sample, set to True if you want the model to stop on the first error (changeable).
# overall_timeout: this is the overall timeout you want to use for the prediction, in this case we set it to 20000 seconds, meaning if the model takes longer than 20000 seconds to predict, it will abort the prediction (changeable).

# IMPORTANT NOTE: the async_predict variable will return all the prediction results, prediction success, failures, so you can directly see how the model predicts each batch of the given sample.
# test_titles and rules are can be set to None if not needed.
payloads = {'test_titles': test_titles, 'label_map': label_map, 'rules': rules, 'use_transformer': True}
async_predict = wrapper.prediction_method(payloads, X, y_samples=y, chunk_size=1000,
                 max_predictions=3, task="auto", timeout=1000,
                 api_key=api_key, client_ip=None, overall_timeout=20000,
                 stop_on_error=False)

print(f'[=] Results: {async_predict}')


# NOTE: This function below MUST require test_titles or titles, label_map and example rules:
print('[==] Initiating advanced batch prediction')
         predicted_output = async_manager.advanced_batch_prediction(test_titles, label_map, example_rules,
         X=None, y=None, # provide your initialized X and y samples (Also Optional, can be set to None)
         secret_key=secret_key, client_ip=None) # you can add client_ip to provide a robust authentication paired with secret_key
# for better and faster advanced prediction when using titles and rules, consider using advanced batch prediction like in the above example
[=] Note:
- Asynchronous prediction used Event loop that handles incoming request, There are conditions where event loop will not start and can't accet requests:
- CPU Above > 95% - Disk space is < 100 MB
- RAM above > 95%
- When event loop is not triggered, Asynchronous prediction can't be initiated and must be restarted/retried.
- Script setup can be downloaded here: async_script
- Peer-to-Peer Probability coordination:
- Each peer is both server and client simultaneously for robustness and resilience during during P2P.
- To Make the Agent cooperate with other peers, consider using this setup:
- [=] for ensemble prediction from multiple peers, exchanging predicted label with each other, consider using this setup:
# step 3

# NOTE:
# All three Models (MLP, Transformer and LSTM) must be Initialized and Trained first before initiating P2P.
from AbstractIntegratedModule import CohesiveAgentDeployment
from AbstractIntegratedModule import PipelinePredictionManager
import asyncio
import traceback

prediction_manager = PipelinePredictionManager(main_model, label_csv=<your_training_labels.txt>, target_title=<target_title>, label=<target_label>)

secondary_model = IntegratedPipeline(memory_name=memory_name,
                use_async=True, agent_port=8080,
                ssl_cert_file=cert_file, ssl_key_file=key_file) # provide cert_file path or key_file path (optional)
# secondary model of integrated pipeline is critical for ARM64 environment to prevent socket conflict during P2P with the first Integrated pipeline instance.
# make sure that the agent_port in secondary_model must be different from agent_port in first IntegratedPipeline instance you initialized to prevent address already in use error [Errno 48].

print("=== SECURE PEER-TO-PEER CLUSTER ===")

# CohesiveAgentDeployment is deeply tied and coupled with AgentDistributedInference,
# if you already set an SSL cert and key, CohesiveAgentDeployment will use the SSL directly from AgentDistributedInference
# allowing secure socket to be used directly by CohesiveAgentDeployment


# example task (change to regression if yours are regression task)
# function must be async to use the await syntax (Non-blocking)
async def p2p_tasks(task='classification')
   main_model.distribution.enable_ssl = False # set to false if you dont have SSL key and CERT, this code would instruct AgentDistributedInference that you don't have SSL, and provide you a regular unsecured socket (Not necessary for production)
   secondary_model.distribution.enable_ssl = False

   # NOTE:
      # shared_auth_token : the secret_key you have alread made
      # trusted networks is a list (must be list), that contain allowed IPs for networking.
      # pass IntegratedPipeline (here its main_model), and PipelinePredictionManager (here its main_prediction).
      # agent memory_name can be anything you want.
      # pass target_titles and label_name (matches the target_title you used during loading your label_map inside your .txt file.)

      # enable_peers : allow an agent to communicate with other agent.
      # security_level:
         # PRODUCTION: secure for P2P networking,
         # DEVELOPMENT: not-secure for P2P networking (use this for testing)
   # Agent 1 - Primary (Port 5555)
   agent1 = CohesiveAgentDeployment(
      pipeline=main_model, # main_model is your initialized integrated pipeline
      memory_name="agent_primary", # any name you want for the agent.
      filename=<filename>, # name of your .txt file that contains the CSV format and training labels
      target_title=<title_name>,
      label_name=<label_name>,
      security_level="PRODUCTION", # production level security
      enable_peers=True, # allow peer discovery
      trusted_networks=['127.0.0.1/32', '192.168.1.0/24'], # for trusted networks, you need to provide the list of IPs of your peers.
      peer_discovery_port=5555, # peer port to start P2P
      shared_auth_token=secret_key, # your previous initialized secret_key
      predict_manager=prediction_manager, # your prediction manager
      peer_config = <'your_peer_ip_lists.json'> # you need to create .json file that contains your peer IP and Port lists
      consecutive_peer_config = <'your_second_fallback_peer_ip_lists.json'> # same for this one too, but for fallback.
      )

   # Agent 2 - Secondary (Port 5556)
   agent2 = CohesiveAgentDeployment(
      pipeline=secondary_model,
      memory_name="agent_secondary",
      filename=<filename>,
      target_title=<title_name>,
      label_name=<label_name>,
      security_level="PRODUCTION",
      enable_peers=True, # agent is allowed to find peers
      trusted_networks=['127.0.0.1/32', '192.168.1.0/24'],
      peer_discovery_port=5556,
      shared_auth_token=secret_key,
      predict_manager=prediction_manager,
      peer_config = <'your_peer_ip_lists.json'> # you need to create .json file that contains your peer IP and Port lists
      consecutive_peer_config = <'your_second_fallback_peer_ip_lists.json'> # same for this one too, but for fallback.
      )

   # Note: CohesiveAgentDeployment contains ConsecutivePeerAgent that can start a server once ensemble prediction from peer is started
   # be advised to stop the server too before shutdown-ing CohesiveAgentDeployment cluster

   # example peer_Ip_lists_config.json (de-comment to use)
   # {
         # you must put "known_peers" in the config so python can identify the list of IPs and Ports
         #  "known_peers": [
         #    ["127.0.0.1", 5555], can be modified using real IP or local IP.
         #    ["127.0.0.1", 5556],
               # more ip and port lists...
      #   ]
      # }


   try:
      # Start both agents
      print("\n🚀 Starting Agent 1...")
      await agent1.start()
      print("✅ Agent 1 started on port 5555")

      print("\n🚀 Starting Agent 2...")
      await agent2.start()
      print("✅ Agent 2 started on port 5556")

      # Give servers time to fully bind
      await asyncio.sleep(2)

      # Get API keys
      api_key = agent1.get_api_key()
      print(f"\n🔑 Using API Key: {api_key[:20]}...")

      texts = {"test_titles": test_titles, "label_map": label_map, "rules": rules, # test_titles and rules are Optional samples, can be set to None.
   'X': None, "y":None, "use_transformer": True, "agent_id": agent_id} # (X and y are optional samples here too)
      # Important Note: If you set titles and rules to None, you must provide X and y samples for prediction, otherwise the models cant predict anything.

      # texts dictionary must contain test_titles, label_map, and rules that you can assign,
      # agent ID can be strings, int, or floats, recommendded to make it long for better security.
      agent1.pipeline.use_transformer = False # set agent1 pipeline to not use transformer for efficient processing in ARM64 env.
      agent2.pipeline.use_transformer = False

         # Make prediction with peer ensemble
         # Connection will be guaranteed successfull during discovery.
      result = await agent1.multi_modal_peer_ensemble_prediction(
            texts=texts,
            api_key=api_key,
            method='advanced',
            disable_sync=True
         )  # await using asyncio, multi_modal_peer_ensemble is already async by design (Inside ConsecutivePeerAgent), no need to put asyncio.run()

      # must have agent2 peer ensemble function after agent1 peer ensemble prediction function,
      # so agent1 can receive agent2 peer ensemble prediction request.
      result2 = await agent2.multi_modal_peer_ensemble_prediction(
            texts=texts,
            api_key=api_key,
            method='advanced',
            disable_sync=True
         )

      print(f"\n📊 Ensemble Result for Agent 1:")
      print(f"   Prediction: {result.get('prediction', 'N/A')}")
      print(f"   Confidence: {result.get('confidence', 0):.2%}")

      print(f"\n📊 Ensemble Result for Agent 2:")
      print(f"   Prediction: {result2.get('prediction', 'N/A')}")
      print(f"   Confidence: {result2.get('confidence', 0):.2%}")

      # Keep running briefly
      print("\n⏳ Cluster stable. Waiting 5 seconds before shutdown...") # 5 seconds before shutdown.

      # stop ConsecutivePeerAgent servers inside CohesiveAgentDeployment.
      agent1._peer_agent.stop_server() # ._peer_agent is ConsecutivePeerAgent
      agent2._peer_agent.stop_server()

      await asyncio.sleep(5)

   except Exception as e:
      print(f"\n❌ Error in cluster: {e}")
      traceback.print_exc()

   finally:
      print("\n🛑 Shutting down cluster...")
      await agent1.shutdown()
      await agent2.shutdown()
      print("✅ Cluster shutdown complete")

# Initiate tasks:
if __name__ == '__main__':
   # match to your own task (classification or regression based on your samples)
   p2p_tasks(task='classification')
[=] Important Note: - This setup outputs the given predicted label of an input directly, making P2P more flexible and fast. - This setup used Hybrid feature in prediction handling, Asynchronous prediction request, and Synchronous prediction handling. Synchronous prediction does block code execution for a few seconds, it was used for a few reason here, such as: - allowing a more slower traffic between agents, preventing other agent to get the same peer prediction over time, making each interaction equals and each peer can receive different peer prediction output.
[=] You can download this setup here for a direct test: P2PDirectTest.py
- [=] for probability coordination, locally, get peers data from database or via socket.
# step 4
# X_generated is an X samples generated from using dataset converted into Vectors.
dataset, X_generated = main_model.data_preparation(test_titles, label_map)
# sequence inputs for Transformer
sequence_inputs = main_model.sequence_encoding(dataset)
# NOTE:
# if you have X samples:
# sequence_inputs = main_model._features_to_sequence(X)
# ignore the dataset version.


# type='Hybrid' = Transformer probabilities will be present for ensemble weighting with MLp probabilities
# type='others' = Transformer probabilities will be ignored, and ensemble weighting will not be initiated as MLP probs will be used.
peer_probability_calibration = main_model.predict_proba(sequence_inputs, X, type='Hybrid', embedded=True) # peer-to-peer calibration is inside this function
[~] Note: the peer calibration coordination has a chance of triggering if both MLP and Transformer prediction doesn't agree on certain output. Consider using this setup below for using stand-alone peer-to-peer main function without being wrapped in other parent function, allowing flexible and auditable peer-to-peer sharing for probability coordination:
from AbstractIntegratedModule import WeightedEnsemblePredictor
from AbstractIntegratedModule import Transformer

# Initialize the ensemble helper class:
# main_model.distribution is the AgentDistributedInference for Handling samples:
ensemble_method = WeightedEnsemblePredictor(main_model, main_model.distribution, memory_name) # consider using the same memory name used in your previous pipeline


# Suit based on what samples you have, n_features can be set to None for classification, or used in regression samples.
# use your own vocab_size, in this case we use the old initialized vocab_size:
transformer = Transformer(
   vocab_size=main_model.vocab_size, d_model=32, n_heads=4, num_classes=num_classes, learning_rate=0.1, n_features=None, task='classification') # you can audit how much parameter the transformer needs.
main_model.model2 = transformer # overwrite previous transformer initialization in IntegratedPipeline

# main_model.distribution is AgentDistributedInference() class
# consider using ssl for secure peer to peer coordination
# main_model.distribution.ssl_cert_file = <path_to_your_ssl_cert_file>
# main_model.distribution.ssl_key_file = <path_to_your_ssl_key_file>

# Create Sequence input that Transformer can Process:
sequence_input = main_model._features_to_sequence(X)
transformer_probs, attn_weights = transformer.forward(sequence_input)

# use your X and y samples here samples here
# set embedded to always True for Transformer forward method.
probs = ensemble_method.predict_ensemble(sequence_input, X, y, method='dynamic', embedded=True)
# 3 options for ensemble weighting method:
# 1. dynamic: allow flexible, efficient weighting from both transformer and MLP,
# 2. meta: for a much more in-depth weighting from both model,
# 3. calibration: allow calibrating probability for both model outputs based on both best weights assembling.

# Get Models Agreement from previous ensemble prediction:
agreement = main_model.agreement

# start server to initiate socket for P2P listener
main_model.distribution.start_server()

# set connection timeout (Optional)
main_model.distribution.connection_timeout = 150 # 150 seconds before timeout
calibrated_probability = main_model._handle_distributed_connections(probs, attn_weights, sequence_input, agreement)

# if an Agent experience a failure on tasks, consider using this function to reduce peer trust for safer flexible coordination:

# main_model.distribution.report_failure(id(main_model), '<task_name>', reason='<unknown>') # you can add the task_name and reason
# main_model.distribution.print_network_status() # to show other peers info.
[~] Note: this calibrated_probability is later used to calculate confidence and chosen output based on given label_map.
- Consider checking:
- multi_agent_client.py for a In-depth start for client testing.
- multi_agent_server.py for a In-depth start for server testing.
- If you get undefined NoneType Behavior when using .accept(), consider see Troubleshooting Issue 7 for a Quick fix.
-
SNN Prediction Usage (Separated from IntegratedPipeline):
- Example usage:
- NOTE: (Our SNN cant handle Regression samples):
-
[CLASSIFICATION TASK AND REGRESSION TASK] :
-
from AbstractIntegratedModule import train_snn_network
from AbstractIntegratedModule import snn_predict
from AbstractIntegratedModule import initialize_snn_network

# if your X samples (for regression and classification) has large values, consider re-scaling your X samples to lower range to [-1, 1] to prevent Exploding gradients.
# X = main_model._safe_to_2d_float(X) if your X samples has len(shape) > 2

# n_hidden and seed can be changed and flexible.
# X, y, and label map is a must samples to pass.
net, hidden_layer, utility = initialize_snn_network(X, y, label_map, n_hidden=64, seed=42)

encoder, net, reports, warnings = train_snn_network(X=X, y=y, epochs=50,
      net=net, hidden_layer=hidden_layer, task='<your_task>', # pass your net, hidden_layer and task (can be classification and regression)
      batch_size=32, n_steps=20, # n number of steps for Input encoding for Noise robustness, higher steps, higher robustness from Noise.
      n_hidden=64, lr=2e-3,  # pass hidden layers (n_hidden) for the SNN Network (n_hidden must match the previous initialized n_hidden), and learning rate for the SNN network.
      pretrain_steps=200, unsupervised_stdp=False # pretrain steps can be set to 0 if unsupervised_std is set to False (This is for STDP Unsupervised leearning for the SNN before BPTT Training in order to shape better Weights)
      )
# This function already includes diagnostic modules for the Whole SNN network to give you a Clearer picture of the SNN Condition before Prediction.
# Very High Dead neurons is a sign of Bad development, consider to Increase hidden layers or learning rate in order for the Model to improve.

# x must be a two dimensional sample, if X.ndim > 2, consider reshaping the X to be a 2D sample safely.
results = snn_predict(X=X, y=y, task='your_task', label_map=label_map, encoder=encoder, net=net)
# net is the SNNNetwork Class, and Encoder is PoissonEncoder, both are required for Prediction and must be passed in this function, consider saving the SNN net and the encoder using json for later use.
# Small Note:
# - This architecture is not guaranteed to work best for Classifying tabular datas, its good for time series event based activity classification.
-
Cross-Session availability:
- To use Cross-session avialability to transfer or import memory, consider using this setup:
-
main_model._cross_session_availability() # cross session capability function
-
- As an option, You can add more feature's directly to what it should predict, behave using rules you have given, Create a visual dashboard, create a distributed mesh of this agent, and much more features you can try.
[+] Troubleshooting
-
Issue 1: "ModuleNotFoundError: No module named 'AbstractIntegratedModule'" When using the binary version of the library, Solution:
- [=] Verify the binary file is in the correct location:
ls -la AbstractIntegratedModule*.so # Linux dir AbstractIntegratedModule.pyd # Windows- [=] Check Python path:
python -c "import sys; print('\n'.join(sys.path))"- [~] Note: - Move binary to project root if not already there
- Ensure you're using Python 3.13 of the supported version.
-
Issue 2: "ImportError: DLL load failed" when using binary version of the library (For Windows) Solution:
-
- Ensure AbstractIntegratedModule.pyd is in your project root
-
- Install Visual C++ redistributables: Download from: https://support.microsoft.com/en-us/help/2977003
-
- Verify Python architecture (32-bit vs 64-bit) matches the .pyd file
-
-
Issue 3: "Permission denied" when using binary version of the library (for Linux/Raspberry Pi) [=] Solution:
-
# Make sure you have read permissions
chmod 644 AbstractIntegratedModule.cpython-39-*.so
# If in virtual environment, ensure it's activated
source venv/bin/activate
-
-
Issue 4: Missing Dependencies when using binary [=] Solution:
-
# Reinstall all dependencies
pip install --upgrade pip setuptools wheel
pip install numpy pandas scikit-learn matplotlib scipy requests

# Verify installation
pip list
-
-
Issue 5: Virtual Environment Issues [=] Solution:
-
# Deactivate current environment
deactivate

# Create a fresh virtual environment
python -m venv fresh_venv

# Activate it
source fresh_venv/bin/activate  # Linux/Raspberry Pi
# or
fresh_venv\Scripts\activate     # Windows

# Reinstall
pip install --upgrade pip
pip install numpy pandas scikit-learn matplotlib scipy
-
-
Issue 6: Raspberry Pi - "Bus error" or Performance Issues Solution:
- [=] Ensure adequate swap space:
free -h # Check current swap sudo nano /etc/dphys-swapfile # Increase if needed - Close unnecessary applications before running
- Consider using a faster SD card (UHS-I or better)
- [=] Ensure adequate swap space:
-
Issue 7: P2P Undefined Connection: If you get this warning:
-
[❌] Failed to connect to <host>:<port>: Nonetype object has no attribute .accept()- [=] Solution:
-
# initiate socket first
main_model.distribution.socket = socket.socket(socket.AF_INET, socket.SOCK_STREAM)
main_model.distribution.socket.setsockopt(socket.SOL_SOCKET, socket.SO_REUSEADDR, 1)
main_model.distribution.socket.bind(('0.0.0.0', self.port)) # self.port could be changed with other ports
main_model.distribution.socket.listen(5) # listens for 5 seconds
-
-
Issue 8: Cannot compare using '<' with str and float data:
- This happens when one of the labels extracted from your CSV file has NaN value, consider replace NaN with actual labels.
-
Issue 9: Failed authentication during asynchronous prediction:
- Solution: Ensure API_KEY is initialized inside PipelineAsyncManager like this:
-
 async_manager = PipelineAsyncManager(main_model,
 main_prediction, # your previous initialized PipelinePredictionManager
 config=security_config,
 state_file=None, # state file is used to load known security logs ex: ip used, ip blacklisted, etc.
 security_level=SecurityLevel.PRODUCTION, # production level security initiated
 api_key=secret_key # set secret key you initialized <- THIS IS IMPORTANT
 max_workers=4, # workers to initiate prediction, more workers, more capabilities to process prediction requests.
 task_timeout=30,
 max_retries=3 ) # retries after failure during prediction
- And make sure you also initialized api_key in the predict function that requires api_key:
async_manager.predict(...., ...., api_key=api_key, ...)
- And make sure you also initialized api_key in the predict function that requires api_key:
[=] Detailed process of Alpha-computing
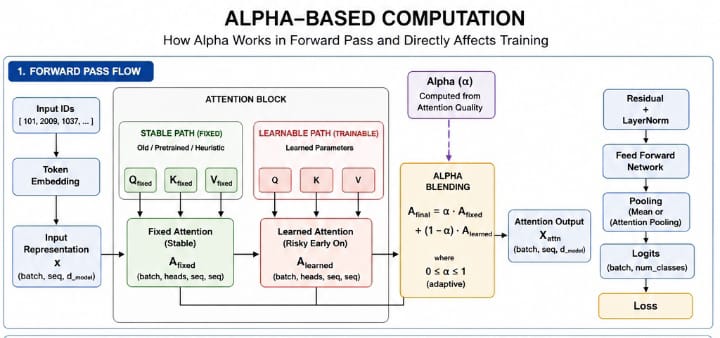
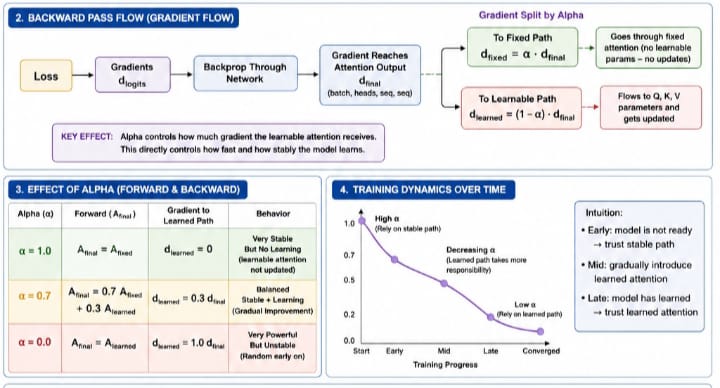 🧠 What Alpha-Based Computation Actually Does
At its core, alpha (α) is a control parameter that blends two different information paths inside a given transformer: A_final = α · A_fixed + (1 − α) · A_learned. [~] Where:
- A_fixed → stable, non-trainable (or minimally changing) attention
- A_learned → dynamic, trainable attention (Q, K, V)
- α ∈ [0, 1] → controls how much each path contributes
[~] Forward Pass -> Controlling Information Flow: During the forward pass, alpha determines what representation the model uses. If α is high (e.g., 0.8–1.0): Model relies mostly on stable attention → outputs are consistent → less noise → safer early training, If α is low (e.g., 0.0–0.3), Model relies mostly on learned attention, → more expressive → but unstable early on. So in forward propagation, alpha is essentially, “How much do I trust learned attention vs safe attention?”
[~] Backward Pass -> Controlling Gradient Flow: When gradients flow backward:
- dA_final → splits into two paths
    - Mathematically:
        - dA_fixed   = α · dA_final
        - dA_learned = (1 − α) · dA_final
[~] Simple Explanation:
- If α (alpha) is high: → most gradient goes to fixed path → learned attention gets very little update → training is stable but slow
- If α is low: → most gradient goes to learned attention → fast learning → but noisy / unstable
[=] Why This Matters for Training
- Without alpha: attention starts random → gradients noisy → model stuck (~10% accuracy)
- With alpha: early stage -> rely on stable structure → meaningful gradients
Main Components
[=] 1. - Consider checking and run: IntegratedPipeline_Flow.html regarding each function of the whole components and deep-dive mechanism. 2. - consider checking ARCHITECTURE.md for more explanation about the main components.
[=] With 23 total architectures working together as a standalone library that is efficient and robust, Main components include:
- GeometricWeightShaping Purpose: Analyzes the geometric structure of data (anisotropy, spectral properties, complexity) and generates optimal weight matrices based on that geometry. Essentially teaches the model how to "understand" the shape of data before processing it, Highly robust to noise, making it an excellent fit for messy environment.
- Activation Purpose: Provides standard neural network activation functions (ReLU, sigmoid, softmax) and their derivatives for backpropagation for MLP Class.
- Loss Purpose: Implements categorical crossentropy loss and its gradient for training classification models for both MLP and The Transformer
- Transformer Purpose: A complete transformer implementation with multi-head attention, positional embeddings, feed-forward networks, layer normalization, and custom backpropagation. Includes both fixed (stable) and dynamic (adaptive) training modes necessary for Scarce data environment using algorithm such as Alpha based computing directly during forward pass.
- Dense and QATDense: Purpose: A regular dense layer and a Dense layer that specifically handles Quantization-Aware method for Training that is flexible.
- SoftmaxOutput
Purpose: A simple wrapper around softmax activation that stores the output and passes gradients through unchanged (since softmax + crossentropy gradient is handled elsewhere).
- MLP Purpose: A multi-layer perceptron that can switch between standard training and "focused" training (using feed-forward layers only) based on data complexity. Includes prediction, scoring, and geometric measurement methods.
- WeightedEnsemblePredictor Purpose: Combines Transformer and MLP predictions using dynamic weighting based on attention quality, model confidence, and agreement. Also manages memory storage, explainability, and peer agent communication.
- CrossSessionAutomation Purpose: Manages exporting, importing, and syncing model sessions across different devices or time periods. Allows saving entire model states to JSON and transferring them over network sockets.
- ExplainabilityModule Purpose: Generates human-readable explanations for predictions, learns from user feedback, maintains decision history, and batch-trains on corrections. The transparency layer for the AI agent.
- ModelStorage Purpose: SQLite-based persistence for models, attention weights, node memories, and agent data. Handles serialization/deserialization of numpy arrays and model dictionaries.
- AgentDistributedInference Purpose: The distributed agent system - can act as a server or client, handles SSL/TLS security, rate limiting, authentication, peer-to-peer prediction requests, memory synchronization, ensemble voting, and trust management between agents.
- QueryNode
Purpose: Manages trust relationships and identity verification between nodes. Evaluates node agreement, establishes connections, performs safety checks, and maintains the network of trusted peers.
- AutoBatcherAutomation
Purpose: Automatically batches incoming prediction requests to optimize throughput. Collects requests up to a maximum batch size or time window, then processes them together.
- IntegratedPipeline Purpose: The main orchestration class that ties everything together - handles text encoding, model initialization, training, prediction, memory management, hybrid predictions, and distributed inference coordination.
- PipelinePredictionManager Purpose: High-level prediction interface that loads labels from CSV, performs regular/advanced/hybrid predictions, displays results, and calculates entropy for uncertainty estimation.
- ThreadedMessageQueue purpose: Handles message queue in thread for asynchronous message handling. (Queue based)
- AsyncMessageQueue purpose: Handles incoming message from Asychronous peer request (Queue based)
- CohesiveAgentDeployment purpose: Handles both synchronous prediction, and P2P Asynchronous prediction request, acts as a server and a listener simultaneously.
- ConsecutivePeerAgent purpose: handles ensemble weighting from received output from peer, managed server and acts as a listener simultaneously.
- LSTMCell purpose: handles LSTM Core equations In Numpy.
- LSTMNetwork purpose: handling LSTM Feed-forward layer, Training and Samples handling.
- LSTMEngine purpose: handles Proper LSTM Confidence and calibration layer.
Full Documentation Features
- Go to IntegratedPipeline-Specialized-AI-Agent-library
- Go to MANN Intro
- Go to Abstract Weight Encoder (AWE) Intro
- Go to LSTM And Transformer Into
- Go to Why IntegratedPipeline?
- Go to Requirements
- Go to System-Specific-Notes
- Go to Quickstart with Docker
- Go to Performance in ARM64 Environment/Container
- Go to Step's for in-depth Usage
- Go to Troubleshooting
- Go to Detailed process of Alpha-computing
- Go to Main Components
- Go to Source code
- Consider checking:
- ROADMAP.md
- Contributing.md
- changelog.md
- requirements-For-Dev for contributors requirements.
- architecture_diagram.js.
License
[=] LICENSE: - MIT (2026) || See LICENSE for more information.
1 maintainer

Metadata
1 maintainer
Release files for AbstractIntegratedModule 1.2.7
For a detailed explanation of source distributions (sdists) and built distributions (wheels), please see the package formats documentation.
Source distribution (sdist)
| File | Size | Uploaded | |
|---|---|---|---|
| abstractintegratedmodule-1.2.7.tar.gz | 452.3 kB | Details |
Built distributions (wheels)
Total release size: 97.5 MB
Release files / abstractintegratedmodule-1.2.7.tar.gz
| Download URL | abstractintegratedmodule-1.2.7.tar.gz |
|---|---|
| Size | 452.3 kB |
| Tags | Source |
|
SHA-256 checksum How to use checksums |
e9202feb5944499f9de8adfa356a0e0277739cbd8a99a52913d186361cec1985
|
|
BLAKE2b-256 checksum How to use checksums |
695e92c199a58c97edfddd2f11054cda45728d1b360873d8d32932837383014c
|
| Upload date | |
|
Uploaded using Trusted Publishing? What is trusted publishing? |
No |
| Uploaded via |
twine/7.0.0 CPython/3.14.6
|
Release files / abstractintegratedmodule-1.2.7-cp312-cp312-win_amd64.whl
| Download URL | abstractintegratedmodule-1.2.7-cp312-cp312-win_amd64.whl |
|---|---|
| Size | 3.0 MB |
| Tags | CPython 3.12 Windows x86-64 |
|
SHA-256 checksum How to use checksums |
c5706e6176582710fee9db3d168a5136604676fed9e383d1b8e243fb673c2682
|
|
BLAKE2b-256 checksum How to use checksums |
5bdd9487f53359ebcb15b37d406bfe5eb2cb8193d522b5a2b676fa491bf70fb2
|
| Upload date | |
|
Uploaded using Trusted Publishing? What is trusted publishing? |
No |
| Uploaded via |
twine/7.0.0 CPython/3.14.6
|
Release files / abstractintegratedmodule-1.2.7-cp311-cp311-win_amd64.whl
| Download URL | abstractintegratedmodule-1.2.7-cp311-cp311-win_amd64.whl |
|---|---|
| Size | 3.1 MB |
| Tags | CPython 3.11 Windows x86-64 |
|
SHA-256 checksum How to use checksums |
a3733d10b8e560a40d63864725749c5bb35e80ca1bd8d2ae537121c04dee7b32
|
|
BLAKE2b-256 checksum How to use checksums |
01e5f973d9b2126e2cea031f96c4e74752722abb3defa283c9534fbcb563dc1c
|
| Upload date | |
|
Uploaded using Trusted Publishing? What is trusted publishing? |
No |
| Uploaded via |
twine/7.0.0 CPython/3.14.6
|
Release files / abstractintegratedmodule-1.2.7-cp311-cp311-musllinux_1_2_aarch64.whl
| Download URL | abstractintegratedmodule-1.2.7-cp311-cp311-musllinux_1_2_aarch64.whl |
|---|---|
| Size | 22.3 MB |
| Tags | CPython 3.11 Linux musl 1.2+ ARM64 |
|
SHA-256 checksum How to use checksums |
7880921adb52bbfe9e785c2dd78da27f18ccc4cbb2406df6cbda82815315812b
|
|
BLAKE2b-256 checksum How to use checksums |
f6989aa8c5337d77181bd87fc4841b0229988cb442c6b3bd1e30c53f4fb69908
|
| Upload date | |
|
Uploaded using Trusted Publishing? What is trusted publishing? |
No |
| Uploaded via |
twine/7.0.0 CPython/3.14.6
|
Release files / abstractintegratedmodule-1.2.7-cp311-cp311-manylinux2014_aarch64.manylinux_2_17_aarch64.manylinux_2_28_aarch64.whl
| Download URL | abstractintegratedmodule-1.2.7-cp311-cp311-manylinux2014_aarch64.manylinux_2_17_aarch64.manylinux_2_28_aarch64.whl |
|---|---|
| Size | 22.6 MB |
| Tags | CPython 3.11 Linux glibc 2.17+ ARM64 Linux glibc 2.28+ ARM64 |
|
SHA-256 checksum How to use checksums |
2a77f8df4985984d5068fb8bef00e1a88387e29b2b07b205612a01403f01819c
|
|
BLAKE2b-256 checksum How to use checksums |
6ff122ed600dd278a267f9106e98ed2caa2dbe055d5e81e485b3088e19e1ae1f
|
| Upload date | |
|
Uploaded using Trusted Publishing? What is trusted publishing? |
No |
| Uploaded via |
twine/7.0.0 CPython/3.14.6
|
Release files / abstractintegratedmodule-1.2.7-cp310-cp310-win_amd64.whl
| Download URL | abstractintegratedmodule-1.2.7-cp310-cp310-win_amd64.whl |
|---|---|
| Size | 3.1 MB |
| Tags | CPython 3.10 Windows x86-64 |
|
SHA-256 checksum How to use checksums |
5ddf44b8c73c98afde9faddbc2d8efe68d51f700df093f9d52e480c2d8dbe440
|
|
BLAKE2b-256 checksum How to use checksums |
739793573296679e485113f25682d0c261e490d2310869b193056e164d54b4fb
|
| Upload date | |
|
Uploaded using Trusted Publishing? What is trusted publishing? |
No |
| Uploaded via |
twine/7.0.0 CPython/3.14.6
|
Release files / abstractintegratedmodule-1.2.7-cp310-cp310-musllinux_1_2_aarch64.whl
| Download URL | abstractintegratedmodule-1.2.7-cp310-cp310-musllinux_1_2_aarch64.whl |
|---|---|
| Size | 21.3 MB |
| Tags | CPython 3.10 Linux musl 1.2+ ARM64 |
|
SHA-256 checksum How to use checksums |
501675bcd1a5636be143f894102a7b12f57c8ee9914c31a34fe58abc8e711b76
|
|
BLAKE2b-256 checksum How to use checksums |
6e3eb6a650a940dc34b555ac2cdb6df6602bd822735a32f1e287536a3a630a7f
|
| Upload date | |
|
Uploaded using Trusted Publishing? What is trusted publishing? |
No |
| Uploaded via |
twine/7.0.0 CPython/3.14.6
|
Release files / abstractintegratedmodule-1.2.7-cp310-cp310-manylinux2014_aarch64.manylinux_2_17_aarch64.manylinux_2_28_aarch64.whl
| Download URL | abstractintegratedmodule-1.2.7-cp310-cp310-manylinux2014_aarch64.manylinux_2_17_aarch64.manylinux_2_28_aarch64.whl |
|---|---|
| Size | 21.7 MB |
| Tags | CPython 3.10 Linux glibc 2.17+ ARM64 Linux glibc 2.28+ ARM64 |
|
SHA-256 checksum How to use checksums |
34ac95ca9630bc1a377630ba937a656704ee406994449e05279392535bbb0316
|
|
BLAKE2b-256 checksum How to use checksums |
27d1d801f668c60fe5fa5b36fd342de91e29c5bf2b568561a7ad261b39636270
|
| Upload date | |
|
Uploaded using Trusted Publishing? What is trusted publishing? |
No |
| Uploaded via |
twine/7.0.0 CPython/3.14.6
|














