
A tool to extract and format academic data from Web of Science and Crossref

Project description
COSC425-DATA
[!IMPORTANT]
🎉 Now Available on PyPI!
Install with:pip install academic-metricsThis is the recommended installation method for most users.
What is it?
This repository (COSC425-DATA) is the host of the source code for the Academic Metrics package.
Academic Metrics is an AI-powered toolkit for collecting and classifying academic research publications.
The system:
- Collects publication data from Crossref API based on institutional affiliation
- Uses LLMs to classify research into NSF PhD research focus areas
- Extracts and analyzes themes and methodologies from abstracts
- Generates comprehensive analytics at article, author, and category levels
- Stores results in MongoDB (local or live via atlas), local JSON files, and optionally Excel files
Features
- Data Collection: Automated fetching of publications via Crossref API
- AI Classification: LLM-powered analysis of research abstracts
- Multi-level Analytics:
- Article-level metrics and classifications
- Author/faculty publication statistics
- Category-level aggregated data
- Flexible Storage: MongoDB integration, local JSON output, and optionally Excel files
- Configurable Pipeline: Customizable date ranges, models, and processing options
- And more!: There are many useful tools within the academic metrics package that can be used for much more than just classification of academic research data, and they're all quite intuitive to use. See Other Uses for more information.
Documentation and example site built using the Salisbury University data from 2009-2024
To be able to see any and all implementation details from the code logic, structure, prompts, and more you can check out our documentation. The documentation is built with Sphinx, allowing for easy use and a sense of famliarity.
Academic Metrics Documentation
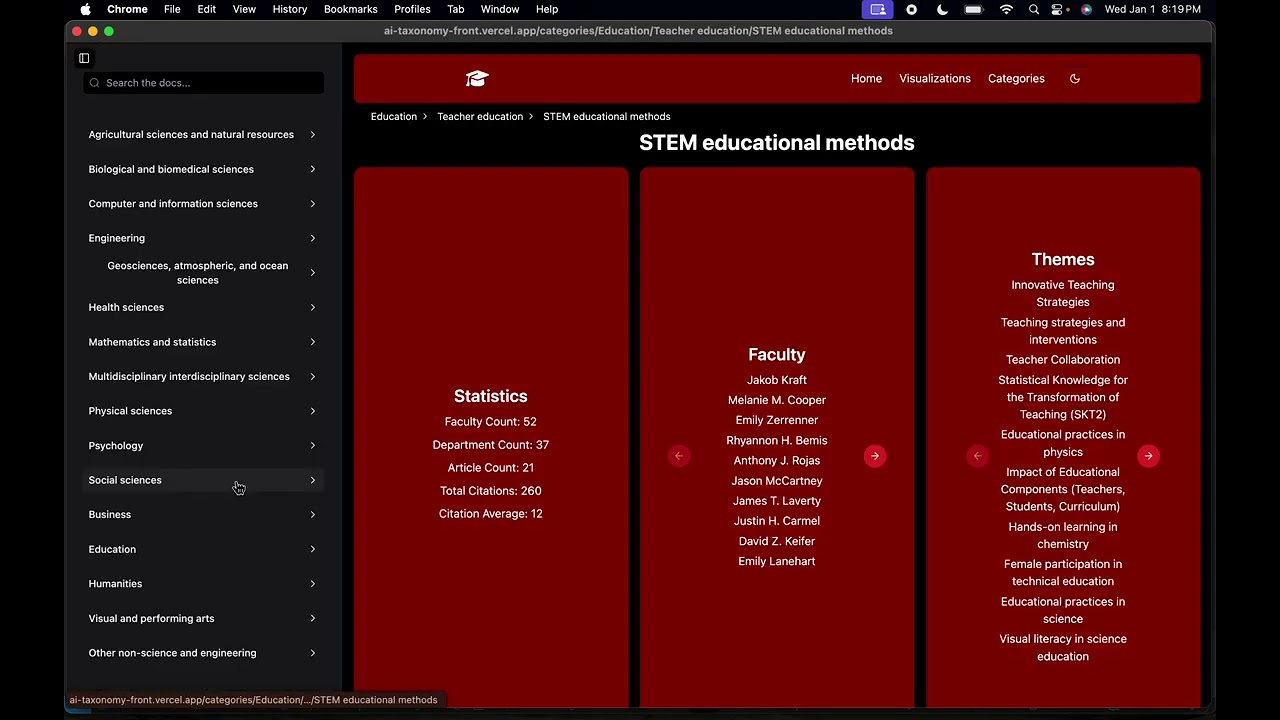
We also built an example site with the data we collected so that you can get a small idea of the potential uses for the data. This is by no means the only use case, but it does serve as a nice introduction to decide if this package would be useful for you.
[!NOTE] The source code for the example site is available here
[!TIP] You can use our site source code for your own site! To easily launch your own website using the data you collect and classify via Academic Metrics see Site Creation Guide
To see a demo of the site, you can watch the below video:
Installation and setup via pip
Hey all, we are pleased to announce as of January 1st, 2025, you can now install the Academic Metrics package via pip and easily run the system. Below are instructions outlining step by step how to do it.
0. External Setup
Recommended to use python 3.12 as that is the version used for development and has not been tested on other versions.
Setting up mongod:
To see instructions on how to install and run mongod see the MongoDB documentation.
If you have struggles setting up mongodb, google, youtube, and chatgpt are your friends.
The installation is rather easy, just follow the instructions and you should be able to get it running.
To find the name of your db you can run mongosh and then show dbs to see a list of all the databases on your server.
To create a new db with a custom name you can run use <db_name>.
Collection creation is handled by the system, you do not need to create them.
1. Installation and setup
Install academic_metrics>=1.0.98 via pip.
To install the latest version of the package, you can run the following command:
pip install academic-metrics
Virtual environment (Optional, but recommended):
- Create a virtual environment:
[!NOTE] For these virtual environment examples we will be using
am_data_collectionas the name of the environment.
venv:
[!NOTE] venv is of the form
python -m venv <env_name>
python -m venv am_data_collection
conda:
[!NOTE] conda is of the form
conda create -n <env_name> python=<python_version>
conda create -n am_data_collection python=3.12
- Activate the virtual environment:
venv:
[!NOTE] venv is of the form:
source <env_name>/bin/activate
source am_data_collection/bin/activate
conda:
[!NOTE] conda is of the form
conda activate <env_name>
conda activate am_data_collection
2. Creating the directory and necessary files
-
Create the directory and navigate into it:
For this example we will be using
am_data_collectionas the name of the directory, but you can name it whatever you want.All systems (seperate commands):
mkdir am_data_collection
cd am_data_collection
Or as a single line:
Linux / Mac / Windows Command Prompt:
mkdir am_data_collection && cd am_data_collection
Windows Powershell:
mkdir am_data_collection; cd am_data_collection
-
Create a
.envfile inside the directory you just created.Linux/Mac:
touch .envWindows (Command Prompt):
type nul > .env
Windows (PowerShell):
New-Item -Path .env -Type File
You should now have a
.envfile in your directory.
3. Setting required environment variables
-
Open the
.envfile you just created, and add the following variables:- a variable to store your MongoDB URI, I recommend
MONGODB_URI - a variable to store your database name, I recommend
DB_NAME - a variable to store your OpenAI API Key, I recommend
OPENAI_API_KEY
After each variable you should add
=""to the end of the variable.Once you've done this, your
.envfile should look something like this:MONGODB_URI="" DB_NAME="" OPENAI_API_KEY=""
- a variable to store your MongoDB URI, I recommend
-
Retrieve and set your MongoDB URI:
For local MongoDB it's typically:
MONGODB_URI="mongodb://localhost:27017"
For live MongoDB:
For a live version you should use the MongoDB Atlas URI. It should look something like this:
mongodb+srv://<username>:<password>@<cluster-name>.<unique-id>.mongodb.net/?retryWrites=true&w=majority&appName=<YourAppNameOnAtlas>
So in the
.envfile you should have something that looks like this:Local:
MONGODB_URI="mongodb://localhost:27017"
Live:
MONGODB_URI="mongodb+srv://<username>:<password>@<cluster-name>.<unique-id>.mongodb.net/?retryWrites=true&w=majority&appName=<YourAppNameOnAtlas>"
[!WARNING] I recommend starting locally unless you need to use a live MongoDB instance. This will avoid the need to deal with setting up MongoDB Atlas, which while not difficult, it is an added step.
-
Set your database name
You can pick any name you want for
DB_NAME, but it needs to be a name of a valid database on your mongodb server. To make one on the command line you can run:mongosh use <db_name>For this demonstration we will be using
academic_metrics_dataas theDB_NAME.First we'll create the database on the command line:
mongosh
use academic_metrics_data
This is to ensure the database actually exists so that the system can access it.
Now that the database exists, we'll set the
DB_NAMEin the.envfile.DB_NAME="academic_metrics_data"
-
Set your OpenAI API Key
If you do not have an OpenAI API key you will need to create one, but do not worry, it's easy.
Go to the following link and click on "+ Create new secret key":
https://platform.openai.com/api-keys
Give the key a name, and then copy the key.
Then in the
.envfile paste the key in theOPENAI_API_KEYvariable.It should look similar to this, but with the full key instead of
sk-proj...:OPENAI_API_KEY="sk-proj..."
[!IMPORTANT] You will need to add funds to your OpenAI account to use the API.
When using the default model for the system (gpt-4o-mini), it cost us about $3-4 dollars to process all of the data from Salisbury University from 2009-2024.
For larger models such as gpt-4o, the cost will be much higher.
We saw good results using gpt-4o-mini, and it's also the most cost effective. So I recommend starting with that.
Additionally, whether you opt to use our command line interface or your own script, the data is processed one month at a time and saved to the database, so if you run out of funds on your OpenAI account you will not lose data for the entire run, only the current month being processed. Simply add funds to your account and continue.
You do not have to change anything in the code once you run it again, the system checks for existing data and only processes data that has not yet been processed.
All together your .env file should look like this:
MONGODB_URI="mongodb://localhost:27017"
DB_NAME="academic_metrics_data"
OPENAI_API_KEY="sk-proj..."
4. Quick Setup and Usage
For running the core system you have 2 options for how to do it.
- Writing a short script (code provided) to loop over a range of dates you'd like to collect.
- Using a provided function to run a command line interface version.
If you have experience with python, or don't mind learning a couple basics about loops, I recommend the first option.
If you do not have any experience with python or programming, and just want a plug and play solution, the second option works great.
Both options are simple to setup and use. I will detail the process for both options below. I suggest briefly reading through both options and then picking the one you prefer. Once you've picked one, simply follow the instructions for that option.
Option 1 - Short Script
For this option you need to do the following:
-
Create the python file
Within your directory, create a new python file, for this example we will be using
run_am.py, but you can name it whatever you want.Linux/Mac:
touch run_am.pyWindows (Command Prompt):
type nul > run_am.py
Windows (PowerShell):
New-Item -Path run_am.py -Type File
You should now have a python file in your directory whose name matches the one you created.
-
Copy paste the following code into the file you just created:
# dotenv is the python package responsible for handling env files
from dotenv import load_dotenv

# os is used to get the environment variables from the .env file
import os

# PipelineRunner is the main class used to run the pipeline
from academic_metrics.runners import PipelineRunner

# load_dotenv is used to load the environment variables from the .env file
load_dotenv()

# Get the environment variables from the .env file
ai_api_key = os.getenv("OPENAI_API_KEY")
mongodb_uri = os.getenv("MONGODB_URI")
db_name = os.getenv("DB_NAME")

# Set the date range you want to process
# Years is a list of years as strings you want to process
# Months is a list of strings representing the months you want processed for each year
# For example if you want to process data from 2009-2024 for all months out of the year, you would do:
# Note: the process runs left to right, so from beginning of list to the end of the list,
# so this will process 2024, then 2023, then 2022, etc.
# Data will be saved after each month is processed.
years = [
    "2024",
    "2023",
    "2022",
    "2021",
    "2020",
    "2019",
    "2018",
    "2017",
    "2016",
    "2015",
    "2014",
    "2013",
    "2012",
    "2011",
    "2010",
    "2009",
]
months = ["1", "2", "3", "4", "5", "6", "7", "8", "9", "10", "11", "12"]

# Loop over the years and months and run the pipeline for each month
# New objects are created for each month to avoid memory issues as well as to avoid overwriting data
for year in years:
    for month in months:

        # Create a new PipelineRunner object for each month
        # parameters:
        # ai_api_key: the OpenAI API key
        # crossref_affiliation: the affiliation to use for the Crossref API
        # data_from_month: the month to start collecting data from
        # data_to_month: the month to end collecting data on
        # data_from_year: the year to start collecting data from
        # data_to_year: the year to end collecting data on
        # mongodb_url: the URL of the MongoDB server
        # db_name: the name of the database to use
        pipeline_runner = PipelineRunner(
            ai_api_key=ai_api_key,
            crossref_affiliation="Salisbury University",
            data_from_month=int(month),
            data_to_month=int(month),
            data_from_year=int(year),
            data_to_year=int(year),
            mongodb_uri=mongodb_uri,
            db_name=db_name,
        )

        # Run the pipeline for the current month
        pipeline_runner.run_pipeline()
If you'd like to save the data to excel files in addition to the other data formats, you can do so via importing the function
get_excel_reportfromacademic_metrics.runnersand calling it at the end of the script.Full code for convenience:
# dotenv is the python package responsible for handling env files
from dotenv import load_dotenv

# os is used to get the environment variables from the .env file
import os

# PipelineRunner is the main class used to run the pipeline
# get_excel_report is the function used to save the data to excel files
# it takes in a DatabaseWrapper object as a parameter, which connects to the database
# and retrives the data before writing it to 3 seperate excel files. One for each data type.
from academic_metrics.runners import PipelineRunner, get_excel_report

# DatabaseWrapper is the class used to connect to the database and retrieve the data
from academic_metrics.DB import DatabaseWrapper

# load_dotenv is used to load the environment variables from the .env file
load_dotenv()

# Get the environment variables from the .env file
# If you used the same names as the ones in the examples, you can just copy paste these
# if you used different names, you will need to change them to match the ones in your .env file
ai_api_key = os.getenv("OPENAI_API_KEY")
mongodb_url = os.getenv("MONGODB_URI")
db_name = os.getenv("DB_NAME")

# Set the date range you want to process
# Years is a list of years as strings you want to process
# Months is a list of strings representing the months you want processed for each year
# For example if you want to process data from 2009-2024 for all months out of the year, you would do:
# Note: the process runs left to right, so from beginning of list to the end of the list,
# so this will process 2024, then 2023, then 2022, etc.
# Data will be saved after each month is processed.
years = [
    "2024",
    "2023",
    "2022",
    "2021",
    "2020",
    "2019",
    "2018",
    "2017",
    "2016",
    "2015",
    "2014",
    "2013",
    "2012",
    "2011",
    "2010",
    "2009",
]
months = ["1", "2", "3", "4", "5", "6", "7", "8", "9", "10", "11", "12"]

# Loop over the years and months and run the pipeline for each month
#
# New objects are created for each month
# to avoid memory issues as well as to avoid overwriting data
for year in years:
    for month in months:

        # Create a new PipelineRunner object for each month
        # parameters:
        # ai_api_key: the OpenAI API key
        # crossref_affiliation: the affiliation to use for the Crossref API
        # data_from_month: the month to start collecting data from
        # data_to_month: the month to end collecting data on
        # data_from_year: the year to start collecting data from
        # data_to_year: the year to end collecting data on
        # mongodb_url: the URL of the MongoDB server
        # db_name: the name of the database to use
        pipeline_runner = PipelineRunner(
            ai_api_key=ai_api_key,
            crossref_affiliation="Salisbury University",
            data_from_month=int(month),
            data_to_month=int(month),
            data_from_year=int(year),
            data_to_year=int(year),
            mongodb_uri=mongodb_uri,
            db_name=db_name,
        )

        # Run the pipeline for the current month
        pipeline_runner.run_pipeline()

# Create a new DatabaseWrapper object so it can be given to get_excel_report
db = DatabaseWrapper(db_name=db_name, mongo_uri=mongodb_uri)

# Call the get_excel_report function, passing in the db object, to save the data to excel files
#
# Once this finishes running, you should have 3 excel files in your directory:
# article_data.xlsx, author_data.xlsx, and category_data.xlsx
get_excel_report(db)
-
Run the script
python run_am.pyIf you get the following error:
'python' is not recognized as an internal or external command, operable program or batch file.
Then it's likely one of the following issues, I recommend checking the following in order:
- Try using
python3instead ofpython - Make sure python is installed on your system
- Make sure python is added to your system path, to see how to do this, you can look here
The latter two are likely not to be the issue, as you would've ran into them when setting up your virtual environment, but if the first does not fix the issue, then check the other two.
- Try using
Option 2 - Command Line Interface
For this options you will still need to create a python file, but the code will only be a couple lines long as you'll be passing in your arguments via the command line.
-
Create the python file
Within your directory, create a new python file, for this example we will be using
run_am.py, but you can name it whatever you want.Linux/Mac:
touch run_am.pyWindows (Command Prompt):
type nul > run_am.py
Windows (PowerShell):
New-Item -Path run_am.py -Type File
You should now have a python file in your directory whose name matches the one you created.
-
Copy and paste the following code into the file you just created:
from academic_metrics.runners import command_line_runner

command_line_runner()
[!WARNING] If you did not use the
MONGODB_URIandOPENAI_API_KEYas the variable names in the .env file, you will need to make a couple changes to the above code.
How to use with different variable names:
The command_line_runner functions takes in 2 optional arguments, openai_api_key_env_var_name and mongodb_uri_env_var_name corresponding to the names of the environment variables you used in your .env file.
To use the different names, do the following:
from academic_metrics.runners import command_line_runner

# The strings should be changes to match the names you used in your .env file
command_line_runner(
    openai_api_key_env_var_name="YOUR_OPENAI_API_KEY_ENV_VAR_NAME",
    mongodb_uri_env_var_name="YOUR_MONGODB_URI_ENV_VAR_NAME",
)
- Run the script
For this option you will still run the script from command line, but you will also be passing in arguments, details laid out below.
There are various command line arguments you can pass in, almost all are detailed here, but to complete list you can run:
python run_am.py --help
To run it, you can use the following arguments:
--from-month- The month to start collecting data from, defaults to 1--to-month- The month to end collecting data on, defaults to 12--from-year- The year to start collecting data from, defaults to 2024--to-year- The year to end collecting data on, defaults to 2024--db-name- The name of the database to use (required)--crossref-affiliation- The affiliation to use for the Crossref API, defaults to Salisbury University (required)
If you want to save the data to excel files you can pass in the --as-excel argument.
[!NOTE] The
--as-excelargument is an additional action, it doesn't remove the the saving to other data formats, but merely adds the excel saving functionality.
Examples
Say you want to collect data for every month from 2019 to 2024 for Salisbury University and save it to excel files. You would run the following command:
python run_am.py --from-month=1 \
--to-month=12 \
--from-year=2019 \
--to-year=2024 \
--crossref-affiliation="Salisbury University" \
--as-excel \
--db-name=Your_Database_Name
The default AI model used for all parts is gpt-4o-mini. If you want to use a different model you can use the following arguments:
--pre-classification-model- The model to use for the pre-classification step--classification-model- The model to use for the classification step--theme-model- The model to use for the theme extraction step
[!WARNING] This process consumes a lot of tokens, during testing we found that using
gpt-4o-miniwas the most cost effective and provided good results.If you want to use a larger model like
gpt-4oyou can do so, but be warned it will run through your tokens very quickly.If you do use a larger model I recommend you start with a smaller date range and work your way up.
Here's how you would run the pipeline using the larger gpt-4o model:
python run_am.py --from-month=1 \
--to-month=12 \
--from-year=2019 \
--to-year=2024 \
--crossref-affiliation="Salisbury University" \
--as-excel \
--db-name=Your_Database_Name \
--pre-classification-model=gpt-4o \
--classification-model=gpt-4o \
--theme-model=gpt-4o
Wrapping Up
That's it! You've now successfully installed and run the system.
If you have any questions, or need help, feel free to reach out to me at spencerpresley96@gmail.com.
If you are a potential employer, please reach out to me at spencerpresley96@gmail.com so that I can provide you with a copy of my resume. You can also reach out to me on linkedin at https://www.linkedin.com/in/spencerpresley96/.
Happy coding!
Release history Release notifications | RSS feed


Download files
Download the file for your platform. If you're not sure which to choose, learn more about installing packages.
Source Distribution
Built Distribution
Filter files by name, interpreter, ABI, and platform.
If you're not sure about the file name format, learn more about wheel file names.
Copy a direct link to the current filters
File details
Details for the file academic_metrics-1.0.98.tar.gz.
File metadata
- Download URL: academic_metrics-1.0.98.tar.gz
- Upload date:
- Size: 139.2 kB
- Tags: Source
- Uploaded using Trusted Publishing? No
- Uploaded via: twine/6.0.1 CPython/3.9.21
File hashes
| Algorithm | Hash digest | |
|---|---|---|
| SHA256 |
1f78da444ec37f0ed9c2344321bf7e30839b4a0cc3a9caadc53f35e9f7ffdce7
|
|
| MD5 |
d6726a8cd5d46c297e4bd76f7b4942ed
|
|
| BLAKE2b-256 |
cff474314bcc4a5f478ec1a4c175db14bca925353499889f918a7e3f70551046
|
File details
Details for the file academic_metrics-1.0.98-py3-none-any.whl.
File metadata
- Download URL: academic_metrics-1.0.98-py3-none-any.whl
- Upload date:
- Size: 151.8 kB
- Tags: Python 3
- Uploaded using Trusted Publishing? No
- Uploaded via: twine/6.0.1 CPython/3.9.21
File hashes
| Algorithm | Hash digest | |
|---|---|---|
| SHA256 |
1b7c71190fc61cf4339110342677290878622b4c599d82020c5539ccd8c44468
|
|
| MD5 |
5b48c3c3867a7eb6de2ac3776496a418
|
|
| BLAKE2b-256 |
516b54567c4a15e3940d9d8657877a37d806789ea6346939bc68e103c355b423
|






