
agent-plex
A fast, good-looking Perplexity chat for your terminal: researched answers with sources, streamed live, with chat history.
It uses Perplexity's Agent API (/v1/agent). Perplexity subscription plan is not required. The package is called agent-plex; the command it installs is plex.
The API is billed per use with an API key. A Perplexity Pro subscription doesn't cover it. A typical
fastanswer costs about $0.002, and plex shows the cost under every answer.
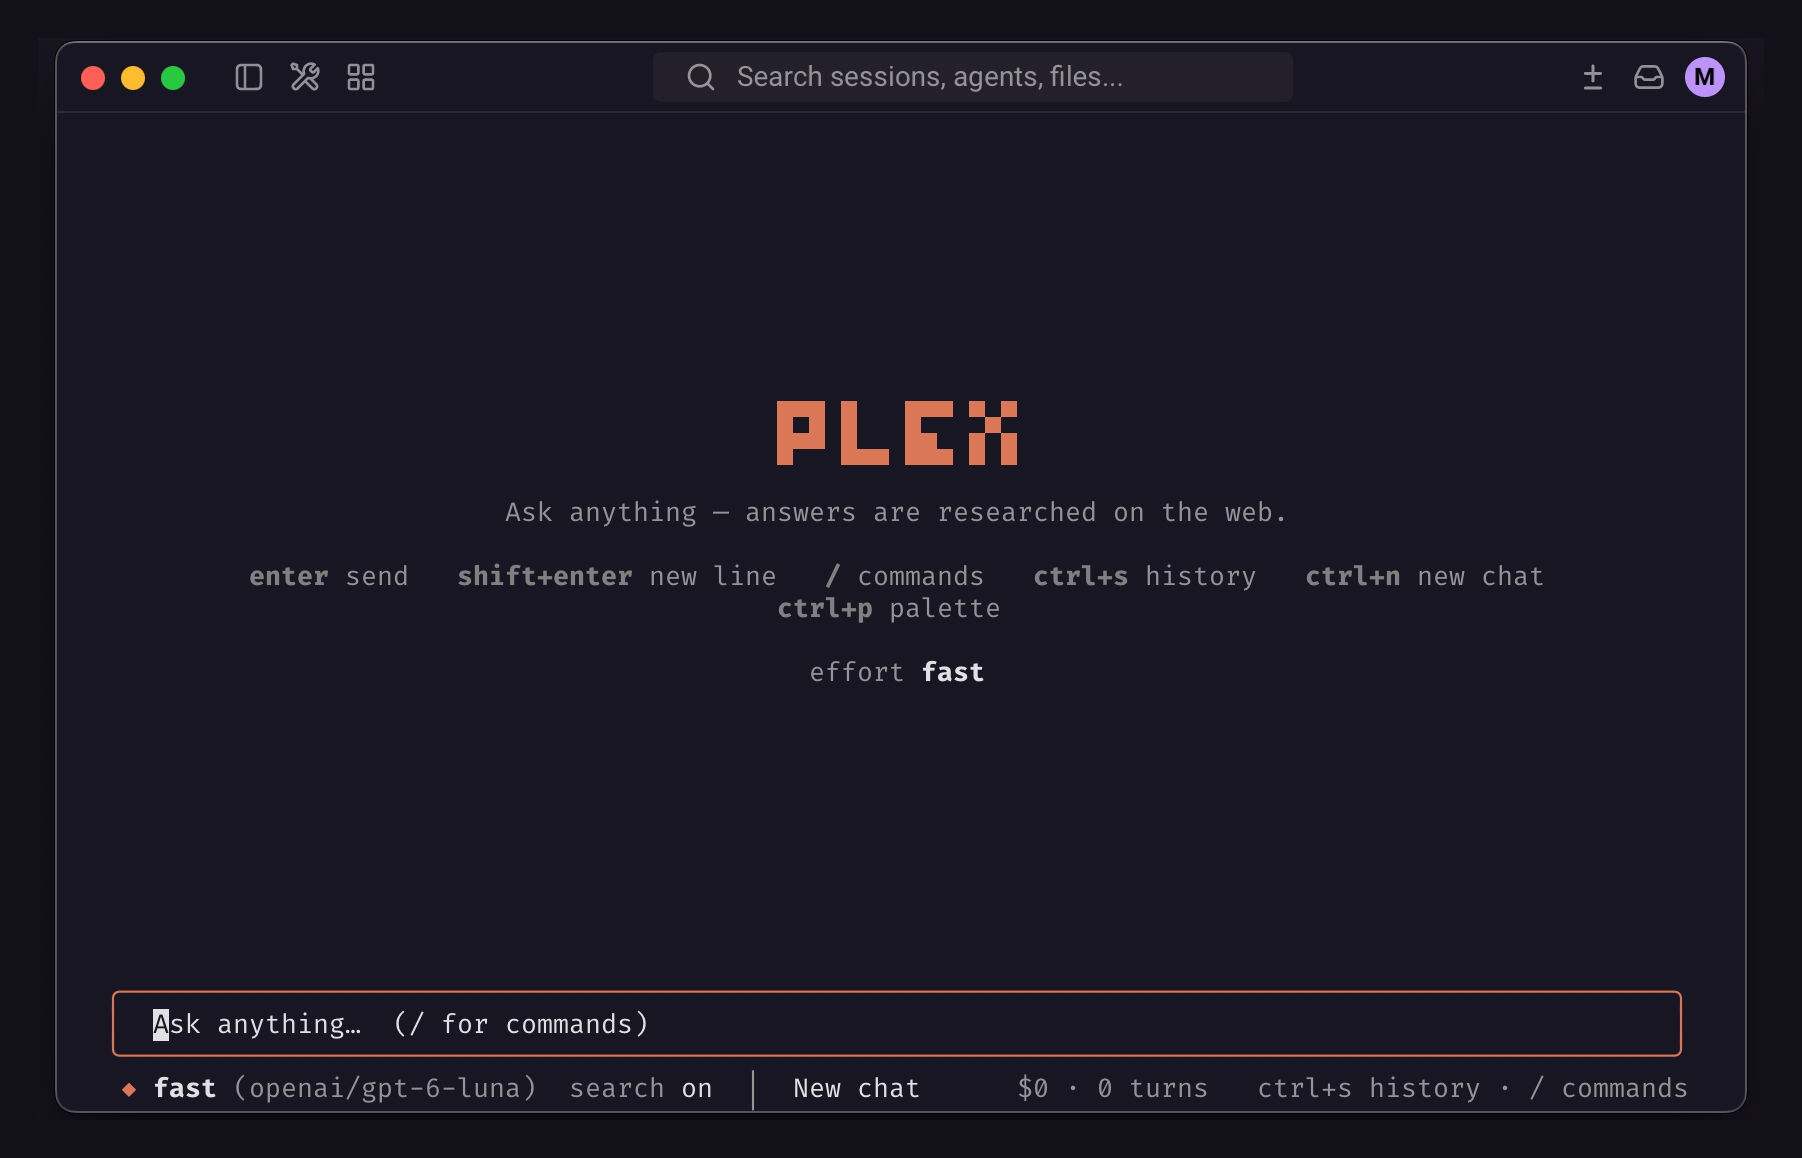
You can use it as a full-featured shell with a familiar UI and commands, similar to other popular agentic CLIs like Claude Code or OpenCode.
Or you can get quick answers right in the terminal, without interrupting your work or switching tools.
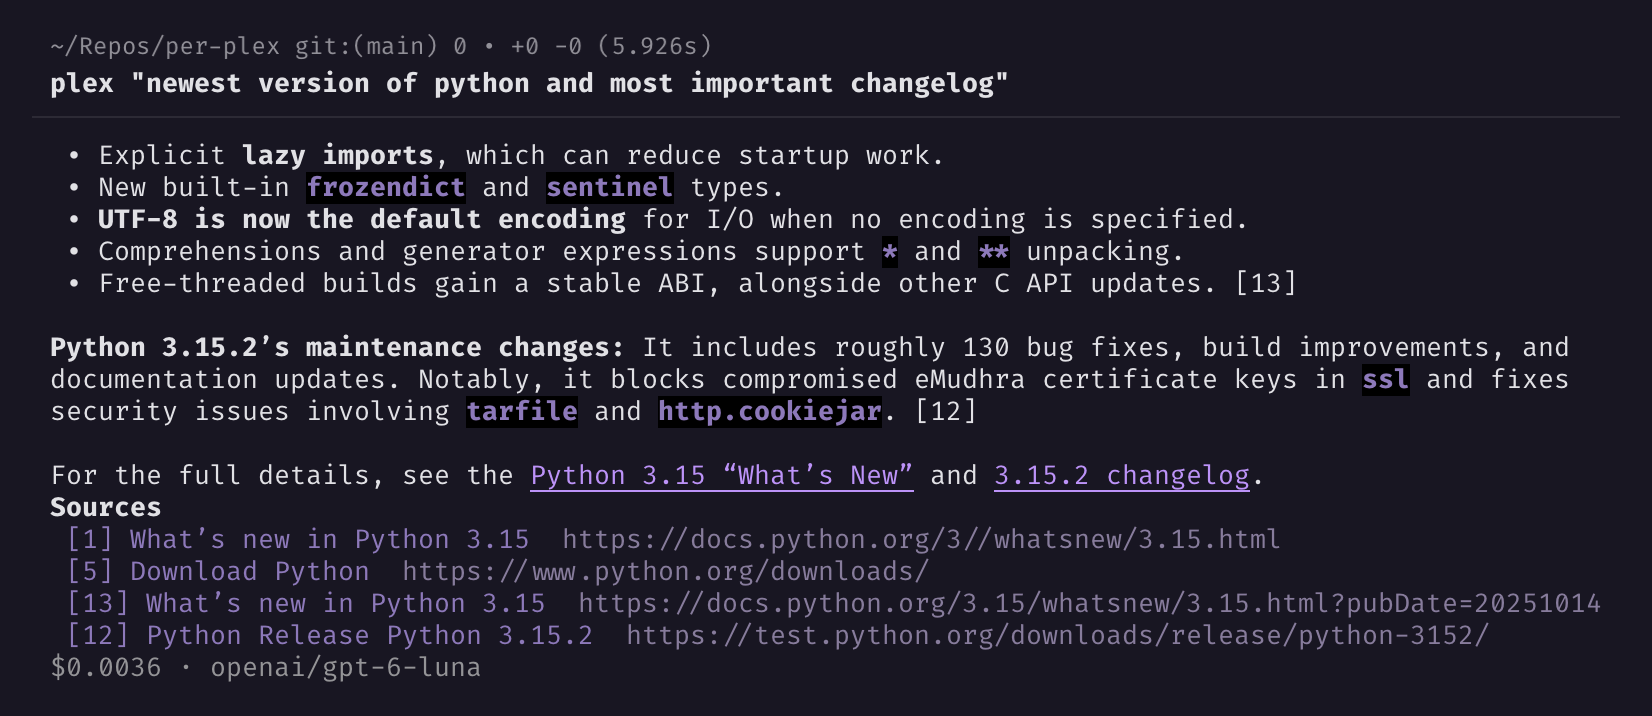
The main difference with plex is that it's built for quick use, spending minimal time and tokens. Big harnesses use more than 10K tokens on every first message just to "set up" the model. Perplexity is mainly a search-and-summarize engine, and plex is your door to it with nothing in between.
Features
- Chat UI with streamed answers, inline source citations and the cost of every answer.
- One-shot mode for scripts:
plex "question", and piped input is appended to the question. - Effort presets from
fasttoultra, or pick a specific model and its reasoning effort. - Saved conversations: reopen the last one, search by id or title, rename, delete, or clear everything.
- History sidebar, command palette,
/commandswith tab completion, copy the last answer. - Themes: ones that keep your terminal's own colors, a few full-color ones, and your own as a small TOML file.
- Your API key is stored in a file only you can read, or taken from
PERPLEXITY_API_KEY.
Installation
agent-plex is available from a variety of sources.
pip or brew is recommended, because they have a convenient way to manage updates automatically.
It needs Python 3.11 or newer.
- pip (Recommended for everyone with a Python environment)
- You can check if you have Python installed by running
python --versionin the Terminal or cmd. - For Mac and Linux users, there is a high chance that you already have Python installed on your system.
- For Windows users, you can download Python from the official website.
- After confirmation, install agent-plex through the PyPI package
manager, typing
pip install agent-plexin the Terminal. For Mac users, you may need to usepip3instead ofpip. The package is calledagent-plex; the command it installs isplex. - Verify the installation with
plex --version. - You are perfect, you can use the app with
plexfrom any folder in your system.
- You can check if you have Python installed by running
- brew (Recommended for Mac and Linux users)
- Type
brew tap manefunction/tapin your Terminal to add my custom tap (app source) to your brew sources, if you haven't already. - Type
brew install agent-plexto install the application itself. - Verify the installation with
plex --version. - You are perfect, you can use the app with
plexfrom any folder in your system.
- Type
- Python package (manual installation, for advanced users)
- Clone the repository or download the source code from GitHub.
- Go to the folder with the code in your Terminal.
- Run
pip install .to installagent-plexto your system. - Run
plex --versionto verify the install.
Usage
Log in
plex auth login # paste a key from https://www.perplexity.ai/account/api
This works like opencode: the key is stored in ~/.local/share/plex/auth.json with mode 600. You can also just start plex, and it will ask for a key the first time. PERPLEXITY_API_KEY in the environment takes precedence over the stored key.
| Command | |
|---|---|
plex auth status |
shows which key is in use (masked) |
plex auth logout |
removes the stored key |
Chat
plex                      # open the chat
plex -r                   # reopen the last conversation
plex -o "python"          # reopen a conversation by id or title text
plex --history            # list saved conversations
plex --clear              # delete all saved conversations (asks y/n first)

plex "what's new in Python 3.15?"      # one-shot: print the answer and exit
git diff | plex "review this"          # piped input is appended to the question
plex -p high "compare uv and pip"      # pick an effort preset
plex -m openai/gpt-6-luna -e high "…"  # a specific model and its effort
Keys
| Key | Action |
|---|---|
enter |
send |
shift+enter / alt+enter / ctrl+j |
new line |
↑ / ↓ on an empty prompt |
recall earlier questions |
esc |
cancel the answer being written |
ctrl+n |
new chat |
ctrl+s |
history sidebar |
ctrl+e |
effort preset picker |
ctrl+p |
command palette |
ctrl+q |
quit |
Commands
Type / to see suggestions, then press tab to complete.
| Command | |
|---|---|
/new, /clear |
new conversation |
/history |
browse history |
/preset [level] |
effort preset: fast · low · medium · high · xhigh · ultra (drops a selected model) |
/effort [level] |
effort for the selected model: minimal · low · medium · high · xhigh · max · default (in preset mode, asks for a model first) |
/model [id] / /model off |
pick a model from the list your key can use, or give an id (e.g. perplexity/sonar) / go back to presets |
/search [on|off] |
toggle web search |
/sources |
sources of the last answer |
/copy |
copy the last answer |
/rename <title> |
rename this conversation |
/delete |
delete this conversation |
/theme |
change the theme |
/login |
set the API key |
/help |
keys and commands |
/quit, /exit |
exit |
Files
| Path | |
|---|---|
~/.local/share/plex/auth.json |
API key (0600) |
~/.local/share/plex/sessions/*.json |
conversations, saved after every answer; ones not updated in 64 days (keep_days) are deleted when plex starts |
~/.local/share/plex/state.json |
last used effort, model, reasoning effort, search and theme, plus the model last seen for each effort level |
~/.config/plex/config.toml |
optional defaults (see below) |
# ~/.config/plex/config.toml
effort = "fast"
# model = "perplexity/sonar"
# reasoning = "medium"     # reasoning effort in model mode: minimal … max
# search = true
# theme = "terminal"
# max_steps = 5            # research steps in model mode
# keep_days = 64           # delete conversations not updated in this many days; 0 keeps them forever
# instructions = "..."     # custom system prompt
Themes
terminal (the default), terminal-coral, terminal-green and terminal-violet keep your terminal's own background, text and palette and add a single accent color. terminal takes its accent from the terminal palette too, so it fits any color scheme, light or dark. matrix is terminal-green with dim digital rain falling behind the chat. The rain never runs through text and pauses while the terminal window is in the background. The others are tokyo-night, catppuccin-mocha, dracula and gruvbox.
Each theme is one TOML file, named after the theme. The bundled ones live in src/plex_cli/themes/. To add your own, put a file in ~/.config/plex/themes/ ($XDG_CONFIG_HOME/plex/themes/ if that's set, on Linux and macOS alike). plex creates this folder the first time you open the chat UI (one-shot questions don't), with an empty PUT_YOUR_THEMES_HERE file in it. Your themes are loaded alongside the bundled ones and show up in /theme the next time plex starts. A file with the same name as a bundled theme replaces it. Files with mistakes are skipped, and plex tells you why at startup.
A terminal-style theme needs just an accent:
# ~/.config/plex/themes/terminal-teal.toml
terminal = true       # use the terminal's own background, text and palette
accent = "#2AA198"    # any hex color, or a terminal color like "ansi_cyan"
# effect = "rain"     # optional animated background (the one `matrix` uses)
A full-color theme sets its own colors (primary is required, the rest are optional):
# ~/.config/plex/themes/my-theme.toml
primary = "#88C0D0"     # highlights
secondary = "#81A1C1"   # your messages, key hints
accent = "#EBCB8B"      # answer bar, focused input
warning = "#EBCB8B"
error = "#BF616A"
success = "#A3BE8C"
foreground = "#D8DEE9"  # text
background = "#2E3440"
surface = "#3B4252"     # sidebar, menus, dialogs
panel = "#434C5E"       # borders
dark = true             # false for light themes

[variables]             # optional fine-tuning with Textual theme variables
border = "#88C0D0"
Credits
Built on the Perplexity Python SDK, Textual and Rich. This is an unofficial client and is not affiliated with Perplexity AI.
Repository info
This repo follows the Conventional Commits specification.




1 maintainer

Metadata
1 maintainer
Release files for agent-plex 0.9.0
For a detailed explanation of source distributions (sdists) and built distributions (wheels), please see the package formats documentation.
Source distribution (sdist)
| File | Size | Uploaded | Provenance | Actions |
|---|---|---|---|---|
| agent_plex-0.9.0.tar.gz | 55.8 kB | With provenance | Details for agent_plex-0.9.0.tar.gz |
Built distribution (wheel)
| File | Interpreter | ABI | Platform | Actions Reset |
|---|---|---|---|---|
| agent_plex-0.9.0-py3-none-any.whl | Python 3 | none | any | Details for agent_plex-0.9.0-py3-none-any.whl |
Total release size: 107.1 kB
Release files / agent_plex-0.9.0.tar.gz
| Download URL | agent_plex-0.9.0.tar.gz |
|---|---|
| Size | 55.8 kB |
| Tags | Source |
|
SHA-256 checksum How to use checksums |
dd7d3a9bd9eb2de4da970aed323a98b11d9dbb045a9e572ba53a461f163fc7e5
|
|
BLAKE2b-256 checksum How to use checksums |
f8fbf53b4ece744e411f2c9a153d31526491aee198ec5278c24566d1aedc0b41
|
| Upload date | |
|
Uploaded using Trusted Publishing? What is trusted publishing? |
Yes |
| Uploaded via |
twine/7.0.0 CPython/3.13.16
|
Provenance
Provenance describes where a file came from. On PyPI, provenance is shared via attestations, which provide a verifiable record of the build or publishing details. View details, limitations and caveats.


PyPI Publish Attestation
PyPI verified that this artifact, at this checksum, originated from the publisher listed below.
Signed by GitHub Actions, verified by PyPI on Nov 19, 2026.
Transparency logRelease files / agent_plex-0.9.0-py3-none-any.whl
| Download URL | agent_plex-0.9.0-py3-none-any.whl |
|---|---|
| Size | 51.3 kB |
| Tags | Python 3 |
|
SHA-256 checksum How to use checksums |
5d3fd3a771896a7e23f47ee0877586cbc5ca3d84aa93ba5bf5b7d1a1b7aa646b
|
|
BLAKE2b-256 checksum How to use checksums |
e86bdd26a7ffb26dba6d86d3b33719797f8649c46c045396b3c5c05e122fafc3
|
| Upload date | |
|
Uploaded using Trusted Publishing? What is trusted publishing? |
Yes |
| Uploaded via |
twine/7.0.0 CPython/3.13.16
|
Provenance
Provenance describes where a file came from. On PyPI, provenance is shared via attestations, which provide a verifiable record of the build or publishing details. View details, limitations and caveats.
PyPI Publish Attestation
PyPI verified that this artifact, at this checksum, originated from the publisher listed below.
Signed by GitHub Actions, verified by PyPI on Nov 19, 2026.
Transparency logSecurity for agent-plex 0.9.0
Provenance
Provenance describes where a file came from. On PyPI, provenance is shared via attestations, which provide a verifiable record of the build or publishing details. View details, limitations and caveats.
Full provenance
Both files in this release have been uploaded with provenance metadata.
Attestation for agent_plex-0.9.0.tar.gz
PyPI Publish Attestation
PyPI verified that this artifact, at this checksum, originated from the publisher listed below.
Signed by GitHub Actions, verified by PyPI on Nov 19, 2026.
Transparency logA note on package security
PyPI is a repository for distributing packages, not a service for auditing them. While third-party security researchers and our staff do their best to detect and remove malicious packages, PyPI cannot guarantee the quality, security or suitability of any given package.
To learn more about protecting yourself from malicious actors, visit our package security documentation.













