
AgentTakt



Review, edit, and approve AI agent task plans in a ComfyUI-style visual node editor — right in your terminal.
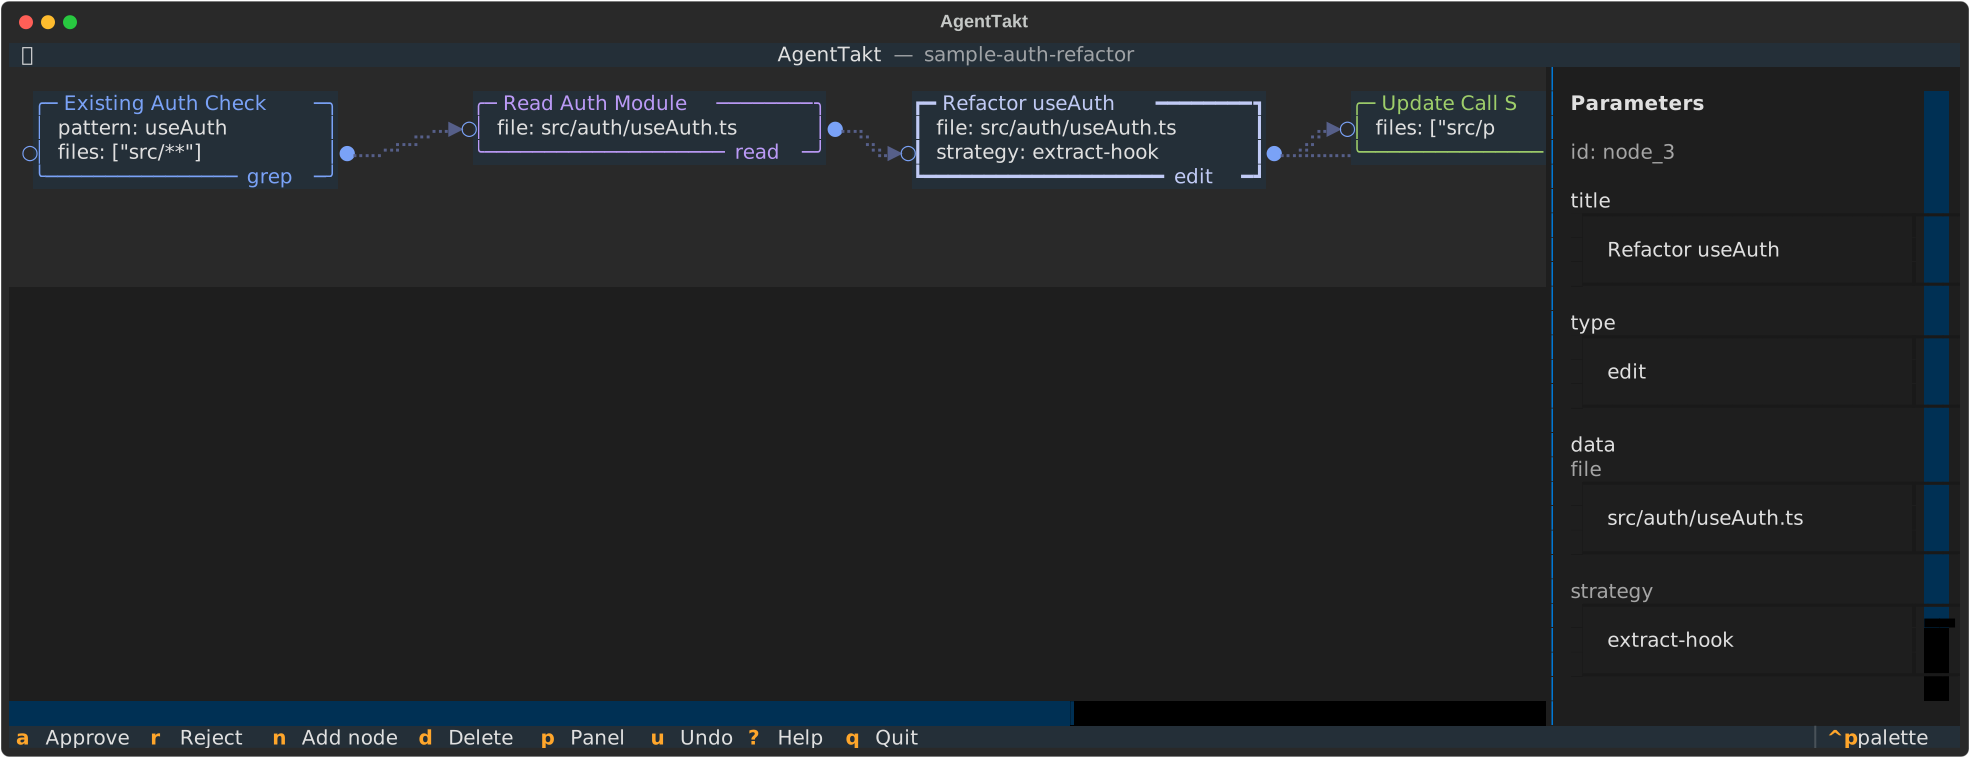
AgentTakt is an MCP (Model Context Protocol) server and TUI tool. When an AI agent (an "Executor" such as Claude Code) sends a task execution plan over MCP, AgentTakt renders it as a node graph in your terminal. You review it with mouse and keyboard — move, add, and delete nodes, draw dependency edges, edit parameters — then approve, and the edited plan JSON is returned to the Executor for execution.
Claude Code (Executor)
   │ stdio (MCP)                        your other terminal
   ▼                                           │
[agenttakt serve] ── Unix domain socket ──▶ [agenttakt (TUI)]
 MCP server                               review / edit / approve
Features
- Terminal-native — no web UI; everything runs inside your terminal
- Visual node editor — rounded nodes, dependency edges, and per-type coloring, powered by Textual
- Mouse-first editing — drag nodes to move them, draw edges between ports (rubber band), click to select and delete
- Safe approval loop — cycle detection (DAG guarantee) and other validations at the entry point, returning errors the agent can self-correct
Requirements
- Python 3.10+ (recommended: uv)
- A terminal emulator with mouse reporting (iTerm2, WezTerm, kitty, Ghostty, ...)
Installation
If you have uv, no installation is needed. uvx agenttakt fetches and runs AgentTakt on demand, and the .mcp.json example below starts the MCP server the same way.
If you don't have uv, install AgentTakt once:
brew install ryoohshima/tap/agenttakt    # Homebrew
pipx install agenttakt                   # pipx
Installing is also handy for everyday use even with uv — you start the TUI by hand, so plain agenttakt beats typing uvx agenttakt each time:
uv tool install agenttakt
Quick Start
AgentTakt runs as two processes: the MCP server, which Claude Code starts for you, and the TUI, which you start yourself in a separate terminal. The TUI is what displays the plan, so start it before asking the Executor for approval.
┌─ Terminal A: you ───────────────────┐   ┌─ Terminal B: Claude Code ───────────┐
│ $ uvx agenttakt                     │   │ $ claude                            │
│                                     │   │                                     │
│   ╭─ grep ───╮                      │   │ > Plan the refactor, then ask       │
│   │ pattern  │───╮                  │   │   me to approve it                  │
│   ╰──────────╯   │                  │   │                                     │
│             ╭────▼─────╮            │   │   calls request_approval(plan)      │
│             │   edit   │            │   │   waiting for approval...           │
│             ╰──────────╯            │   │   (blocked until you decide)        │
│                                     │   │                                     │
│   [a] Approve   [r] Reject          │   │                                     │
└─────────────────────────────────────┘   └─────────────────────────────────────┘
             ▲                                                    │
             ╰──────────────── Unix domain socket ────────────────╯
Running the TUI in the same session as Claude Code does not work. A stdio MCP server has its standard input and output reserved for protocol traffic, so the same process cannot also drive a full-screen terminal UI. That is why the two halves are separate processes talking over a Unix domain socket.
1. Start the TUI (in its own terminal)
uvx agenttakt # if installed: agenttakt (short alias: agt)
An idle screen appears, waiting for plans from the Executor. Leave this terminal open. If no TUI is running when the Executor calls request_approval, the call fails with:
AgentTakt editor is not running. Ask the user to run "agenttakt" in a separate terminal, then call request_approval again.
2. Register the MCP server with the Executor (Claude Code)
Add the following to your project's .mcp.json:
{
  "mcpServers": {
    "agenttakt": {
      "command": "uvx",
      "args": ["agenttakt", "serve"],
      "timeout": 1800000
    }
  }
}
[!IMPORTANT] Setting
timeout(milliseconds) explicitly is required. Therequest_approvaltool blocks until the human finishes reviewing. MCP progress notifications do not extend client-side timeouts, so the default would cut the request off before approval. The example above sets 30 minutes (1800000).
3. Request approval from the Executor
When the Executor calls the MCP tool request_approval(plan, summary), the plan appears in the TUI as a node graph. Once the human edits and approves (or rejects) it, the result is returned as:
{ "status": "approved", "plan": { "...edited plan..." }, "reason": null }
See docs/schema.md for the plan JSON format and what to write in each node.
Debug mode (try it without MCP)
uvx agenttakt open examples/sample_plan.json --out edited.json
Loads a plan from a file, opens the editor, and writes the approval result to --out.
Key Bindings
| Key | Action |
|---|---|
a |
Approve the plan (confirmation dialog) |
r |
Reject the plan (with a reason) |
n |
Add a node |
d / Delete |
Delete the selected node/edge |
u / U |
Undo / Redo |
| Arrow keys | Move the selected node by one cell (fine-tuning) |
Escape |
Clear selection |
p |
Toggle the parameter panel |
? |
Help (controls and how to write type / data) |
q |
Quit |
Mouse: drag a node to move it; drag from a node's output port (●, right edge) and release on another node to create an edge.
Edges are drawn as braille Bezier-like curves by default. If they render poorly in your environment, switch to rounded orthogonal lines with --edges orthogonal.
Documentation
- Plan JSON schema — data model, node fields, what to write in
type/data, and validation rules
License
1 maintainer

Download files
Download the file for your platform. If you're not sure which to choose, learn more about installing packages.
Source Distribution
Built Distribution
Filter files by name, interpreter, ABI, and platform.
If you're not sure about the file name format, learn more about wheel file names.
Copy a direct link to the current filters
File details
Details for the file agenttakt-0.1.3.tar.gz.
File metadata
- Download URL: agenttakt-0.1.3.tar.gz
- Upload date:
- Size: 204.6 kB
- Tags: Source
- Uploaded using Trusted Publishing? Yes
- Uploaded via: twine/7.0.0 CPython/3.13.14
File hashes
| Algorithm | Hash digest | |
|---|---|---|
| SHA256 |
2f46727658c5c56cabde4e6234b0c74c6ade17cb38d38ce6a02d556e4c38fb2f
|
|
| MD5 |
1eedfc4b7b934ac3b203fbd61654da7b
|
|
| BLAKE2b-256 |
66d5ed1f221c5c975b294f79b49c2b74469f5f19f4b4f5d37add060c87a5550e
|
Provenance
The following attestation bundles were made for agenttakt-0.1.3.tar.gz:
Publisher:
release.yml on ryoohshima/AgentTakt
-
Statement:
-
Statement type:
https://in-toto.io/Statement/v1 -
Predicate type:
https://docs.pypi.org/attestations/publish/v1 -
Subject name:
agenttakt-0.1.3.tar.gz -
Subject digest:
2f46727658c5c56cabde4e6234b0c74c6ade17cb38d38ce6a02d556e4c38fb2f - Sigstore transparency entry: 2364238561
- Sigstore integration time:
-
Permalink:
ryoohshima/AgentTakt@ee408811bc80edc7aeac9bfaf75fdcddbcc889b4 -
Branch / Tag:
refs/tags/v0.1.3 - Owner: https://github.com/ryoohshima
-
Access:
public
-
Token Issuer:
https://token.actions.githubusercontent.com -
Runner Environment:
github-hosted -
Publication workflow:
release.yml@ee408811bc80edc7aeac9bfaf75fdcddbcc889b4 -
Trigger Event:
push
-
Statement type:
File details
Details for the file agenttakt-0.1.3-py3-none-any.whl.
File metadata
- Download URL: agenttakt-0.1.3-py3-none-any.whl
- Upload date:
- Size: 36.1 kB
- Tags: Python 3
- Uploaded using Trusted Publishing? Yes
- Uploaded via: twine/7.0.0 CPython/3.13.14
File hashes
| Algorithm | Hash digest | |
|---|---|---|
| SHA256 |
37c6a5aefac1072bc8192e5915e645f7ec5f1a237de84e9b08b4a2d2f89153c7
|
|
| MD5 |
07983bffd61c7faca24744dded3636fe
|
|
| BLAKE2b-256 |
6738af60f41c3cfa063e46ff2aee36a31310cf97c08d99dc019f292fce6920f1
|
Provenance
The following attestation bundles were made for agenttakt-0.1.3-py3-none-any.whl:
Publisher:
release.yml on ryoohshima/AgentTakt
-
Statement:
-
Statement type:
https://in-toto.io/Statement/v1 -
Predicate type:
https://docs.pypi.org/attestations/publish/v1 -
Subject name:
agenttakt-0.1.3-py3-none-any.whl -
Subject digest:
37c6a5aefac1072bc8192e5915e645f7ec5f1a237de84e9b08b4a2d2f89153c7 - Sigstore transparency entry: 2364238608
- Sigstore integration time:
-
Permalink:
ryoohshima/AgentTakt@ee408811bc80edc7aeac9bfaf75fdcddbcc889b4 -
Branch / Tag:
refs/tags/v0.1.3 - Owner: https://github.com/ryoohshima
-
Access:
public
-
Token Issuer:
https://token.actions.githubusercontent.com -
Runner Environment:
github-hosted -
Publication workflow:
release.yml@ee408811bc80edc7aeac9bfaf75fdcddbcc889b4 -
Trigger Event:
push
-
Statement type:







