
AIForge
Build, train and use your own AI models in the terminal, without writing any code.
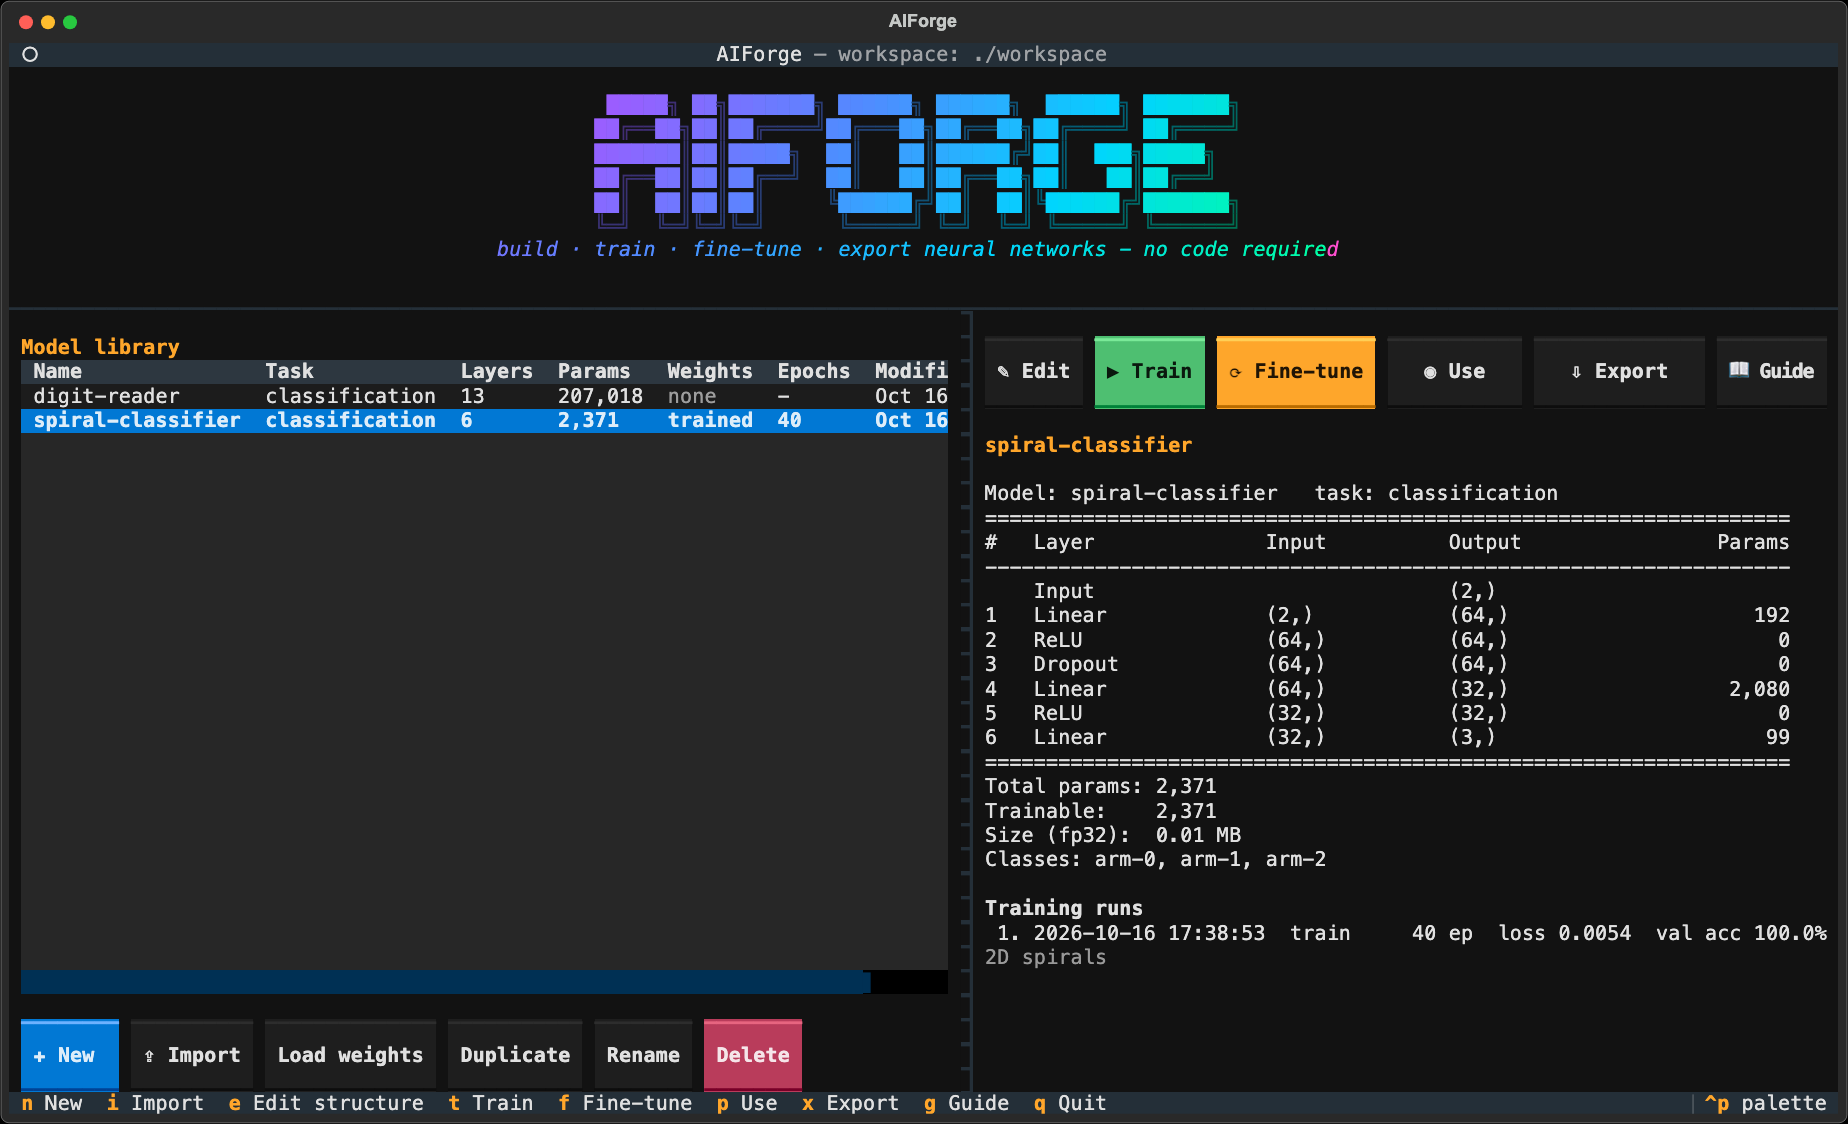
AIForge is a program that runs in your terminal. You use it with the mouse or keyboard to:
- Design a neural network by choosing layers from a list
- Train it on your own data: a spreadsheet (CSV), text, or a folder of images
- Fine-tune a trained model so it learns a new but related task
- Use the model to make predictions
- Export the model so other programs (Python, ONNX Runtime, mobile apps…) can use it
You don't need to know PyTorch or Python. Some machine-learning words come up along the way; the glossary explains each one in plain language.
Contents
- Before you start
- Install
- Start the app
- Tutorial: your first model in 5 minutes
- Every screen explained (including the built-in Guide)
- Using your own data
- Which template should I choose?
- How to read the training charts
- Words you will see
- Keyboard shortcuts
- Problems and solutions
- Where are my files?
- For developers
1. Before you start
You need:
| What | How to check | Notes |
|---|---|---|
| Python 3.10 or newer | Run python3 --version in a terminal |
Install it from python.org if it's missing |
| A terminal | macOS: Terminal or iTerm2 · Windows: Windows Terminal · Linux: any | |
| About 2 GB of free disk space | Mostly for PyTorch | |
| A large terminal window | At least 120 columns × 35 rows. Full screen works best. |
A graphics card (GPU) is optional. AIForge automatically uses an NVIDIA GPU (CUDA) or an Apple Silicon GPU (MPS) if it finds one. Otherwise it uses the CPU, which is fine for the examples.
2. Install
Option A: install from PyPI (recommended)
pipx installs AIForge as a stand-alone app, separate from your other Python projects:
python3 -m pip install --user pipx    # one-time setup (Windows: py -m pip install --user pipx)
python3 -m pipx ensurepath            # then close and reopen the terminal
pipx install aiforge-studio
…or with plain pip, ideally inside a virtual environment:
pip install aiforge-studio
The first install downloads PyTorch (several hundred MB), so it can take a few minutes.
On a PC with an NVIDIA graphics card, also run pipx inject aiforge-studio nvidia-ml-py (or
pip install "aiforge-studio[nvidia]") to see GPU usage while training.
Check it worked:
aiforge --version
You should see aiforge 0.1.0 (or newer). The package is called aiforge-studio, but the
command you type is just aiforge.
Update to the newest version later: pipx upgrade aiforge-studio (or pip install --upgrade aiforge-studio).
Option B: from the source code (for developers)
git clone https://github.com/ducdinh-codehub/ai-forge.git
cd ai-forge
python3 -m venv .venv
.venv/bin/pip install -e .          # Windows: .venv\Scripts\pip install -e .
.venv/bin/aiforge --version         # Windows: .venv\Scripts\aiforge --version
3. Start the app
aiforge
Installed from source? Use
.venv/bin/aiforge(Windows:.venv\Scripts\aiforge), or runsource .venv/bin/activatefirst and then justaiforge.
Your models are saved in the AIForge folder in your home folder (e.g.
/Users/you/AIForge or C:\Users\you\AIForge). See Where are my files?.
You will see the home screen:
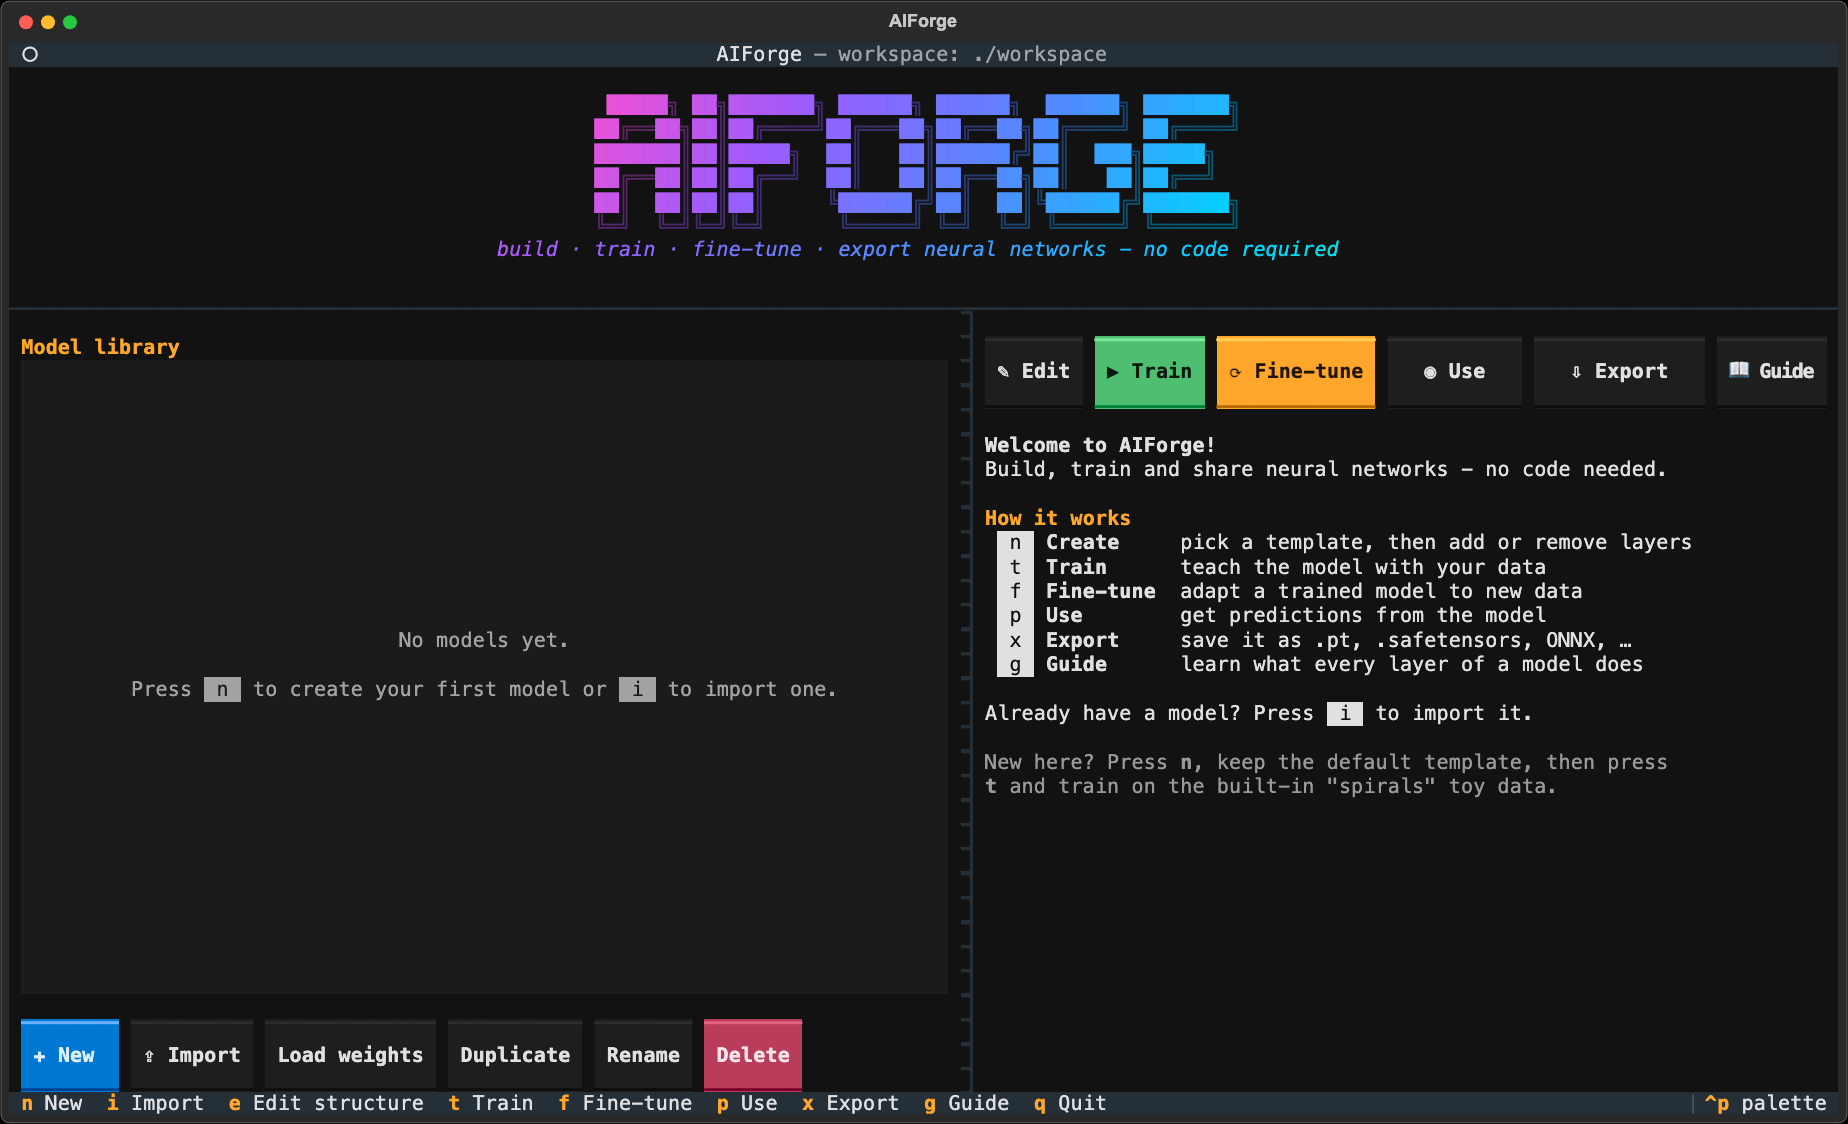
How to move around:
- Click buttons, list rows and input boxes with the mouse, or
- press the keys shown in the bottom bar, e.g.
n= New,t= Train,q= Quit Tabmoves to the next box,Escgoes back to the previous screen- Enter confirms
To quit, press q on the home screen, or Ctrl+Q anywhere.
4. Tutorial: your first model in 5 minutes
In this tutorial you build a model that learns to tell apart three intertwined spirals of points. The data is built into AIForge, so you don't need to download anything.
Step 1: create the model
Press n (or click ✚ New).
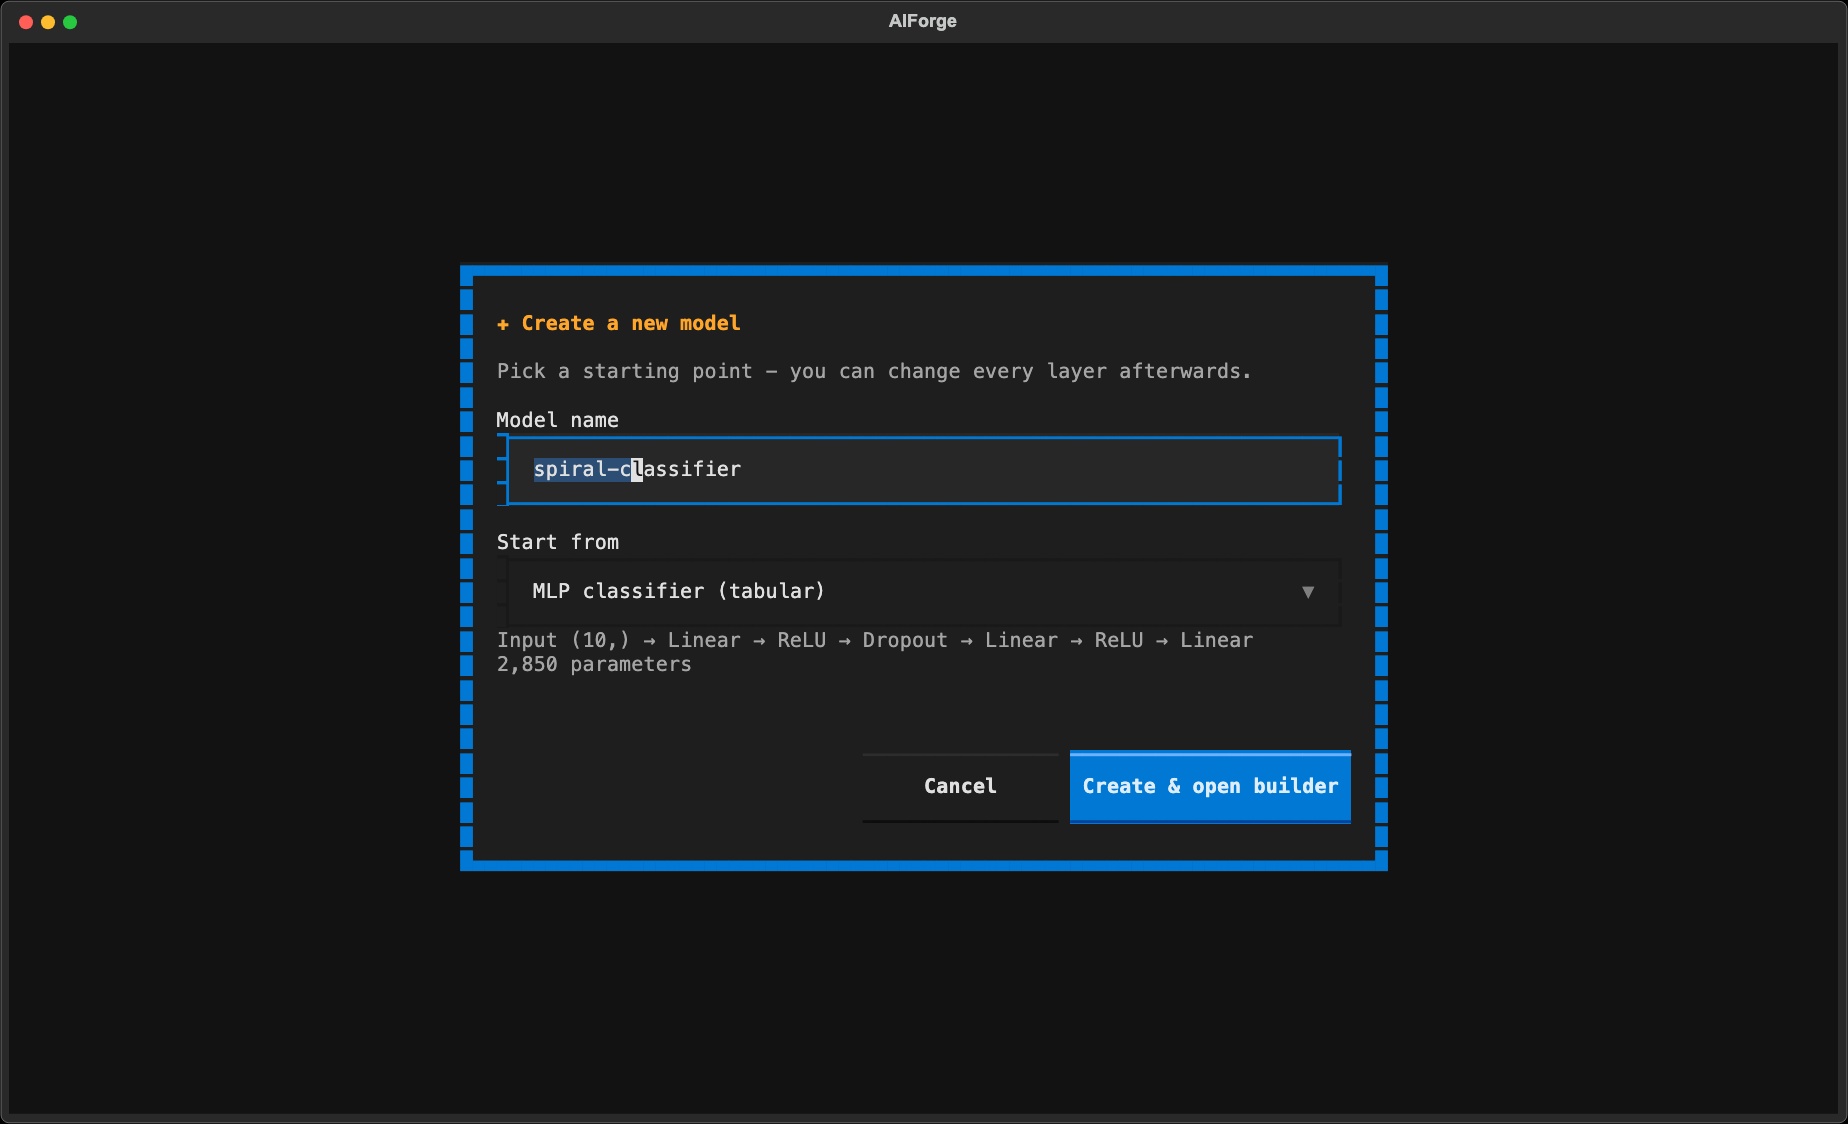
- Type a name, e.g.
spiral-classifier - Leave Start from on MLP classifier (tabular)
- Click Create & open builder
Step 2: look at the model (builder screen)
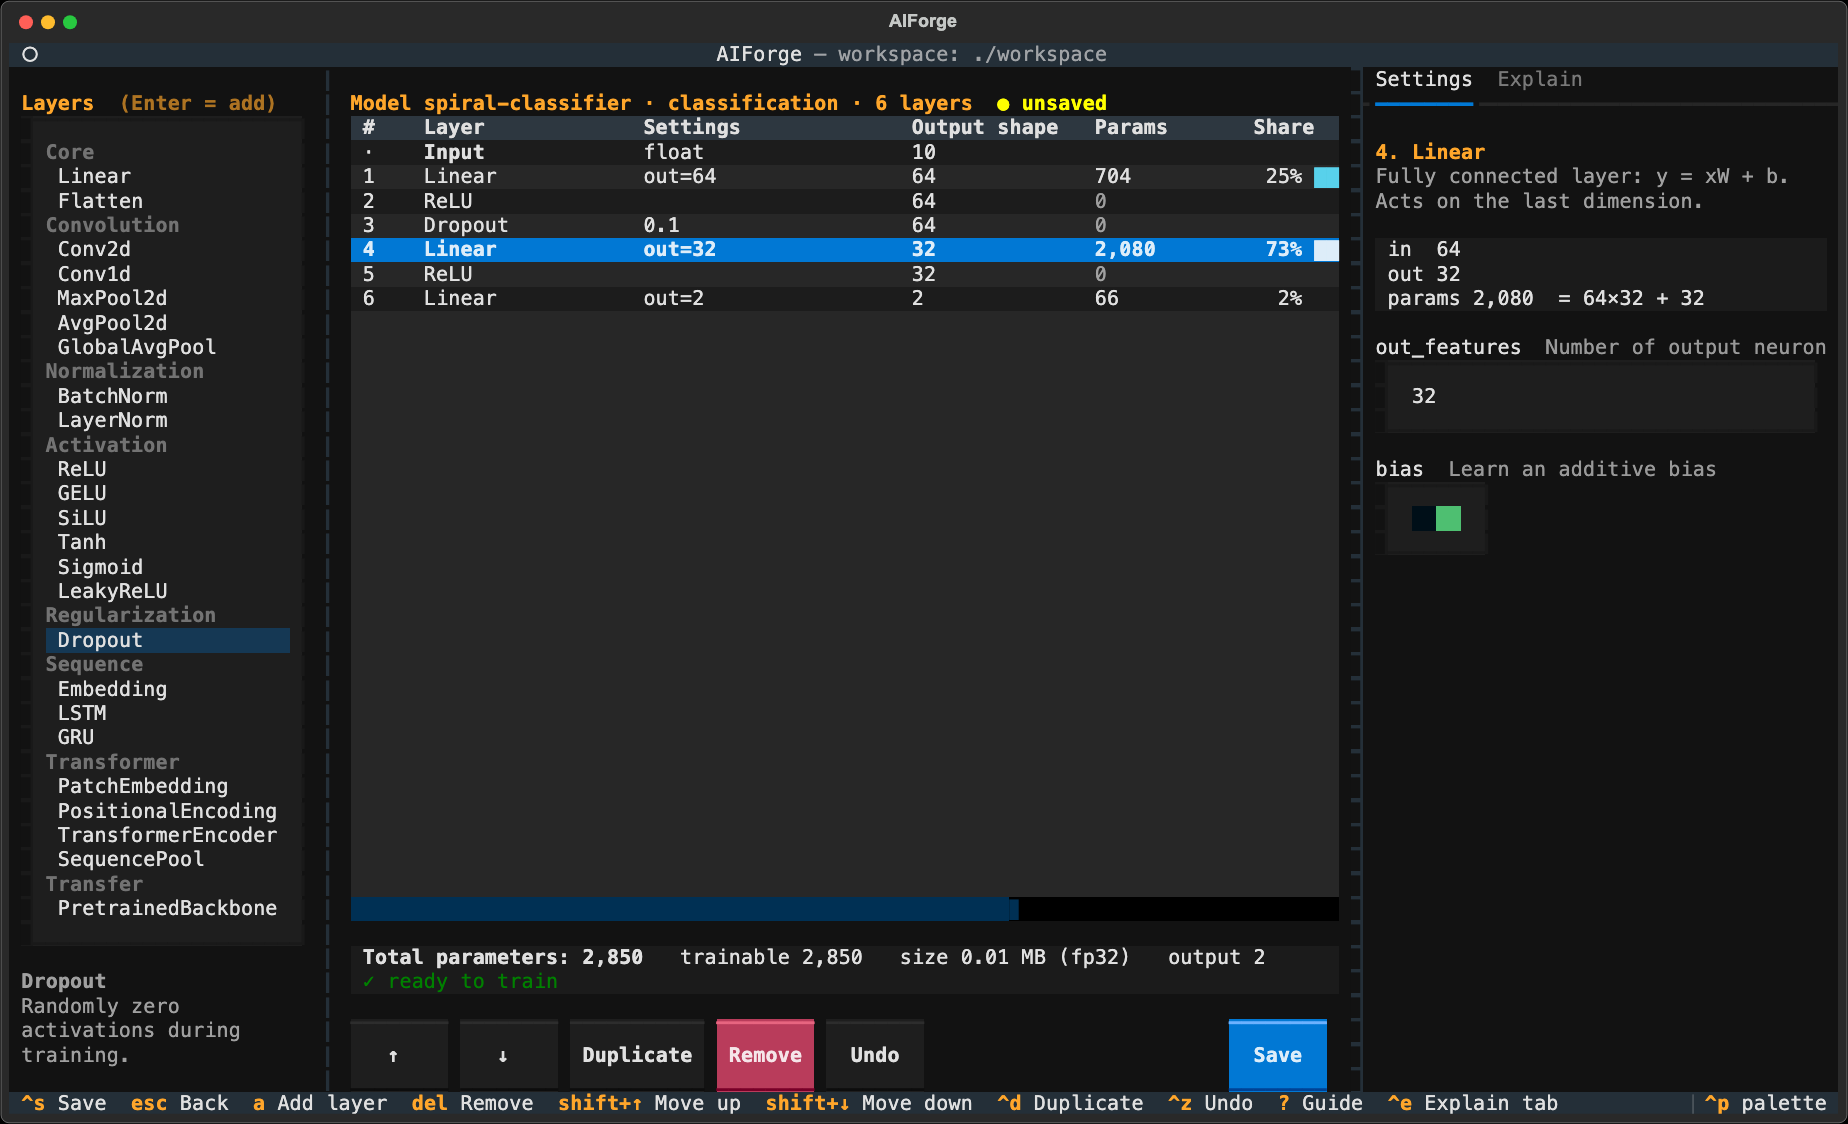
The builder has three columns:
| Column | What it shows |
|---|---|
| Left: Layers | All the building blocks you can add. Highlight one and press Enter to add it below the selected row. The box at the bottom explains the highlighted layer. |
| Middle: your model | Your layers from top (input) to bottom (output). For each layer: the output shape, how many parameters it has, its share of all parameters, and how that number is calculated. |
| Right: settings | The settings for the selected layer. Change a number and the whole table updates straight away. |
In the screenshot, layer 4 (Linear, 64 → 32) has 64×32 + 32 = 2,080 parameters, which is
73% of the model. The bar at the bottom shows the total (2,850), the size (0.01 MB), and
✓ ready to train.
Want to know what a layer does? Select it and press Ctrl+E to switch the right
panel to the Explain tab, or press ? for the full guide. See
5.8 Guide.
You don't need to change anything for this tutorial. Press Ctrl+S to save, then
Esc to go back.
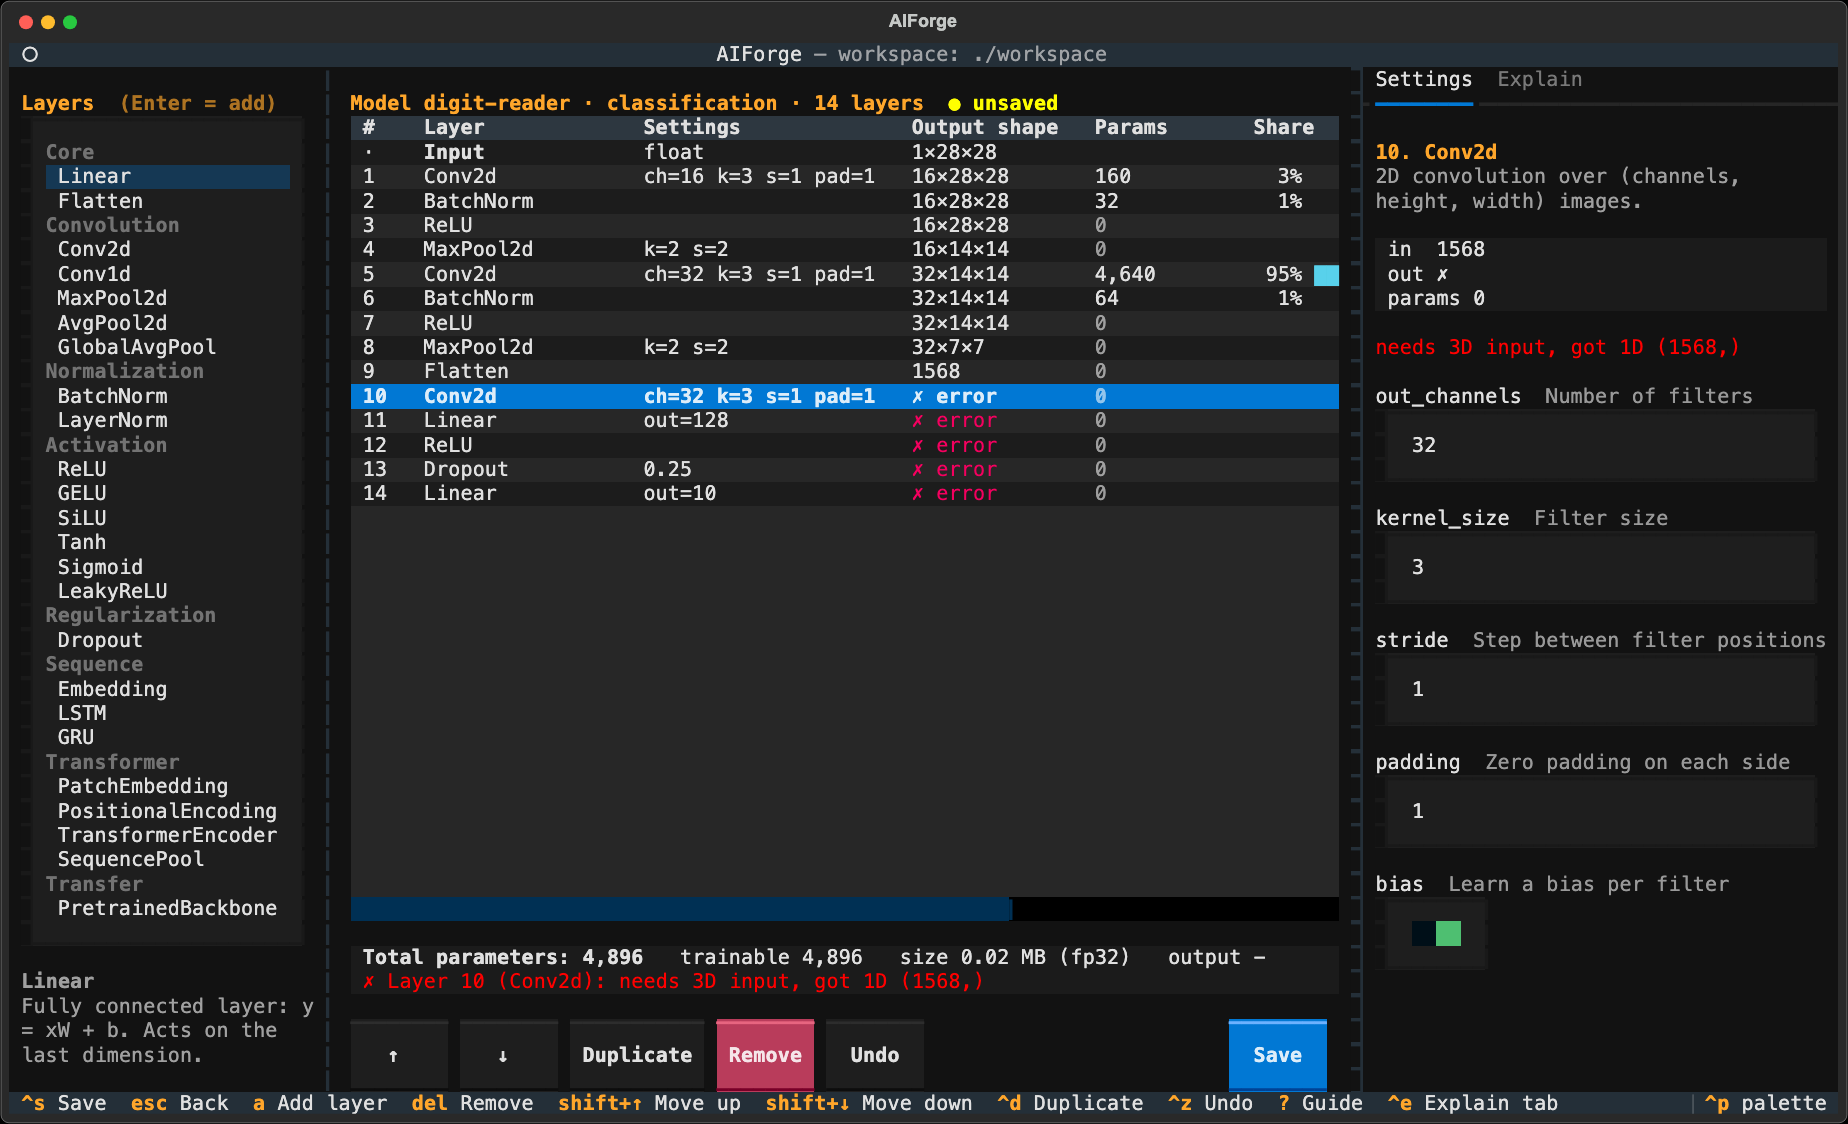
What if I make a mistake? The builder shows it immediately in red. For example, adding an image layer (
Conv2d) after aFlattenlayer gives:
Press
Ctrl+Zto undo, orDelto remove the layer.
Step 3: train it
Make sure your model is selected in the list, then press t (or click ▶ Train).
-
① Data: leave it on Synthetic toy data and choose spirals.
-
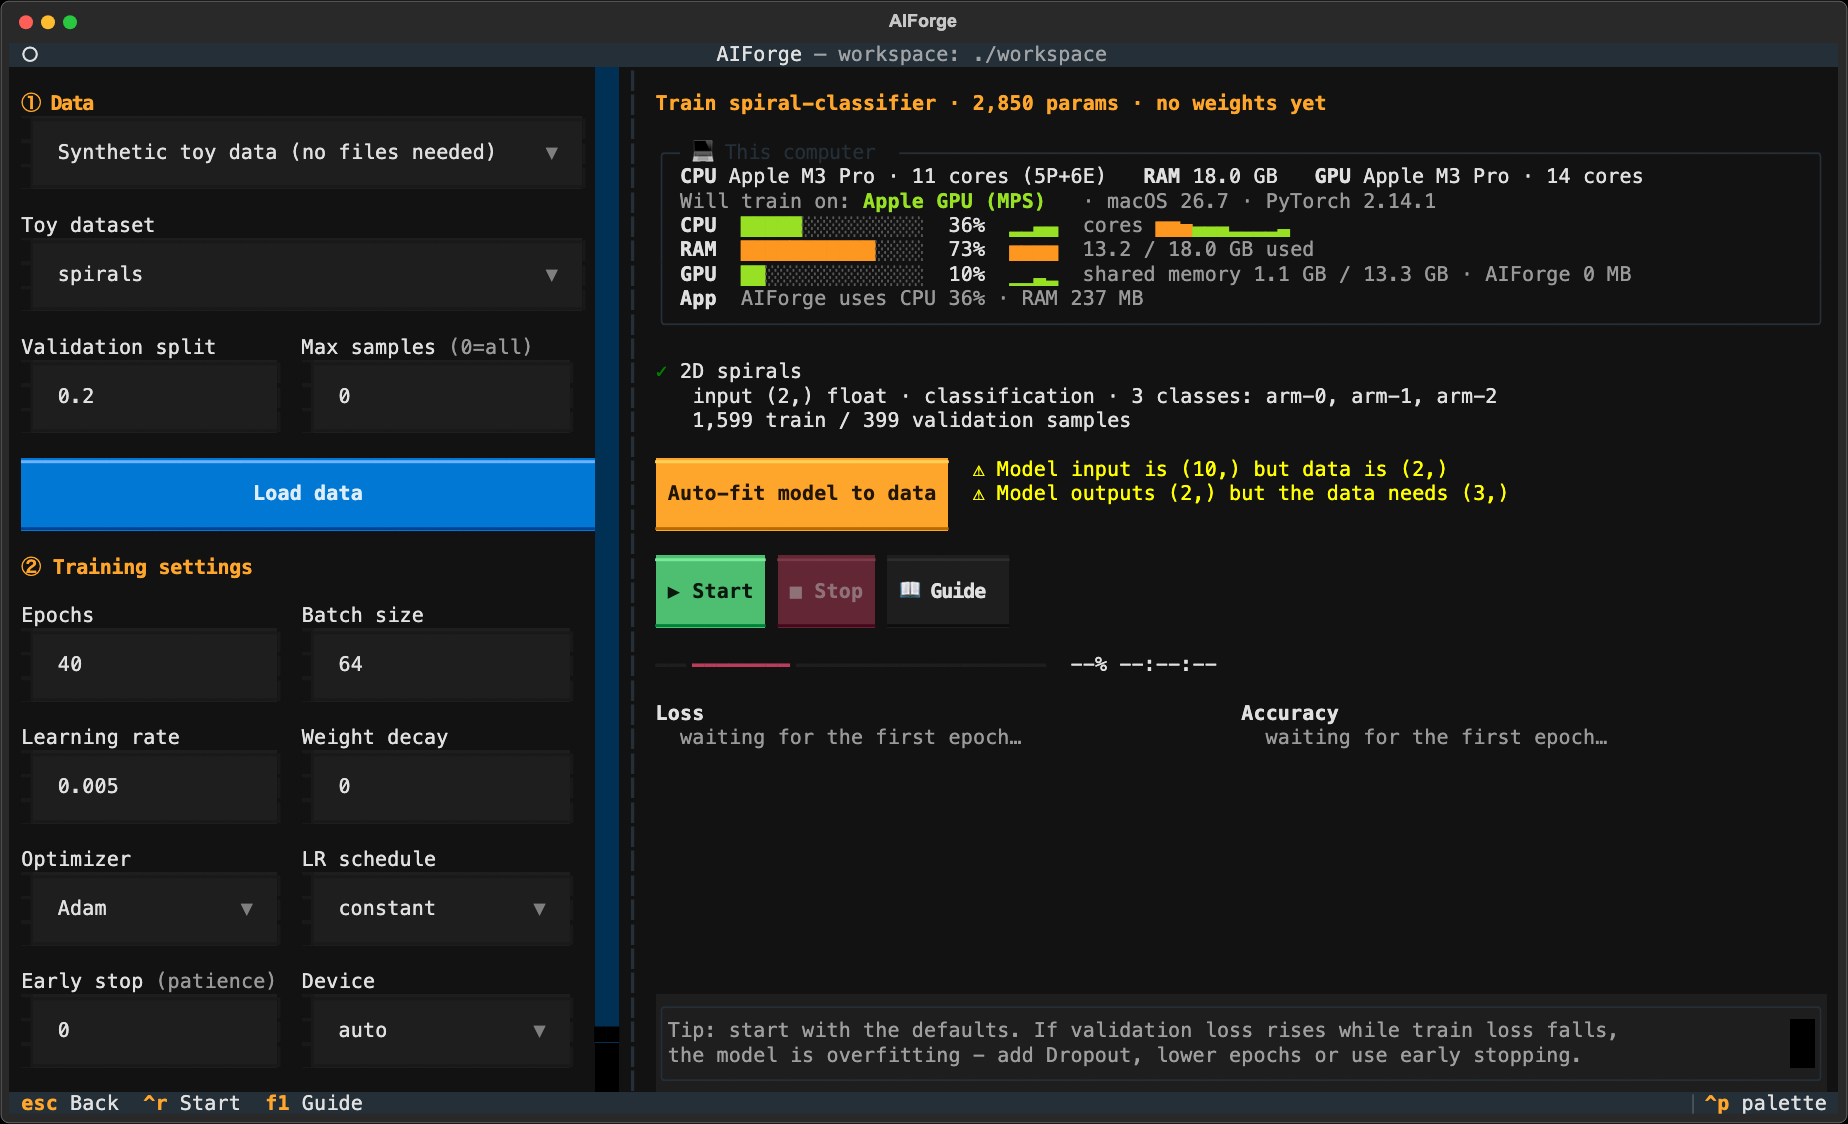
Click Load data. AIForge shows what it found: 2 input values, 3 classes, 1,599 training samples and 399 validation samples.
-
A yellow warning appears: the model was made for 10 inputs and 2 classes, but this data has 2 inputs and 3 classes.
Click Auto-fit model to data. AIForge adjusts the input and output layers for you.
If the model's structure doesn't suit the data (for example a table model given images), a 🔧 Fix the model window opens. It explains the problem in plain words and offers fixes, each already checked to work and showing its parameter count:
- 🔧 automatic: add the missing layer for you (Flatten, GlobalAvgPool or SequencePool) in the right place
- 📦 template: switch to a template made for your kind of data (e.g. a CNN for images)
- ✎ manual: open the builder with your data's shape already set and fix it yourself. When you save and come back, training continues with your fixed model.
The right side previews the model after the fix, with new layers marked ➕. You can reopen the window any time with the 🔧 Fix model… button.
-
② Training settings: set Epochs to
40and Learning rate to0.005. -
Click ▶ Start (or press
Ctrl+R).
Watch it learn:
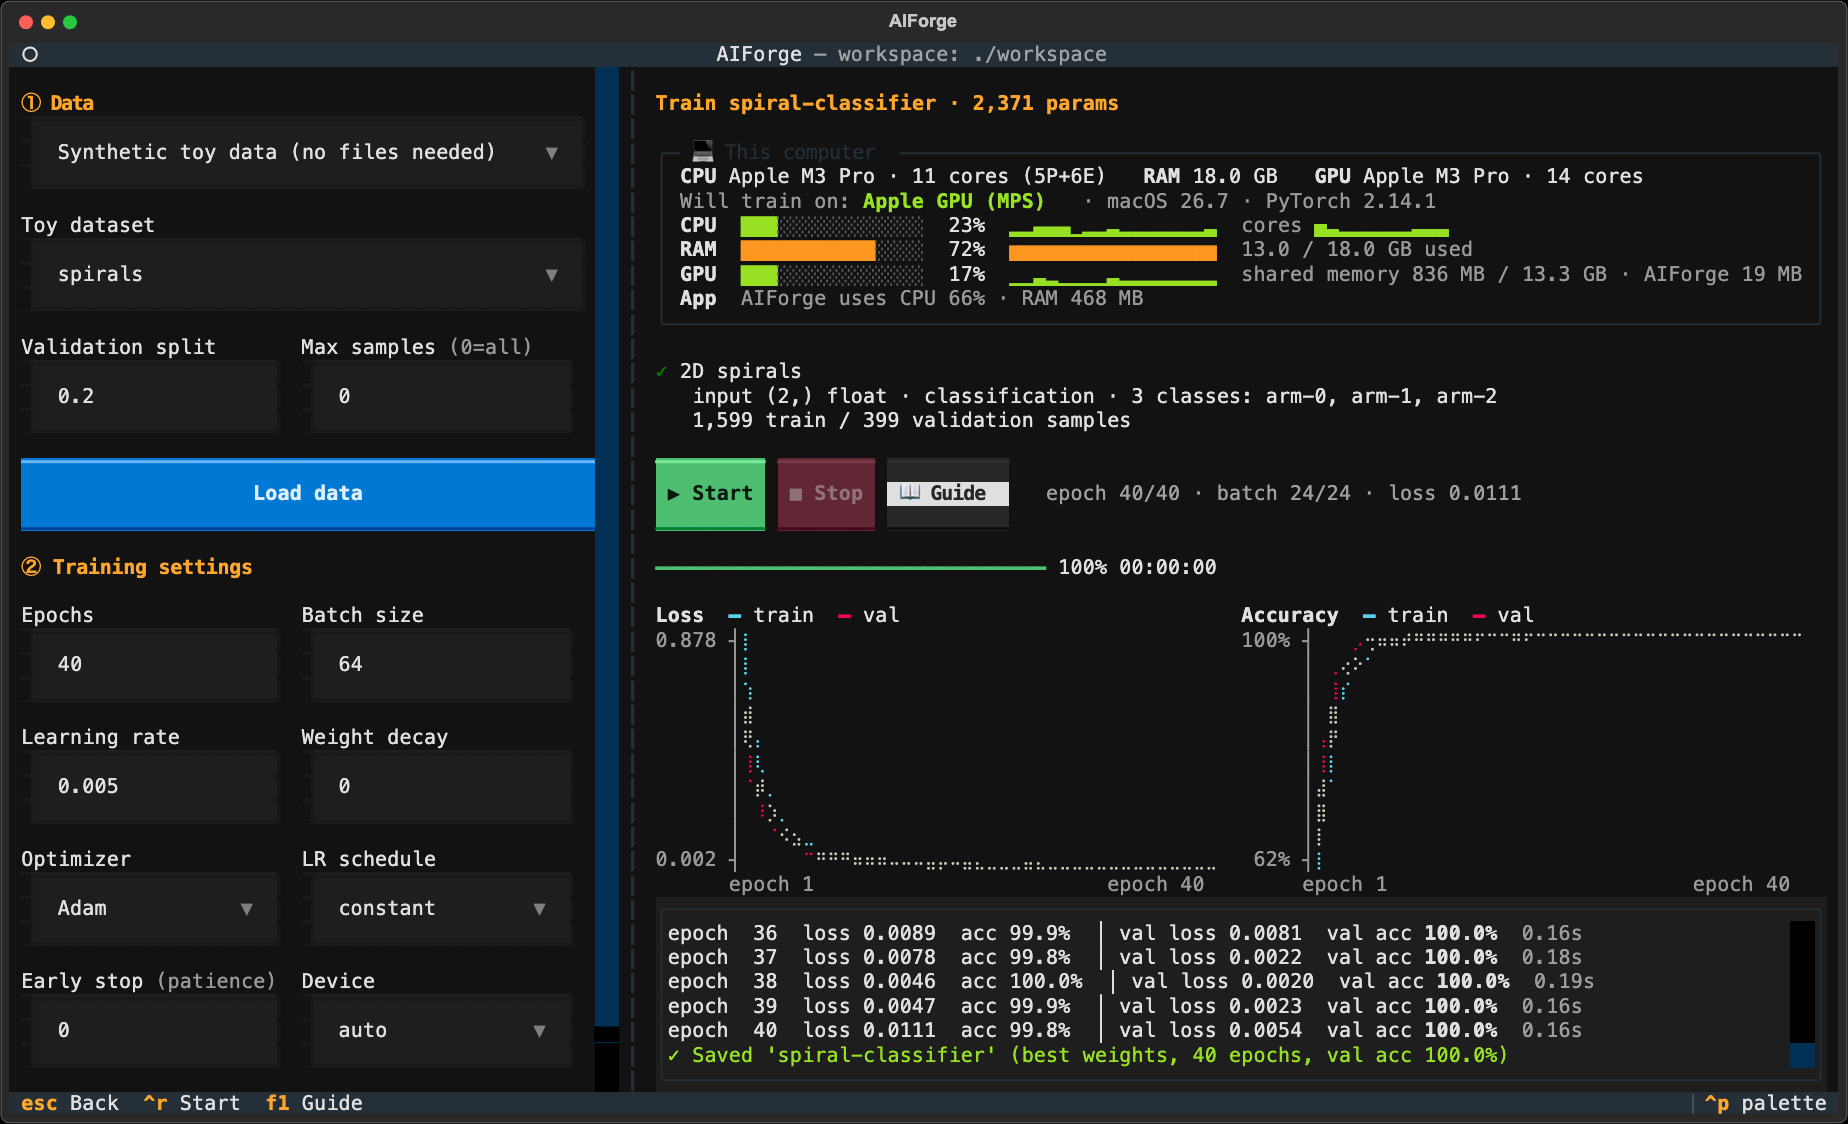
- The Loss chart going down means the model is making fewer mistakes.
- The Accuracy chart going up means it's getting more answers right.
- The log lists every epoch. At the end you'll see something like
✓ Saved 'spiral-classifier' (best weights, 40 epochs, val acc 100.0%).
Press Esc to go back.
Step 4: use it
Press p (or click ◉ Use). Type two numbers, e.g. 0.1, 0.45, and press Enter:
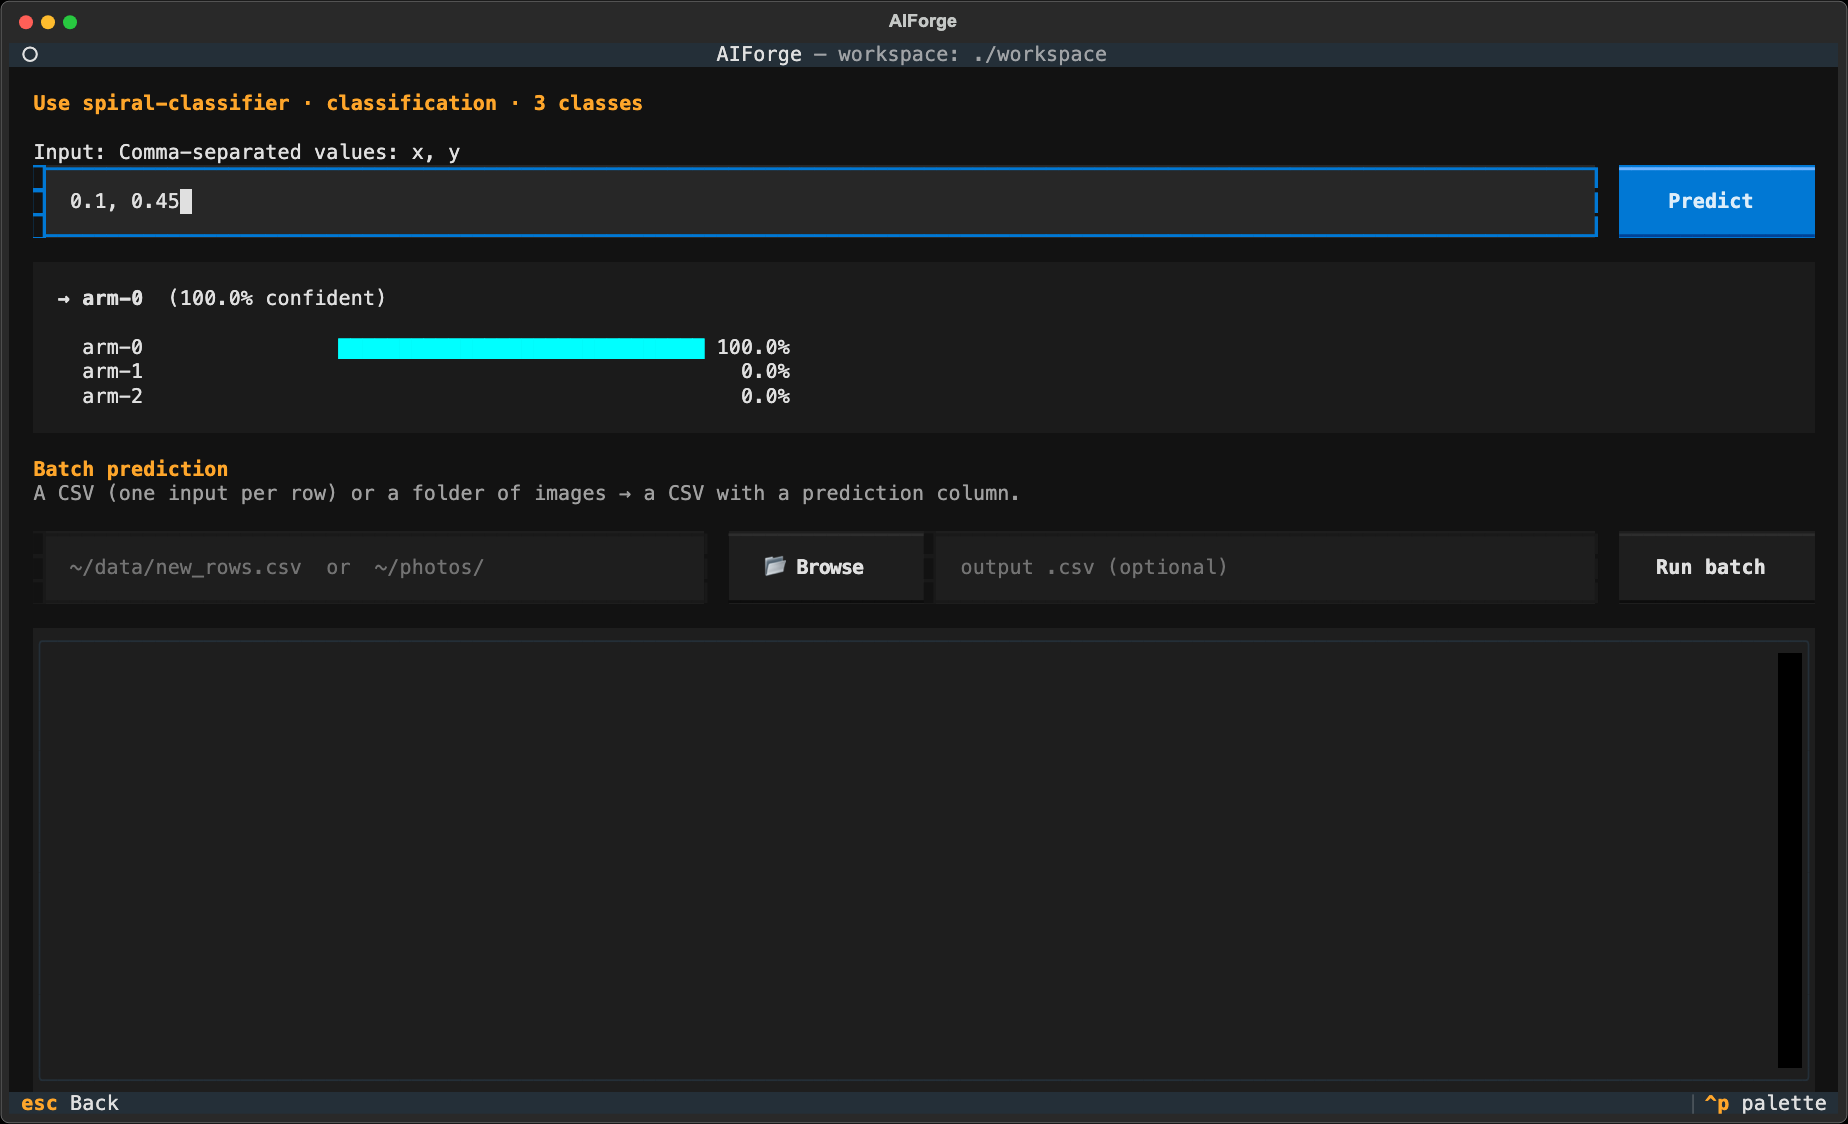
The model answers arm-0 and shows how confident it is in each class.
Step 5: export it
Press x (or click ⇩ Export). Tick the formats you want with the space bar or
mouse, then click ⇩ Export:
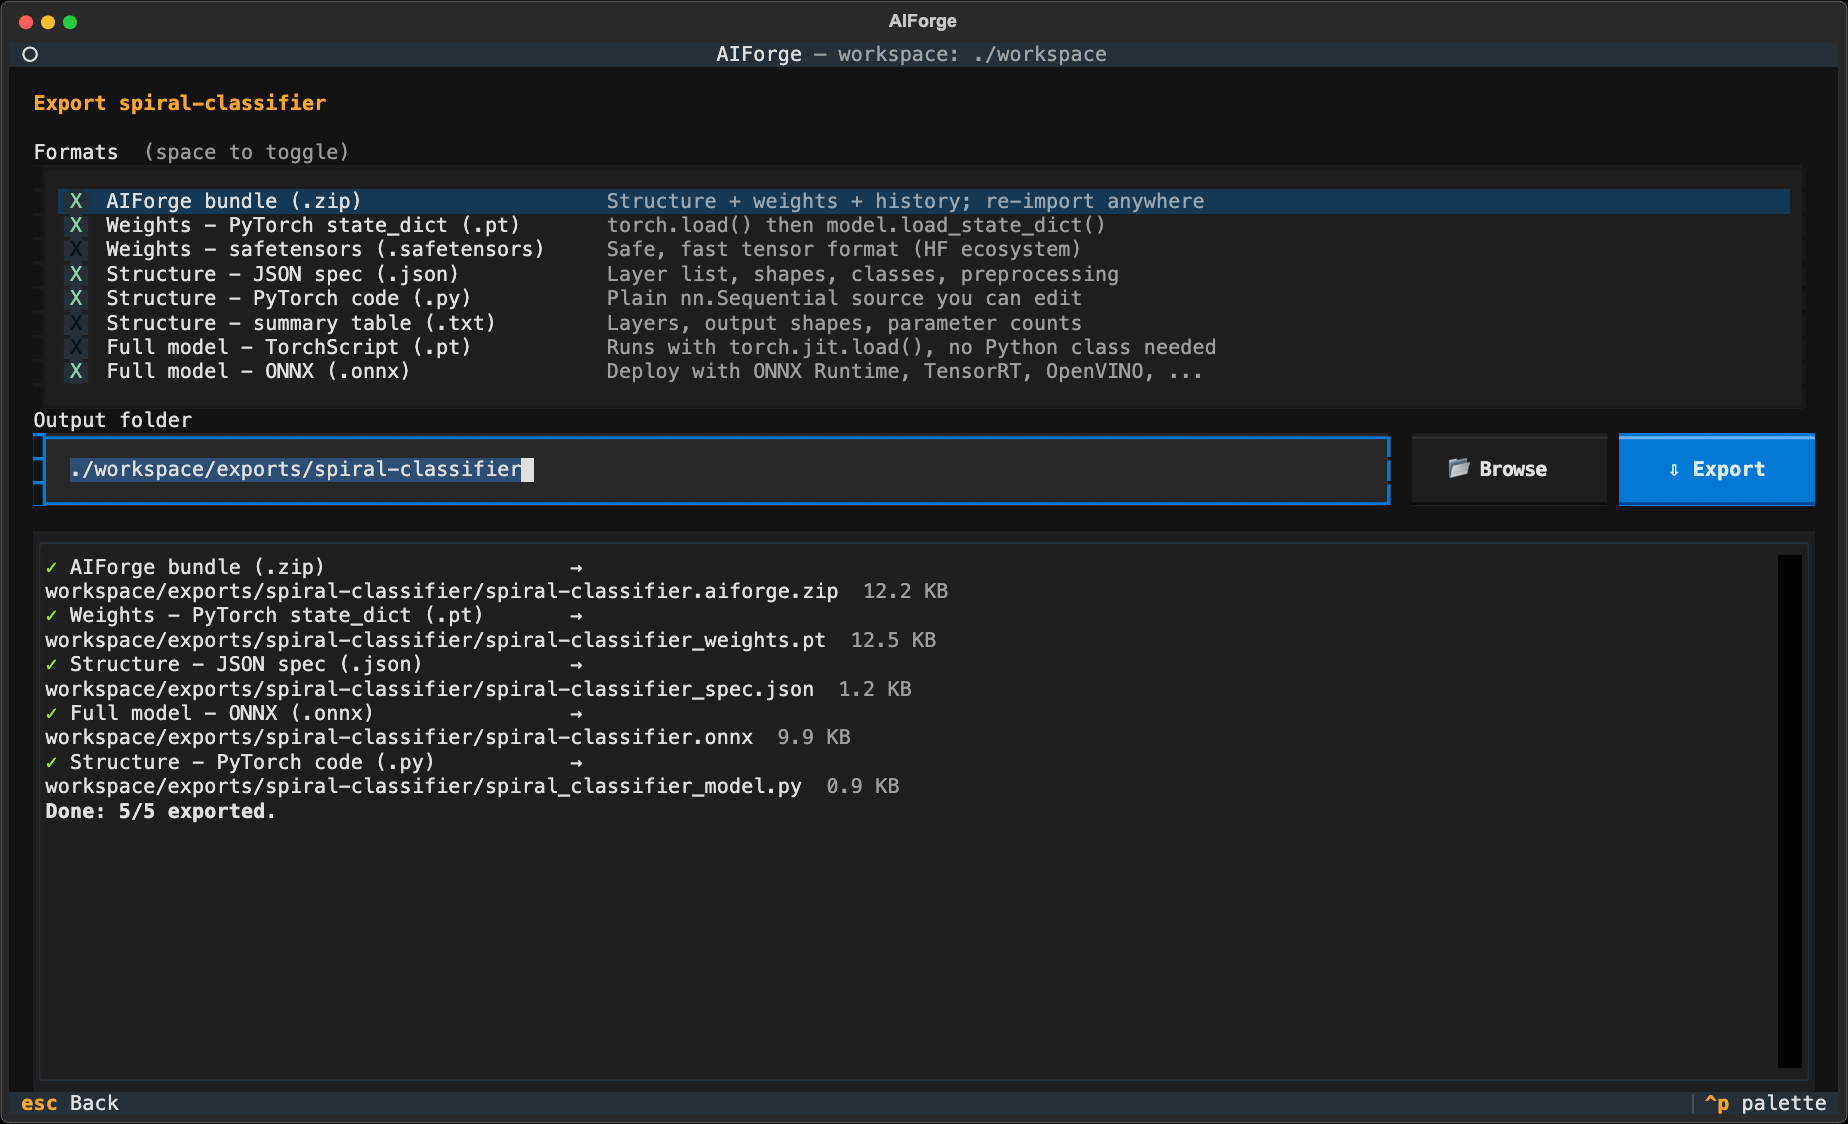
Your files are now in workspace/exports/spiral-classifier/.
🎉 You built, trained, used and exported a neural network without writing code.
5. Every screen explained
5.1 Home: the model library
- Left: all your models. Weights: trained means it has been trained; none means it hasn't been trained yet.
- Right: a summary of the selected model (its layers and their sizes) and every training run you've done.
- Buttons: New · Import · Load weights · Duplicate · Rename · Delete (left) and Edit · Train · Fine-tune · Use · Export (right).
5.2 Builder: design the model
See Step 2 for the layout. Useful actions:
| I want to… | Do this |
|---|---|
| Add a layer | Press a (or click the Layers list), highlight a layer, press Enter |
| Change a layer's settings | Select it in the middle table and edit the boxes on the right |
| Change the model's input size, input type or task | Select the Input row at the top of the table |
| Move a layer up or down | Shift+↑ / Shift+↓, or the ↑ ↓ buttons |
| Copy a layer | Ctrl+D |
| Remove a layer | Del |
| Undo | Ctrl+Z |
| Save | Ctrl+S |
| Learn what the selected layer does | Ctrl+E (Explain tab) or ? (full guide) |
If you change a model that is already trained, layers you didn't touch keep what they learned. Only new or resized layers start from scratch.
Available layers
| Group | Layers | Used for |
|---|---|---|
| Core | Linear, Flatten | Every model. Linear is the basic "neuron" layer. |
| Convolution | Conv2d, Conv1d, MaxPool2d, AvgPool2d, GlobalAvgPool | Images (2d) and signals (1d) |
| Normalization | BatchNorm, LayerNorm | Steadier, faster training |
| Activation | ReLU, GELU, SiLU, Tanh, Sigmoid, LeakyReLU | Let the model learn non-straight-line patterns. Put one after most Linear/Conv layers. |
| Regularization | Dropout | Reduces overfitting |
| Sequence | Embedding, LSTM, GRU | Text and other sequences |
| Transformer | PatchEmbedding, PositionalEncoding, TransformerEncoder, SequencePool | Transformer models for text or images |
| Transfer | PretrainedBackbone | Reuses a big image model already trained by others (ResNet, EfficientNet…) |
5.3 Train: teach the model
The left side has two sections.
① Data: where the examples come from
| Option | What you need |
|---|---|
| Synthetic toy data | Nothing. Good for learning how things work. |
| CSV table | A .csv file (click 📂 Browse to find it). Choose which column to predict (Target column). |
| CSV with text | A .csv file with a text column and a label column |
| Image folder | A folder with one sub-folder per class |
| MNIST / Fashion-MNIST / CIFAR-10 | Nothing. Downloaded automatically the first time. |
Choosing files: click 📂 Browse next to the path box instead of typing a path.
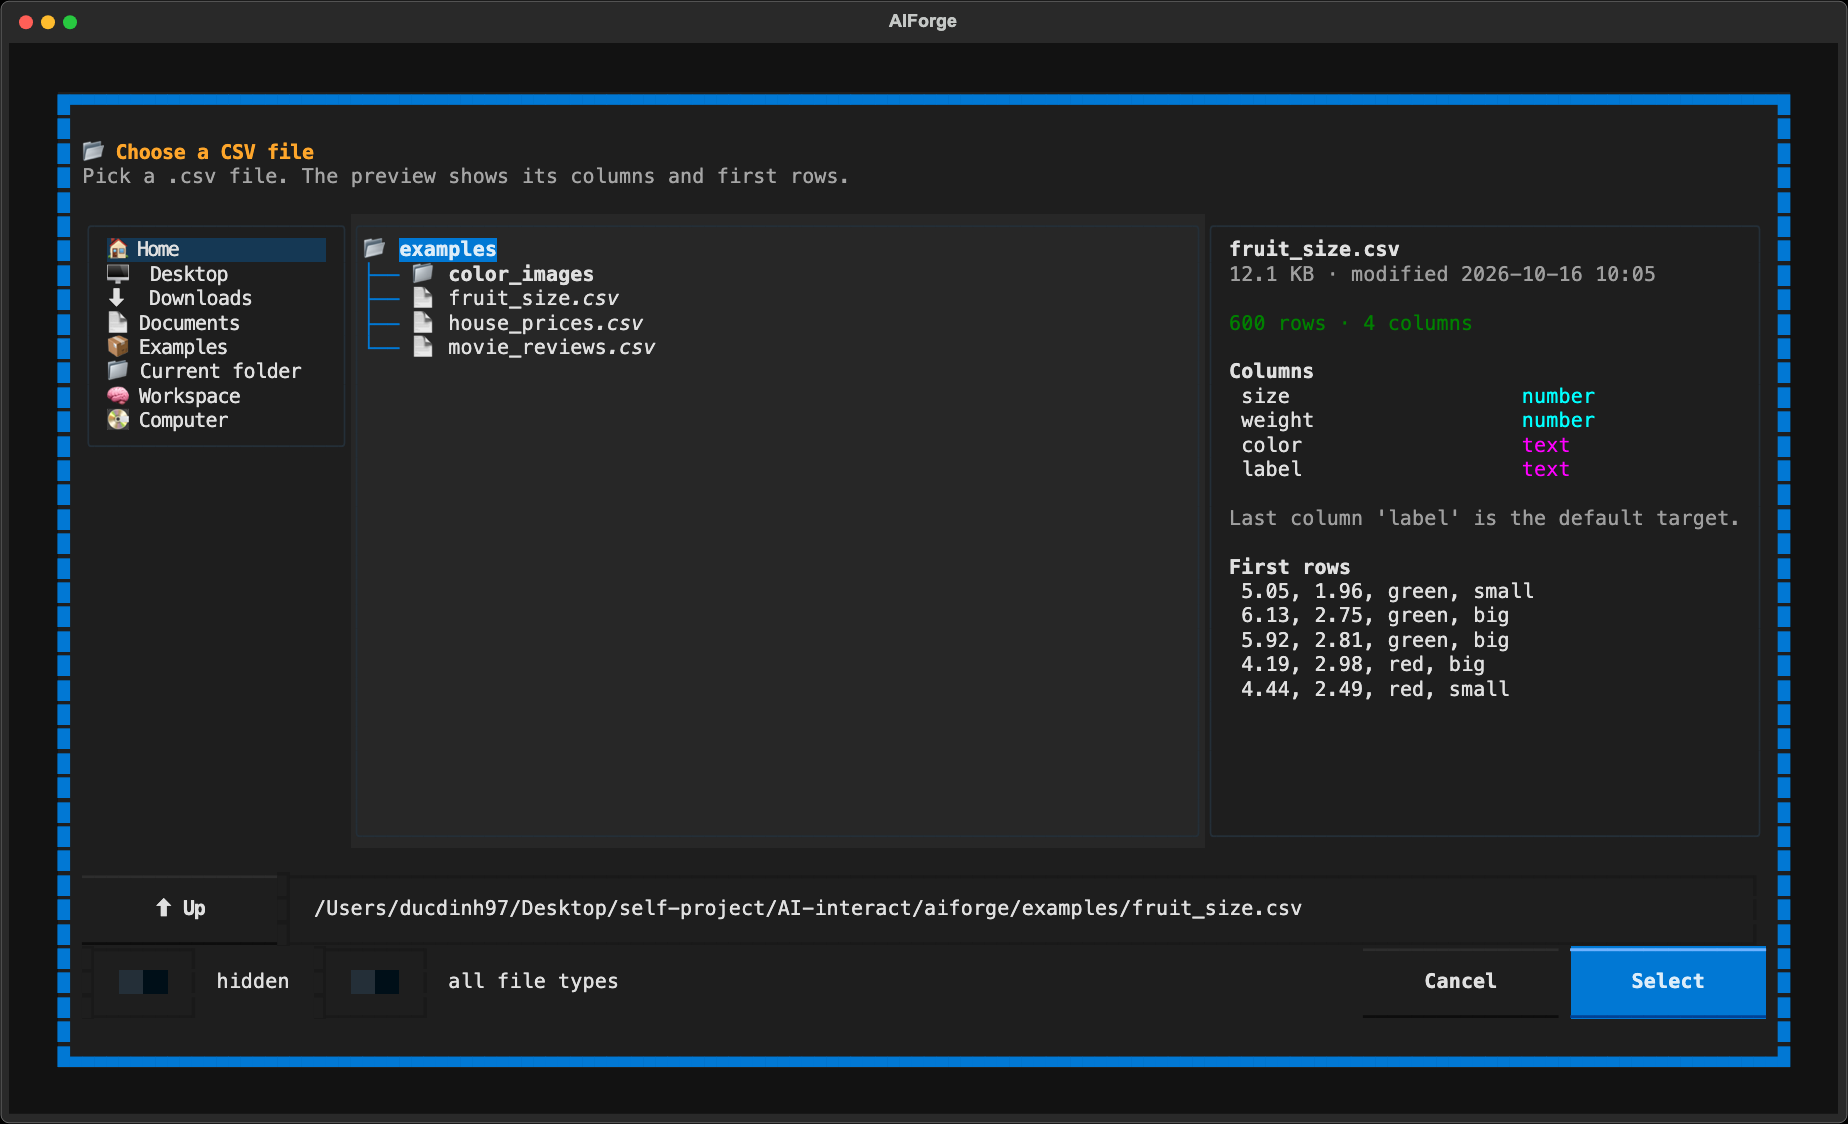
- Left: shortcuts to Home, Desktop, Downloads, Documents, the bundled Examples, your Workspace and the whole computer.
- Middle: folders and files. Only the file types that make sense are shown (e.g.
.csvwhen choosing a table). Switch on all file types or hidden to see everything. - Right: a preview of the highlighted item, so you can check it before choosing:
- CSV: number of rows, every column and whether it holds numbers or text, the first rows
- Folder: whether it is an image dataset, its classes, and how many images each class has. It warns you when a class has fewer than 20 images.
- Image: size and a small colour thumbnail
- Model files (
.zip,.json,.safetensors): the layers and classes inside
- Keys: ↑ ↓ move · Enter opens a folder or chooses a file · Backspace goes to the parent folder · Esc cancels. You can also type or paste a path into the box at the bottom and press Enter.
The same 📂 Browse button appears everywhere you need a path: Import, Load weights, Use (an image or a batch file) and Export (the output folder).
Validation split (default 0.2) keeps 20% of the data aside to test the model on
examples it never trained on. Max samples limits how much data is used (0 = all), which
is handy for a quick test on a big dataset.
② Training settings
| Setting | Meaning | Good starting value |
|---|---|---|
| Epochs | How many times the model sees the whole dataset | 10–50 |
| Batch size | How many examples it looks at before each update | 32–128 |
| Learning rate | How big each learning step is. Too high: unstable. Too low: slow. | 0.001 |
| Weight decay | Gently keeps weights small, which helps against overfitting | 0 (try 0.01) |
| Optimizer | The method used to update weights | Adam |
| LR schedule | Lowers the learning rate over time | constant (try cosine) |
| Early stop | Stop if validation loss hasn't improved for this many epochs (0 = off) | 0 or 5 |
| Device | Where to run: CPU or GPU | auto |
| Continue from saved weights | On: keep training the existing model. Off: start over from scratch. | On |
💻 This computer panel (top right) shows your hardware and how hard it's working, refreshed every second:
| Row | What it shows |
|---|---|
| Specs | CPU model and cores (e.g. Apple M3 Pro · 11 cores (5P+6E)), total RAM, GPU name |
| Will train on / Training on | The processor training uses: GPU in green, CPU in yellow. If a GPU exists but Device is set to cpu, it tells you. |
| CPU | Total usage, a history graph, and one small bar per core |
| RAM | Memory used on the whole computer |
| GPU | Usage % with history, GPU memory, and how much of it AIForge uses (plus temperature and power on NVIDIA cards) |
| App | How much CPU and RAM AIForge itself uses, and the training speed in samples per second while training |
How to read it:
- GPU high (60–100%) while training: 👍 the GPU is doing the work.
- GPU low but CPU high: you are training on the CPU (check Device), or the model is so small that the GPU has little to do. That's normal for toy data.
- RAM near 100% (red): lower Batch size or Max samples, or close other apps.
- Samples/s: compare settings with it. A bigger batch size is usually faster per sample.
On NVIDIA GPUs, install the optional extra to see GPU usage, temperature and power:
.venv/bin/pip install -e ".[nvidia]"
Right side (below the panel): loss and accuracy charts, a progress bar, and a log of each epoch.
📖 Guide panel: click 📖 Guide (next to Start/Stop) or press F1 to slide open a panel on the right. You can keep changing settings and training while it's open.
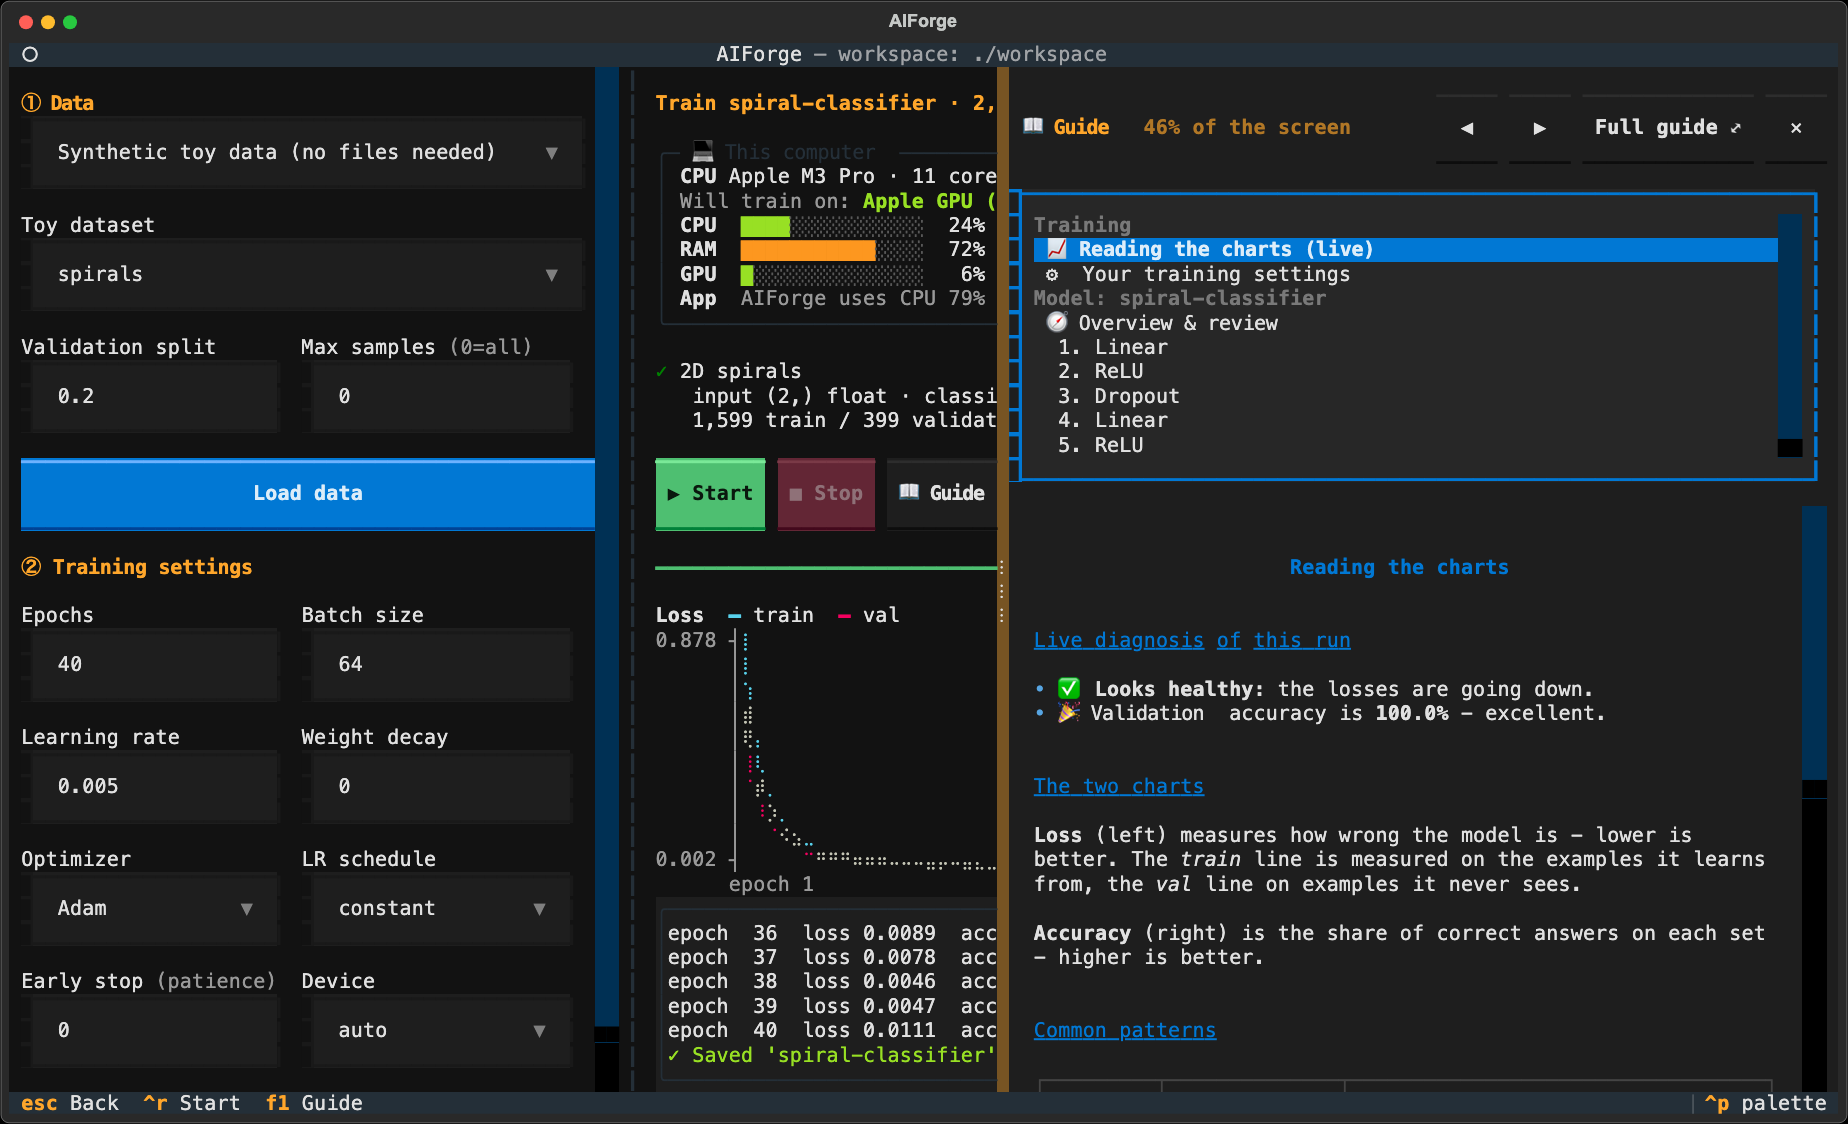
| Topic | What you'll read |
|---|---|
| 📈 Reading the charts (live) | A live diagnosis of the current run that updates every epoch, e.g. "✅ Looks healthy", "⚠️ Overfitting: validation loss has risen… the best epoch was 7", "⚠️ the loss goes up and down a lot - learning rate too high". It also explains how to read the charts. |
| ⚙ Your training settings | Each setting explained with the values you've chosen, e.g. "1,599 examples × 12 epochs with batches of 64 = 25 updates per epoch, 300 in total". It warns about risky values (e.g. a learning rate that's too high) and updates as you type. |
| 🧭 Overview & review | The model being trained, explained step by step, with a design review |
| 1. Linear, 2. ReLU, … | Each layer of the model with its real shapes and parameter counts |
Full guide ⤢ opens the full-screen guide. ✕, Esc or F1 closes the panel.
Make the panel wider or narrower (from 25% to 85% of the screen):
- drag its left edge (the coloured strip with
⋮) with the mouse. Double-click the edge to reset it to the default (46%). - click ◀ (wider) or ▶ (narrower) in the panel's header
- press
<(wider) or>(narrower) when you're not typing in a box
AIForge remembers the size you choose (in workspace/settings.json) and uses it the next time
you open the panel.
Click ■ Stop at any time. AIForge always keeps the best version, i.e. the epoch with the lowest validation loss.
5.4 Fine-tune: reuse a trained model for a new task
Fine-tuning starts from a model that has already learned something and teaches it a new, related task. It's usually faster and needs less data than training from scratch.
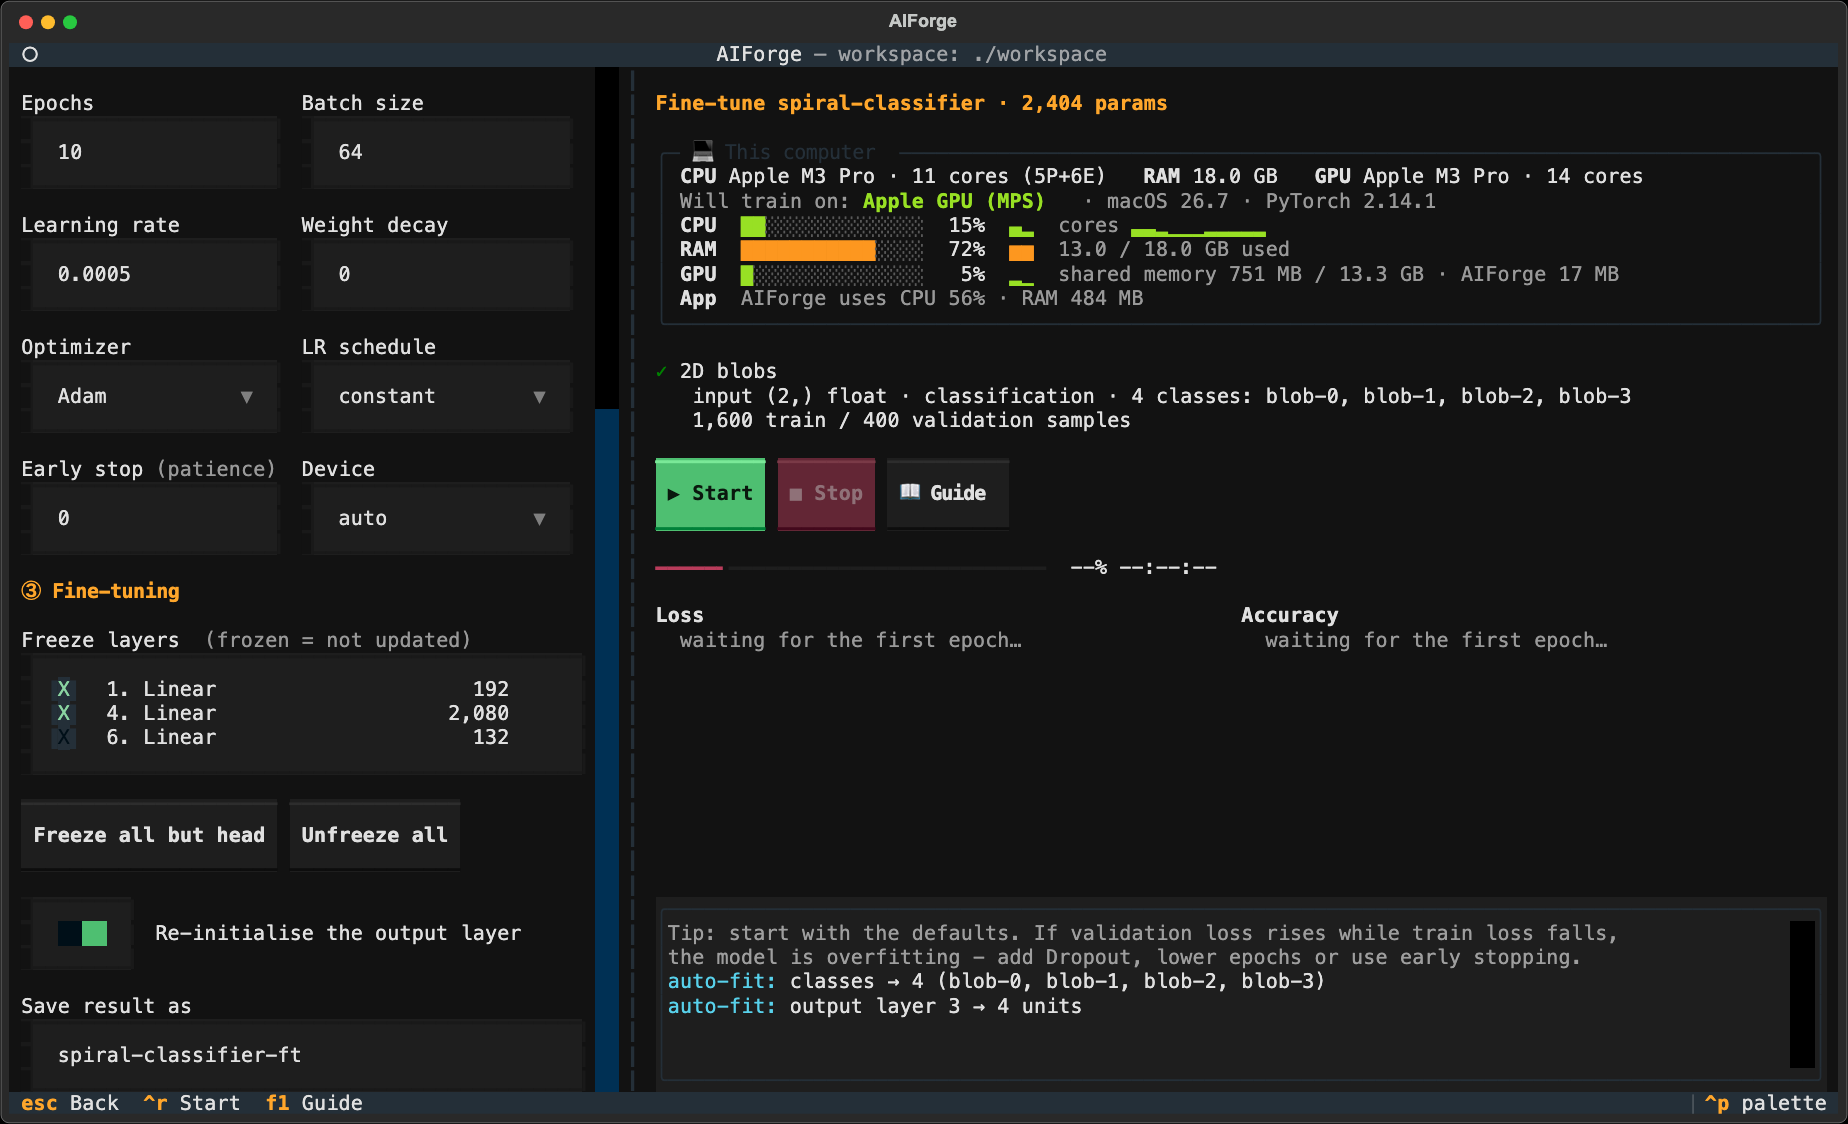
It works like Train, plus a ③ Fine-tuning section:
- Freeze layers: ticked layers are frozen, meaning they won't change. Click Freeze all but head to keep everything the model learned and only retrain the last layer.
- Re-initialise the output layer: gives the last layer a fresh start. This is switched on automatically when the new data has different classes.
- Save result as: the fine-tuned model is saved under a new name, so your original model stays safe.
The learning rate starts lower (0.0005) because fine-tuning should only nudge the model.
5.5 Use: get predictions
What you type depends on the model:
| Model trained on | Type this |
|---|---|
| CSV table | The values in column order, separated by commas, e.g. 6, 3.5, red. The screen shows the expected columns. |
| Text | A sentence, e.g. what an amazing movie |
| Images | The path to an image file, e.g. ~/Pictures/cat.jpg |
Batch prediction: give it a whole CSV file or image folder. It writes a new CSV with a
prediction column (plus confidence for classification models).
5.6 Export: save the model for other programs
| Format | File | Choose this if you want to… |
|---|---|---|
| AIForge bundle | .aiforge.zip |
Back up the model or share it with another AIForge user (re-import with i) |
| Weights (PyTorch) | _weights.pt |
Load the weights in your own PyTorch code |
| Weights (safetensors) | .safetensors |
Share safely; also used by Hugging Face |
| Structure (JSON) | _spec.json |
Keep a readable description of the layers |
| Structure (PyTorch code) | _model.py |
Get real Python code for the model, to learn from or edit |
| Summary | _summary.txt |
Print or paste a layer table into a report |
| TorchScript | _torchscript.pt |
Run the model in C++ or on mobile with PyTorch |
| ONNX | .onnx |
Run it almost anywhere: ONNX Runtime, TensorRT, OpenVINO, browsers… |
5.7 Import: bring in an existing model
Press i on the home screen and enter a file path.
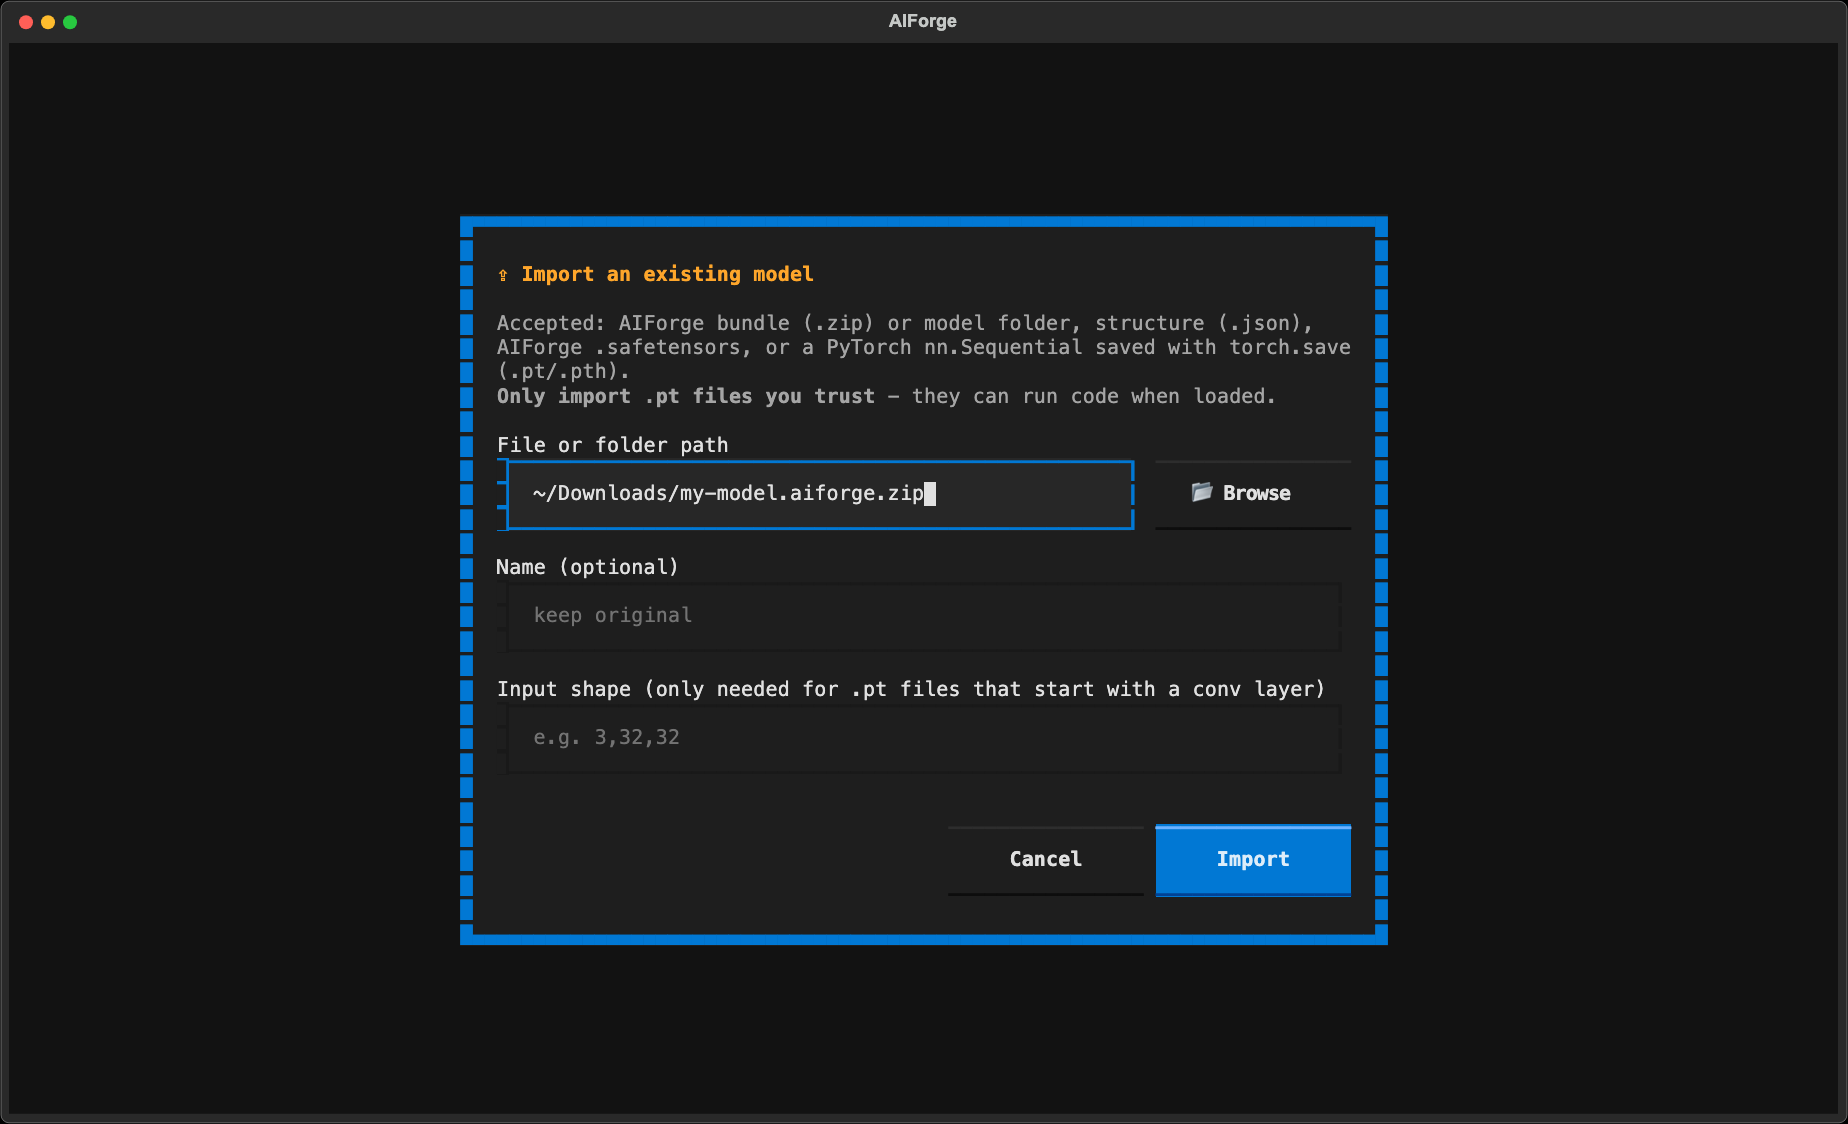
| You have | What happens |
|---|---|
An AIForge .zip bundle or model folder |
Imported exactly, including weights and history |
An AIForge .json structure |
Imported as an untrained model |
An AIForge .safetensors file |
Imported with its weights |
A PyTorch nn.Sequential saved with torch.save(model) |
Converted into editable layers, weights kept. If it starts with a conv layer, fill in the input shape, e.g. 3,32,32. |
| Only a weights file (state_dict) | Select a model with the same structure and press w (Load weights) instead |
⚠️ Only import
.pt/.pthfiles from people you trust. These files can contain hidden code that runs when they are opened.
5.8 Guide: learn what each layer does
New to neural networks? AIForge explains every part of your model in plain language. There are two ways to open the explanations.
A. The Explain tab (inside the builder)
Press Ctrl+E (or click Explain at the top of the right panel). It explains the
selected layer using your model's real numbers:
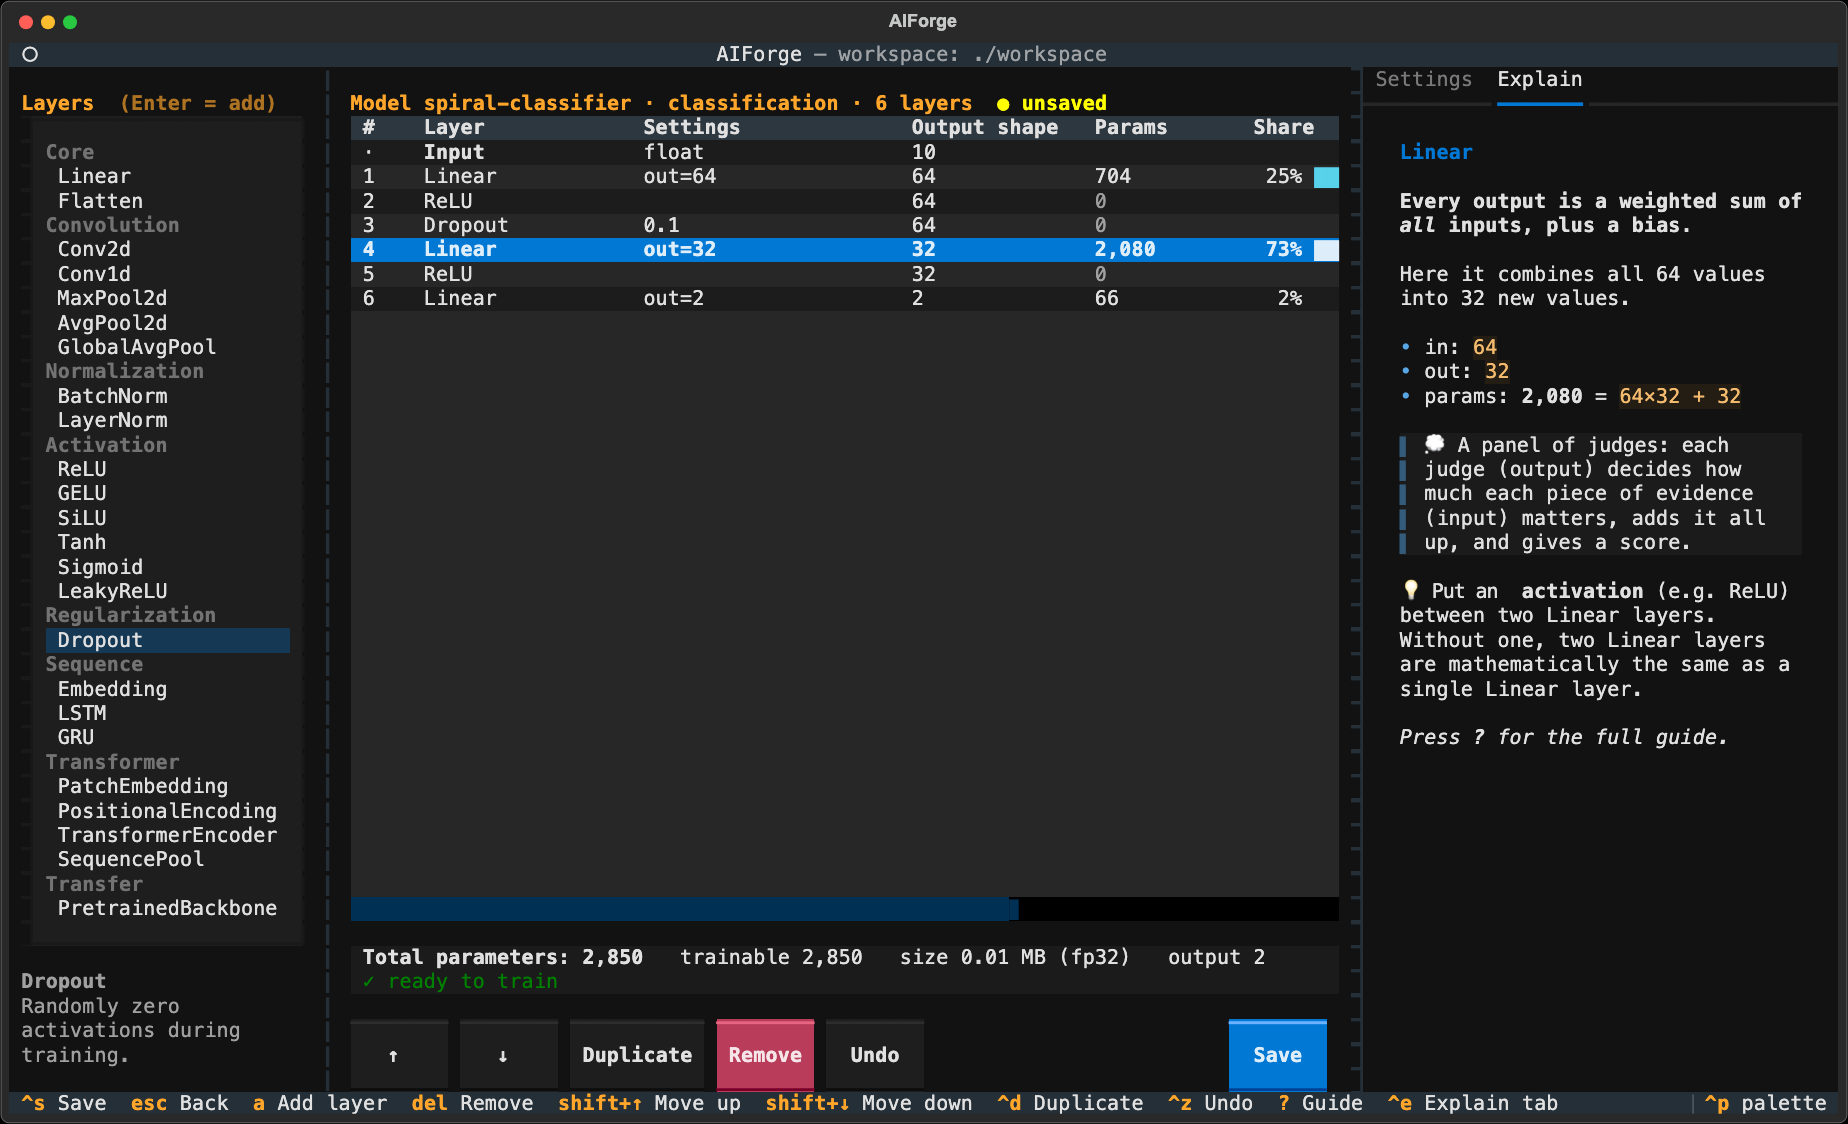
- what the layer does, in one sentence
- what it does in your model, e.g. "combines all 10 values into 64 new values"
- its input/output shape and how its parameter count is calculated (
10×64 + 64 = 704) - an everyday analogy and the most important tip
The text updates as you change settings. Select the Input row to get a summary of the
whole model and a quick design review. Press Ctrl+E again to return to Settings.
B. The full Guide (? in the builder, g or 📖 Guide on the home screen)
A full-screen reader with three parts:
-
Overview & review: the whole model explained step by step. It covers what goes in, what each layer does to the data, where the parameters are, how the model learns, and a design review that points out common mistakes.
-
Each layer of your model: the real numbers for that layer, followed by the full article about that layer type.
-
Layer encyclopedia: an article for every layer AIForge offers, with how it works, a diagram, each setting explained, when to use it, and tips.
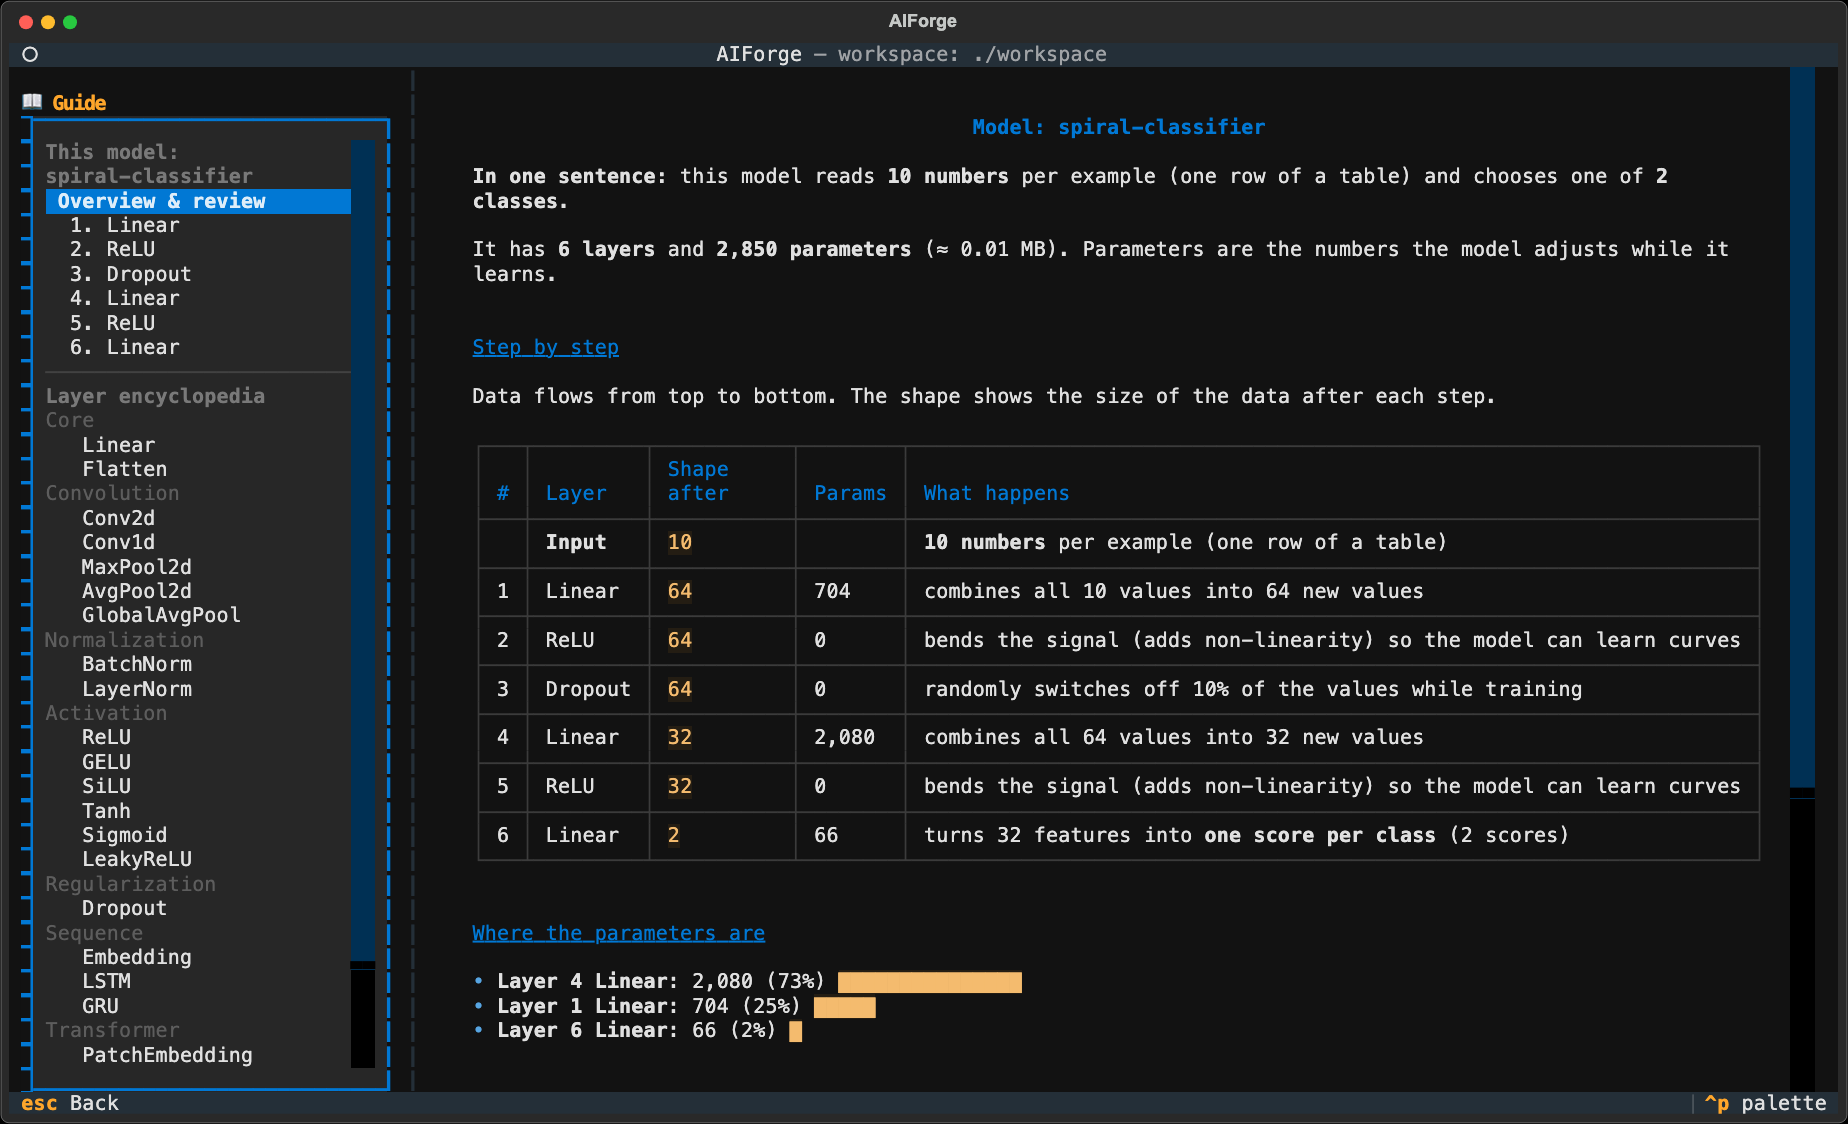
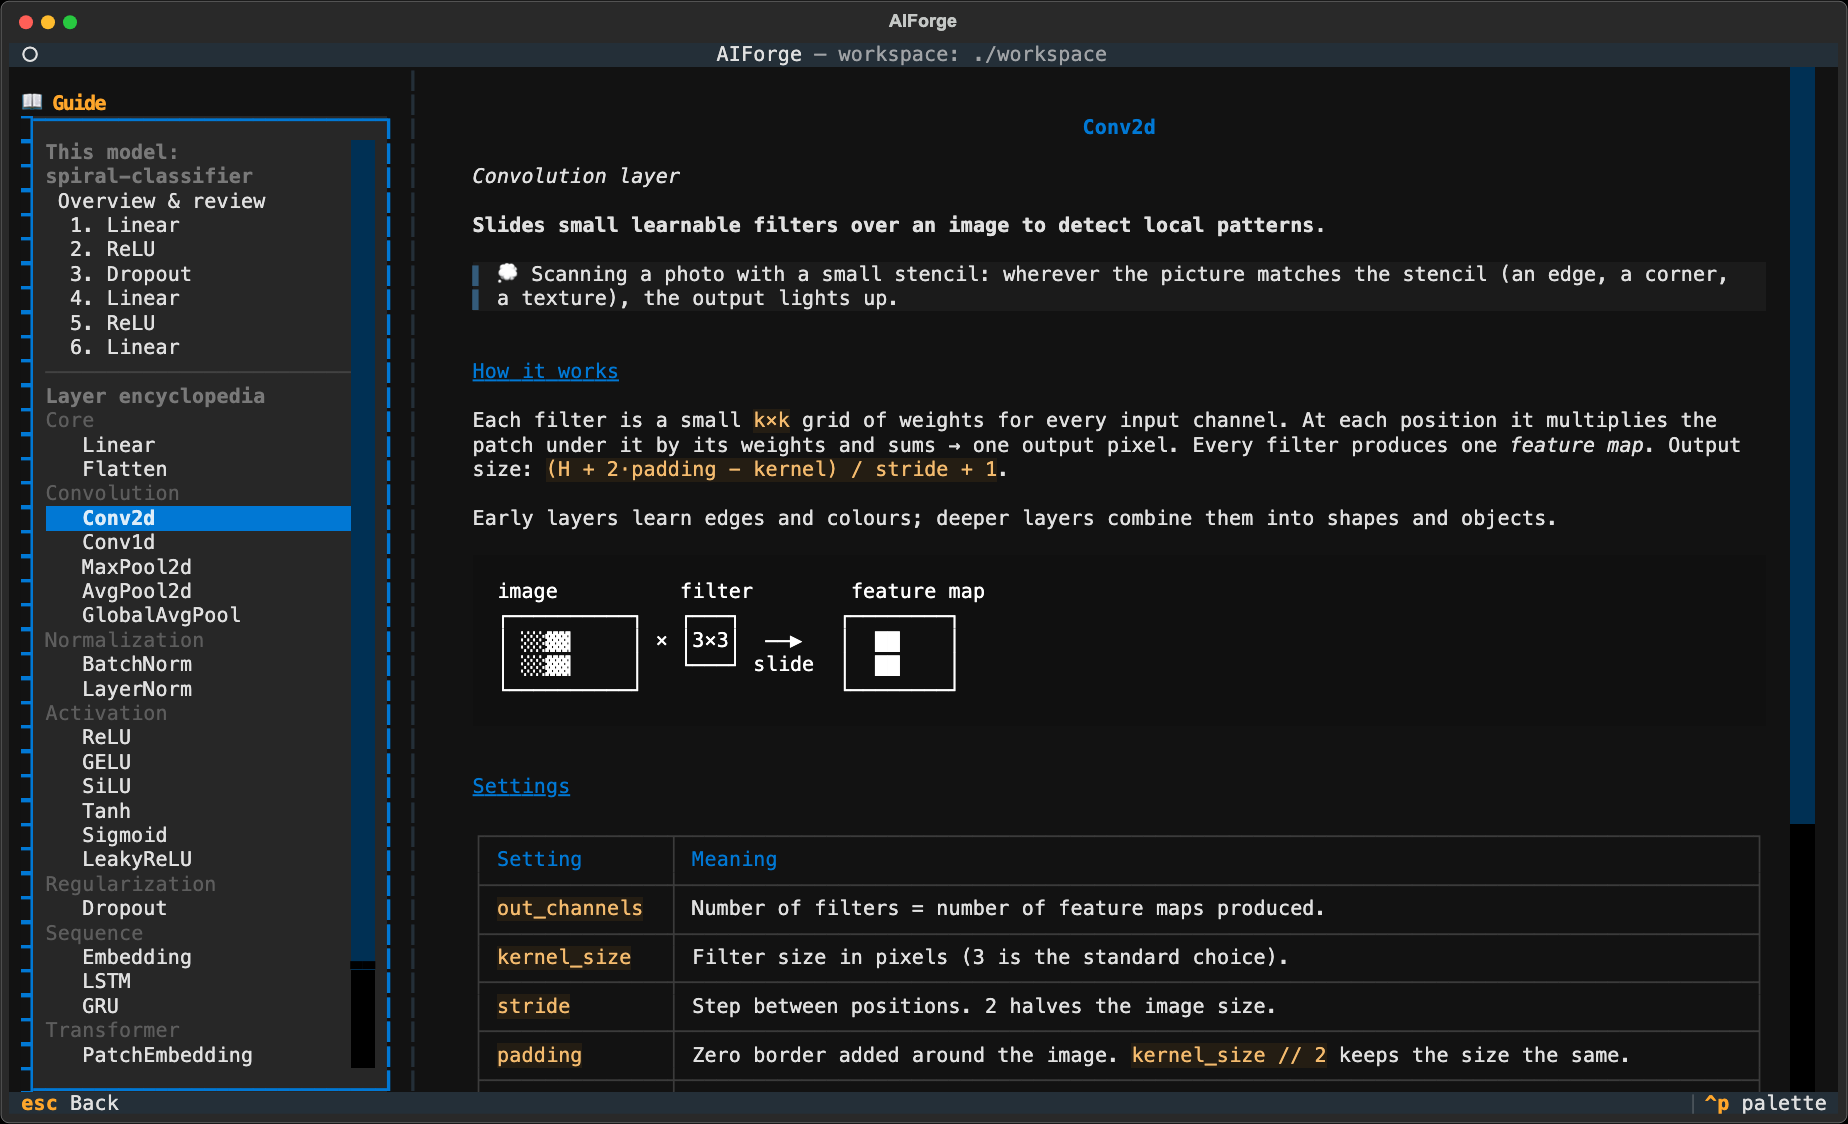
Use ↑ / ↓ to pick a topic and → (or Enter) to scroll the text. Esc goes back.
What the design review checks
| Message | Why it matters |
|---|---|
| ⚠️ Two Linear layers with no activation between them | Without a ReLU (or similar) between them, two Linear layers can only learn what a single one could |
| ⚠️ Classification model ends with Sigmoid/ReLU/… | The training loss expects raw scores, so the extra activation hurts learning |
| ⚠️ Transformer without PositionalEncoding | The model can't tell word or patch order |
| 💡 A huge Linear layer right after Flatten | GlobalAvgPool or more pooling would make the model far smaller |
| 💡 Big model with no Dropout | Dropout helps if the model starts overfitting |
| 💡 Several Conv2d layers without BatchNorm | BatchNorm usually makes CNNs train faster |
| ❌ Shape errors | A layer can't accept the data it receives |
6. Using your own data
Small sample files are in the examples/ folder, so you can try each format right away. They're
installed together with AIForge: in any 📂 Browse window, click 📦 Examples to open them.
6.1 A table (CSV): predict a category or a number
One row per example, with a header row. The last column is the one to predict, unless you choose another column.
size,weight,color,label
5.05,1.96,green,small
6.13,2.75,green,big
- Number columns are scaled automatically.
- Text columns like
colorare turned into codes automatically. - Empty number cells are filled with the column average.
- If the target column holds numbers with many different values, AIForge treats it as regression (predicting a number). Otherwise it's classification (predicting a category). You can override this with the Task setting.
Examples: fruit_size.csv (classification) and
house_prices.csv (regression; choose price as the target).
6.2 Text (CSV): classify sentences
One column with text and one with the label:
text,sentiment
"great movie, loved the actors",pos
"boring plot and awful ending",neg
Use the template Text Transformer classifier or Text classifier (Embedding + LSTM).
Example: movie_reviews.csv.
6.3 Images: classify pictures
Make a folder with one sub-folder per class. The sub-folder name becomes the class name:
my_photos/
├── cat/
│   ├── 001.jpg
│   └── 002.jpg
└── dog/
    ├── 001.jpg
    └── 002.jpg
Images are resized to the model's input size automatically (set it on the builder's
Input row, e.g. 3,64,64). Example: color_images/.
How much data do I need? For images, aim for at least 50–100 per class. With fewer images, use the Transfer learning (ResNet18) template, which starts from a model that already understands images.
7. Which template should I choose?
| Your data | Template | Size |
|---|---|---|
| A table of numbers/categories, predicting a category | MLP classifier (tabular) | tiny |
| A table, predicting a number (price, temperature…) | MLP regressor (tabular) | tiny |
| Small grayscale images (28×28, e.g. digits) | Small CNN | ~200K parameters |
| Small colour images (32×32) | CNN (CIFAR-10) | ~67K parameters |
| Photos, especially with few examples | Transfer learning (ResNet18) | ~11M parameters |
| Images, to try a modern architecture | Vision Transformer (ViT) | ~546K parameters |
| Sentences / reviews | Text Transformer classifier | ~2.8M parameters |
| Sentences, simpler / faster | Text classifier (Embedding + LSTM) | ~1.4M parameters |
| You want to design everything yourself | Blank | — |
You can change any template after creating it.
8. How to read the training charts
| What you see | What it means | What to do |
|---|---|---|
| Both loss lines go down and level off | 👍 The model is learning well | Nothing; it's working |
| Train loss goes down, val loss goes up | Overfitting: it memorizes the training data instead of learning general rules | Add a Dropout layer, train fewer epochs, turn on Early stop, or get more data |
| Both lines stay high and flat | Underfitting: the model is too simple, or isn't learning | Train more epochs, add layers or neurons, or try a higher learning rate |
| Lines jump around wildly | The learning rate is too high | Lower it, e.g. 0.001 → 0.0003 |
Loss shows nan |
Training broke down (numbers became too large) | Lower the learning rate a lot and start again |
9. Words you will see
| Word | Plain meaning |
|---|---|
| Model / neural network | A program that learns patterns from examples instead of being written by hand |
| Layer | One step in the model. Data flows through the layers from top to bottom. |
| Parameters (weights) | The numbers inside the model that change during training. More parameters can learn more, but need more data and time. |
| Shape | The size of the data at each step, e.g. 3×32×32 = an image with 3 colour channels, 32×32 pixels |
| Training | Showing the model examples with answers so it adjusts its parameters |
| Epoch | One pass through the entire training dataset |
| Batch | A small group of examples processed together |
| Loss | A score for how wrong the model is. Lower is better. |
| Accuracy | The percentage of correct answers (classification only) |
| MAE | Mean absolute error: the average size of the mistake when predicting numbers |
| Validation data | Examples held back to test the model honestly |
| Overfitting | The model memorizes the training examples but fails on new ones |
| Learning rate | How big each adjustment is during training |
| Classification | Predicting a category (cat/dog, spam/not spam) |
| Regression | Predicting a number (a price, a temperature) |
| Fine-tuning | Continuing to train an already-trained model on a new task |
| Freezing | Locking layers so fine-tuning doesn't change them |
| Transfer learning | Starting from a model someone else trained on a huge dataset |
| Transformer | A modern type of model that uses attention: every part of the input looks at every other part |
| Export | Saving the model in a format other programs can use |
10. Keyboard shortcuts
Everywhere: Esc back · Tab next box · Enter confirm · Ctrl+Q quit · Ctrl+P command palette
| Home | Builder | Train / Fine-tune | |||
|---|---|---|---|---|---|
n |
New model | a |
Go to the layer list | Ctrl+R |
Start training |
F1 |
Open / close the Guide panel | ||||
< / > |
Guide panel wider / narrower | ||||
i |
Import | Enter |
Add the highlighted layer | Esc |
Back (stop training first) |
e / Enter |
Edit structure | Del |
Remove layer | ||
t |
Train | Shift+↑ / ↓ |
Move layer | ||
f |
Fine-tune | Ctrl+D |
Duplicate layer | ||
p |
Use (predict) | Ctrl+Z |
Undo | ||
x |
Export | Ctrl+S |
Save | ||
g |
Guide | Ctrl+E |
Settings ↔ Explain tab | ||
? |
Full guide | ||||
w |
Load weights | ||||
c |
Duplicate model | ||||
r |
Rename | ||||
d |
Delete | ||||
q |
Quit |
11. Problems and solutions
| Problem | Solution |
|---|---|
command not found: aiforge |
Installed with pipx: run python3 -m pipx ensurepath, then close and reopen the terminal. Installed from source: use .venv/bin/aiforge, or activate the environment first with source .venv/bin/activate |
| My old models are missing after updating | Earlier versions saved models in ./workspace. Start AIForge from the folder that contains it, or run aiforge -w path/to/workspace |
python3: command not found |
Install Python from python.org (Windows: try py instead of python3) |
| The screen looks cut off or squashed | Make the terminal window bigger (at least 120×35) or full screen. The banner hides itself on small windows. |
| Strange symbols instead of boxes and lines | Use a modern terminal (iTerm2, Windows Terminal) and a font such as Cascadia Code, JetBrains Mono or Fira Code |
| The mouse doesn't work | Use the keyboard (see the bottom bar), or enable mouse support in your terminal's settings |
| I don't know the path to my file | Click 📂 Browse and navigate to it. The preview shows whether it's the right file. |
| My file doesn't appear in the browser | It's filtered by type. Switch on all file types (or hidden for files starting with .) |
| Yellow warning "Model input is … but data is …" | Click Auto-fit model to data |
| "Final output must be a flat vector, got shape (3, 64, 2)" (or similar) | The model is missing a layer that flattens images or sequences. Choose a fix in the 🔧 Fix the model window (it opens after Auto-fit, or click 🔧 Fix model…) |
| Red "✗ error" in the builder | Read the message on the right. Usually a layer is in the wrong place (e.g. Conv2d after Flatten). Remove or move it, or press Ctrl+Z. |
| "Every layer is frozen" | In Fine-tune, untick at least one layer |
| Training is very slow | Check the 💻 This computer panel: if it says Training on: CPU but you have a GPU, set Device to auto. Also try a smaller model, or set Max samples to e.g. 5000 |
| The panel shows GPU "none found" | PyTorch can't use your GPU. On NVIDIA, install the CUDA build of PyTorch from pytorch.org; Apple Silicon Macs work out of the box |
| Download of MNIST/CIFAR fails | Check your internet connection. The files are stored in workspace/data/ after the first download. |
| Predictions look random | Make sure the model is trained (Weights: trained on the home screen) and check its validation accuracy in the run history |
| "Expected N values, got M" | Type exactly as many comma-separated values as the hint shows, in the same order |
12. Where are my files?
Everything lives in one workspace folder:
| How you run AIForge | Workspace folder |
|---|---|
Normally (aiforge) |
AIForge in your home folder, e.g. /Users/you/AIForge or C:\Users\you\AIForge |
From a folder that already contains a workspace/ folder with models |
that ./workspace folder (this is how earlier versions stored models) |
aiforge -w /another/folder, or with the AIFORGE_WORKSPACE environment variable set |
the folder you chose |
The folder looks like this:
AIForge/
├── models/
│   └── spiral-classifier/
│       ├── spec.json       ← the model's structure (layers, classes, preprocessing)
│       ├── weights.pt      ← what the model learned
│       └── history.json    ← every training run
├── settings.json           ← your preferences (e.g. the Guide panel size)
├── exports/                ← files created by Export
└── data/                   ← downloaded datasets (MNIST, CIFAR-10…)
To back up a model, export it as an AIForge bundle or copy its folder.
13. For developers
aiforge/
├── layers.py        layer registry: settings, building, parameter formulas
├── spec.py          model description (JSON), workspace storage, templates, code generation
├── data.py          dataset loaders and input preprocessing
├── trainer.py       training / fine-tuning loop
├── predict.py       single and batch predictions
├── sysinfo.py       hardware specs and live CPU / RAM / GPU usage
├── model_io.py      export and import
├── guide.py         plain-language explanations: layer encyclopedia, model walk-through, design review
├── fixes.py         finds and verifies fixes when a model's structure doesn't fit the data
└── tui/             the terminal interface (Textual): home, builder, train, predict, export, guide,
                     browser (file/folder picker with previews), sysmon (the "This computer" panel)
docs/
├── images/              README screenshots (PNG)
└── make_screenshots.py  regenerates them: .venv/bin/python docs/make_screenshots.py
aiforge/examples/    small sample datasets (shipped with the package)
Publishing a new version to PyPI: bump __version__ in aiforge/__init__.py, then
python -m build and twine upload dist/*.
Built with PyTorch and Textual. Released under the MIT License.
1 maintainer

Metadata
1 maintainer
Release files for aiforge-studio 0.1.0
For a detailed explanation of source distributions (sdists) and built distributions (wheels), please see the package formats documentation.
Source distribution (sdist)
| File | Size | Uploaded | |
|---|---|---|---|
| aiforge_studio-0.1.0.tar.gz | 141.4 kB | Details |
Built distribution (wheel)
| File | Interpreter | ABI | Platform | Reset |
|---|---|---|---|---|
| aiforge_studio-0.1.0-py3-none-any.whl | Python 3 | none | any | Details |
Total release size: 283.2 kB
Release files / aiforge_studio-0.1.0.tar.gz
| Download URL | aiforge_studio-0.1.0.tar.gz |
|---|---|
| Size | 141.4 kB |
| Tags | Source |
|
SHA-256 checksum How to use checksums |
60103bef36c904eecd50ce93dfded9031be8c1cd8ce7d9e9ee37143b30615f81
|
|
BLAKE2b-256 checksum How to use checksums |
816d97eb6a15aad2c043b411c03ebd28f0078a5e31b42d531eeda02a04965b70
|
| Upload date | |
|
Uploaded using Trusted Publishing? What is trusted publishing? |
No |
| Uploaded via |
twine/7.0.0 CPython/3.13.3
|
Release files / aiforge_studio-0.1.0-py3-none-any.whl
| Download URL | aiforge_studio-0.1.0-py3-none-any.whl |
|---|---|
| Size | 141.7 kB |
| Tags | Python 3 |
|
SHA-256 checksum How to use checksums |
242b951c1559248d4f9556519d77b8bda124eac1a456b3082ef1d0934d478c17
|
|
BLAKE2b-256 checksum How to use checksums |
36ec7671303ec2ae9fb7a15b482f26a67bc4d3f19c3104f1f3006051bf9f51be
|
| Upload date | |
|
Uploaded using Trusted Publishing? What is trusted publishing? |
No |
| Uploaded via |
twine/7.0.0 CPython/3.13.3
|














