U-Net based cell and nucleus segmentation for brightfield microscopy

Project description


aiSEGcell - Overview
This repository contains a torch implementation of U-Net (Ronneberger et al., 2015).
We provide trained models to semantically segment nuclei and whole cells in bright field images.
Please cite this paper if you are using this code in your research.
Contents
- Installation
- Data
- Training
- Testing
- Predicting
- Image annotation tools
- Troubleshooting & support
- Citation
Installation
If you do not have python installed already, we recommend installing it using the
Anaconda distribution. Installing aisegcell takes ~5 min and
was tested with python 3.13.9.
Virtual environment setup
If you do not use and IDE that handles virtual environments
for you (e.g. PyCharm) use your command line application (e.g. Terminal) and
one of the many virtual environment tools (see here). We will
use conda
-
Create new virtual environment
conda create -n aisegcell python=3.13
-
Activate virtual environment
conda activate aisegcell
pip installation
Recommended if you do not want to develop the aisegcell code base.
-
Install
aisegcell# update pip pip install -U pip pip install aisegcell
-
(Optional)
GPUsgreatly speed up training and inference of U-Net and are available fortorch(v2.9.0) forWindowsandLinux. Check if yourGPU(s)are CUDA compatible (Windows,Linux) and update their drivers if necessary. -
Install
torch/torchvisioncompatible with your system.aisegcellwas tested withtorchversion2.9.0,torchvisionversion0.24.0, andcudaversion12.6. Depending on your OS, yourCPUorGPU(andCUDAversion) the installation may change# Windows/Linux CPU pip install torch==2.9.0 torchvision==0.24.0 --index-url https://download.pytorch.org/whl/cpu # Windows/Linux GPU (CUDA 12.6) pip install torch==2.9.0 torchvision==0.24.0 --index-url https://download.pytorch.org/whl/cu126 # macOS CPU pip install torch==2.9.0 torchvision==0.24.0
-
Install
lightning.aisegcellwas tested with version2.5.5.pip install lightning==2.5.5
Source installation
Installation requires a command line application (e.g. Terminal) with
git and python installed.
If you operate on Windows we recommend using
Ubuntu on Windows.
Alternatively, you can install Anaconda and
use Anaconda Powershell Prompt. An introductory tutorial on how to use git and GitHub can be found
here.
-
(Optional) If you use
Anaconda Powershell Prompt, installgitthroughcondaconda install -c anaconda git
-
clone the repository (consider
sshalternative)# change directory cd /path/to/directory/to/clone/repository/to git clone https://github.com/CSDGroup/aisegcell.git
-
Navigate to the cloned directory
cd aisegcell
-
Install
aisegcell# update pip pip install -U pip
-
as a user
pip install .
-
as a developer (in editable mode with development dependencies and pre-commit hooks)
pip install -e ".[dev]"
pre-commit install
-
-
(Optional)
GPUsgreatly speed up training and inference of U-Net and are available fortorch(v2.9.0) forWindowsandLinux. Check if yourGPU(s)are CUDA compatible (Windows,Linux) and update their drivers if necessary. -
Install
torch/torchvisioncompatible with your system.aisegcellwas tested withtorchversion2.9.0,torchvisionversion0.24.0, andcudaversion12.6. Depending on your OS, yourCPUorGPU(andCUDAversion) the installation may change# Windows/Linux CPU pip install torch==2.9.0 torchvision==0.24.0 --index-url https://download.pytorch.org/whl/cpu # Windows/Linux GPU (CUDA 12.6) pip install torch==2.9.0 torchvision==0.24.0 --index-url https://download.pytorch.org/whl/cu126 # macOS CPU pip install torch==2.9.0 torchvision==0.24.0
-
Install
pytorch-lightning.aisegcellwas tested with version1.5.9.pip install lightning==2.5.5
Data
U-Net is currently intended for single-class semantic segmentation. Input images are expected to be 8-bit or 16-bit greyscale images. Segmentation masks are expected to decode background as 0 intensity and all intensities >0 are converted to a single intensity value (255). Consequently, different instances of a class (instance segmentation) or multi-class segmentations are handled as single-class segmentations. Have a look at this notebook for a data example.
Training
Training U-Net is as simple as calling the command aisegcell_train. We provide a
notebook on how to train
U-Net with a minimal working example (~10 min). aisegcell_train is available if you activate the virtual environment you
installed and can be called with the following arguments:
--help: show help message--data: Path to CSV file containing training image file paths. The CSV file must have the columnsbfandmask.--data_val: Path to CSV file containing validation image file paths (same format as--data).--output_base_dir: Path to output directory.--model: Model type to train (currently only U-Net). Default is "Unet".--checkpoint: Path to checkpoint file matching--model. Only necessary if continuing a model training. Default isNone.--devices: Devices to use for model training. If you want to use GPU(s) you have to provideintIDs. Multiple GPU IDs have to be listed separated by spacebar (e.g.2 5 9). If you want to use the CPU you have to use "cpu". Default is "cpu".--epochs: Number of training epochs. Default is 5.--batch_size: Number of samples per mini-batch. Default is 2.--lr: Learning rate of the optimizer. Default is 1e-4.--base_filters: Number of base_filters of Unet. Default is 32.--shape: Shape [heigth, width] that all images will be cropped/padded to before model submission. Height and width cannot be smaller than--receptive_field. Default is [1024,1024].--receptive_fieldReceptive field of a neuron in the deepest layer. Default is 128.--log_frequency: Log performance metrics every N gradient steps during training. Default is 50.--loss_weight: Weight of the foreground class compared to the background class for the binary cross entropy loss. Default is 1.--bilinear: If flag is used, use bilinear upsampling, else transposed convolutions.--multiprocessing: If flag is used, all GPUs given in devices will be used for traininig. Does not support CPU.--retrain: If flag is used, best scores for model saving will be reset (required for training on new data).--transform_intensity: If flag is used random intensity transformations will be applied to input images.--seed: None or Int to use for random seeding. Default isNone.
The command aisegcell_generate_list can be used to write CSV files for --data and --data_val and
has the following arguments:
--help: show help message--bf: Path (globpattern) to input images (e.g. bright field). Naming convention must match naming convention of--mask.--mask: Path (globpattern) to segmentation masks corresponding to--bf.--out: Directory to which output file is saved.--prefix: Prefix for output file name (i.e.{PREFIX}_paths.csv). Default is "train".
Use wildcard characters like * to select all files you want to
input to --bf and --mask (see example below).
Consider the following example:
# activate the virtual environment
conda activate aisegcell

# generate CSV files for data and data_val
aisegcell_generate_list \
  --bf "/path/to/train_images/*/*.png" # i.e. select all PNG files in all sub-directories of /path/to/train_images\
  --mask "/path/to/train_masks/*/*mask.png" # i.e. select all files in all sub-directories that end with "mask.png"\
  --out /path/to/output_directory \
  --prefix train

aisegcell_generate_list \
  --bf "/path/to/val_images/*.png" \
  --mask "/path/to/val_masks/*.png" \
  --out /path/to/output_directory \
  --prefix val

# starting multi-GPU training
aisegcell_train \
  --data /path/to/output_directory/train_paths.csv \
  --data_val /path/to/output_directory/val_paths.csv \
  --model Unet \
  --devices 2 4 # use GPU 2 and 4 \
  --output_base_dir /path/to/results/folder \
  --epochs 10 \
  --batch_size 8 \
  --lr 1e-3 \
  --base_filters 32 \
  --shape 1024 512 \
  --receptive_field 128 \
  --log_frequency 5 \
  --loss_weight 1 \
  --bilinear  \
  --multiprocessing # required if you use multiple --devices \
  --transform_intensity \
  --seed 123

# OR retrain an existing checkpoint with single GPU
aisegcell_train \
  --data /path/to/output_directory/train_paths.csv \
  --data_val /path/to/output_directory/val_paths.csv \
  --model Unet \
  --checkpoint /path/to/checkpoint/file.ckpt
  --devices 0 \
  --output_base_dir /path/to/results/folder \
  --epochs 10 \
  --batch_size 8 \
  --lr 1e-3 \
  --base_filters 32 \
  --shape 1024 1024 \
  --receptive_field 128 \
  --log_frequency 5 \
  --loss_weight 1 \
  --bilinear  \
  --transform_intensity \
  --seed 123
The output of aisegcell_train will be stored in subdirectories {DATE}_Unet_{ID1}/lightning_logs/version_{ID2}/ at
--output_base_dir. Its contents are:
hparams.yaml: stores hyper-parameters of the model (used bylightning.LightningModule)metrics.csv: contains all metrics tracked during trainingloss_step: training loss (binary cross-entropy) per gradient stepepoch: training epochstep: training gradient steploss_val_step: validation loss (binary cross-entropy) per validation mini-batchf1_step: f1 score per validation mini-batchiou_step: average ofiou_small_stepandiou_big_stepper validation mini-batchiou_big_step: intersection over union of objects with > 2000 px in size per validation mini-batchiou_small_step: intersection over union of objects with <= 2000 px in size per validation mini-batchloss_val_epoch: averageloss_val_stepover all validation steps per epochf1_epoch: averagef1_stepover all validation steps per epochiou_epoch: averageiou_stepover all validation steps per epochiou_big_epoch: averageiou_big_epochover all validation steps per epochiou_small_epoch: averageiou_small_epochover all validation steps per epochloss_epoch: averageloss_stepover all training gradient steps per epoch
checkpoints: model checkpoints are stored in this directory. Path to model checkpoints are used as input to--checkpointofaisegcell_trainor--modelofaisegcell_testandaisegcell_predict.best-f1-epoch={EPOCH}-step={STEP}.ckpt: model weights with the (currently) highestf1_epochbest-iou-epoch={EPOCH}-step={STEP}.ckpt: model weights with the (currently) highestiou_epochbest-loss-epoch={EPOCH}-step={STEP}.ckpt: model weights with the (currently) lowestloss_val_epochlatest-epoch={EPOCH}-step={STEP}.ckpt: model weights of the (currently) latest checkpoint
Trained models
We provide trained models:
| modality | image format | example image | description | availability |
|---|---|---|---|---|
| nucleus segmentation | 2D grayscale | 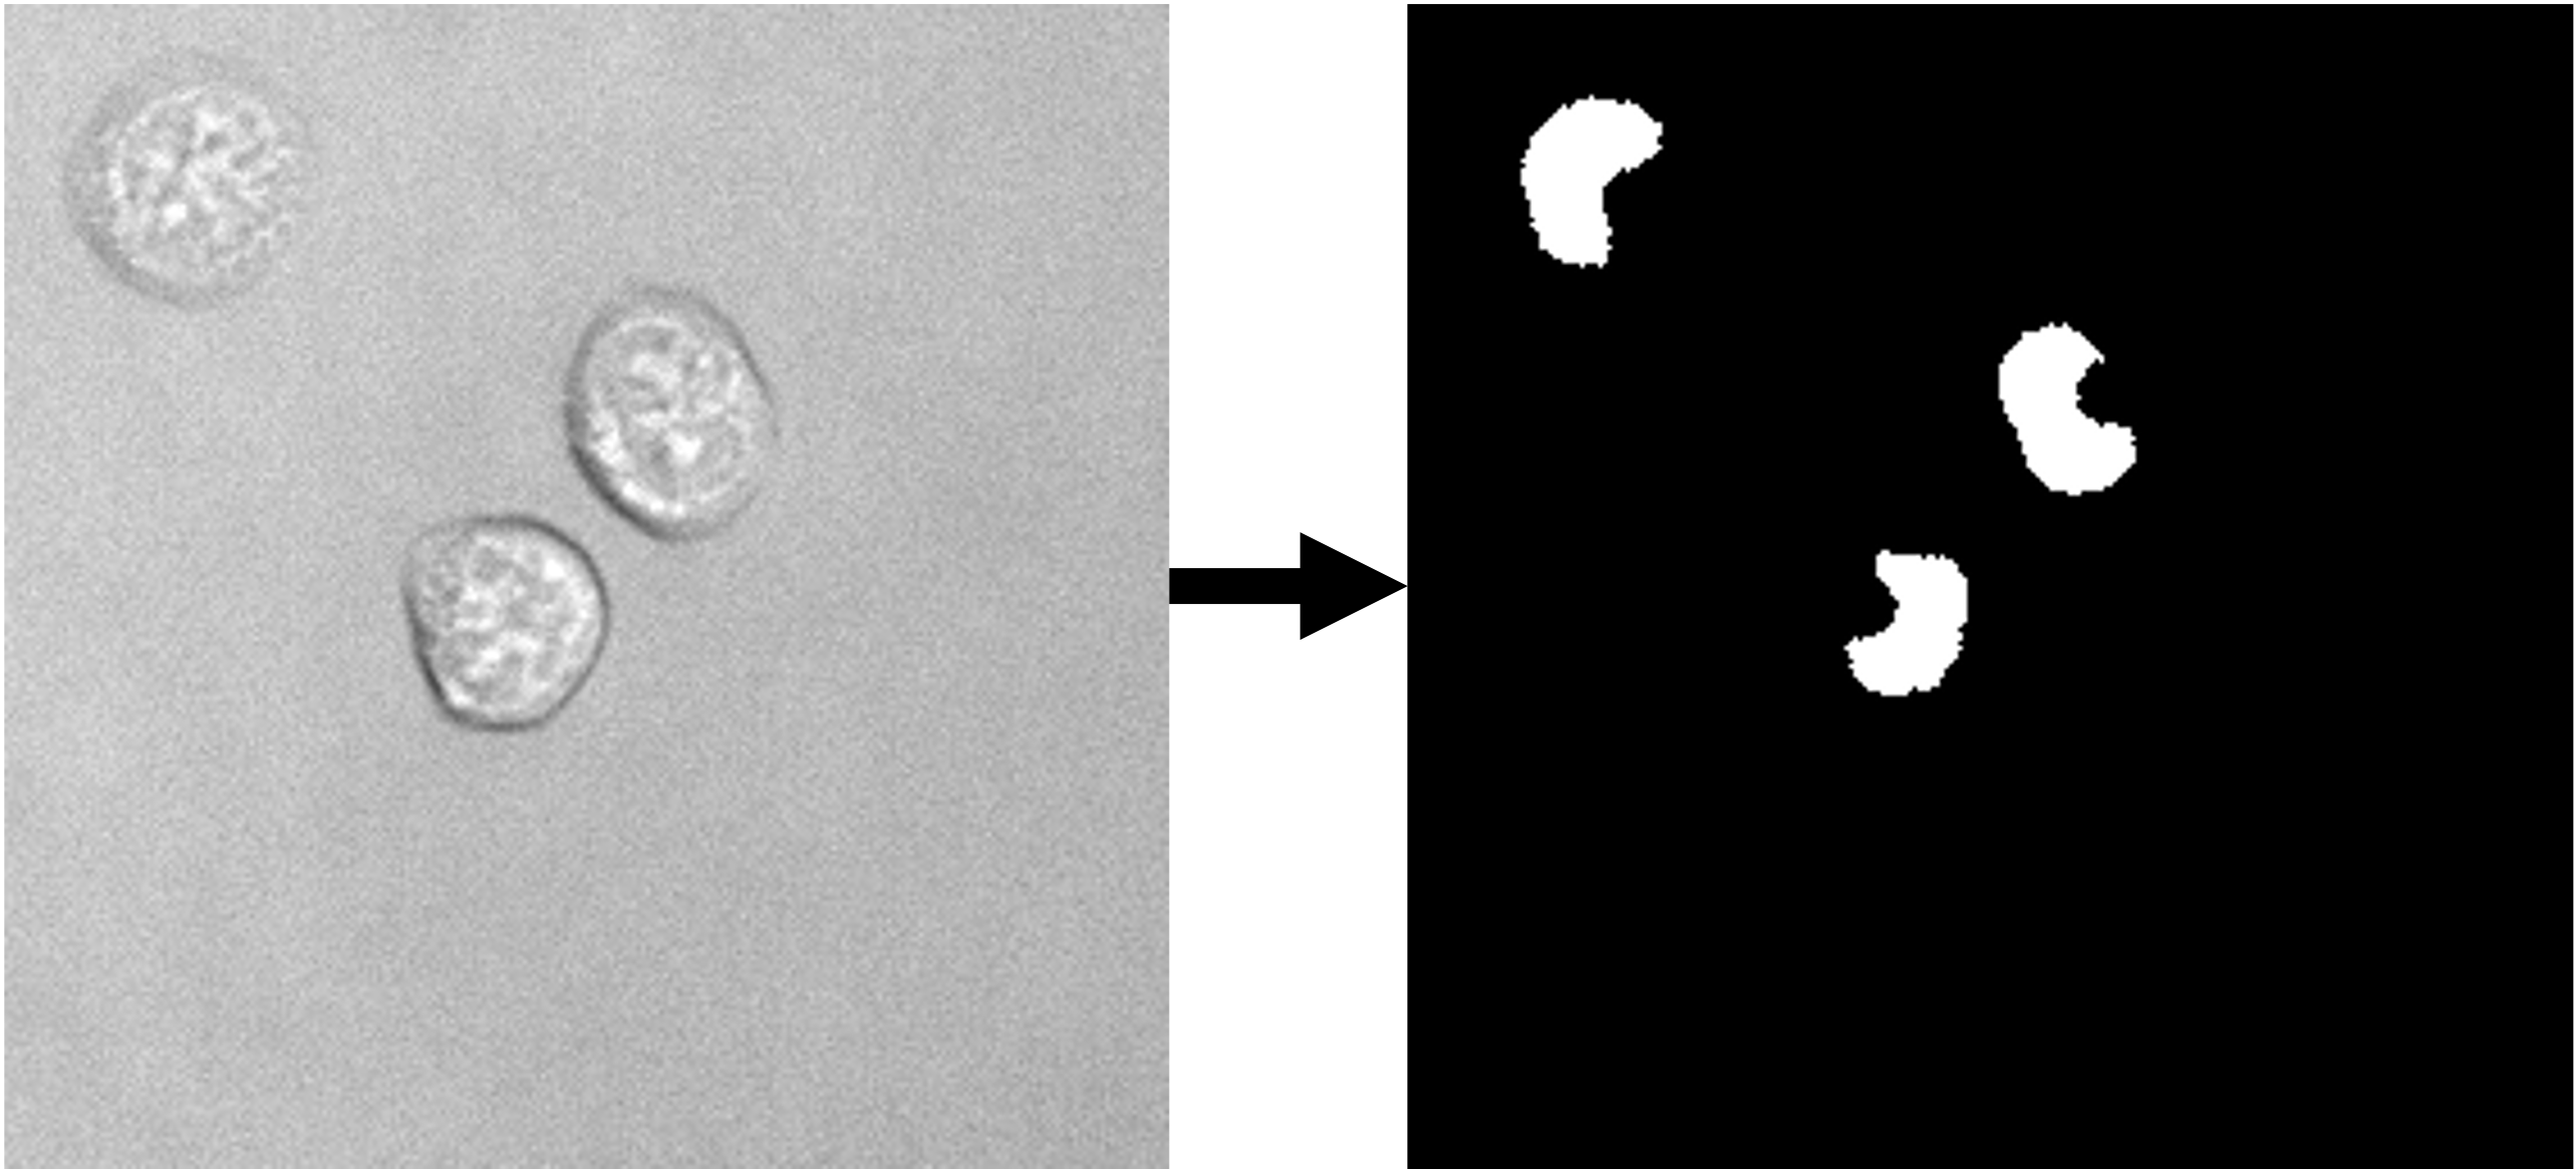 |
Trained on a data set (link to data set) of 9849 images (~620k nuclei). | ETH Research Collection |
| whole cell segmentation | 2D grayscale | 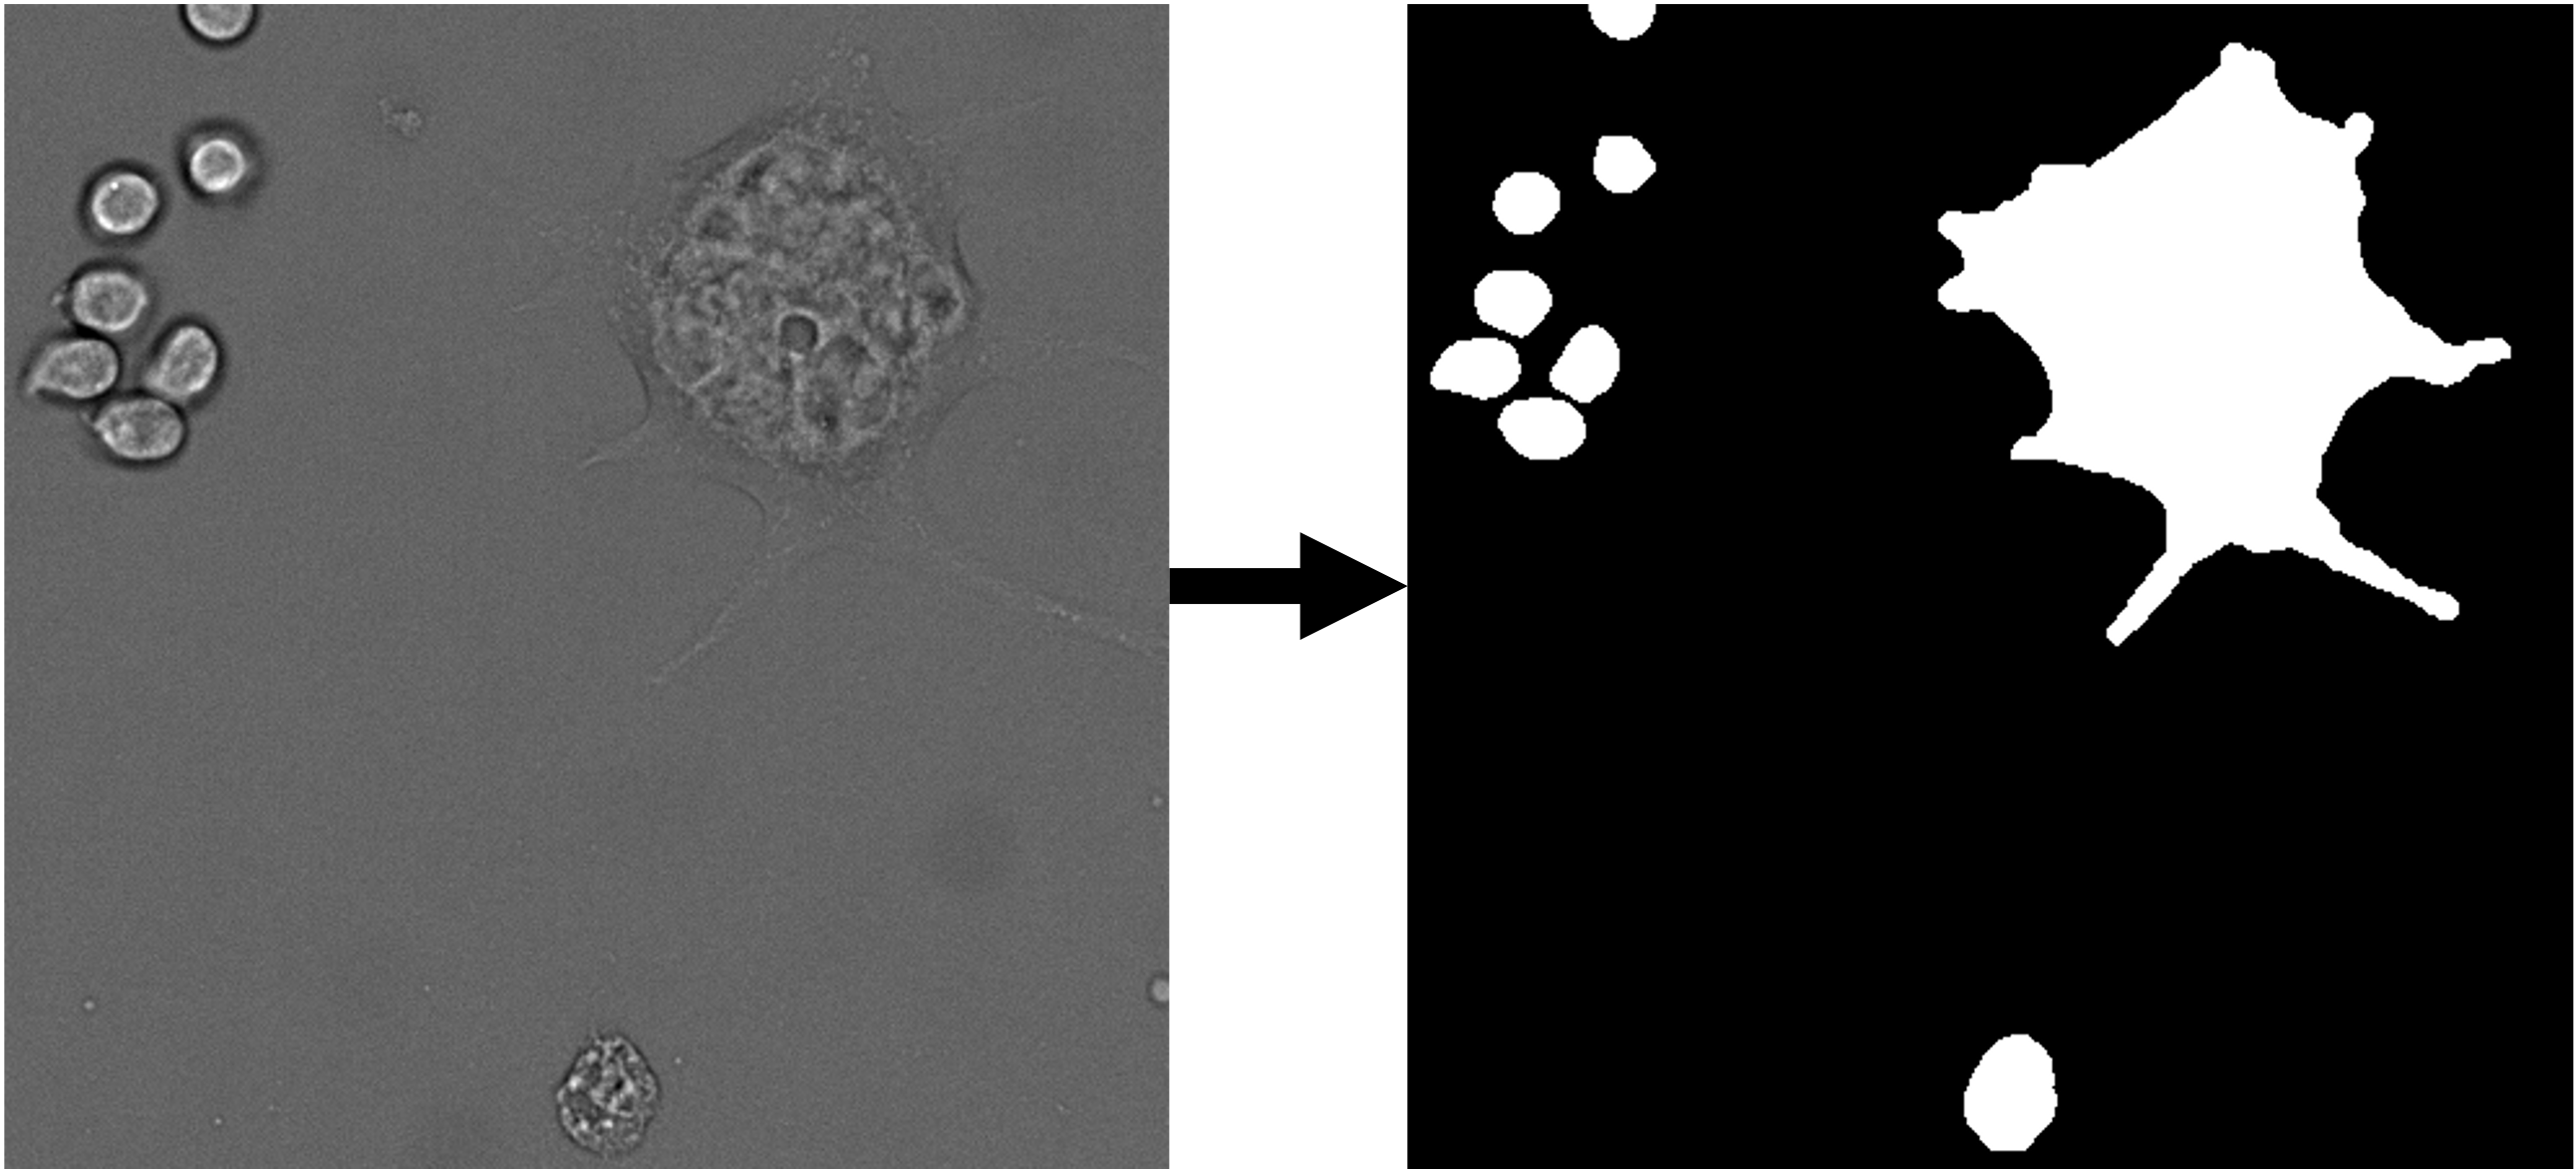 |
Trained on a data set (link to data set) of 224 images (~12k cells). | ETH Research Collection |
Testing
A trained U-Net can be tested with aisegcell_test. We provide a
notebook on how to test
with U-Net. aisegcell_test returns predicted masks and performance metrics. aisegcell_test can be called with the
following arguments:
--help: show help message--data: Path to CSV file containing test image file paths. The CSV file must have the columnsbfand--mask.--model: Path to checkpoint file of trainedlightning.LightningModule.--suffix: Suffix to append to all mask file names.--output_base_dir: Path to output directory.--devices: Devices to use for model training. If you want to use GPU(s) you have to provideintIDs. Multiple GPU IDs have to be listed separated by spacebar (e.g.2 5 9). If multiple GPUs are provided only the first ID will be used. If you want to use the CPU you have to use "cpu". Default is "cpu".
Make sure to activate the virtual environment created during installation before calling
aisegcell_test.
Consider the following example:
# activate the virtual environment
conda activate aisegcell

# generate CSV file for data
aisegcell_generate_list \
  --bf "/path/to/test_images/*.png" \
  --mask "/path/to/test_masks/*.png" \
  --out /path/to/output_directory \
  --prefix test

# run testing
aisegcell_test \
  --data /path/to/output_directory/test_paths.csv \
  --model /path/to/checkpoint/file.ckpt \
  --suffix mask \
  --output_base_dir /path/to/results/folder \
  --devices 0 # predict with GPU 0
The output of aisegcell_test will be stored in subdirectories lightning_logs/version_{ID}/ at
--output_base_dir. Its contents are:
hparams.yaml: stores hyper-parameters of the model (used bylightning.LightningModule)metrics.csv: contains all metrics tracked during testing. Column IDs are identical tometrics.csvduring trainingtest_masks: directory containing segmentation masks obtained from U-Net
Predicting
A trained U-Net can used for predictions with aisegcell_predict. We provide a
notebook on how to
predict with U-Net. aisegcell_predict returns only predicted masks (no metrics) and can be called with the following
arguments:
--help: show help message--data: Path to CSV file containing predict image file paths. The CSV file must have the columnbf. If the CSV file contains additional columns (e.g.mask) they will be ignored.--model: Path to checkpoint file of trainedlightning.LightningModule.--suffix: Suffix to append to all mask file names.--output_base_dir: Path to output directory.--devices: Devices to use for model training. If you want to use GPU(s) you have to provideintIDs. Multiple GPU IDs have to be listed separated by spacebar (e.g.2 5 9). If multiple GPUs are provided only the first ID will be used. If you want to use the CPU you have to use "cpu". Default is "cpu".
Make sure to activate the virtual environment created during installation before calling
aisegcell_predict.
Consider the following example:
# activate the virtual environment
conda activate aisegcell

# generate CSV file for data
aisegcell_generate_list \
  --bf "/path/to/predict_images/*.png" \
  --mask "/path/to/predict_images/*.png" # necessary to provide "--mask" for aisegcell_generate_list but will be
  ignored by aisegcell_predict \
  --out /path/to/output_directory \
  --prefix predict

# run prediction
aisegcell_predict \
  --data /path/to/output_directory/predict_paths.csv \
  --model /path/to/checkpoint/file.ckpt \
  --suffix mask \
  --output_base_dir /path/to/results/folder \
  --devices 0 # predict with GPU 0
The output of aisegcell_predict will be stored in subdirectories lightning_logs/version_{ID}/ at
--output_base_dir. Its contents are:
hparams.yaml: stores hyper-parameters of the model (used bylightning.LightningModule)predicted_masks: directory containing segmentation masks obtained from U-Net
napari plugin
aisegcell_predict is also available as a plug-in for napari (link to napari-hub page and github page).
Image annotation tools
Available tools to annotate segmentations include:
Troubleshooting & support
In case you are experiencing issues with aisegcell inform us via the issue tracker.
Before you submit an issue, check if it has been addressed in a previous issue.
Citation
t.b.d.
Release history Release notifications | RSS feed


Download files
Download the file for your platform. If you're not sure which to choose, learn more about installing packages.
Source Distribution
Built Distribution
Filter files by name, interpreter, ABI, and platform.
If you're not sure about the file name format, learn more about wheel file names.
Copy a direct link to the current filters
File details
Details for the file aisegcell-0.3.0.tar.gz.
File metadata
- Download URL: aisegcell-0.3.0.tar.gz
- Upload date:
- Size: 2.4 MB
- Tags: Source
- Uploaded using Trusted Publishing? No
- Uploaded via: twine/6.2.0 CPython/3.13.7
File hashes
| Algorithm | Hash digest | |
|---|---|---|
| SHA256 |
2a8d3013e557b0ea4a85f07132ca39d5c7a54d020e97afe5bc2d2d736b24f430
|
|
| MD5 |
230f54600854b10a72d75ee68eaa39ce
|
|
| BLAKE2b-256 |
72702a67e61ec573643671f2cc0fd87ff31b6cecc4a02809b8352c976d7c7930
|
File details
Details for the file aisegcell-0.3.0-py3-none-any.whl.
File metadata
- Download URL: aisegcell-0.3.0-py3-none-any.whl
- Upload date:
- Size: 31.1 kB
- Tags: Python 3
- Uploaded using Trusted Publishing? No
- Uploaded via: twine/6.2.0 CPython/3.13.7
File hashes
| Algorithm | Hash digest | |
|---|---|---|
| SHA256 |
65e89f4beeff11e1ef319099961128173c4863a7dfb58640c49a65b4f2ec1662
|
|
| MD5 |
c9d30bd4f87d2f3816fda641a50565cd
|
|
| BLAKE2b-256 |
a18b6e52e1cea3987cca73b3113736bc81578d512aebc51e79bc357419f57eaa
|


