
# allianceauth_oidc
Allianceauth OIDC Provider
Features
- OIDC / OAuth2
- Scopes Available
- openid
- profile
- Includes
groupsclaim with all a members groups and state as a list of strings
- Includes
- Scopes Available
- Application level permissions
- global access
- State access
- group access
Example
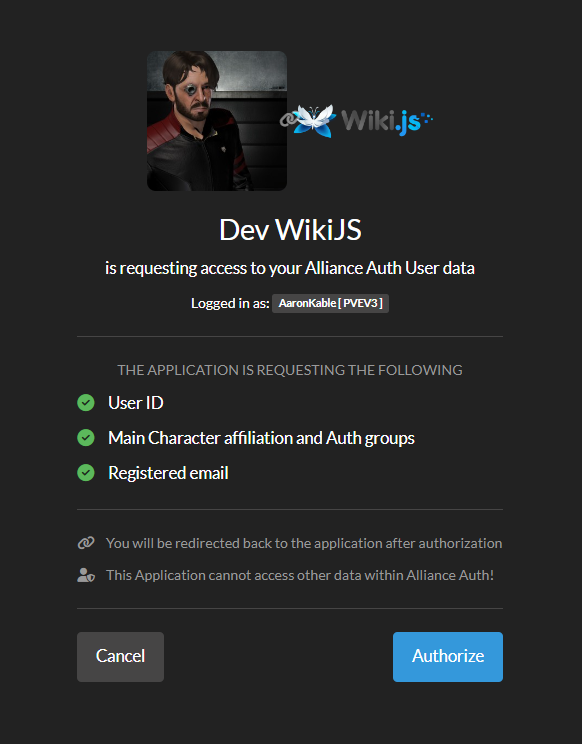
Setup/Install:
-
pip install allianceauth-oidc-provider -
add to INSTALLED_APPS
'allianceauth_oidc', 'oauth2_provider', -
Extra Settings Required
 # at the top of the file
 from pathlib import Path

 # Add these to the file further down
OAUTH2_PROVIDER_APPLICATION_MODEL='allianceauth_oidc.AllianceAuthApplication'
OAUTH2_PROVIDER = {
"OIDC_ENABLED": True, # https://django-oauth-toolkit.readthedocs.io/en/stable/oidc.html#creating-rsa-private-key
"OIDC_RSA_PRIVATE_KEY": Path("/path/to/key/file").read_text(), ## Load your private key
"OAUTH2_VALIDATOR_CLASS": "allianceauth_oidc.auth_provider.AllianceAuthOAuth2Validator",
"SCOPES": {
"openid": "User Profile",
"email": "Registered email",
"profile": "Main Character affiliation and Auth groups"
},
"PKCE_REQUIRED": False,
"APPLICATION_ADMIN_CLASS": "allianceauth_oidc.admin.ApplicationAdmin",
'ACCESS_TOKEN_EXPIRE_SECONDS': 60,
'REFRESH_TOKEN_EXPIRE_SECONDS': 24*60*60,
'ROTATE_REFRESH_TOKEN': True,
}
Please see this for more info on creating and managing a private key
- Add the endpoints to your
urls.py
path('o/', include('allianceauth_oidc.urls', namespace='oauth2_provider')),
- run migrations
- restart auth
Application setup
The Big 4
- Authorization:
https://your.url/o/authorize/ - Token:
https://your.url/o/token/ - Profile:
https://your.url/o/userinfo/ - Issuer
https://your.url/o/
Claims
openid profile email
Claim key mapping
nameEve Main Character Name ( Profile Grant? )emailRegistered email on auth ( Email Grant )groupsList of all groups with the members state thrown in too ( Profile Grant )subPK of user model
Create an application
Before configuring the external application you want to go on your auth admin pannel at /admin/allianceauth_oidc and create a new alliance auth application.
Usercan be set to 1, this is a parameter for the upstream library not used in this applicationclient typeshould be confidentialauthorization grant typeshould beAuthorization codeClient secretneeds to be saved somewhere before hitting save if you leave the hashing on (it won't be displayed again)Algorithm:RSA with SHA-2 256
Then you can set which states or group can access this application.
Note that they will also need the allianceauth_oidc.access_oidc role to access any application.
WikiJS
Manually create and groups you care for your users to have in the wiki and the service will map them for you. This greatly cuts down on group spam.
in auth create Administrators to give access to the full wiki admin site.
Administration > Authentication > Generic OpenID Connect / OAuth2
- Skip User Profile
off - Email claim
email - Display Name Claim
name - Map Groups
on - Groups Claim
groups - Allow Self Registration
on
Grafana
Tested only with access no group mapping as yet
Group>Team mapping requires Grafana cloud or Enterprise and is outside of the scope of this doc.
/etc/grafana/grafana.ini
[server]
root_url = <URL of your grafana server>

[auth.generic_oauth]
enabled = true
name = <Your Auth Name>
allow_sign_up = true
client_id = <client id from the application>
client_secret = <client secret from the application (unhashed)>
scopes = openid,email,profile
empty_scopes = false
email_attribute_path = email
name_attribute_path = name
auth_url = https://<your.auth.url>/o/authorize/
token_url = https://<your.auth.url>/o/token/
api_url = https://<your.auth.url>/o/userinfo/
Debugging an application
- Enable Debug Mode for the specific application in the auth admin site.
- then in your
gunicorn.loglook for long lines similar to this after you attempt to log in,
[01/Jan/2099 00:00:05] WARNING [allianceauth_oidc.signals:12] {"access_token": "abcdefghijklmnopqrstuvwxyz", "expires_in": 60, "token_type": "Bearer", "scope": "openid profile email", "refresh_token": "abcdefghijklmnopqrstuvwxyz", "id_token": "long ass string here"}
- take the
id_tokenfield and paste it into https://jwt.io/ to debug the data being sent to the application. it should be fairly self explanitory expect for these 2 fields.
issis the issuer that must match exactly in the applications own settings.subis your user id if you need to debug why user is being sent.
If you want to check the token signature on jwt.io and lost your public key your can use:
ssh-keygen -y -e -m pem -f /path/to/key/file
This will output the public key in the PEM format for jwt.io to check the signature.
1 maintainer

Download files
Download the file for your platform. If you're not sure which to choose, learn more about installing packages.
Source Distribution
Built Distribution
Filter files by name, interpreter, ABI, and platform.
If you're not sure about the file name format, learn more about wheel file names.
Copy a direct link to the current filters
File details
Details for the file allianceauth_oidc_provider-0.0.3.tar.gz.
File metadata
- Download URL: allianceauth_oidc_provider-0.0.3.tar.gz
- Upload date:
- Size: 27.9 kB
- Tags: Source
- Uploaded using Trusted Publishing? No
- Uploaded via:
twine/6.2.0 CPython/3.11.15
File hashes
| Algorithm | Hash digest | |
|---|---|---|
| SHA256 |
806f65f55bb87eaaf0351d87640724127c8ea2a4f46bf792678c5699b4ba8501
|
|
| MD5 |
86da2442d49fc75dcf18e0d533841d7f
|
|
| BLAKE2b-256 |
4ebe0afd7d2906651b4ff43ca4566c13b94cc9c33049aa4544811559179c22e0
|
File details
Details for the file allianceauth_oidc_provider-0.0.3-py2.py3-none-any.whl.
File metadata
- Download URL: allianceauth_oidc_provider-0.0.3-py2.py3-none-any.whl
- Upload date:
- Size: 24.8 kB
- Tags: Python 2, Python 3
- Uploaded using Trusted Publishing? No
- Uploaded via:
twine/6.2.0 CPython/3.11.15
File hashes
| Algorithm | Hash digest | |
|---|---|---|
| SHA256 |
fe0049aed651ec7dc5769a78ccac76653909f582b41c067316c664f6c47d3957
|
|
| MD5 |
da2b979eaa17523c749c7c3aee822844
|
|
| BLAKE2b-256 |
fdd92a2e38616cb96f0ab23f670effc5eef60b8bec602acfb9eb096677e271d8
|







