Optical character recognition model for Tensorflow based on Visual Attention.

Project description
# Attention-based OCR
Visual attention-based OCR model for image recognition with additional tools for creating TFRecords datasets and exporting the trained model with weights as a [SavedModel](https://www.tensorflow.org/api_docs/python/tf/saved_model) or a frozen graph.
## Acknowledgements
This project is based on a model by [Qi Guo](http://qiguo.ml) and [Yuntian Deng](https://github.com/da03). You can find the original model in the [da03/Attention-OCR](https://github.com/da03/Attention-OCR) repository.
## The model
Authors: [Qi Guo](http://qiguo.ml) and [Yuntian Deng](https://github.com/da03).
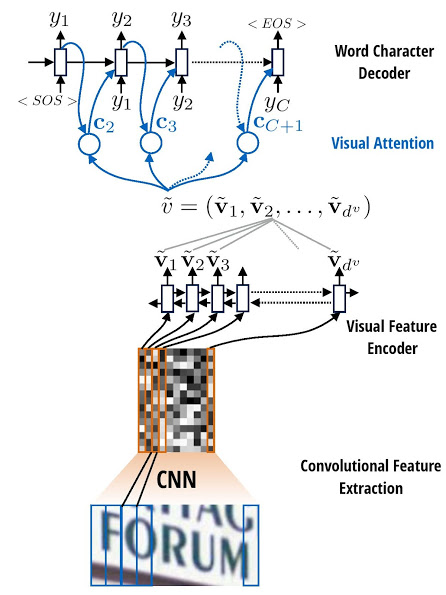
The model first runs a sliding CNN on the image (images are resized to height 32 while preserving aspect ratio). Then an LSTM is stacked on top of the CNN. Finally, an attention model is used as a decoder for producing the final outputs.
## Installation
```
pip install aocr
```
Note: Tensorflow 1.2 and Numpy will be installed as dependencies. Additional dependencies are `PIL`/`Pillow`, `distance`, and `six`.
## Usage
### Create a dataset
To build a TFRecords dataset, you need a collection of images and an annotation file with their respective labels.
```
aocr dataset datasets/annotations-training.txt datasets/training.tfrecords
aocr dataset datasets/annotations-testing.txt datasets/testing.tfrecords
```
Annotations are simple text files containing the image paths (either absolute or relative to your working dir) and their corresponding labels:
```
datasets/images/hello.jpg hello
datasets/images/world.jpg world
```
### Train
```
aocr train datasets/training.tfrecords
```
A new model will be created, and the training will start. Note that it takes quite a long time to reach convergence, since we are training the CNN and attention model simultaneously.
The `--steps-per-checkpoint` parameter determines how often the model checkpoints will be saved (the default output dir is `checkpoints/`).
**Important:** there is a lot of available training options. See the CLI help or the `parameters` section of this README.
### Test and visualize
```
aocr test datasets/testing.tfrecords
```
Additionally, you can visualize the attention results during testing (saved to `results/` by default):
```
aocr test --visualize datasets/testing.tfrecords
```
Example output images in `results/correct`:
Image 0 (j/j):

Image 1 (u/u):

Image 2 (n/n):

Image 3 (g/g):

Image 4 (l/l):

Image 5 (e/e):

### Export
```
aocr export exported-model
```
Load weights from the latest checkpoints and export the model into the `./exported-model` directory.
## Google Cloud ML Engine
To train the model in the [Google Cloud Machine Learning Engine](https://cloud.google.com/ml-engine/), upload the training dataset into a Google Cloud Storage bucket and start a training job with the `gcloud` tool.
1. Set the environment variables:
```
# Prefix for the job name.
export JOB_PREFIX="aocr"
# Region to launch the training job in.
# Should be the same as the storage bucket region.
export REGION="us-central1"
# Your storage bucket.
export GS_BUCKET="gs://aocr-bucket"
# Path to store your training dataset in the bucket.
export DATASET_UPLOAD_PATH="training.tfrecords"
```
2. Upload the training dataset:
```
gsutil cp datasets/training.tfrecords $GS_BUCKET/$DATASET_UPLOAD_PATH
```
3. Launch the ML Engine job:
```
export NOW=$(date +"%Y%m%d_%H%M%S")
export JOB_NAME="$JOB_PREFIX$NOW"
export JOB_DIR="$GS_BUCKET/$JOB_NAME"
gcloud ml-engine jobs submit training $JOB_NAME \
--job-dir=$JOB_DIR \
--module-name=aocr \
--package-path=aocr \
--region=$REGION \
--scale-tier=BASIC_GPU \
--runtime-version=1.2 \
-- \
--model-dir=$JOB_DIR \
train $GS_BUCKET/$DATASET_UPLOAD_PATH \
--steps-per-checkpoint=500 \
--batch-size=512 \
--num-epoch=20
```
## Parameters
### Global
* `log-path`: Path for the log file.
### Testing
* `visualize`: Output the attention maps on the original image.
### Exporting
* `format`: Format for the export (either `savedmodel` or `frozengraph`).
### Training
* `steps-per-checkpoint`: Checkpointing (print perplexity, save model) per how many steps
* `num-epoch`: The number of whole data passes.
* `batch-size`: Batch size.
* `initial-learning-rate`: Initial learning rate, note the we use AdaDelta, so the initial value does not matter much.
* `target-embedding-size`: Embedding dimension for each target.
* `attn-use-lstm`: Whether or not use LSTM attention decoder cell.
* `attn-num-hidden`: Number of hidden units in attention decoder cell.
* `attn-num-layers`: Number of layers in attention decoder cell. (Encoder number of hidden units will be `attn-num-hidden`*`attn-num-layers`).
* `target-vocab-size`: Target vocabulary size. Default is = 26+10+3 # 0: PADDING, 1: GO, 2: EOS, >2: 0-9, a-z
* `no-resume`: Create new weights even if there are checkpoints present.
* `max-gradient-norm`: Clip gradients to this norm.
* `no-gradient-clipping`: Do not perform gradient clipping.
* `gpu-id`: GPU to use.
* `use-gru`: Use GRU cells.
* `max-width`: Maximum width for the input images. WARNING: images with the width higher than maximum will be discarded.
* `max-height`: Maximum height for the input images.
* `max-prediction`: Maximum length of the predicted word/phrase.
## References
[Convert a formula to its LaTex source](https://github.com/harvardnlp/im2markup)
[What You Get Is What You See: A Visual Markup Decompiler](https://arxiv.org/pdf/1609.04938.pdf)
[Torch attention OCR](https://github.com/da03/torch-Attention-OCR)
Visual attention-based OCR model for image recognition with additional tools for creating TFRecords datasets and exporting the trained model with weights as a [SavedModel](https://www.tensorflow.org/api_docs/python/tf/saved_model) or a frozen graph.
## Acknowledgements
This project is based on a model by [Qi Guo](http://qiguo.ml) and [Yuntian Deng](https://github.com/da03). You can find the original model in the [da03/Attention-OCR](https://github.com/da03/Attention-OCR) repository.
## The model
Authors: [Qi Guo](http://qiguo.ml) and [Yuntian Deng](https://github.com/da03).
The model first runs a sliding CNN on the image (images are resized to height 32 while preserving aspect ratio). Then an LSTM is stacked on top of the CNN. Finally, an attention model is used as a decoder for producing the final outputs.

## Installation
```
pip install aocr
```
Note: Tensorflow 1.2 and Numpy will be installed as dependencies. Additional dependencies are `PIL`/`Pillow`, `distance`, and `six`.
## Usage
### Create a dataset
To build a TFRecords dataset, you need a collection of images and an annotation file with their respective labels.
```
aocr dataset datasets/annotations-training.txt datasets/training.tfrecords
aocr dataset datasets/annotations-testing.txt datasets/testing.tfrecords
```
Annotations are simple text files containing the image paths (either absolute or relative to your working dir) and their corresponding labels:
```
datasets/images/hello.jpg hello
datasets/images/world.jpg world
```
### Train
```
aocr train datasets/training.tfrecords
```
A new model will be created, and the training will start. Note that it takes quite a long time to reach convergence, since we are training the CNN and attention model simultaneously.
The `--steps-per-checkpoint` parameter determines how often the model checkpoints will be saved (the default output dir is `checkpoints/`).
**Important:** there is a lot of available training options. See the CLI help or the `parameters` section of this README.
### Test and visualize
```
aocr test datasets/testing.tfrecords
```
Additionally, you can visualize the attention results during testing (saved to `results/` by default):
```
aocr test --visualize datasets/testing.tfrecords
```
Example output images in `results/correct`:
Image 0 (j/j):

Image 1 (u/u):

Image 2 (n/n):

Image 3 (g/g):

Image 4 (l/l):

Image 5 (e/e):

### Export
```
aocr export exported-model
```
Load weights from the latest checkpoints and export the model into the `./exported-model` directory.
## Google Cloud ML Engine
To train the model in the [Google Cloud Machine Learning Engine](https://cloud.google.com/ml-engine/), upload the training dataset into a Google Cloud Storage bucket and start a training job with the `gcloud` tool.
1. Set the environment variables:
```
# Prefix for the job name.
export JOB_PREFIX="aocr"
# Region to launch the training job in.
# Should be the same as the storage bucket region.
export REGION="us-central1"
# Your storage bucket.
export GS_BUCKET="gs://aocr-bucket"
# Path to store your training dataset in the bucket.
export DATASET_UPLOAD_PATH="training.tfrecords"
```
2. Upload the training dataset:
```
gsutil cp datasets/training.tfrecords $GS_BUCKET/$DATASET_UPLOAD_PATH
```
3. Launch the ML Engine job:
```
export NOW=$(date +"%Y%m%d_%H%M%S")
export JOB_NAME="$JOB_PREFIX$NOW"
export JOB_DIR="$GS_BUCKET/$JOB_NAME"
gcloud ml-engine jobs submit training $JOB_NAME \
--job-dir=$JOB_DIR \
--module-name=aocr \
--package-path=aocr \
--region=$REGION \
--scale-tier=BASIC_GPU \
--runtime-version=1.2 \
-- \
--model-dir=$JOB_DIR \
train $GS_BUCKET/$DATASET_UPLOAD_PATH \
--steps-per-checkpoint=500 \
--batch-size=512 \
--num-epoch=20
```
## Parameters
### Global
* `log-path`: Path for the log file.
### Testing
* `visualize`: Output the attention maps on the original image.
### Exporting
* `format`: Format for the export (either `savedmodel` or `frozengraph`).
### Training
* `steps-per-checkpoint`: Checkpointing (print perplexity, save model) per how many steps
* `num-epoch`: The number of whole data passes.
* `batch-size`: Batch size.
* `initial-learning-rate`: Initial learning rate, note the we use AdaDelta, so the initial value does not matter much.
* `target-embedding-size`: Embedding dimension for each target.
* `attn-use-lstm`: Whether or not use LSTM attention decoder cell.
* `attn-num-hidden`: Number of hidden units in attention decoder cell.
* `attn-num-layers`: Number of layers in attention decoder cell. (Encoder number of hidden units will be `attn-num-hidden`*`attn-num-layers`).
* `target-vocab-size`: Target vocabulary size. Default is = 26+10+3 # 0: PADDING, 1: GO, 2: EOS, >2: 0-9, a-z
* `no-resume`: Create new weights even if there are checkpoints present.
* `max-gradient-norm`: Clip gradients to this norm.
* `no-gradient-clipping`: Do not perform gradient clipping.
* `gpu-id`: GPU to use.
* `use-gru`: Use GRU cells.
* `max-width`: Maximum width for the input images. WARNING: images with the width higher than maximum will be discarded.
* `max-height`: Maximum height for the input images.
* `max-prediction`: Maximum length of the predicted word/phrase.
## References
[Convert a formula to its LaTex source](https://github.com/harvardnlp/im2markup)
[What You Get Is What You See: A Visual Markup Decompiler](https://arxiv.org/pdf/1609.04938.pdf)
[Torch attention OCR](https://github.com/da03/torch-Attention-OCR)
Release history Release notifications | RSS feed


Download files
Download the file for your platform. If you're not sure which to choose, learn more about installing packages.
Source Distribution
aocr-0.2.1.tar.gz
(26.8 kB
view details)
File details
Details for the file aocr-0.2.1.tar.gz.
File metadata
- Download URL: aocr-0.2.1.tar.gz
- Upload date:
- Size: 26.8 kB
- Tags: Source
- Uploaded using Trusted Publishing? No
File hashes
| Algorithm | Hash digest | |
|---|---|---|
| SHA256 |
c712b892954a06c8d60009589a58224f314299c6a8595cd6f3d50a57066c76c9
|
|
| MD5 |
4de6b706d5509805b11e5dba9db4bfea
|
|
| BLAKE2b-256 |
a670a08e7b2d2eed95003481aba4d2a7edf452f082f0090638dea676f8e5219d
|


