
auto_model_monitor
训练等待多煎熬,邮件一响指标晓
监视模型训练时生成的权重文件,符合条件时发送QQ邮件通知。
使用场景
当你希望在模型训练过程中,当某个指标(例如验证集上的损失或准确率)低于/高于预设阈值时收到邮件通知。这有助于你及时了解模型的性能表现,以便进行必要的调整。
如何使用
安装依赖
pip install auto-model-monitor
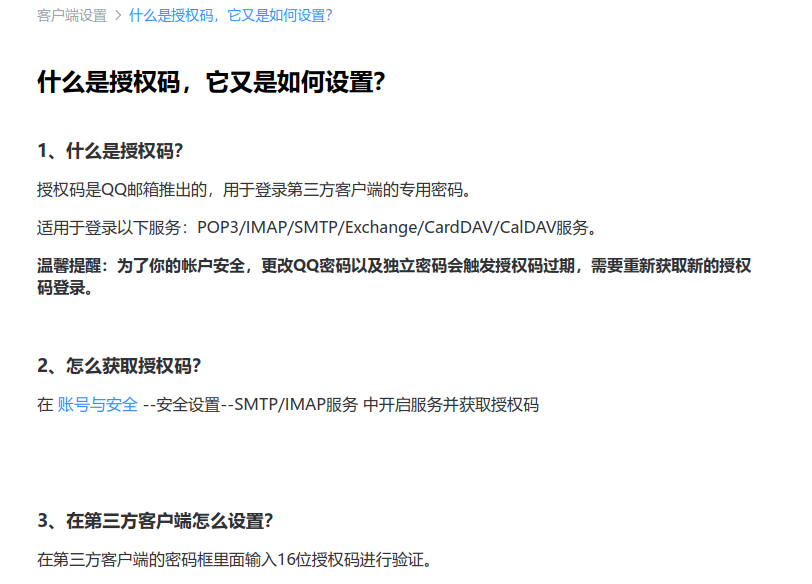
获取QQ授权码
为了给QQ邮箱发送邮件,你需要使用授权码而不是密码。你可以在QQ邮箱的设置中找到它。
https://service.mail.qq.com/detail/0/75
示例代码
上述配置后,你就可以使用代码了。
基础使用
测试代码在tests/basic_test.py
from auto_model_monitor import ModelMonitor, MonitorConfig, CustomParser

# 自定义解析器(TODO: 替换为你的自定义解析器')
parser = CustomParser(pattern=r'val_loss_([0-9.]+)_')

# 配置参数
config = MonitorConfig(
    watch_dir='./quicktest/logs',     # 监控的文件夹路径
    threshold=0.004,                  # 阈值
    sender='aaaa@qq.com',       # 发送邮箱
    receiver='aaaa@qq.com',     # 接收邮箱
    auth_code='xxxx',                 # 邮箱授权码(TODO: 替换为你的授权码')
    check_interval=5,                 # 检查间隔 (秒)
    log_dir='model_monitor_logs',     # 日志文件夹路径
    comparison_mode='lower',          # 比较模式
    parser=parser                     # 使用自定义解析器
)

# 初始化并启动监控器
monitor = ModelMonitor(config)
monitor.start_monitoring()
配置参数说明
在使用前,需通过 MonitorConfig 配置以下参数:
| 参数名 | 含义说明 | 示例/取值范围 |
|---|---|---|
watch_dir |
需要监控的文件夹路径(日志文件所在目录) | ./quicktest/logs(相对路径) |
threshold |
触发监控动作的阈值(根据业务场景定义,比如指标波动阈值) | 0.004(数值型,根据需求调整) |
sender |
发送通知的邮箱地址 | aaaa@qq.com |
receiver |
接收通知的邮箱地址 | aaaa@qq.com |
auth_code |
发送邮箱的授权码(需在邮箱服务商处获取,如 QQ 邮箱的 SMTP 授权码) | xxxx(替换为实际授权码) |
check_interval |
监控检查的时间间隔(单位:秒) | 5(建议根据日志更新频率调整) |
log_dir |
项目自身运行日志的存储目录 | model_monitor_logs |
comparison_mode |
阈值比较模式('lower' 表示“低于阈值时触发”,'higher' 表示“高于时触发”) |
'lower' / 'higher' |
parser |
自定义日志解析器(需实现特定接口,用于解析 watch_dir 中的日志内容) |
需继承 BaseParser 类 |
当你的模型权重文件中的分数低于或高于阈值时,你将收到邮件通知。例如:
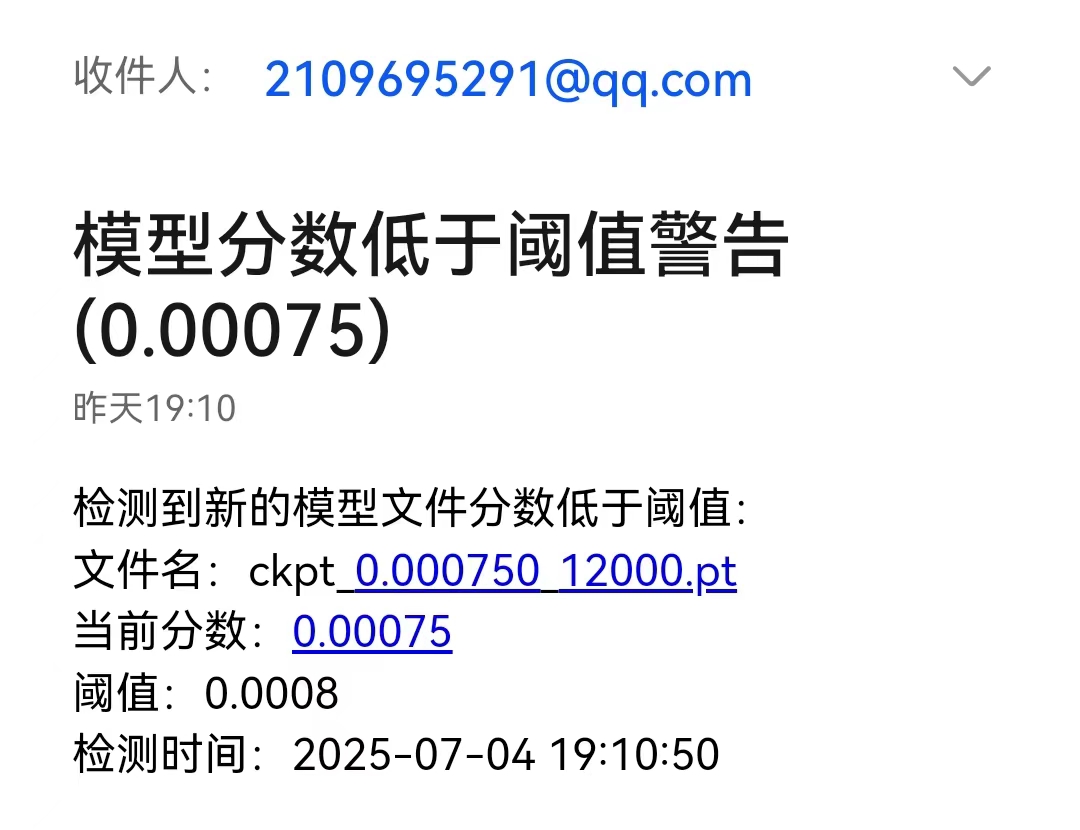
自定义使用1
你可以自定义邮件的主题和内容模板。例如:
from auto_model_monitor import ModelMonitor, MonitorConfig, CustomParser
# 自定义解析器
parser = CustomParser(pattern=r'val_loss_([0-9.]+)_')
# 自定义主题和内容模板
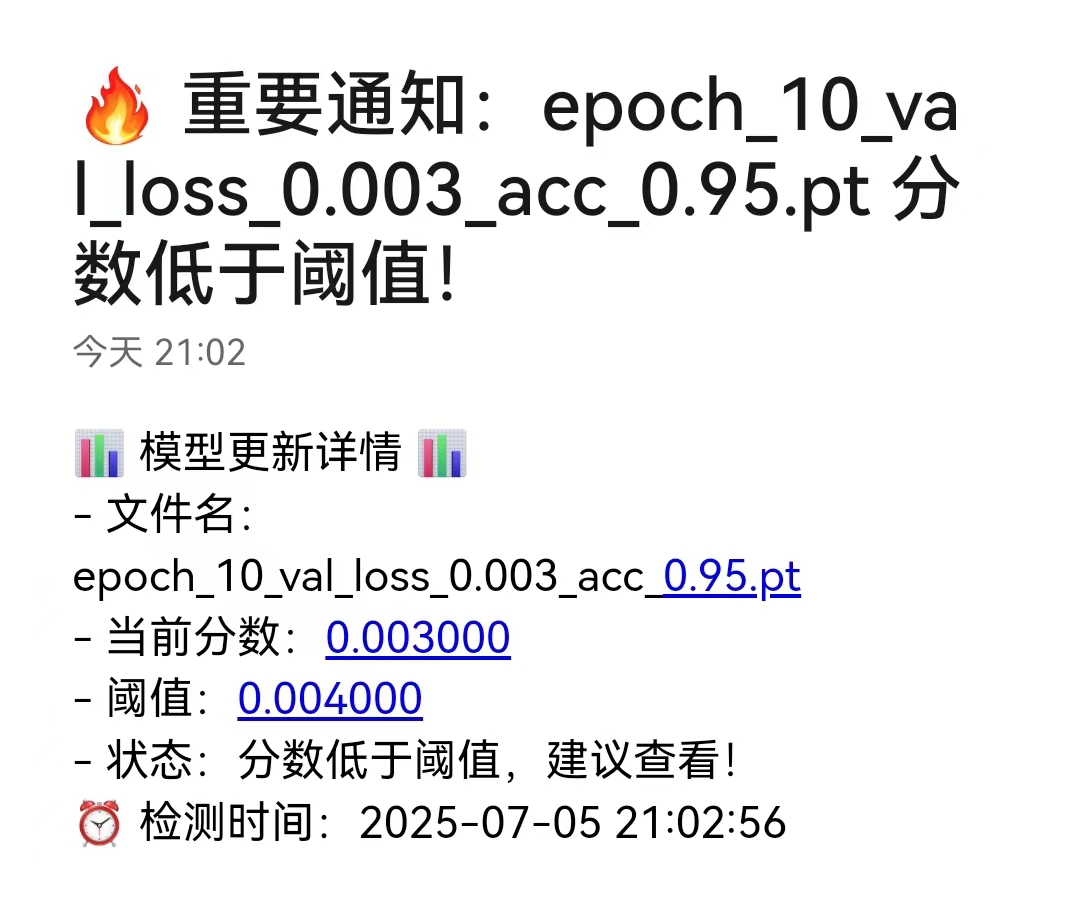
subject_template = "🔥 重要通知:{filename} 分数{condition}阈值!"

content_template = """
📊 模型更新详情 📊

- 文件名:{filename}
- 当前分数:{score:.6f}
- 阈值:{threshold:.6f}
- 状态:分数{condition}阈值,建议查看!

⏰ 检测时间:{timestamp}
"""

config = MonitorConfig(
    watch_dir='./quicktest/logs',             # 监控的文件夹路径
    threshold=0.004,                          # 阈值
    sender='2109695291@qq.com',               # 发送邮箱
    receiver='2109695291@qq.com',             # 接收邮箱
    auth_code='XXXX',                         # 邮箱授权码
    check_interval=10,                        # 检查间隔 (秒)
    log_dir='model_monitor_logs',             # 日志文件夹路径
    comparison_mode='lower',                  # 比较模式
    parser=parser,                            # 使用自定义解析器
    email_subject_template=subject_template,  # 设置主题模板
    email_content_template=content_template   # 设置内容模板
)
monitor = ModelMonitor(config)
monitor.start_monitoring()
收到的邮件内容如下所示:
自定义使用2
你可以自定义邮件的内容生成器。例如:
from auto_model_monitor import ModelMonitor, MonitorConfig, CustomParser
from datetime import datetime
from typing import Tuple, List

def custom_notification_generator(score: float, filename: str) -> Tuple[str, List[str]]:
    """根据分数和文件名生成自定义通知内容"""
    # 根据分数级别设置不同的优先级图标
    if score < 0.003:
        priority = "🔥🔥🔥 紧急"
        emoji = "🚀"
    elif score < 0.004:
        priority = "🚨 重要"
        emoji = "💡"
    else:
        priority = "ℹ️ 信息"
        emoji = "📌"

    # 主题
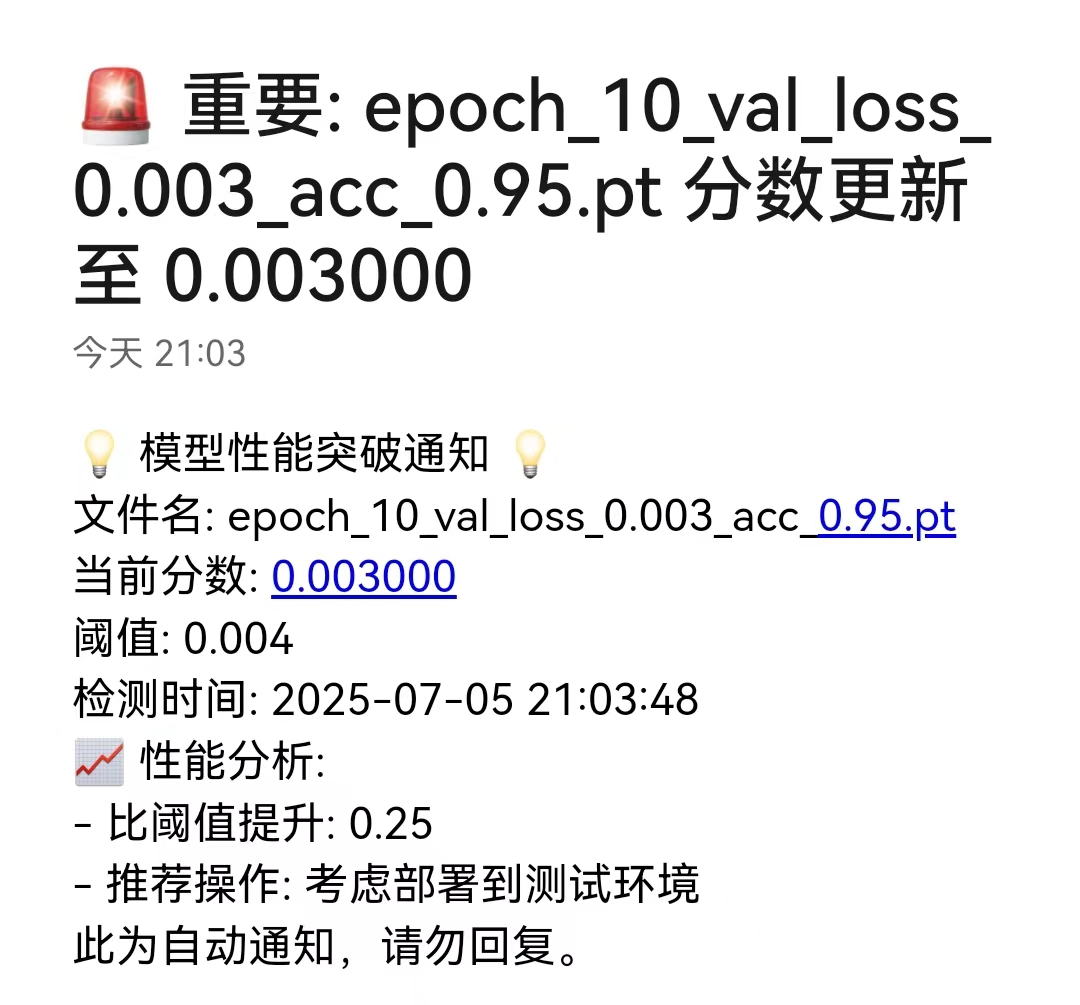
    subject = f"{priority}: {filename} 分数更新至 {score:.6f}"

    # 详细内容
    contents = [
        f"{emoji} 模型性能突破通知 {emoji}",
        "",
        f"文件名: {filename}",
        f"当前分数: {score:.6f}",
        f"阈值: 0.004",
        f"检测时间: {datetime.now().strftime('%Y-%m-%d %H:%M:%S')}",
        "",
        "📈 性能分析:",
        f"- 比阈值提升: {(0.004 - score) / 0.004 }",
        f"- 推荐操作: 考虑部署到测试环境",
        "",
        "此为自动通知,请勿回复。"
    ]

    return subject, contents
# 自定义解析器
parser = CustomParser(pattern=r'val_loss_([0-9.]+)_')

config = MonitorConfig(
    watch_dir='./quicktest/logs',                           # 监控的文件夹路径
    threshold=0.004,                                        # 阈值
    sender='2109695291@qq.com',                             # 发送邮箱
    receiver='2109695291@qq.com',                           # 接收邮箱
    auth_code='XXXX',                                       # 邮箱授权码
    check_interval=10,                                      # 检查间隔 (秒)
    log_dir='model_monitor_logs',                           # 日志文件夹路径
    comparison_mode='lower',                                # 比较模式
    parser=parser,                                          # 使用自定义解析器
    email_content_generator=custom_notification_generator   # 设置自定义通知生成器
)
monitor = ModelMonitor(config)
monitor.start_monitoring()
收到的邮件内容如下所示:
开发日志
2025-07-04 更新:
- 最初版本发布。
2025-07-05 更新:
- 代码重构。如果你需要重构前的代码,在tests/quicktest中查看。
- 代码打包,上传PyPI。
- 由于
model_monitor这个名字已经被占用,改为auto_model_monitor。 - 发布v0.2.0版本。
2025-07-15 更新:
- 完善README.md,将github图片变成网址。
PyPI库版本
v0.1.0
- 基础版本
v0.1.1
- 代码重构
v0.1.2
- 完善README.md
v0.2.0
- 添加自定义主题和内容,方便用户自定义邮件内容
v0.2.1
- 修复PyPI图片无法显示问题
v0.2.2
- 修复PyPI图片无法显示问题
1 maintainer

Metadata
1 maintainer
Release files for auto-model-monitor 0.2.2
For a detailed explanation of source distributions (sdists) and built distributions (wheels), please see the package formats documentation.
Source distribution (sdist)
| File | Size | Uploaded | Provenance | Actions |
|---|---|---|---|---|
| auto_model_monitor-0.2.2.tar.gz | 11.6 kB | Without provenance | Details for auto_model_monitor-0.2.2.tar.gz |
Built distribution (wheel)
| File | Interpreter | ABI | Platform | Actions Reset |
|---|---|---|---|---|
| auto_model_monitor-0.2.2-py3-none-any.whl | Python 3 | none | any | Details for auto_model_monitor-0.2.2-py3-none-any.whl |
Total release size: 21.5 kB
Release files / auto_model_monitor-0.2.2.tar.gz
| Download URL | auto_model_monitor-0.2.2.tar.gz |
|---|---|
| Size | 11.6 kB |
| Tags | Source |
|
SHA-256 checksum How to use checksums |
db2b889bd3adb964f5d105af8f369eb00ee6f76be4488f159d1c676d9e4c3b1f
|
|
BLAKE2b-256 checksum How to use checksums |
b568624319e1d325c56868b2015533031ac40ffef76637029d92ee9b8e6578d9
|
| Upload date | |
|
Uploaded using Trusted Publishing? What is trusted publishing? |
No |
| Uploaded via |
twine/6.1.0 CPython/3.8.10
|
Release files / auto_model_monitor-0.2.2-py3-none-any.whl
| Download URL | auto_model_monitor-0.2.2-py3-none-any.whl |
|---|---|
| Size | 9.8 kB |
| Tags | Python 3 |
|
SHA-256 checksum How to use checksums |
146c849e30987bfb43ff7dd357268350ac3deae6fd68891f28c34233a8762bb9
|
|
BLAKE2b-256 checksum How to use checksums |
a4d0cbbfb1efc39233a512a261531b7553250e9fa2d9b017ccaf69c447ed0b41
|
| Upload date | |
|
Uploaded using Trusted Publishing? What is trusted publishing? |
No |
| Uploaded via |
twine/6.1.0 CPython/3.8.10
|
Security for auto-model-monitor 0.2.2
Provenance
Provenance describes where a file came from. On PyPI, provenance is shared via attestations, which provide a verifiable record of the build or publishing details. View details, limitations and caveats.
No provenance found
None of the files in this release were uploaded with provenance metadata.
A note on package security
PyPI is a repository for distributing packages, not a service for auditing them. While third-party security researchers and our staff do their best to detect and remove malicious packages, PyPI cannot guarantee the quality, security or suitability of any given package.
To learn more about protecting yourself from malicious actors, visit our package security documentation.














