Automate PsychoPy experiments

Project description
Automating PsychoPy experiments in Builder
Introduction
When building inter-participant experiments with PsychoPy's GUI Builder, two issues may arise:
- The need for adapting the stimuli to different conditions, according to the group to which the participant is assigned.
- Automatically assigning participants to the experimental conditions, such that the amount of participants across the groups is balanced.
These issues can be addressed by adding extensive Python code to Code block available in the Builder. The goal of the autopsypy is to simplify this task, requiring an extremely low amount of Python code to be added to the experiment.
Installation
The autopsypy module is available at PyPI. It can be easily installed on Linux systems with this command, inside the same virtual environment that is used for PsychoPy:
python -m pip install autopsypy
In Windows systems, you might try to install it from PsychoPy, in the menu item Tools ⇒ Plugins/packages manager. If this does not work, download the wheel file for the latest version from PyPI, unzip it, and copy the directory autopsypy-<version>.dist-info and the files autopsypy.py into the site-packages directory of your PsychoPy installation (probably C:\Program Files\PsychoPy3\lib\site-packages)
The module has been tested against PsychoPy versions 2023.1.2, 2024.1.4, and 2024.2.1. It may work with other versions.
If you are using a standalone PsychoPy autopsypy.py, it may be that the module installed via pip is not found. In this case, add the path where autopsypy.pyis to the general section of the preferences. For details, see the PsychoPy documentation.
How it works
An example
Let us illustrate how the module works through a very simple example. Imagine that we wish to investigate the participant's preference between two images, say a daisy and a pine. We will present both images simultaneously on the screen during, say, 3 seconds and determine the fixation time on each image using, for instance, oculometric measurements. In order to avoid left/right preferences, we divide the participants into two groups. The daisy will be on the left side and the pine will be on the right side for the first group and vice-versa for the second group, as illustrated below:

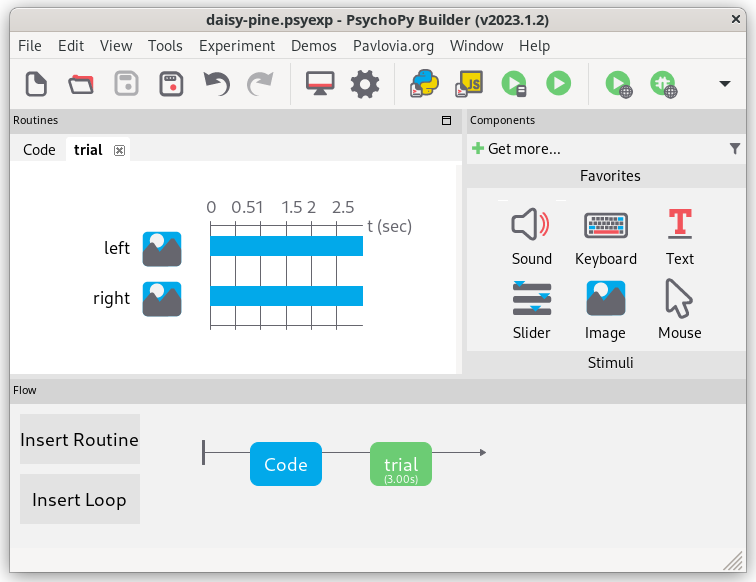
In PsychoPy's Builder, this is how a minimalist experiment would be set up, with two Image components and one Code component:
Specifying the conditions
The Code component, which must be placed in a separate routine located at the very beginning of the experiment, must contain, in its section “Begin Experiment”, the following code:
from autopsypy import AutoPsyPy
x = AutoPsyPy()
and must also contain, in its section “End Experiment”, the following code:
x.finish()
This will create a variable x of class AutoPsyPy. Any name can be used for the variable, x being only an example here. The autopsypy module will then open the comma-separated value (CSV) file conditions.csv that must exist in the current directory. Any other file name can be used through the argument conditions of AutoPsyPy(). The field delimiter of the CSV file can be specified by the csv_delimiter argument and defaults to the semicolon ";". There is also an optional argument desired_group_size, through which the experimenter declares the desired number of participants in each group. This argument, whose value defaults to infinity (∞), has only informational value (i.e. does not affect the behavior of autopsyy) and is shown at the end of the experiment. This helps experiments to check how far they are from the end of the study.
The conditions file must contain, in its first line, the names of the columns (that will be used later, see below) and each subsequent line will represent an experimental condition. In our example, the conditions file will look like this:
left;right
daisy.jpg;pine.png
pine.png;daisy.jpg
The names of the columns will be used in the settings of the Image blocks, more precisely in the “Image” fields of the Image routine properties. In the present example, it must be set to $x["left"] in the component labeled “left” and $x["right"] in the component labeled “right”.
Specifying the groups
The groups are defined by introducing variables in the “Experiment info” section of the Properties window (accessible by clicking on the gear icon of the PsychoPy Builder). The autopsypy module imposes the presence of a “participant” field (with that precise name). The experiment will stop if this field does not exist. A field with name either “condition” or “keep” is forbidden (the experiment will stop with an error message in this case). Any other field created will be used in the definitions of the groups.
Let us say that a field with name “age” was created in the Experiment info section and that participants would be either in the “young” group or in the “old” group, an information that will be provided by the experimenter when the session is started.
At the first time the experiment is run, a CSV file sessions.csv is created (or whichever name is specified through the sessions argument of AutoPsyPy()). This file will always have columns named participant, datetime, condition, and keep. In our present example, a forth column will be added, with name age. If the sessions file already exists, it will be read by the autopsypy module and is not recreated. This file keeps a record of which condition was selected for each participant. It can be edited at will between two consecutive sessions, for example for getting rid of a falling participant.
The condition column contains integers that indicate the selected lines of the conditions file. In our case, the value will be either 1 or 2 (for the daisy on the left side or on the right side, respectively). Let us say that three participants have already run the experiment, two “young” and one “old.” The sessions file will then look like the following:
participant;datetime;age;condition;keep
1;2023-09-05_10h53.01.058;young;1;yes
2;2023-09-06_12h33.38.161;old;1;yes
3;2023-09-06_16h56.26.312;young;2,yes
If the fourth participant is “young”, then condition 1 will be run. otherwise, if the fourth participant is “old”, then condition 2 will be run.
Extra fields can added to the Experiment info section and will contribute to the stratification of participants. For instance, if a new field “gender” is created with two possible values “male” and “female”, then autopsypy will consider that four groups exist (“young female”, “old female”, “young male”, and “old male”) and will balance the number of conditions 1 and 2 in each group.
At the end of the session, the chosen condition is shown to the user. Information on the size of each experimental group is also shown, alongside the desired size of the groups (the argument desired_group_size used when instantiating the variable of class AutoPsyPy, see above).
At any point of the study, the experimenter may decide that some participants must be excluded of the study (because, for instance, something went wrong during the session). There are two ways to exclude participants:
- by removing the respective lines from file
sessions.csv(or whichever name i has) or - by changing the corresponding
yesvalues in the columnkeepto anything else (for instance,no).
Demo
A demo is available in the demo/ directory, related to the example presented above. Please, feel free to play with it, in order to better understand the usage of autopsypy. In Linux and MacOS systems, the demo can be run with the following command, when launched from that directory:
$ psychopy daisy-pine.psyexp
Acknowledgments
Thanks to Jonathan Parente, for help in designing and testing the autopsypy module, and to Cristina-Ioana Galusca for the interesting suggestions for improvements.
Author
Copyright © 2023 Rafael Laboissière (rafael@laboissiere.net)

autopsypy is distributed under the terms of the terms of the GNU General Public License version 3 or later.
Release history Release notifications | RSS feed


Download files
Download the file for your platform. If you're not sure which to choose, learn more about installing packages.
Source Distribution
Built Distribution
Filter files by name, interpreter, ABI, and platform.
If you're not sure about the file name format, learn more about wheel file names.
Copy a direct link to the current filters
File details
Details for the file autopsypy-0.2.2.tar.gz.
File metadata
- Download URL: autopsypy-0.2.2.tar.gz
- Upload date:
- Size: 19.5 kB
- Tags: Source
- Uploaded using Trusted Publishing? No
- Uploaded via: twine/5.1.1 CPython/3.12.6
File hashes
| Algorithm | Hash digest | |
|---|---|---|
| SHA256 |
91ee49b9cff627825b68ab6296c8bb104a187aad655cf591a58d9c3828de4642
|
|
| MD5 |
8aac9ff2dd547a45f81096e23788d6d6
|
|
| BLAKE2b-256 |
faca34ed89930f590c0d170e55270752517d7073c77ed0bbf7e29dda825d6177
|
File details
Details for the file autopsypy-0.2.2-py3-none-any.whl.
File metadata
- Download URL: autopsypy-0.2.2-py3-none-any.whl
- Upload date:
- Size: 20.0 kB
- Tags: Python 3
- Uploaded using Trusted Publishing? No
- Uploaded via: twine/5.1.1 CPython/3.12.6
File hashes
| Algorithm | Hash digest | |
|---|---|---|
| SHA256 |
a1fe9b5223de9fb9e90d5f538960256c74b0901fa6820cc56233018306d4b228
|
|
| MD5 |
3696ed7c2c1e39d036abcfcf13d26654
|
|
| BLAKE2b-256 |
3fd013e5c4a4838cfed10d6b78d05a68d725b755c226de2c173f312bf5f2e6a7
|


