AWS CDK construct for hosting a Minecraft server Platform-as-a-Service.

Project description
awscdk-minecraft 🧱


The goal of this project is to make a single pip-installable package that allows anyone to provision an entire, cheap, Minecraft-server-hosting Platform as a Service to their personal Amazon Web Services account.
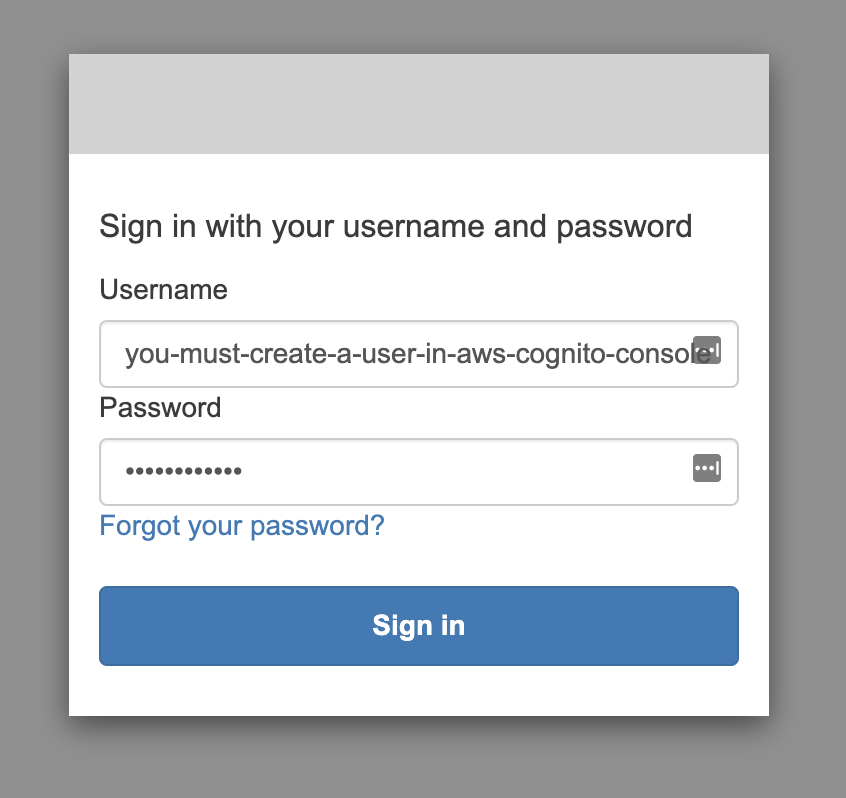
Login
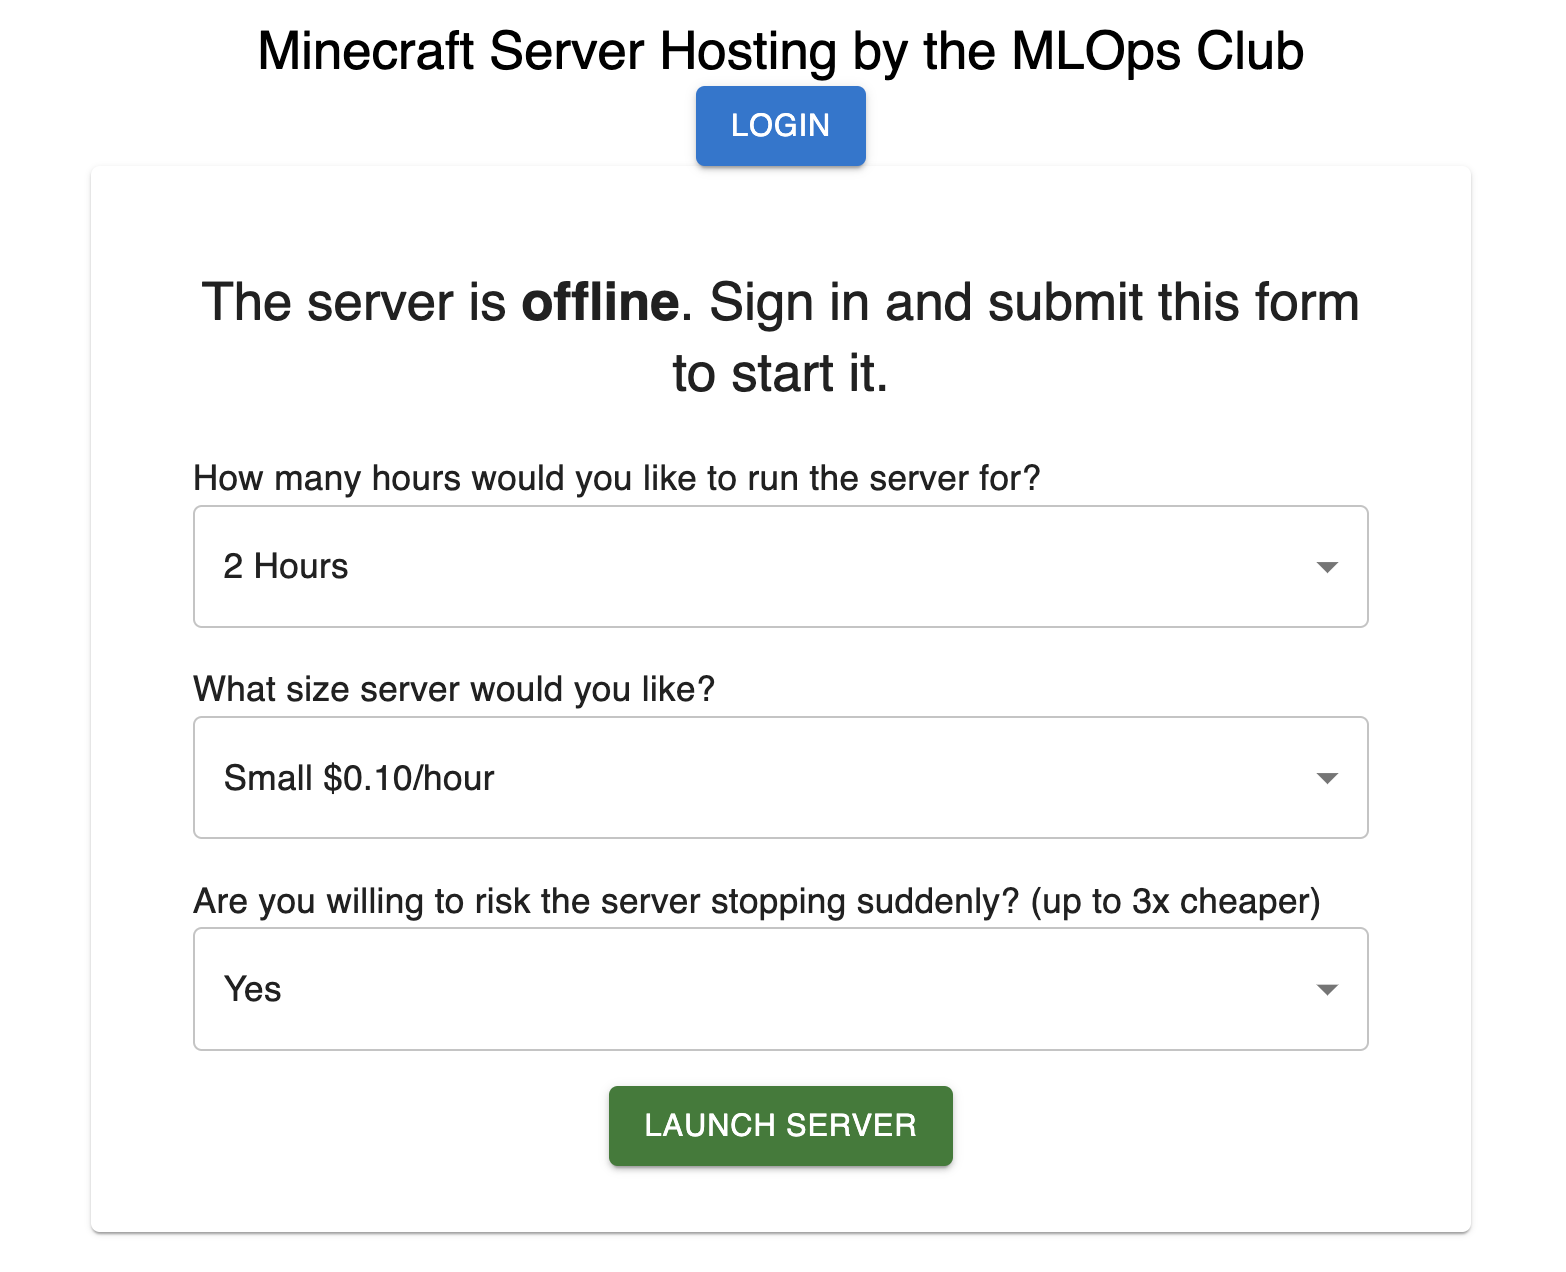
Start a server
Get the IP address
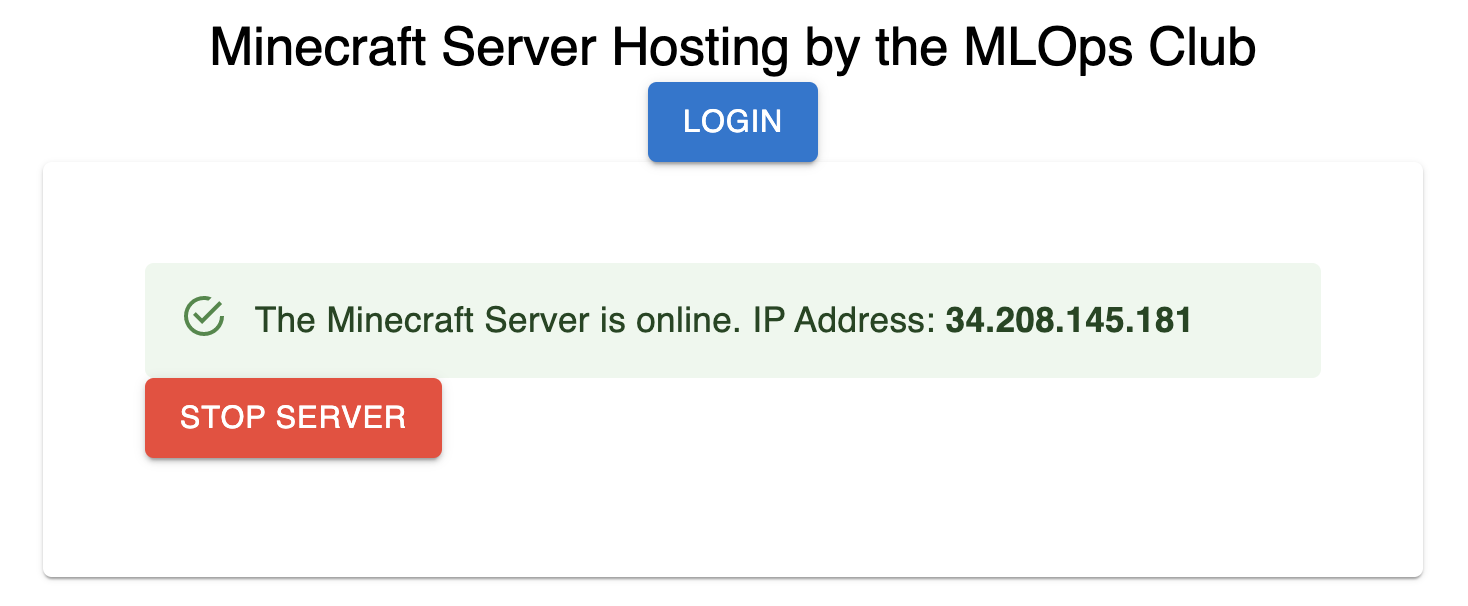
Connect
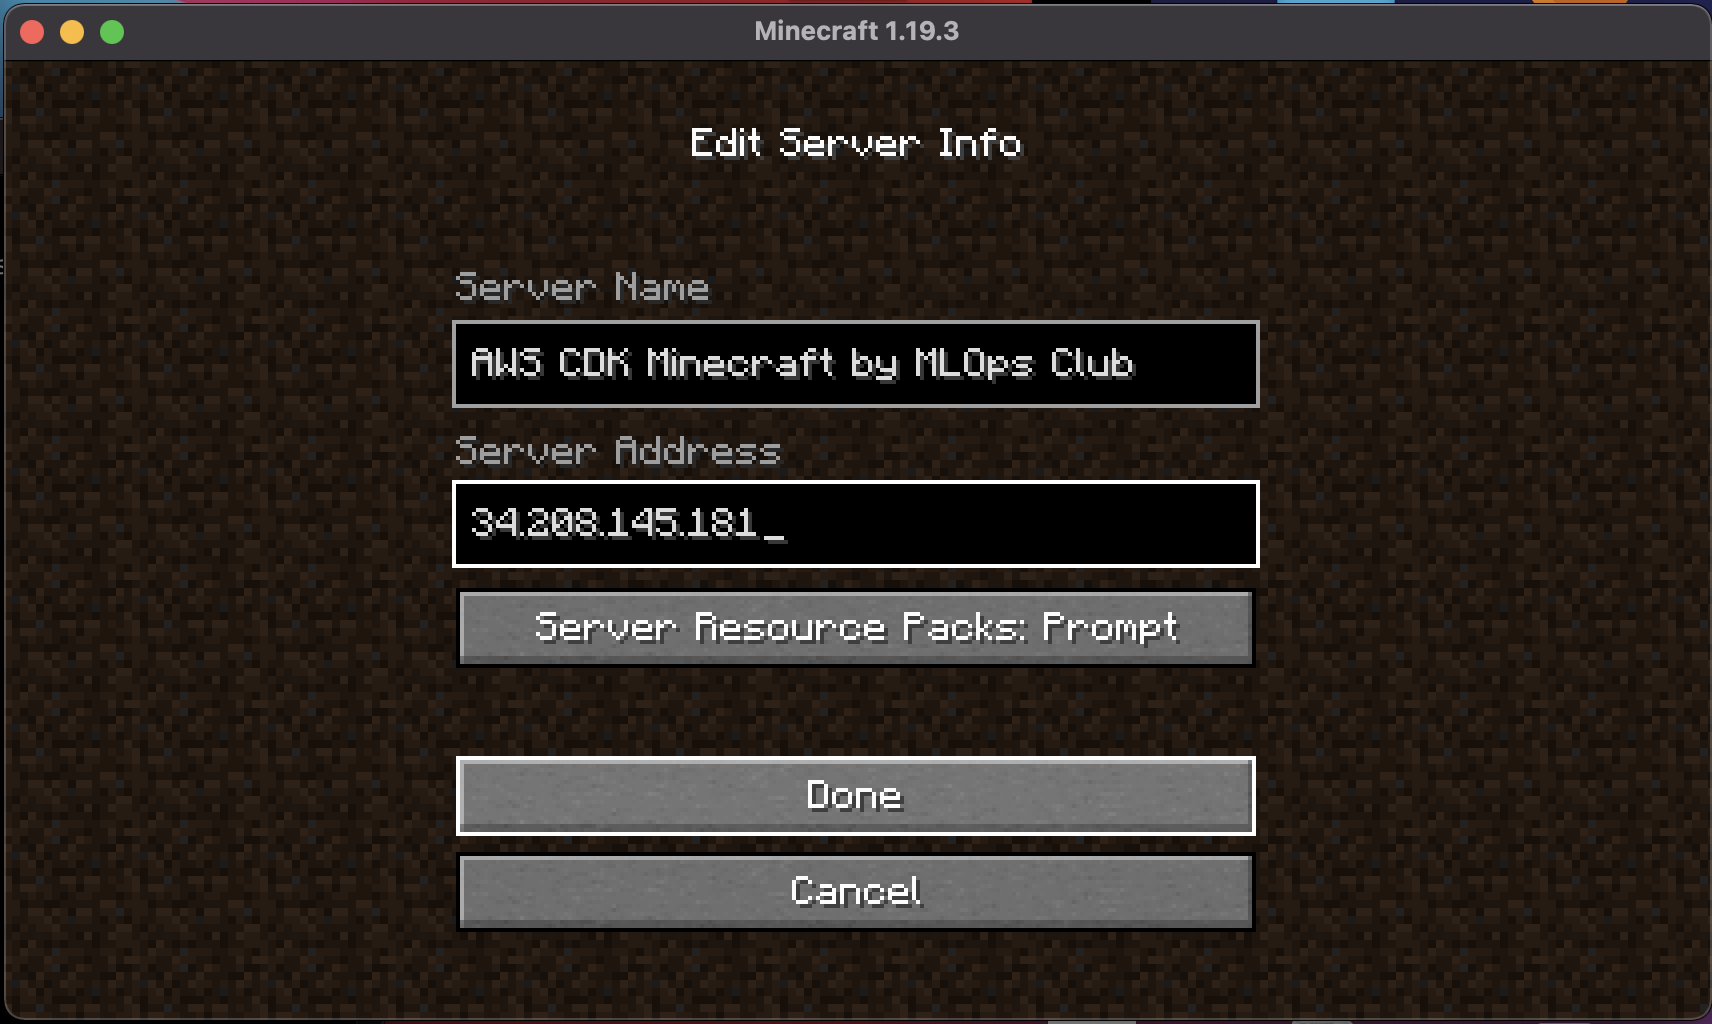
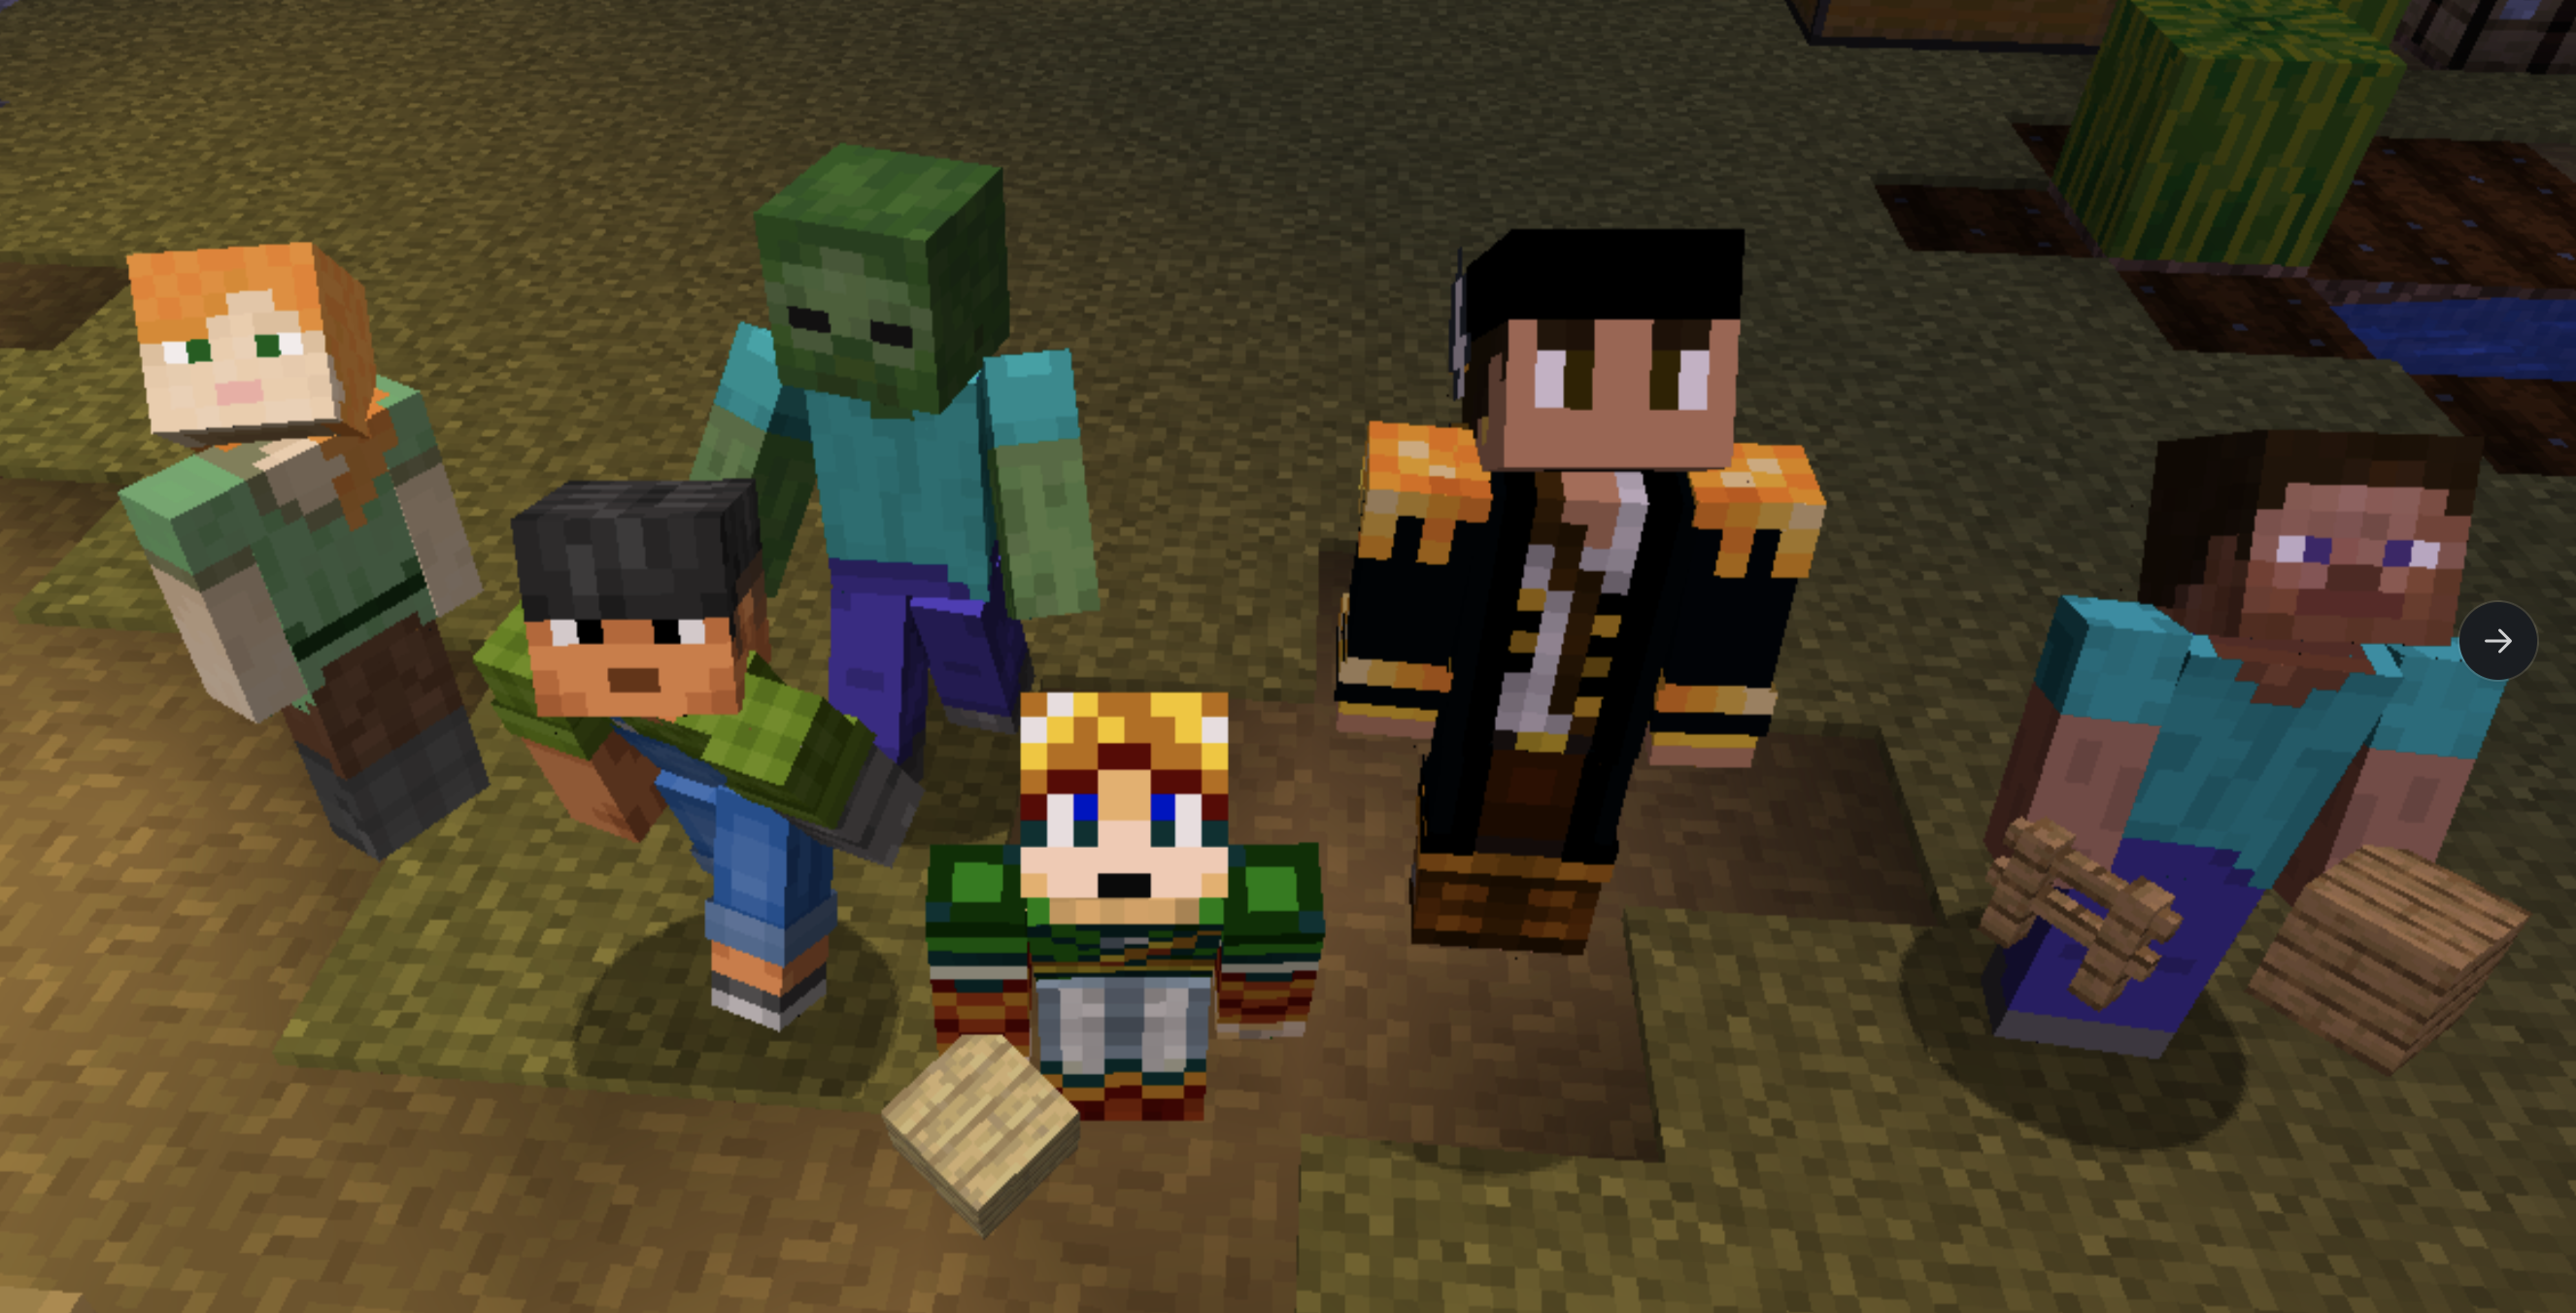
Play!

Usage
(1) Be sure to have the the following installed:
- Python 3.8 or higher
- NodeJS 14 or higher (a dependency of the AWS CDK CLI)
- AWS CDK CLI
- Docker (should be installed and running)
Note: This library makes use of some of AWS's public docker images. You will need to log into AWS's public docker registry (public.ecr.aws).
# get a temporary login session to public.ecr.aws
aws ecr-public get-login-password --region us-east-1 | docker login --username AWS --password-stdin public.ecr.aws
(2) Install the AWS CDK stack exposed by this package
pip install awscdk-minecraft
(3) Use it in your CDK app
# app.py
import os

from aws_cdk import App, Environment
from cdk_minecraft import MinecraftPaasStack

APP = App()

MinecraftPaasStack(
   APP,
   "awscdk-minecraft",
   # login_page_domain_name_prefix just needs to be unique across all AWS accounts
   login_page_domain_name_prefix="mlops-club-minecraft-login"
)

APP.synth()
Note:
app.pyis an AWS Cloud Development Kit concept. If you are not familiar with AWS CDK and what anapp.pyfile is, you can read more about it in the AWS CDK docs.
(4) Create a Cognito User in the AWS Console
You will need to register a user in AWS Cognito UI so that you can log into the website deployed by the stack. A Cognito User Pool is created by the stack for this purpose. You can create a user in that user pool. It will be in whichever region you deployed the stack to.
(5) Play!
One of the stack outputs will be the URL of the Minecraft Platform frontend. Visit the site, log in, and start your server!
Share this link with friends and create Cognito users for them as well if you want them to be able to start and stop the server, too.
Otherwise, just share the IP address with any friends you'd like to be able to join the game.
Advanced Usage
📌 Note: For a complete, working example of the advanced usage, you can refer to this other repository.
Pretty domain name
You can add the components of your minecraft stack as subdomains of a custom domain name.
You will need to have a domain name registered with AWS Route53.
For example, for the domain mlops-club.org you can create these mappings:
minecraft-paas.mlops-club.org-> the PaaS UI to start/stop the serverserver.minecraft-paas.mlops-club.org-> the minecraft server, whenever the EC2 instance is running
# app.py
import os

from aws_cdk import App, Environment
from cdk_minecraft import MinecraftPaasStack

APP = App()

MinecraftPaasStack(
   APP,
   "awscdk-minecraft",
   # login_page_domain_name_prefix just needs to be unique across all AWS accounts
   login_page_domain_name_prefix="mlops-club-minecraft-login"
)

APP.synth()
Connecting to the server over SSH
After starting a temporary EC2 instance with the minecraft server, you can connect to it over SSH if you set up a keypair.
-
Create a keypair, for example, using an existing SSH keypair.
# create a new keypair from ~/.ssh/id_rsa.pub
SSH_KEY_PAIR_NAME=eric-key
aws ec2 import-key-pair --key-name $SSH_KEY_PAIR_NAME --public-key-material file://~/.ssh/id_rsa.pub --profile <your-aws-profile> --region <your-minecraft-aws-region>
If you have trouble with this command, you can always create the key pair in the AWS Console.
-
Register the keypair with your stack.
# app.py

...

MinecraftPaasStack(
   APP,
   "awscdk-minecraft",
   ...
   ssh_key_pair_name="my-keypair",
)

...
-
Connect to the instance when the server is running.
ssh -i ~/.ssh/id_rsa ec2-user@<instance-ip-address>
Customizing the server and running commands as admin
The Minecraft server runs on the EC2 instance using docker-compose.
The container is called itzg/docker-minecraft-server. Specifically, using an
optimized Minecraft server JAR called Paper.
Paper is a fork of the popular Spigot server, which in turn is a fork of CraftBukkit. Spigot and Bukkit "plugins" (mods) like WorldEdit are supported by Paper.
The file structure of the server is like this:
/minecraft
├── docker-compose.yml
└── minecraft-data/     # mounted volume
    ├── ...
    └── server.properties
To issue commands on the server:
# connect to the instance
ssh -i ~/.ssh/id_rsa ec2-user@<instance-ip-address>

# operate as root to have docker privileges
sudo su

# start an RCON session
docker exec -i minecraft rcon-cli
Much more detailed documentation for operating the minecraft server
can be found in the itzg/docker-minecraft-server docs:

Image taken from itzg/docker-minecraft-server
Contributing
This project started as a December 2022 month-long Hackathon.
Contributors can expect to come away with an enviable amount of real-world cloud architecture experience :D
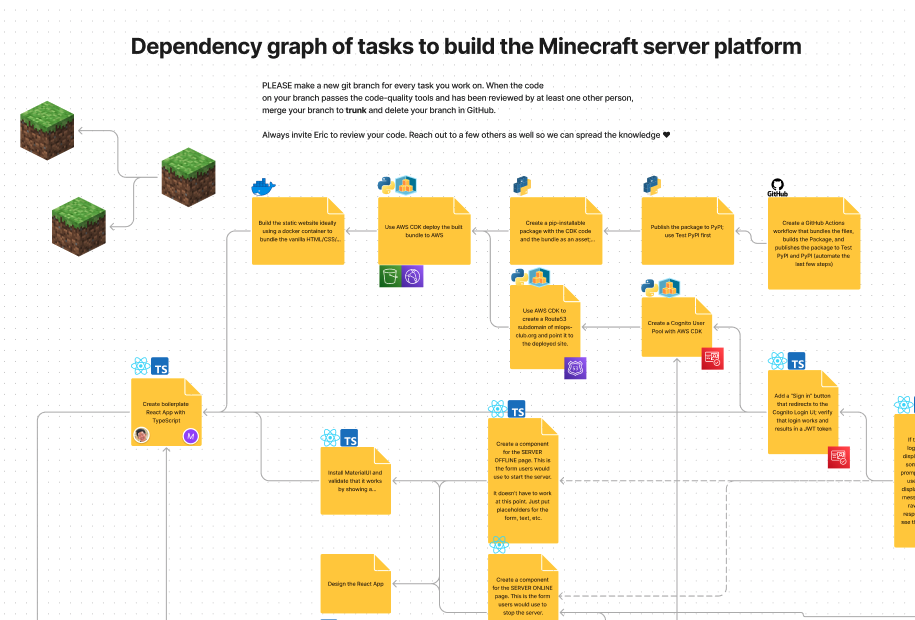
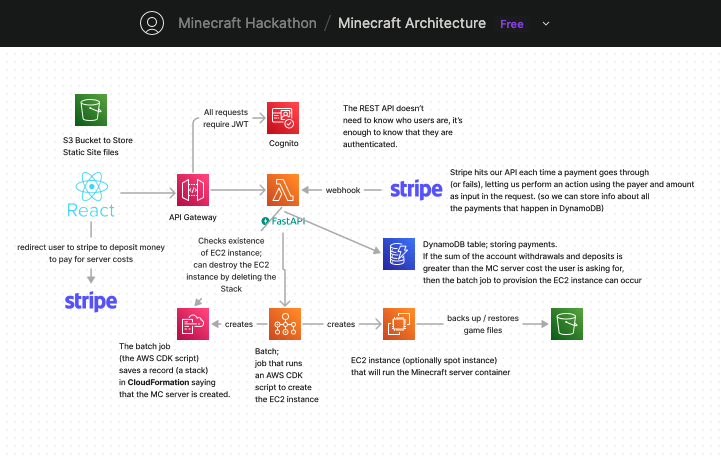
Architecture
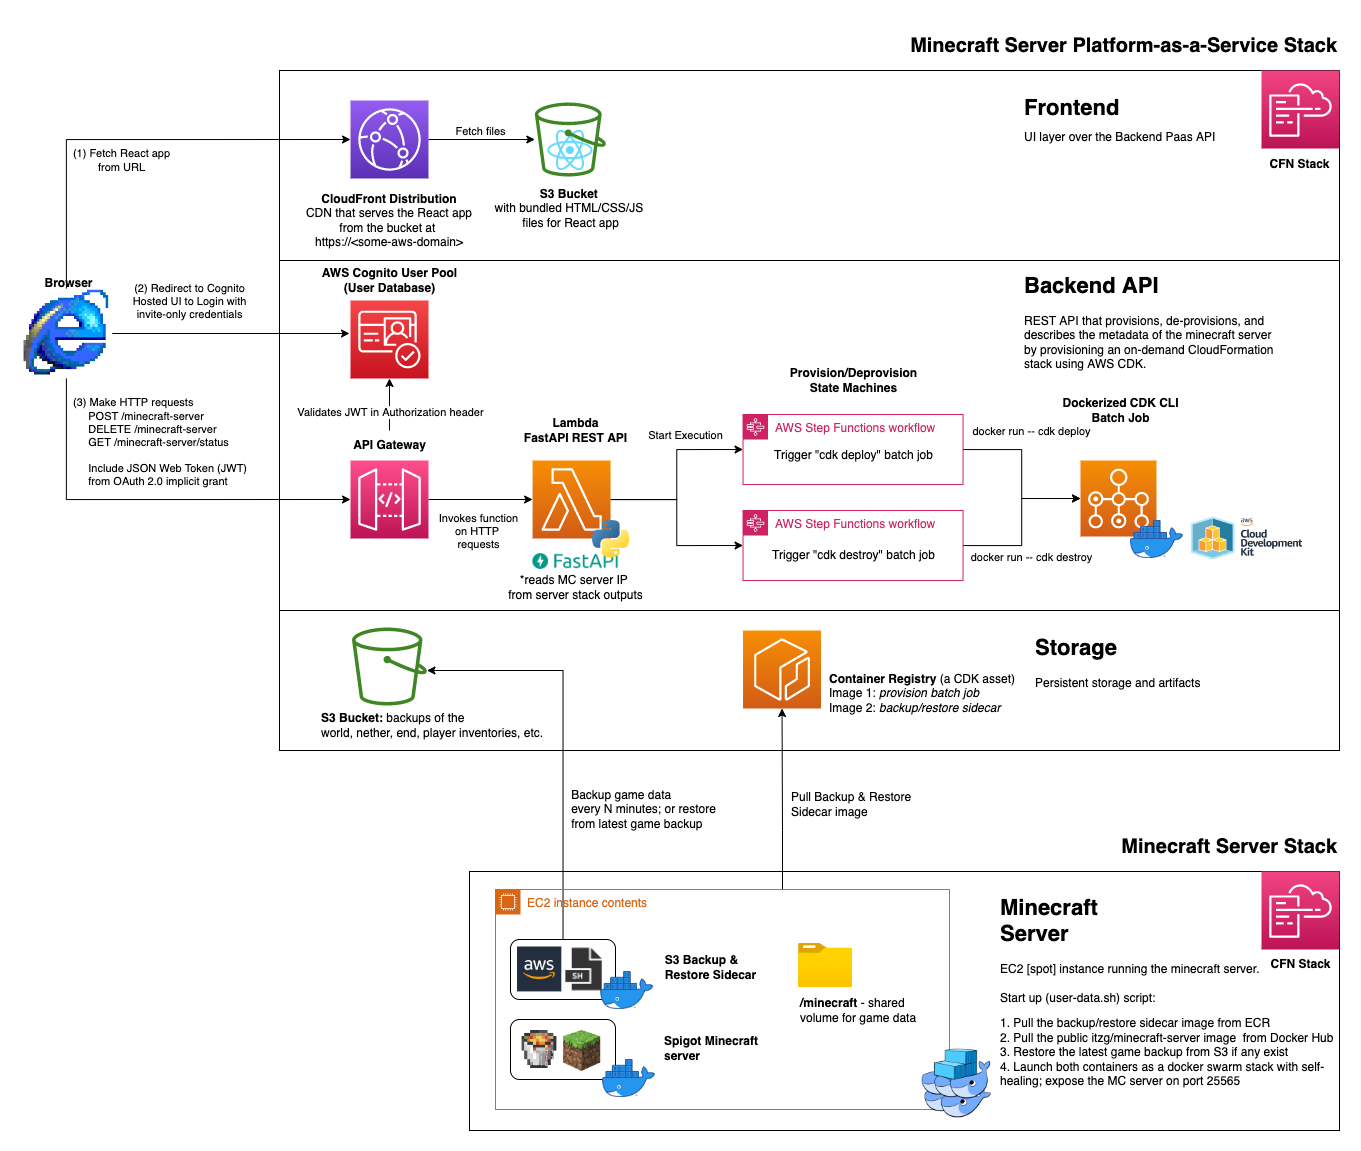
The project has 5 components:
awscdk-minecraft/the Python package. Uses AWS CDK to create the infrastructure. The other folders in this repository are artifacts that this package includes (and deploys!).minecraft-platform-frontend/a React/TypeScript website where users can start/stop a Minecraft server. Theawscdk-minecraftpackage deploys this as a static website in an S3 bucket.minecraft-platform-backend-api/a REST API written with the FastAPI framework that facilitates the functionality exposed in the frontend. Theawscdk-minecraftpackage deploys this API as in a serverless way using AWS Lambda, API Gateway, and Cognito.minecraft-platform-backup-servicea sidecar container that runs alongside theitzg/minecraft-servercontainer (the Minecraft server) on the EC2 instance. It backs up the save files every N minutes, and restores from the most recent backup when the EC2 starts up.awscdk-minecraft-server-deployer/another AWS CDK package. This package is specifically responsible for creating and destroying an EC2 instance with the Minecraft server application running on it. This package itself is built into a Docker image. Theawscdk-minecraftpackage builds the Docker image with this package inside. Then, when users ask theminecraft-platform-backend-apito create or destroy a Minecraft server. The REST API runs an instance of this Docker image which actually carries out the request.
The setup has only been tested for Linux and MacOS, not Windows :(. If you're on windows, you'll have the best contributor experience using the Windows Subsystem for Linux 2 (WSL2).
Useful links
💡 Click the images to go to each collaboration tool.
💡 Bookmark this repository so you can get quick access to these links.
 Our virtual park (for remote collab) |
 Slack, in the #hackathon channel |
 Roadmap, tasks |
 Architecture |
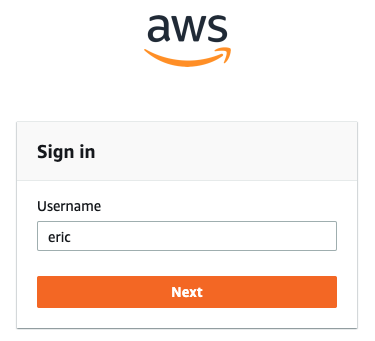 mlops-club AWS account login page |
 Similar project with reference code / resources |
How do I run this project locally?
TL;DR, install node and just.
# install "just"; it's like "make", but less frustrating
brew install just

# install the project's python packages and pre-commit
just install
Alternatively, without brew:
curl --proto '=https' --tlsv1.2 -sSf https://just.systems/install.sh | bash -s -- --to <DEST IN YOUR PATH>
where DEST IN YOUR PATH refers to a directory that is present in your $PATH environment variable. For example, you might have in your ~/.bashrc the line PATH=~/bin:$PATH to look for programs in ~/bin first, which would be the "DEST" supplied above.
You also need node to execute any code related to AWS CDK, which you can install with brew install nvm and nvm install 18.
How do I add code?
Branching strategy: trunk-based development with feature branches
We use pull requests. Create new branches based on trunk for experimentation, then open a PR for it.
You don't have to wait until you want to merge code to open a PR. For this project, the main purpose of doing PRs
is to share knowledge and get early feedback on your ideas.
Linting
Passing the pre-commit checks isn't a huge deal. They are mostly for your own benefit to prevent you
committing things to the repo that you don't want. You can always override pre-commit by running
# run all of the quality checking tools against your code
just lint
# skip the quality checking tools locally
git commit -m "I really want to commit this large file" --no-verify
Git configuration
📌 Note: you may want to use a different email/username for this repository than you typically use on your development machine. You can set your git settings locally like so:
git config --local user.email my-personal-email@gmail.com
git config --local user.user my-github-username
Notes on commits
DON'T COMMIT...
- credentials. Feel free to put them in a
.envfile, but make sure it's gitignored! - large files (large CSV, ML model weights, C binaries, video, etc.) use git LFS rather than committing it directly.
- unformatted code
The pre-commit hooks setup for this repo when you ran just install will remind you
about these each time you commit :)
Features
- Custom URL for site
- Custom URL for minecraft server
- Specify existing SSH key pair to look up
- Specify server version
Release history Release notifications | RSS feed


Download files
Download the file for your platform. If you're not sure which to choose, learn more about installing packages.
Source Distributions
Built Distribution
Filter files by name, interpreter, ABI, and platform.
If you're not sure about the file name format, learn more about wheel file names.
Copy a direct link to the current filters
File details
Details for the file awscdk_minecraft-2.2.0-py2.py3-none-any.whl.
File metadata
- Download URL: awscdk_minecraft-2.2.0-py2.py3-none-any.whl
- Upload date:
- Size: 1.3 MB
- Tags: Python 2, Python 3
- Uploaded using Trusted Publishing? No
- Uploaded via: twine/4.0.2 CPython/3.9.16
File hashes
| Algorithm | Hash digest | |
|---|---|---|
| SHA256 |
35434f7404130889b9418332efc70a392166f2e25a785169d23a88890c7975be
|
|
| MD5 |
5d9289a8f4aadfeae0b8badea218e2b1
|
|
| BLAKE2b-256 |
993b2d8377cb534ad654cd5b768585bc93a8a1c5666d6fa0e4f44fa1877b71b5
|


