





Axoden
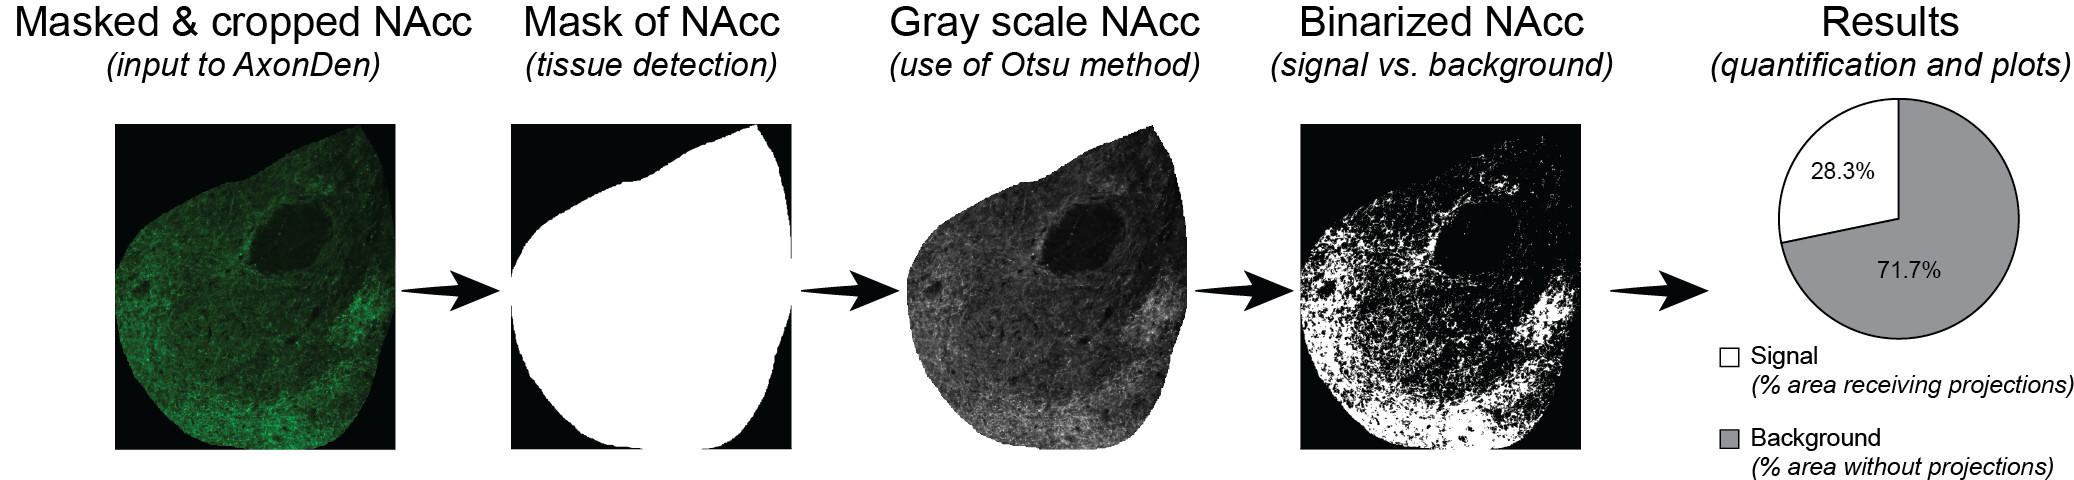
Table of Contents
Overview of AxoDen
AxoDen is an open source platform that facilitates and streamlines the quantification of fluorescently labeled axonal projections of a given brain area.
AxoDen accepts .tif images, transforms them into gray scale and uses the Otsu method to set a threshold that distinguishes signal from background. Because it collects the pixel values of any color channel which sum is above zero, users can use any fluorophore and obtain the same quantification accuracy. In addition, given that the input are images of projections, AxoDen can be applied to virtually any animal species.
AxoDen is a plug an play tool, designed for users with no coding background as well as for developers who wish to integrate the AxoDen functions into their own scripts (read the section "How To Use AxoDen").
How To Use AxoDen
The simplest way to use AxoDen is to simply use the deployed web app at axoden.streamlit.app. It will allow you to upload images directly through a browser and download the results. The files that you upload are only ever kept in memory and discarded once you disconnect from the web app. And we never store or collect anything you upload.
However, if you do not want to upload the images or need to process large amounts of images, we provide a standalone application with a GUI that you can download from here.
Streamlit App
Whether you use the deployed app axoden.streamlit.app or run it locally (see Installation), the easiest way to get started is to check the Tutorial & How To page that you see on the left pane when the app starts. This should explain the steps required and also give you a few tips on how to prepare the images before you upload them.
Standalone GUI
If you download the standalone gui from our release page, there are a few considerations:
Preparing folder and images
Axoden processes folders, not single files. So all the files that you want to process should be in a folder you prepare.
Naming Convention
- All images need to be in .tif format.
- The filename of the images matter! Rename the files to the following format: subjectID_brainregion_group_WhateverYouWant.tif
[!TIP]
- Do not use spaces in the name of the file
- The underscore ("_") character is used to separate the subjectID, brainregion and group
- At least subjectID and brainregion are required, e.g. "animal1_ACC.tif" is valid, "myfile.tif" does not work
- The group is optional, but can be helpful if you want to further process the output from Axoden, e.g. if you want to do your own statistics.
Image Masking
If you want to mask your images to analyze a precise brain region:
- Use Adobe Illustrator or Power Point to overlay the brain atlas onto your image and set the boundaries of your brain region of interest.
- Download ImageJ or FIJI if you do not have it installed.
- Open the image of interest.
- Select the freehand selection tool on the top menu.
- Draw the boundaries of the region of interest according to the overlay you created in step 1. On the top menu select in order:
Edit > Clear OutsideImage > Crop
- If the signal to noise ratio needs to be enhanced:
- On the top menu select
Image > Adjust > Brightness > Crop - Decrease the "Maximum" value using the sliding bar to increase fluorescence intensity.
- Increase the "Minimum" value using the sliding bar to decrease background fluorescence
- On the top menu select
- Save the resulting image following the AxoDen naming conventions.
[!TIP] Use the histogram (
Analyze > Histogram) to confirm that the background fluorescence in the brain region does not contain zero values.
Running the GUI
Execute the application, and you should be presented with the follwoing GUI:
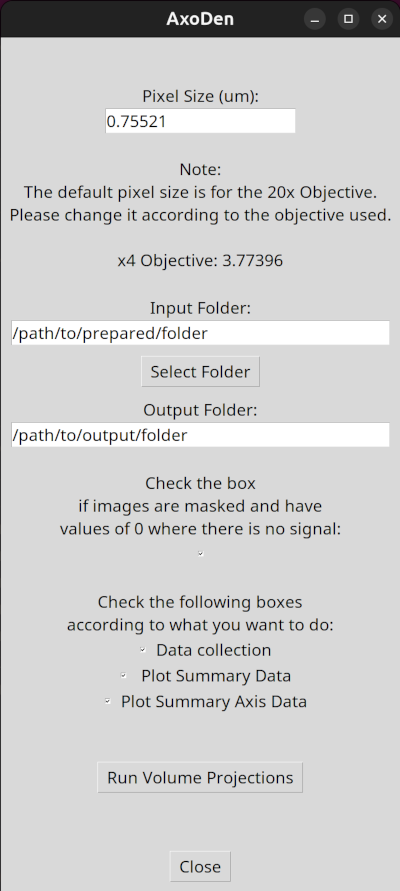
- Select the folder you prepared in the previous step. Use the
Select Folderbutton to open a folder selection dialog - The output folder will be set to the subfolder
Axoden_outputbut you can change it. If the folder does not exist, it will be created. - Make sure the pixel size is set to the correct value. This depends on both the objective used and your device!
- If you use masked images as described in step Image Masking, leave the check as it is. If you did not mask the images and want to process original, unmasked images, remove the check.
- By default, AxoDen will collect all data, then plot the summary and finally the summary axis data.
- Finally click
Run Volume Projectionsto start the processing. - You will find the results in the Output Folder.
Installation
[!Note] This section applies only to people who want to use AxoDen in their python code, or want to run AxoDen from code.
There are two ways to install axoden: Through pip (recommended) or by cloning the repo from github.
Pip Install
For most users, this is the preferred option. Install axoden through pip:
pip install axoden
If you also want the extra gui dependencies, specify it in the pip install:
pip install axoden[gui]
Running the GUIs
Assuming you installed the gui dependencies with the above pip install axoden[gui],
you can start the tkinter with
python -m axoden.gui.gui_projections_quantification
If you get an error saying TkInter is not installed, see the Install TkInter section.
To start the streamlit app locally, run:
python -m axoden.gui.streamlit_app
This is the same interface that is running as the Streamlit Web App, but when running it locally you will benefit from faster processing time, and uploads should be almost instantaneous.
Clone from github
If you want to make changes to axoden, you can clone the full code from the github repo.
Clone the repo
git clone https://github.com/raqueladaia/AxoDen.git
We suggest to set up a virual environment. For more information regarding virtual environments, see https://docs.python.org/3/library/venv.html
Install the dependencies
Use pip to install the dependencies (typically in your virtual environment):
pip install -r requirements.txt
This will install all required python dependencies to fully use axoden, including running the streamlit app locally. The tkinter library cannot be installed through pip and has to be installed separately.
There are two other requirements files that you might want to use instad of the above.
requirements_no_gui.txt: Excludes streamlit, but allows you to use axoden as a library, as well as use the tkinter gui.requirements_dev.txt: For development purposes, includes everything including testing and linting (tox, pytest, black, ruff).
Install TkInter
For windows, tkinter is installed when installing python. If you get an error complaining the module named 'tkinter' is not found when executing the python code, you will have to modify the python installation. For that, launch the python installation again and in the installer, select 'Modify'. Make sure that the checkbox 'tcl/tk and IDLE' is checked!
For linux and Mac, you can install tkinter via command line:
# Linux
sudo apt install python3-tk
# Or for a specific version of python, e.g. python 3.11:
sudo apt install python3.11-tk

# Mac (not tested):
brew install python-tk
Running the GUI
Simply execute the file axoden/gui/gui_projections_quantification.py, e.g. through a terminal:
python axoden/gui/gui_projections_quantification.py
Running Streamlit App Locally
You can run the streamlit app locally with
streamlit run axoden/gui/streamlit_app/1_📊️_Axoden.py
This should automatically open a browser window to the app. If not, streamlit will post the URL where you can reach the web app, usually at http://localhost:8501.
This is the same interface as the Streamlit Web App.
Using axoden in your code
Below you find a few examples of how to use axoden. You can see the full documentation here.
You can process a single image. This will not save any results or plots.
import axoden

img_path = "test_images/745_TH-CL.tif"
fig, data, data_axis = axoden.process_image(img_path, is_masked=True, pixel_size=0.75521)
fig.show()
Or you can process all images in a folder and save the results, similar to what the gui does:
import axoden

input_folder = "test_images"
output_folder = "results"
df_data, df_data_axis = axoden.process_folder(input_folder, pixel_size=0.75521, is_masked=True, output_folder=output_folder)
axoden.write_summary_data_plot(output_folder, df_data, project_name="my project")
axoden.write_signal_intensity_along_axis_plot(output_folder, df_data_axis, pixel_size=0.75521, project_name="my_project")
It is also possible to not save any output, this might be useful if you further process the results.
import axoden

input_folder = "test_images"
df_data, df_data_axis = axoden.process_folder(input_folder, pixel_size=0.75521, is_masked=True, save=False)

output_folder = "results"
axoden.save_table(df_data, output_folder, "projections_quantifications.csv")
axoden.save_table(df_data_axis, output_folder, "projections_quantification_along_axis.csv")

fig_data = axoden.plot_summary_data(df_data, "my_project")
fig_data_axis = axoden.plot_signal_intensity_along_axis("my_project", df_data_axis, pixel_size=0.75521)

fig_data.show()
fig_data_axis.show()
1 maintainer

Metadata
1 maintainer
Release files for axoden 1.1.0
For a detailed explanation of source distributions (sdists) and built distributions (wheels), please see the package formats documentation.
Source distribution (sdist)
| File | Size | Uploaded | Provenance | |
|---|---|---|---|---|
| axoden-1.1.0.tar.gz | 762.3 kB | Without provenance | Details |
Built distribution (wheel)
| File | Interpreter | ABI | Platform | Reset |
|---|---|---|---|---|
| axoden-1.1.0-py3-none-any.whl | Python 3 | none | any | Details |
Total release size: 800.3 kB
Release files / axoden-1.1.0.tar.gz
| Download URL | axoden-1.1.0.tar.gz |
|---|---|
| Size | 762.3 kB |
| Tags | Source |
|
SHA-256 checksum How to use checksums |
22c86b1def5cfa0fc77a7d723c513c6a4c8ae318404de4f9ee07baca16b9f1f9
|
|
BLAKE2b-256 checksum How to use checksums |
199fd5357955030e73f4986961725c8dbf2f770ee858d4939a115c8ca542a176
|
| Upload date | |
|
Uploaded using Trusted Publishing? What is trusted publishing? |
No |
| Uploaded via |
python-requests/2.32.1
|
Release files / axoden-1.1.0-py3-none-any.whl
| Download URL | axoden-1.1.0-py3-none-any.whl |
|---|---|
| Size | 38.1 kB |
| Tags | Python 3 |
|
SHA-256 checksum How to use checksums |
9993b637bf7b89817827c549fff3952ea6885a53677c198b828c0d88fcd2c8b2
|
|
BLAKE2b-256 checksum How to use checksums |
0055eb1f0e87fad838f04307ccc9b6a8f7933b4fd78a15aba0aa60ce180113f1
|
| Upload date | |
|
Uploaded using Trusted Publishing? What is trusted publishing? |
No |
| Uploaded via |
python-requests/2.32.1
|
Security for axoden 1.1.0
Provenance
Provenance describes where a file came from. On PyPI, provenance is shared via attestations, which provide a verifiable record of the build or publishing details. View details, limitations and caveats.
No provenance found
None of the files in this release were uploaded with provenance metadata.
A note on package security
PyPI is a repository for distributing packages, not a service for auditing them. While third-party security researchers and our staff do their best to detect and remove malicious packages, PyPI cannot guarantee the quality, security or suitability of any given package.














