

BasisREMY
A Unified Framework for Study-Specific Basis Set Generation in MR Spectroscopy




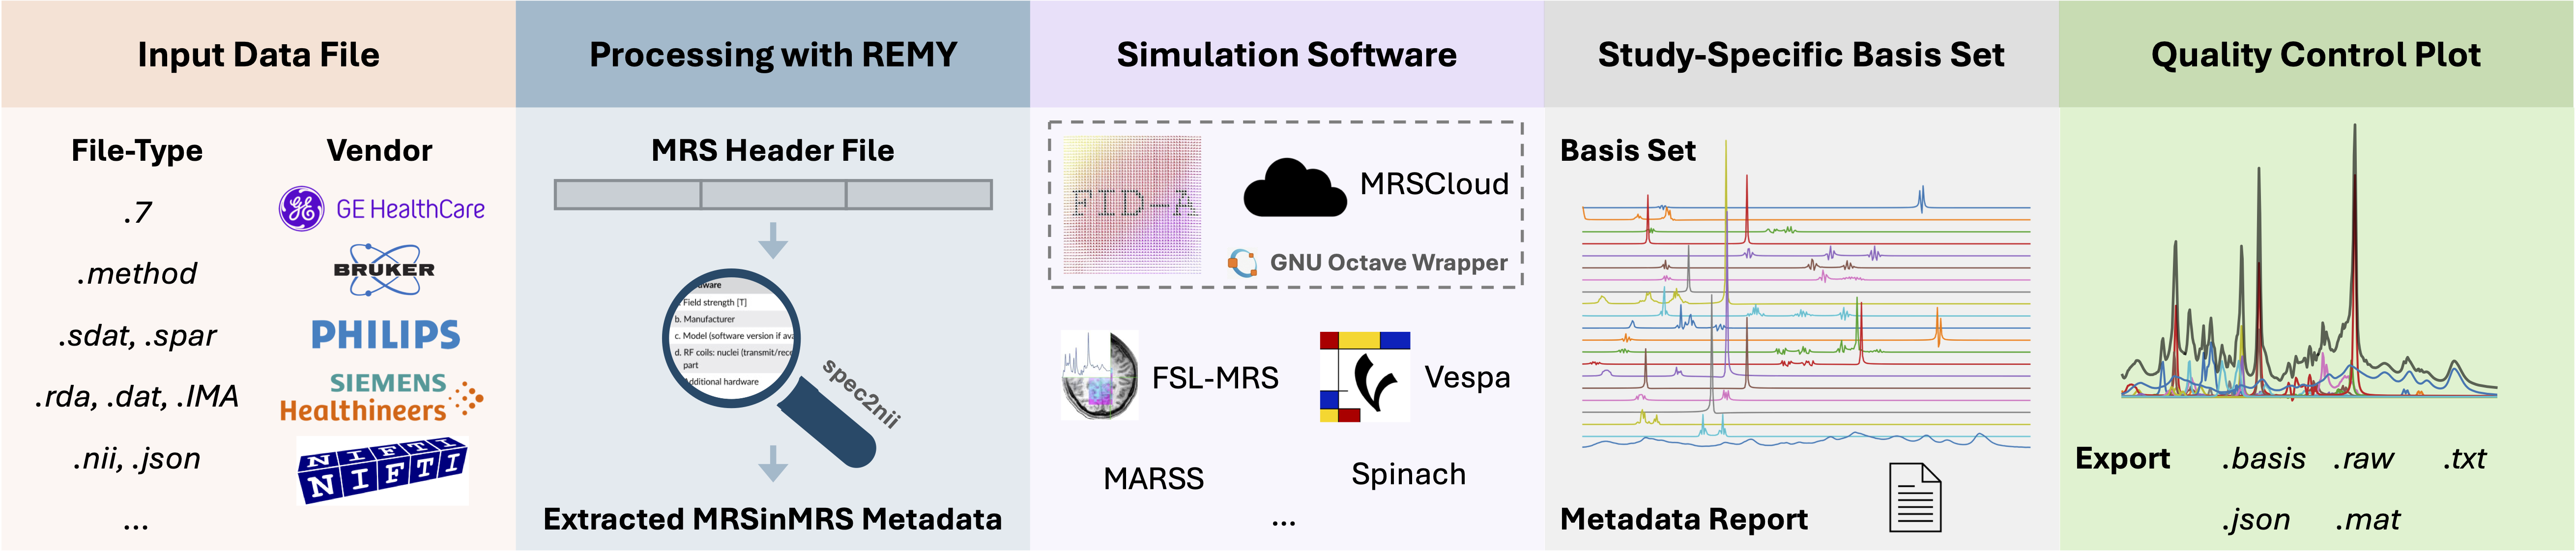
A tool for generating study-specific basis sets directly from raw MRS data, integrating real pulse shapes and acquisition parameters. This project is in its early development stages, and contributions, testing, and feedback are highly welcomed!
Prerequisites
For the recommended uvx quick start you do not
need to install Python yourself — uv downloads a compatible Python automatically.
You only need:
-
uv: installs Python and all dependencies into an isolated environment (one-line installer in Quick Start below). Nothing is installed globally. -
git: used the first time you run a simulation to fetch the third-party simulation toolboxes (and for cloning if you develop). -
Octave Runtime (simulation backends only): Version 4.0 or higher.
You have two options:
- Docker (Recommended) - Automatic setup, works everywhere
- Local Octave - Traditional installation
📖 See the Octave Setup Guide for detailed installation instructions.
Note: BasisREMY automatically detects and uses Docker if available, otherwise falls back to local Octave. Data extraction and parameter configuration work without an Octave runtime; only the simulation step requires it.
Python 3.11+ is only required if you skip
uvand install manually withpip(see Setting Up the Python Environment below).
Quick Start (for users)
The fastest way to run BasisREMY is with uv — a single
tool that installs Python for you (no manual Python, pip, or conda setup required).
1. Install uv (one time):
# macOS / Linux
curl -LsSf https://astral.sh/uv/install.sh | sh

# Windows (PowerShell)
powershell -ExecutionPolicy ByPass -c "irm https://astral.sh/uv/install.ps1 | iex"
2. Launch BasisREMY — the released version, straight from PyPI:
uvx basisremy
Or, for repeated use, install the command once and then run it by name:
uv tool install basisremy
basisremy
To run the latest development state instead of the release:
uvx --from git+https://github.com/julianmer/BasisREMY basisremy
Using BasisREMY from Python instead of the GUI? The package is on PyPI —
pip install basisremygives you the programmatic API (see Examples below) without any GUI setup.
uv automatically downloads a compatible Python and all dependencies into an
isolated environment — nothing is installed globally and your data never leaves
your machine.
Note on simulation backends: The simulation backends rely on third-party toolboxes that cannot be redistributed inside the wheel. The first time you run a simulation, BasisREMY fetches the toolbox it needs (at a pinned version) into a per-user data directory (
~/.basisremy, overridable via$BASISREMY_HOME).
Developer Setup
Clone the repository (with submodules) and let uv create the environment:
git clone --recurse-submodules https://github.com/julianmer/BasisREMY.git
cd BasisREMY
uv sync            # creates .venv and installs all dependencies
uv run basisremy   # launches the GUI
uv sync reads pyproject.toml, provisions a matching Python,
and installs everything into .venv. You do not need to activate the
environment — uv run handles that automatically. To include development tools
(pytest, coverage), run uv sync --extra dev.
Docker / Octave Requirements
Simulation backends execute MATLAB/Octave code and therefore need an Octave runtime. BasisREMY supports two interchangeable options and selects one automatically:
- Docker (recommended) — install Docker Desktop (macOS/Windows) or Docker Engine (Linux), and make sure it is running. BasisREMY pulls/builds an Octave container on demand.
- Local Octave — install Octave 4.0+ directly; it is used as a fallback when Docker is unavailable.
Whether an Octave runtime is needed is backend-dependent: data extraction and parameter configuration work without it; only the simulation step requires it. See the Octave Setup Guide for detailed instructions.
The Spant backend needs R in the same way: Docker (BasisREMY builds an R
image with the spant package on first use) or an R installation of your own,
into which the package is installed on first use. The Vespa backend needs
neither — it runs in a Python side-environment or Docker.
Three environment variables tune the runtimes:
| Variable | Effect |
|---|---|
BASISREMY_OCTAVE_WORKERS |
Octave processes used to simulate metabolites in parallel (default: half the CPUs, at most 4). |
BASISREMY_NO_DOCKER |
Set to 1 to ignore Docker entirely and use only a local Octave. |
BASISREMY_SPANT_RUNTIME |
docker or local to force the Spant runtime (default: Docker, then your own R). |
Troubleshooting
- GUI doesn't open /
ModuleNotFoundError: No module named 'nicegui'— the front-end is NiceGUI shown in a native desktop window via pywebview. They install automatically with the project (uv sync/uvx --from . basisremy); if you installed manually, runpip install nicegui pywebview. These are pure-pip packages, so no systemtcl/tkis required. - Window stays blank or pywebview errors — without
pywebviewthe UI falls back to opening in your browser; install it (pip install pywebview) for the native window. On Linux a system WebKitGTK package may be needed. - Simulation fails / "Octave not found" — start Docker Desktop/Engine, or install local Octave. See the Octave Setup Guide.
uv: command not found— re-open your terminal after installinguv, or add its install location to yourPATH.- Backends can't find
externals/...— the simulation toolboxes are fetched on first use into~/.basisremy(or$BASISREMY_HOME); make suregitis installed and you have network access the first time you run a simulation. In a cloned repository the existing submodules underexternals/are used as-is.
Setting Up the Python Environment (manual / pip)
The
uvquick start above is the recommended path. The steps below remain available if you prefer a manualvenv+pipworkflow.
It is recommended to use a virtual environment to isolate project dependencies. Start by cloning the repository.
git clone --recurse-submodules https://github.com/julianmer/BasisREMY.git
cd BasisREMY
Create and Activate the Virtual Environment
Windows:
python -m venv --prompt basisREMY .venv
.venv\Scripts\activate
macOS/Linux:
python3 -m venv --prompt basisREMY .venv
source .venv/bin/activate
Install Required Python Packages
Upgrade pip and install the required packages by running:
pip install --upgrade pip
pip install -r requirements.txt
Running BasisREMY
With all dependencies installed and your basisREMY environment activated, run the application:
python -m basisremy
This will launch the BasisREMY GUI. (Inside the repo you can equivalently use uv run basisremy.)
Usage Overview
BasisREMY guides you through a simple three-step workflow, shown as a numbered stepper at the top of the window (Data → Parameters → Simulate). You can click any completed step to go back and make changes. A light/dark theme toggle sits in the top-right corner and follows your system setting by default.
- Data — Drop your MRS data file onto the upload area (or click it to browse). Click Continue to automatically read the file and pre-fill the acquisition parameters, or Skip to configure everything manually.
- Parameters — Choose a simulation backend (grouped by category), review the auto-filled parameters, and tick the metabolites to include (Select all toggles the whole list). When the required fields are set, click Simulate basis set.
- Simulate — A progress bar shows the simulation status. When it finishes, an interactive spectrum plot appears and you can click Export basis… to save the basis set in LCModel, jMRUI, FSL-MRS, Osprey, FID-A, INSPECTOR, ProFit, MARSS, MRSCloud, or SpinWizard/JET format. Format writing is handled by the bundled MRS Basis Set Conversion Toolbox.
Every input has a small (?) help icon — hover it for a short explanation of that parameter.
Examples (No GUI)
Want to use BasisREMY programmatically? Check out the examples/ folder!
Quick start:
python examples/basic_usage.py
The example shows how to:
- Load MRS data and extract parameters automatically
- Configure and run simulations without the GUI
- Customize metabolite lists and output settings
Related References
The project builds upon the methodologies used in existing tools. Some references include:
- REMY and related literature (nbm.70039)
- FID-A and related literature (mrm.26091)
- FSL-MRS and related literature (mrm.28630)
- MRSCloud and related literature (mrm.29370)
- Vespa and related literature (mrm.29686)
- Spant and related literature (mrm.28385)
- Spinach and related literature (jmr.2010.11.008)
- MRS Basis Set Conversion Toolbox
- Custom Basis Set Simulation
1 maintainer

Metadata
1 maintainer
Release files for basisremy 0.1.3
For a detailed explanation of source distributions (sdists) and built distributions (wheels), please see the package formats documentation.
Source distribution (sdist)
| File | Size | Uploaded | |
|---|---|---|---|
| basisremy-0.1.3.tar.gz | 1.1 MB | Details |
Built distribution (wheel)
| File | Interpreter | ABI | Platform | Reset |
|---|---|---|---|---|
| basisremy-0.1.3-py3-none-any.whl | Python 3 | none | any | Details |
Total release size: 2.2 MB
Release files / basisremy-0.1.3.tar.gz
| Download URL | basisremy-0.1.3.tar.gz |
|---|---|
| Size | 1.1 MB |
| Tags | Source |
|
SHA-256 checksum How to use checksums |
53e0c47631d9576a558a52e63d24a1cde229277febb1ab19a4c593a3a75aeec9
|
|
BLAKE2b-256 checksum How to use checksums |
89d207a280e68d911efcc278837a1eacfdc6262dd89c7cbd93c3d7cce6d5404d
|
| Upload date | |
|
Uploaded using Trusted Publishing? What is trusted publishing? |
No |
| Uploaded via |
uv/0.11.24 {"installer":{"name":"uv","version":"0.11.24","subcommand":["publish"]},"python":null,"implementation":{"name":null,"version":null},"distro":{"name":"macOS","version":null,"id":null,"libc":null},"system":{"name":null,"release":null},"cpu":null,"openssl_version":null,"setuptools_version":null,"rustc_version":null,"ci":null}
|
Release files / basisremy-0.1.3-py3-none-any.whl
| Download URL | basisremy-0.1.3-py3-none-any.whl |
|---|---|
| Size | 1.1 MB |
| Tags | Python 3 |
|
SHA-256 checksum How to use checksums |
d0010ebf236ad36026bbaad3ed37b5f4b662b73ee1366643af8479c852d30659
|
|
BLAKE2b-256 checksum How to use checksums |
633bc0c6c4031ae172bd4e34416b731cb394b00531e5a3eab37c7d676e972418
|
| Upload date | |
|
Uploaded using Trusted Publishing? What is trusted publishing? |
No |
| Uploaded via |
uv/0.11.24 {"installer":{"name":"uv","version":"0.11.24","subcommand":["publish"]},"python":null,"implementation":{"name":null,"version":null},"distro":{"name":"macOS","version":null,"id":null,"libc":null},"system":{"name":null,"release":null},"cpu":null,"openssl_version":null,"setuptools_version":null,"rustc_version":null,"ci":null}
|














