

BioKb-ChEBI




BioKb-ChEBI (biokb_chebi) is a python package to import ChEBI data into a relational database and create RDF triples (turtles) from it. The turtles can be imported into a Neo4J graph database. The package is part of the BioKb family of packages to create and connect biological and medical knowledge bases and graphs.
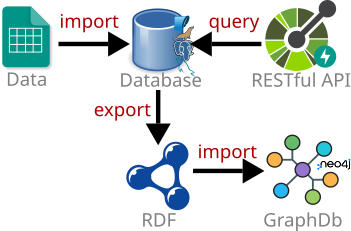
The package provides different options to run it: from command line, as RESTful API server, as Podman/Docker container, or as Podman/Docker networked containers with Neo4J and a relational database.
Features
biokb_chebi allows to ...
- Query ChEBI data with SQLAlchemy or raw SQL
- Load, query and manage ChEBI data with GUIs for knowledge base and graphs (phpMyAdmin, Neo4J Browser)
- Query data via a RESTful API (FastAPI) with OpenAPI documentation and interactive Swagger-UI
to provide this biokb_chebi ...
- imports ChEBI data into a relational database
- creates RDF triples (turtles) from the relational database
- imports the RDF triples into a Neo4J graph database
Supported databases: SQLite, MariaDB/MySQL, PostgreSQL, Oracle, Microsoft SQL Server, and any other database supported by SQLAlchemy.
Options to run BioKb-ChEBI
All biokb packages share the same API and CLI structure. You have different options to run the packages:
- from command line (simplest way to get started)
- as RESTful API server (can start directly from command line)
- as Podman/Docker container (without import into Neo4J, but export of turtles possible)
- as Podman/Docker networked containers (with all features) and 3 containers:
- high-performance relational databases (PostgreSQL, Oracle, MySQL, ...)
- RESTful API (fastAPI) for queries, data import and export
- GUI for querying and administration of MySQL over the Web
Installation
If uv is installed:
uv venv
source .venv/bin/activate
uv pip install biokb_chebi
Otherwise:
python3 -m venv .venv
source .venv/bin/activate
pip install biokb_chebi
Run BioKb-ChEBI
From command line
For sure the simplest way is to run all steps:
biokb_chebi import-data
biokb_chebi create-ttls
Before importing into Neo4J, make sure Neo4J is running (see below "How to run Neo4J").
Then import into Neo4J:
biokb_chebi import-neo4j -p neo4j_password
http://localhost:7474 (user/password: neo4j/neo4j_password)
For more options see the CLI options section below.
As RESTful API server
Usage: biokb_chebi run-api [OPTIONS]
biokb_chebi run-api
- user: admin
- password: admin
| Option | long | Description | default |
|---|---|---|---|
| -P | --port | API server port | 8000 |
| -u | --user | API username | admin |
| -p | --password | API password | admin |
http://localhost:8000/docs#/
- Import data
- Export ttls
- Run Neo4J (see below "How to run Neo4J")
- Import Neo4J
Be patient, each step takes several minutes.
As Podman/Docker container
For docker just replace podman with docker in the commands below.
Build & run with Podman:
git clone https://github.com/biokb/biokb_chebi.git
cd biokb_chebi
podman build -t biokb_chebi_image .
podman run -d --rm --name biokb_chebi_simple -p 8000:8000 biokb_chebi_image
- Login: admin
- Password: admin
With environment variable for user and password for more security:
podman run -d --rm --name biokb_chebi_simple -p 8000:8000 -e API_PASSWORD=your_secure_password -e API_USER=your_secure_user biokb_chebi_image
http://localhost:8000/docs
On the website:
Neo4j import in this context is not possible because Neo4J is not running in the same network as service, but the exported turtles can be imported into any Neo4J instance using the CLI (biokb_chebi import-neo4j).
to stop the container:
podman stop biokb_chebi_simple
to rerun the container:
podman start biokb_chebi_simple
Run as Podman/Docker networked containers
If you have docker or podman on your system, the easiest way to run all components (relational database, RESTful API server, phpMyAdmin GUI) is to use networked containers with podman-compose/docker-compose.
git clone https://github.com/biokb/biokb_taxtree.git
cd biokb_taxtree
podman-compose -f docker-compose.db_neo.yml --env-file .env_template up -d
podman-compose --env-file .env_template up -d
http://localhost:8001/docs
On the website:
stop with:
podman pod stop pod_biokb_db
podman-compose stop
rerun with:
podman pod start pod_biokb_db
podman-compose start
Tip: Copy the .env_template to .env and change the default passwords in the .env file before starting the containers for better security. If you have done that you need to use --env-file .env instead of --env-file .env_template in the commands above or just omit the --env-file option (because the default is .env).
CLI Options
Import data into relational database
Usage: biokb_chebi import-data [OPTIONS]
biokb_chebi import-data
-> SQLite database in ~/.biokb/biokb.db. Open with e.g. DB Browser for SQLite
| Option | long | Description | default |
|---|---|---|---|
| -f | --force-download | Force re-download of the source file | False |
| -k | --keep-files | Keep downloaded source files after import | False |
| -c | --connection-string TEXT | SQLAlchemy engine URL | sqlite:///chebi.db |
If you want to use different relational database (MySQL, PostgreSQL, etc.), provide the connection string with -c option. Examples:
- MySQL:
mysql+pymysql://user:password@localhost/biokb - PostgreSQL:
postgresql+psycopg2://user:password@localhost/biokb
For more examples please check how to create database URLs
Create RDF turtles
Usage: biokb_chebi create-ttls [OPTIONS]
biokb_chebi create-ttls
-> RDF turtles will be created in ~/.biokb/chebi/data/ttls.zip
| Option | long | Description | default |
|---|---|---|---|
| -c | --connection-string TEXT | SQLAlchemy engine URL | sqlite:///chebi.db |
Import into Neo4J
Start Neo4J ...
podman run --rm --name biokb-neo4j-test -p7474:7474 -p7687:7687 -e NEO4J_AUTH=neo4j/neo4j_password neo4j:latest
Note: Remove --rm if you want to keep the container after stopping it. Replace podman with docker if you use Docker.
... and import into Neo4J:
biokb_chebi import-neo4j -p neo4j_password
| Option | long | Description | default |
|---|---|---|---|
| -i | --uri | Neo4j database URI | bolt://localhost:7687 |
| -u | --user | Neo4j username | neo4j |
| -p | --password | Neo4j password |
http://localhost:7474 (user/password: neo4j/neo4j_password)
How to run Neo4J
For the options "Run BioKb-ChEBI as ..."
you need to run Neo4J separately.
If you have not already a Neo4j instance running, the easiest way is to run Neo4J as Podman/ Docker container.
For docker just replace podman with docker in the commands below.
podman run -d --rm --name biokb-neo4j -p7474:7474 -p7687:7687 -e NEO4J_AUTH=neo4j/neo4j_password neo4j:latest
# Remove `--rm` if you want to keep the container after stopping it.
Neo4J is then available at: http://localhost:7474 (user/password: neo4j/neo4j_password
Stop Neo4J with:
podman stop biokb-neo4j
if you have not used --rm above, you can restart Neo4J with:
podman start biokb-neo4j
Query database with SQLAlchemy
In order to query the database with SQLAlchemy you can use the following code snippet:
import os
from biokb_chebi import get_session
from biokb_chebi.db.models import Compound
os.environ.pop("CONNECTION_STR", None)  # to make sure no environment variable is used
with get_session() as session:
    results = session.query(Compound).filter(Compound.name.ilike("%glucose%")).limit(2)
    for row in results:
        print(f"Name: {row.ascii_name}, Name: {row.source}")
Output:
Name: 1,2,3,4-tetrakis-O-galloyl-alpha-D-glucose, Name: KEGG COMPOUND
Name: 1-caffeoyl-beta-D-glucose, Name: KEGG COMPOUND
1 maintainer

Metadata
1 maintainer
Release files for biokb-chebi 0.1.4
For a detailed explanation of source distributions (sdists) and built distributions (wheels), please see the package formats documentation.
Source distribution (sdist)
| File | Size | Uploaded | |
|---|---|---|---|
| biokb_chebi-0.1.4.tar.gz | 511.4 kB | Details |
Built distribution (wheel)
| File | Interpreter | ABI | Platform | Reset |
|---|---|---|---|---|
| biokb_chebi-0.1.4-py3-none-any.whl | Python 3 | none | any | Details |
Total release size: 538.0 kB
Release files / biokb_chebi-0.1.4.tar.gz
| Download URL | biokb_chebi-0.1.4.tar.gz |
|---|---|
| Size | 511.4 kB |
| Tags | Source |
|
SHA-256 checksum How to use checksums |
6afaf0864ecbe8d229b3f24ed1ef54df630fc8e23b2a5a5f933a43864b8b00ba
|
|
BLAKE2b-256 checksum How to use checksums |
c921f462cd155c4c62df4e21b58d948ed795a6137784a487d886015731d93d4f
|
| Upload date | |
|
Uploaded using Trusted Publishing? What is trusted publishing? |
Yes |
| Uploaded via |
twine/6.1.0 CPython/3.13.7
|
Provenance
Provenance describes where a file came from. On PyPI, provenance is shared via attestations, which provide a verifiable record of the build or publishing details. View details, limitations and caveats.


PyPI Publish Attestation
PyPI verified that this artifact, at this checksum, originated from the publisher listed below.
Signed by GitHub Actions, verified by PyPI on Jan 11, 2026.
Transparency logRelease files / biokb_chebi-0.1.4-py3-none-any.whl
| Download URL | biokb_chebi-0.1.4-py3-none-any.whl |
|---|---|
| Size | 26.6 kB |
| Tags | Python 3 |
|
SHA-256 checksum How to use checksums |
c1e057d1810782fef68c680c395af01f4ef413a9c15e4ca54d325ce4601f5d79
|
|
BLAKE2b-256 checksum How to use checksums |
9146a1c84998538b3265ea0effdc1ae0059fabdd6b3c20490106b8bccecb9f54
|
| Upload date | |
|
Uploaded using Trusted Publishing? What is trusted publishing? |
Yes |
| Uploaded via |
twine/6.1.0 CPython/3.13.7
|
Provenance
Provenance describes where a file came from. On PyPI, provenance is shared via attestations, which provide a verifiable record of the build or publishing details. View details, limitations and caveats.
PyPI Publish Attestation
PyPI verified that this artifact, at this checksum, originated from the publisher listed below.
Signed by GitHub Actions, verified by PyPI on Jan 11, 2026.
Transparency log













