
BlendRelay MCP — Create and Edit Blender Scenes with AI
An open-source Blender AI add-on and MCP server for prompt-based 3D modeling, scene generation, Edit Mode changes, reference images, and viewport sketches.
BlendRelay MCP brings AI 3D modeling and text-to-Blender workflows into Blender 4.5+. Connect Codex, Claude Code, Antigravity, or another MCP-compatible AI agent; describe what you want; attach design references; sketch over the viewport; or target selected objects and mesh elements. The agent can then inspect and update the open .blend scene through typed Blender tools.
Visit the BlendRelay website · Install from PyPI · View the source on GitHub
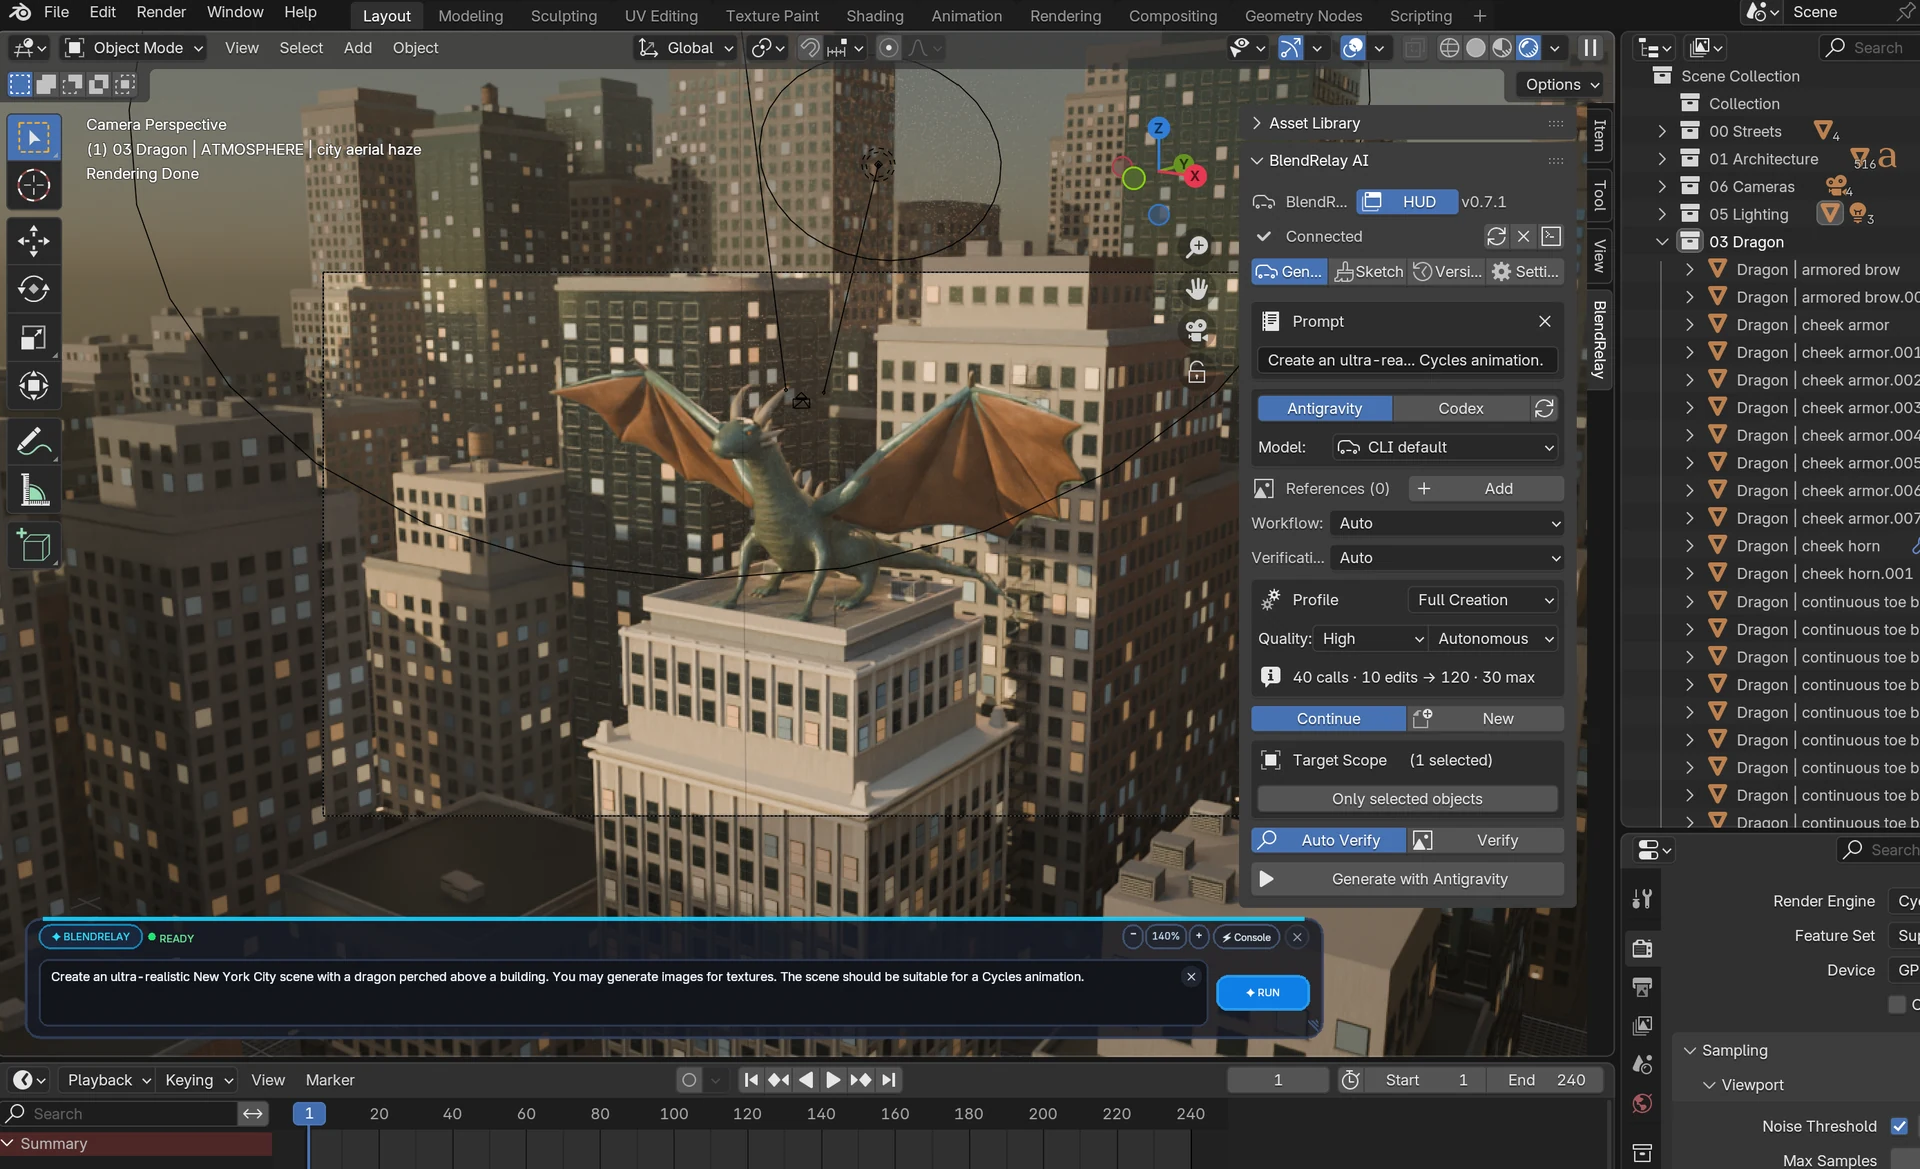
What you can do
- Generate complete scenes, environments, props, buildings, products, and abstract artwork.
- Edit selected objects with natural-language instructions.
- Work with selected vertices, edges, and faces in Blender Edit Mode.
- Use one or more reference images for shape, composition, material, or style guidance.
- Draw viewport sketches and adjustable target boxes to show where changes should happen.
- Create materials, lighting, cameras, modifiers, Geometry Nodes, animation, and renders.
- Save and restore automatic scene checkpoints if a result needs to be undone.
Before you install
You need:
- Blender 4.5 or newer. Open Blender once before running setup.
uvxor Python 3.11+ withpip.- One supported AI command-line agent, installed and signed in:
- OpenAI Codex CLI
- Google Antigravity CLI
- Anthropic Claude Code
Install BlendRelay
Open PowerShell or a terminal and run:
uvx blendrelay-mcp setup
Alternatively, install it with pip:
python -m pip install blendrelay-mcp
blendrelay-mcp setup
Setup creates the local runtime folders and installs the bundled Blender extension into the newest compatible Blender installation it finds.
To target a particular Blender version:
uvx blendrelay-mcp setup --blender-version 4.5
Enable it in Blender
- Restart Blender after installation.
- Open Edit → Preferences → Add-ons / Get Extensions.
- Search for BlendRelay MCP and enable it.
- Return to the 3D Viewport and press
Nto open the sidebar. - Select the BlendRelay tab.
- Click Connect.
The floating HUD can be shown or hidden from the panel. Its prompt supports multiple lines: use Shift+Enter for a new line and Enter to run.
Connect your AI agent
Codex CLI
Register BlendRelay once with Codex:
codex mcp add blendrelay -- uvx blendrelay-mcp mcp
codex mcp list
Make sure blendrelay appears as enabled. In Blender, choose Codex, select a model available to your signed-in account, and click Connect.
Antigravity CLI
Install and sign in to Antigravity, then select Antigravity in the Blender panel. BlendRelay prepares the task-specific MCP configuration when it launches the agent. If your Antigravity permission policy blocks MCP tools, allow mcp(blendrelay/*) in the Antigravity settings.
Claude Code
Install and sign in to Claude Code, then select Claude in the Blender panel. BlendRelay detects the claude executable, supplies an isolated MCP configuration for each run, and approves only tools from mcp__blendrelay__*. You can use Claude Code's configured default model or enter an alias such as sonnet or opus under Settings.
Conversation continuation is supported: enable Continue to resume the Claude session associated with the current Blender workspace, or click New to start cleanly.
Other MCP clients
Claude Desktop, Claude Code, Cursor, and other MCP clients can connect to Blender through the published package:
{
  "mcpServers": {
    "blendrelay": {
      "command": "uvx",
      "args": ["blendrelay-mcp", "mcp"]
    }
  }
}
This external-client connection does not require the Blender panel to launch Codex, Claude, or Antigravity. Blender and the BlendRelay add-on still need to be open and connected.
Your first creation
In the Generate tab:
- Choose the AI agent and model.
- Choose a generation profile and quality level.
- Leave the scope on Full Scene for a new scene.
- Enter a clear prompt.
- Click Generate or use the floating HUD.
Example prompt:
Create a polished studio product scene for a modern wireless speaker.
Use a dark graphite body, a woven fabric grille, soft bevels, and realistic PBR materials.
Place it on a simple pedestal with a large softbox key light, subtle rim lighting,
an 85 mm product camera, and a clean charcoal background. Keep all major parts
as separately named objects and frame the final camera for a 16:9 render.
Strong prompts usually include the subject, dimensions or scale, visual style, materials, lighting, camera composition, required separate parts, and the desired final output.
Edit existing work
For object-level edits:
- Select one or more objects in Blender.
- Enable Only selected objects.
- Describe the requested change, including what must be preserved.
Only edit the selected chair. Make the backrest 15% taller, soften the outer edges,
replace the upholstery with dark green velvet, and preserve its location and dimensions.
For mesh edits, enter Blender Edit Mode, select the relevant vertices, edges, or faces, and enable Only selected geometry.
Only modify the selected faces. Inset them slightly, extrude inward by 3 cm,
and bevel the new boundary with three segments. Preserve the surrounding topology.
BlendRelay can capture focused views of the selection so the agent receives both scene data and visual context.
Use references, sketches, and target regions
- Add multiple images from Reference Images, or drag images onto the 3D Viewport.
- In Sketch & Region, draw strokes over the viewport to communicate paths, silhouettes, placement, or corrections.
- Use an adjustable target box when the requested creation or change belongs in a specific volume.
- State how each reference should be used. For example: “use image 1 for shape and image 2 only for materials.”
Reference images guide the agent; they are not automatically converted into exact production geometry. Include known dimensions whenever accuracy matters.
Choose a generation profile
| Profile | Best for |
|---|---|
| Focused Task | A contained edit to selected objects or geometry |
| Full Creation | A complete object or moderately detailed scene |
| Creation + Assets | Scenes that should search the enabled asset providers |
| Complex Production | Large scenes, multi-stage builds, animation, or detailed verification |
Start with High quality for normal work. Use Maximum when visual finish matters more than generation time and token usage.
Checkpoints and safe iteration
BlendRelay saves a recovery checkpoint before an AI task and another after successful completion. Open Versions to save or restore scene states.
Save the main .blend file normally as well. The workspace identity is stored in the Blender file, allowing BlendRelay to reconnect the file to its existing references, logs, and checkpoints when you reopen it.
Update BlendRelay
For an uvx installation:
uvx --refresh blendrelay-mcp setup
For a pip installation:
python -m pip install --upgrade blendrelay-mcp
blendrelay-mcp setup
Restart Blender after updating so it loads the newly installed extension files.
Troubleshooting
Run the diagnostic command first:
uvx blendrelay-mcp doctor
If Blender shows Disconnected:
- Keep Blender open and click Connect again.
- Confirm the selected AI CLI is installed and signed in.
- For Codex, run
codex mcp listand confirm the server is namedblendrelay. - For Claude, run
claude doctorand confirm the CLI is healthy. BlendRelay supplies the MCP configuration automatically when Claude is launched from the panel. - Rerun
uvx --refresh blendrelay-mcp setupafter installing a new Blender version. - Restart Blender after updating the add-on.
If an agent finishes without changing the scene, inspect the task log shown in the Blender panel. Common causes are a disconnected Blender bridge, an MCP permission denial, or an AI client registered under a different server name.
Local data
BlendRelay stores shared runtime data under %LOCALAPPDATA%\BlendRelayMCP on Windows. Each Blender scene receives its own folder under workspaces/<workspace-id>/ for references, agent logs, screenshots, sketches, and scene versions.
Set BLENDRELAY_DATA_DIR if you need a different storage location.
Advanced commands
blendrelay-mcp doctor: Check the installation and runtime status.blendrelay-mcp install-addon: Reinstall the bundled Blender extension.blendrelay-mcp mcp: Start the MCP stdio gateway.blendrelay-mcp runtime serve: Start the local runtime bridge manually.
License
BlendRelay MCP is open-source software. Contributions, bug reports, feature requests, and documentation improvements are welcome.
- The Python MCP server and runtime are released under the MIT License.
- The Blender extension is released under GPL-3.0-or-later.
See the repository license files for the complete terms.
1 maintainer

Download files
Download the file for your platform. If you're not sure which to choose, learn more about installing packages.
Source Distribution
Built Distribution
Filter files by name, interpreter, ABI, and platform.
If you're not sure about the file name format, learn more about wheel file names.
Copy a direct link to the current filters
File details
Details for the file blendrelay_mcp-0.7.3.tar.gz.
File metadata
- Download URL: blendrelay_mcp-0.7.3.tar.gz
- Upload date:
- Size: 137.1 kB
- Tags: Source
- Uploaded using Trusted Publishing? Yes
- Uploaded via:
twine/7.0.0 CPython/3.13.14
File hashes
| Algorithm | Hash digest | |
|---|---|---|
| SHA256 |
1d9e99fdf2c28eb46cff035b05cd41198629f7a688002c3195c53751fcf0570f
|
|
| MD5 |
a9e324e9a3ca90d752a18b9bc945c194
|
|
| BLAKE2b-256 |
90c810ee436a2194c468574b9fcf51d74841ac541bf8c107c4e7a0d6a07e1d66
|
Provenance
The following attestation bundles were made for blendrelay_mcp-0.7.3.tar.gz:
Publisher:
release.yml on shefq/blendrelay-mcp
-
Statement:
-
Statement type:
https://in-toto.io/Statement/v1 -
Predicate type:
https://docs.pypi.org/attestations/publish/v1 -
Subject name:
blendrelay_mcp-0.7.3.tar.gz -
Subject digest:
1d9e99fdf2c28eb46cff035b05cd41198629f7a688002c3195c53751fcf0570f - Sigstore transparency entry: 2880034159
- Sigstore integration time:
-
Permalink:
shefq/blendrelay-mcp@6e29da282658a788322598084bf77d0bbb3ea044 -
Branch / Tag:
refs/tags/v0.7.3 - Owner: https://github.com/shefq
-
Access:
public
-
Token Issuer:
https://token.actions.githubusercontent.com -
Runner Environment:
github-hosted -
Publication workflow:
release.yml@6e29da282658a788322598084bf77d0bbb3ea044 -
Trigger Event:
push
-
Statement type:
File details
Details for the file blendrelay_mcp-0.7.3-py3-none-any.whl.
File metadata
- Download URL: blendrelay_mcp-0.7.3-py3-none-any.whl
- Upload date:
- Size: 147.5 kB
- Tags: Python 3
- Uploaded using Trusted Publishing? Yes
- Uploaded via:
twine/7.0.0 CPython/3.13.14
File hashes
| Algorithm | Hash digest | |
|---|---|---|
| SHA256 |
ee4e7133f9f5bed518297c4c7bc4cdc301a5025223df817910dc06ef67f7de22
|
|
| MD5 |
8941c8b8544c67fa4f41d74dc28a6a3e
|
|
| BLAKE2b-256 |
01adcc340656558052efbb66f69830d8a726a1809bc2797a0b540cc62f9c3e5e
|
Provenance
The following attestation bundles were made for blendrelay_mcp-0.7.3-py3-none-any.whl:
Publisher:
release.yml on shefq/blendrelay-mcp
-
Statement:
-
Statement type:
https://in-toto.io/Statement/v1 -
Predicate type:
https://docs.pypi.org/attestations/publish/v1 -
Subject name:
blendrelay_mcp-0.7.3-py3-none-any.whl -
Subject digest:
ee4e7133f9f5bed518297c4c7bc4cdc301a5025223df817910dc06ef67f7de22 - Sigstore transparency entry: 2880034171
- Sigstore integration time:
-
Permalink:
shefq/blendrelay-mcp@6e29da282658a788322598084bf77d0bbb3ea044 -
Branch / Tag:
refs/tags/v0.7.3 - Owner: https://github.com/shefq
-
Access:
public
-
Token Issuer:
https://token.actions.githubusercontent.com -
Runner Environment:
github-hosted -
Publication workflow:
release.yml@6e29da282658a788322598084bf77d0bbb3ea044 -
Trigger Event:
push
-
Statement type:














