A free and open source API for accessing various large language models

Project description

Written by @xtekky
[!IMPORTANT] By using this repository or any code related to it, you agree to the legal notice. The author is not responsible for the usage of this repository nor endorses it, nor is the author responsible for any copies, forks, re-uploads made by other users, or anything else related to BugGPT. This is the author's only account and repository. To prevent impersonation or irresponsible actions, please comply with the GNU GPL license this Repository uses.
[!WARNING] "buggpt" serves as a PoC (proof of concept), demonstrating the development of an API package with multi-provider requests, with features like timeouts, load balance and flow control.
Latest version:

Stats:


pip install -U buggpt[all]
docker pull yourdockerhubusername/buggpt
🆕 What's New

-
Explore the latest features and updates Find comprehensive details on our Releases Page.
-
Stay updated with our Telegram Channel 📨 Join us at telegram.me/buggpt_channel.
-
Subscribe to our Discord News Channel 💬🆕️ Stay informed about updates via our News Channel: discord.gg/5E39JUWUFa.
-
Get support in our Discord Community 🤝💻 Reach out for help in our Support Group: discord.gg/qXA4Wf4Fsm.
-
Read our Documentation 📖 Find detailed guidance and resources at buggpt.github.io/docs.
🔻 Site Takedown
Is your site on this repository and you want to take it down? Send an email to takedown@buggpt.ai with proof it is yours and it will be removed as fast as possible. To prevent reproduction please secure your API. 😉
🚀 BugGPT on GitHub Pages 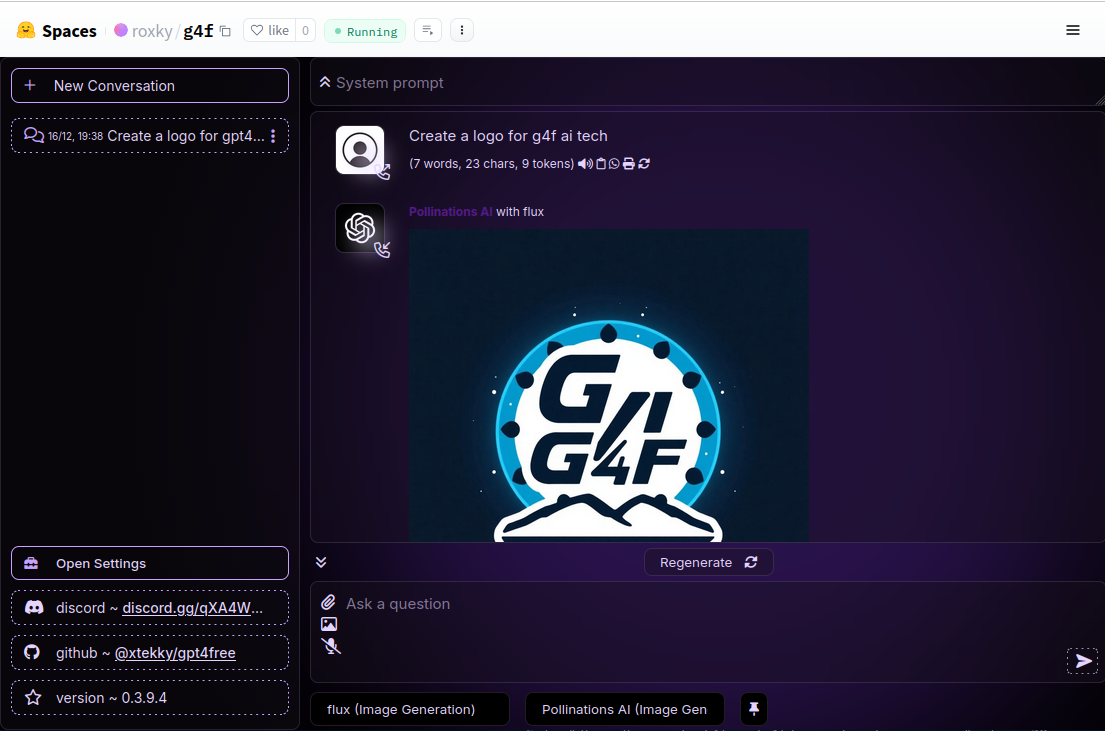
Explore the BugGPT on GitHub Pages.
📚 Table of Contents
- 🆕 What's New
- 📚 Table of Contents
- ⚡ Getting Started
- 💡 Usage
- 🚀 Providers and Models
- 🔗 Powered by BugGPT
- 🤝 Contribute
- 🙌 Contributors
- ©️ Copyright
- ⭐ Star History
- 📄 License
⚡️ Getting Started
🛠 Installation
🐳 Using Docker
- Install Docker: Download and install Docker.
- Set Up Directories: Before running the container, make sure the necessary data directories exist or can be created. For example, you can create and set ownership on these directories by running:
mkdir -p ${PWD}/har_and_cookies ${PWD}/generated_media
sudo chown -R 1200:1201 ${PWD}/har_and_cookies ${PWD}/generated_media
- Run the Docker Container: Use the following commands to pull the latest image and start the container (Only x64):
docker pull yourdockerhubusername/buggpt
docker run -p 8080:8080 -p 7900:7900 \
  --shm-size="2g" \
  -v ${PWD}/har_and_cookies:/app/har_and_cookies \
  -v ${PWD}/generated_media:/app/generated_media \
  yourdockerhubusername/buggpt:latest
- Running the Slim Docker Image: And use the following commands to run the Slim Docker image. This command also updates the
buggptpackage at startup and installs any additional dependencies: (x64 and arm64)
mkdir -p ${PWD}/har_and_cookies ${PWD}/generated_media
chown -R 1000:1000 ${PWD}/har_and_cookies ${PWD}/generated_media
docker run \
  -p 1337:1337 \
  -v ${PWD}/har_and_cookies:/app/har_and_cookies \
  -v ${PWD}/generated_media:/app/generated_media \
  yourdockerhubusername/buggpt:latest-slim \
  /bin/sh -c 'rm -rf /app/buggpt && pip install -U buggpt[slim] && python -m buggpt --debug'
-
Access the Client Interface:
- To use the included client, navigate to: http://localhost:8080/chat/
- Or set the API base for your client to: http://localhost:8080/v1
-
(Optional) Provider Login: If required, you can access the container's desktop here: http://localhost:7900/?autoconnect=1&resize=scale&password=secret for provider login purposes.
🪟 Windows Guide (.exe)
To ensure the seamless operation of our application, please follow the instructions below. These steps are designed to guide you through the installation process on Windows operating systems.
Installation Steps:
- Download the Application: Visit our releases page and download the most recent version of the application, named
buggpt.exe.zip. - File Placement: After downloading, locate the
.zipfile in your Downloads folder. Unpack it to a directory of your choice on your system, then execute thebuggpt.exefile to run the app. - Open GUI: The app starts a web server with the GUI. Open your favorite browser and navigate to http://localhost:8080/chat/ to access the application interface.
- Firewall Configuration (Hotfix): Upon installation, it may be necessary to adjust your Windows Firewall settings to allow the application to operate correctly. To do this, access your Windows Firewall settings and allow the application.
By following these steps, you should be able to successfully install and run the application on your Windows system. If you encounter any issues during the installation process, please refer to our Issue Tracker or try to get contact over Discord for assistance.
🐍 Python Installation
Prerequisites:
- Install Python 3.10+ from python.org.
- Install Google Chrome for certain providers.
Install with PyPI:
pip install -U buggpt[all]
How do I install only parts or do disable parts? Use partial requirements: /docs/requirements
Install from Source:
git clone https://github.com/yourusername/buggpt.git
cd buggpt
pip install -r requirements.txt
How do I load the project using git and installing the project requirements? Read this tutorial and follow it step by step: /docs/git
💡 Usage
📝 Text Generation
from buggpt.client import Client

client = Client()
response = client.chat.completions.create(
    model="gpt-4o-mini",
    messages=[{"role": "user", "content": "Hello"}],
    web_search=False
)
print(response.choices[0].message.content)
Hello! How can I assist you today?
🎨 Image Generation
from buggpt.client import Client

client = Client()
response = client.images.generate(
    model="flux",
    prompt="a white siamese cat",
    response_format="url"
)

print(f"Generated image URL: {response.data[0].url}")

🌐 Web Interface
Run the GUI using Python:
from buggpt.gui import run_gui

run_gui()
Run via CLI (To start the Flask Server):
python -m buggpt.cli gui --port 8080 --debug
Or, start the FastAPI Server:
python -m buggpt --port 8080 --debug
Learn More About the GUI: For detailed instructions on how to set up, configure, and use the BugGPT GUI, refer to the GUI Documentation . This guide includes step-by-step details on provider selection, managing conversations, using advanced features like speech recognition, and more.
🤖 Interference API
The Interference API enables seamless integration with OpenAI's services through BugGPT, allowing you to deploy efficient AI solutions.
- Documentation: Interference API Docs
- Endpoint:
http://localhost:1337/v1 - Swagger UI: Explore the OpenAPI documentation via Swagger UI at
http://localhost:1337/docs - Provider Selection: How to Specify a Provider?
This API is designed for straightforward implementation and enhanced compatibility with other OpenAI integrations.
📱 Run on Smartphone
Run the Web UI on your smartphone for easy access on the go. Check out the dedicated guide to learn how to set up and use the GUI on your mobile device: Run on Smartphone Guide
📘 Full Documentation for Python API
- Client API from BugGPT: /docs/client
- AsyncClient API from BugGPT: /docs/async_client
- Requests API from BugGPT: /docs/requests
- File API from BugGPT: /docs/file
- PydanticAI and LangChain Integration for BugGPT: /docs/pydantic_ai
- Legacy API with python modules: /docs/legacy
- BugGPT - Media Documentation (Image, Audio and Video) /docs/media (New)
Powered by Pollinations AI
🌟 Pollinations AI

A creative AI content platform that generates images, audios, and other media using advanced generative models. Pollinations AI empowers users and developers to turn text into visuals and multimedia experiences.
Powered by BugGPT
💸 MoneyPrinter

MoneyPrinter V2 cranks up the automation for making money online. It’s a complete overhaul of the original MoneyPrinter, rebuilt from the ground up for more features and a plug-and-play, modular design. MPV2 takes the grind and guesswork out of online income: just set it up, let it run, and watch your earnings stack.
🤝 Contribute
We welcome contributions from the community. Whether you're adding new providers or features, or simply fixing typos and making small improvements, your input is valued. Creating a pull request is all it takes – our co-pilot will handle the code review process. Once all changes have been addressed, we'll merge the pull request into the main branch and release the updates at a later time.
Guide: How do i create a new Provider?
- Read: Create Provider Guide
Guide: How can AI help me with writing code?
- Read: AI Assistance Guide
Contributors
A list of all contributors is available here
- The
Vercel.pyfile contains code from vercel-llm-api by @ading2210 - The
har_file.pyhas input from xqdoo00o/ChatGPT-to-API - The
PerplexityLabs.pyhas input from nathanrchn/perplexityai - The
Gemini.pyhas input from dsdanielpark/Gemini-API - The
MetaAI.pyfile contains code from meta-ai-api by @Strvm - The
proofofwork.pyhas input from missuo/FreeGPT35 - The
Gemini.pyhas input from HanaokaYuzu/Gemini-API
Having input implies that the AI's code generation utilized it as one of many sources.
©️ Copyright
This program is licensed under the GNU GPL v3
xtekky/gpt4free: Copyright (C) 2023 xtekky

This program is free software: you can redistribute it and/or modify
it under the terms of the GNU General Public License as published by
the Free Software Foundation, either version 3 of the License, or
(at your option) any later version.

This program is distributed in the hope that it will be useful,
but WITHOUT ANY WARRANTY; without even the implied warranty of
MERCHANTABILITY or FITNESS FOR A PARTICULAR PURPOSE.  See the
GNU General Public License for more details.

You should have received a copy of the GNU General Public License
along with this program.  If not, see <https://www.gnu.org/licenses/>.
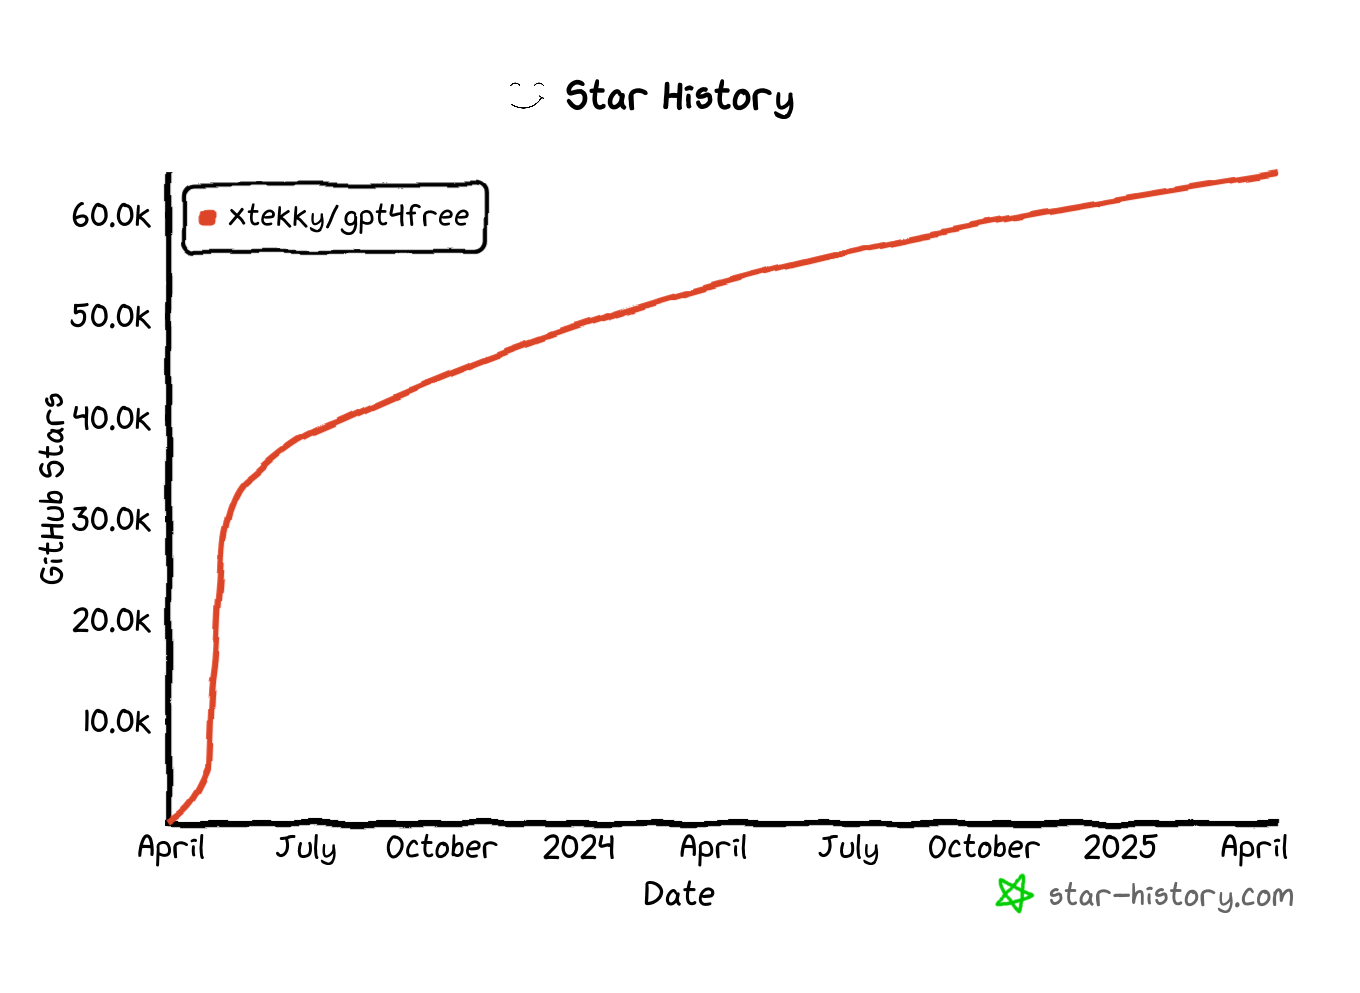
⭐ Star History
📄 License
|
|
 This project is licensed under GNU_GPL_v3.0. |

Now that you have the latest state of the file, try the operation again with fewer, more precise SEARCH blocks. For large files especially, it may be prudent to try to limit yourself to <5 SEARCH/REPLACE blocks at a time, then wait for the user to respond with the result of the operation before following up with another replace_in_file call to make additional edits. (If you run into this error 3 times in a row, you may use the write_to_file tool as a fallback.) <environment_details>
VSCode Visible Files
MANIFEST.in
VSCode Open Tabs
setup.py MANIFEST.in
Current Time
6/8/2025, 12:52:44 PM (Africa/Cairo, UTC+3:00)
Context Window Usage
71,764 / 1,048.576K tokens used (7%)
Current Mode
ACT MODE </environment_details>
Release history Release notifications | RSS feed


Download files
Download the file for your platform. If you're not sure which to choose, learn more about installing packages.
Source Distribution
Built Distribution
Filter files by name, interpreter, ABI, and platform.
If you're not sure about the file name format, learn more about wheel file names.
Copy a direct link to the current filters
File details
Details for the file buggpt-0.0.0.tar.gz.
File metadata
- Download URL: buggpt-0.0.0.tar.gz
- Upload date:
- Size: 363.0 kB
- Tags: Source
- Uploaded using Trusted Publishing? No
- Uploaded via: twine/6.1.0 CPython/3.11.3
File hashes
| Algorithm | Hash digest | |
|---|---|---|
| SHA256 |
c9c23ddb6d2b54862cd01dbcf1908bbc20837dd5f9eefa0053aa0ab2ebb7860f
|
|
| MD5 |
bdb4d16e9ca092cef49e1f8b7b79367f
|
|
| BLAKE2b-256 |
edcc0f57c64d790428c77e9b25d17537f0f0e9d6d1cca17f7c4c963b7d12e809
|
File details
Details for the file buggpt-0.0.0-py3-none-any.whl.
File metadata
- Download URL: buggpt-0.0.0-py3-none-any.whl
- Upload date:
- Size: 454.0 kB
- Tags: Python 3
- Uploaded using Trusted Publishing? No
- Uploaded via: twine/6.1.0 CPython/3.11.3
File hashes
| Algorithm | Hash digest | |
|---|---|---|
| SHA256 |
48aec11a966315d77ca2991621742aa4af741af43449e27205a5835b73a57ce8
|
|
| MD5 |
808e7f1ce9c48b60dc7df18a214133d5
|
|
| BLAKE2b-256 |
7d2e6e5f9664284d002806edc4cbcc9d8ae9db405bfc056881b10d0110788d2f
|


