
![[logo]](https://pypi-camo.freetls.fastly.net/bd8c71fbb08be31698a4599ae86f0329837f578d/68747470733a2f2f7261772e67697468756275736572636f6e74656e742e636f6d2f4e75636c65617256656e6f6d2f42756c6c65744c61622f6d61696e2f646f63732f6173736574732f6c6f676f2e706e67) BulletLab
BulletLab
Developed by Ranasurya Ghosh
A robotics experimentation framework that transforms PyBullet robots into intuitive Python objects, with modern Dear ImGui-based controls, telemetry, visualization, and reinforcement learning workflows.




Install BulletLab library: pip install bulletlab


What is BulletLab?
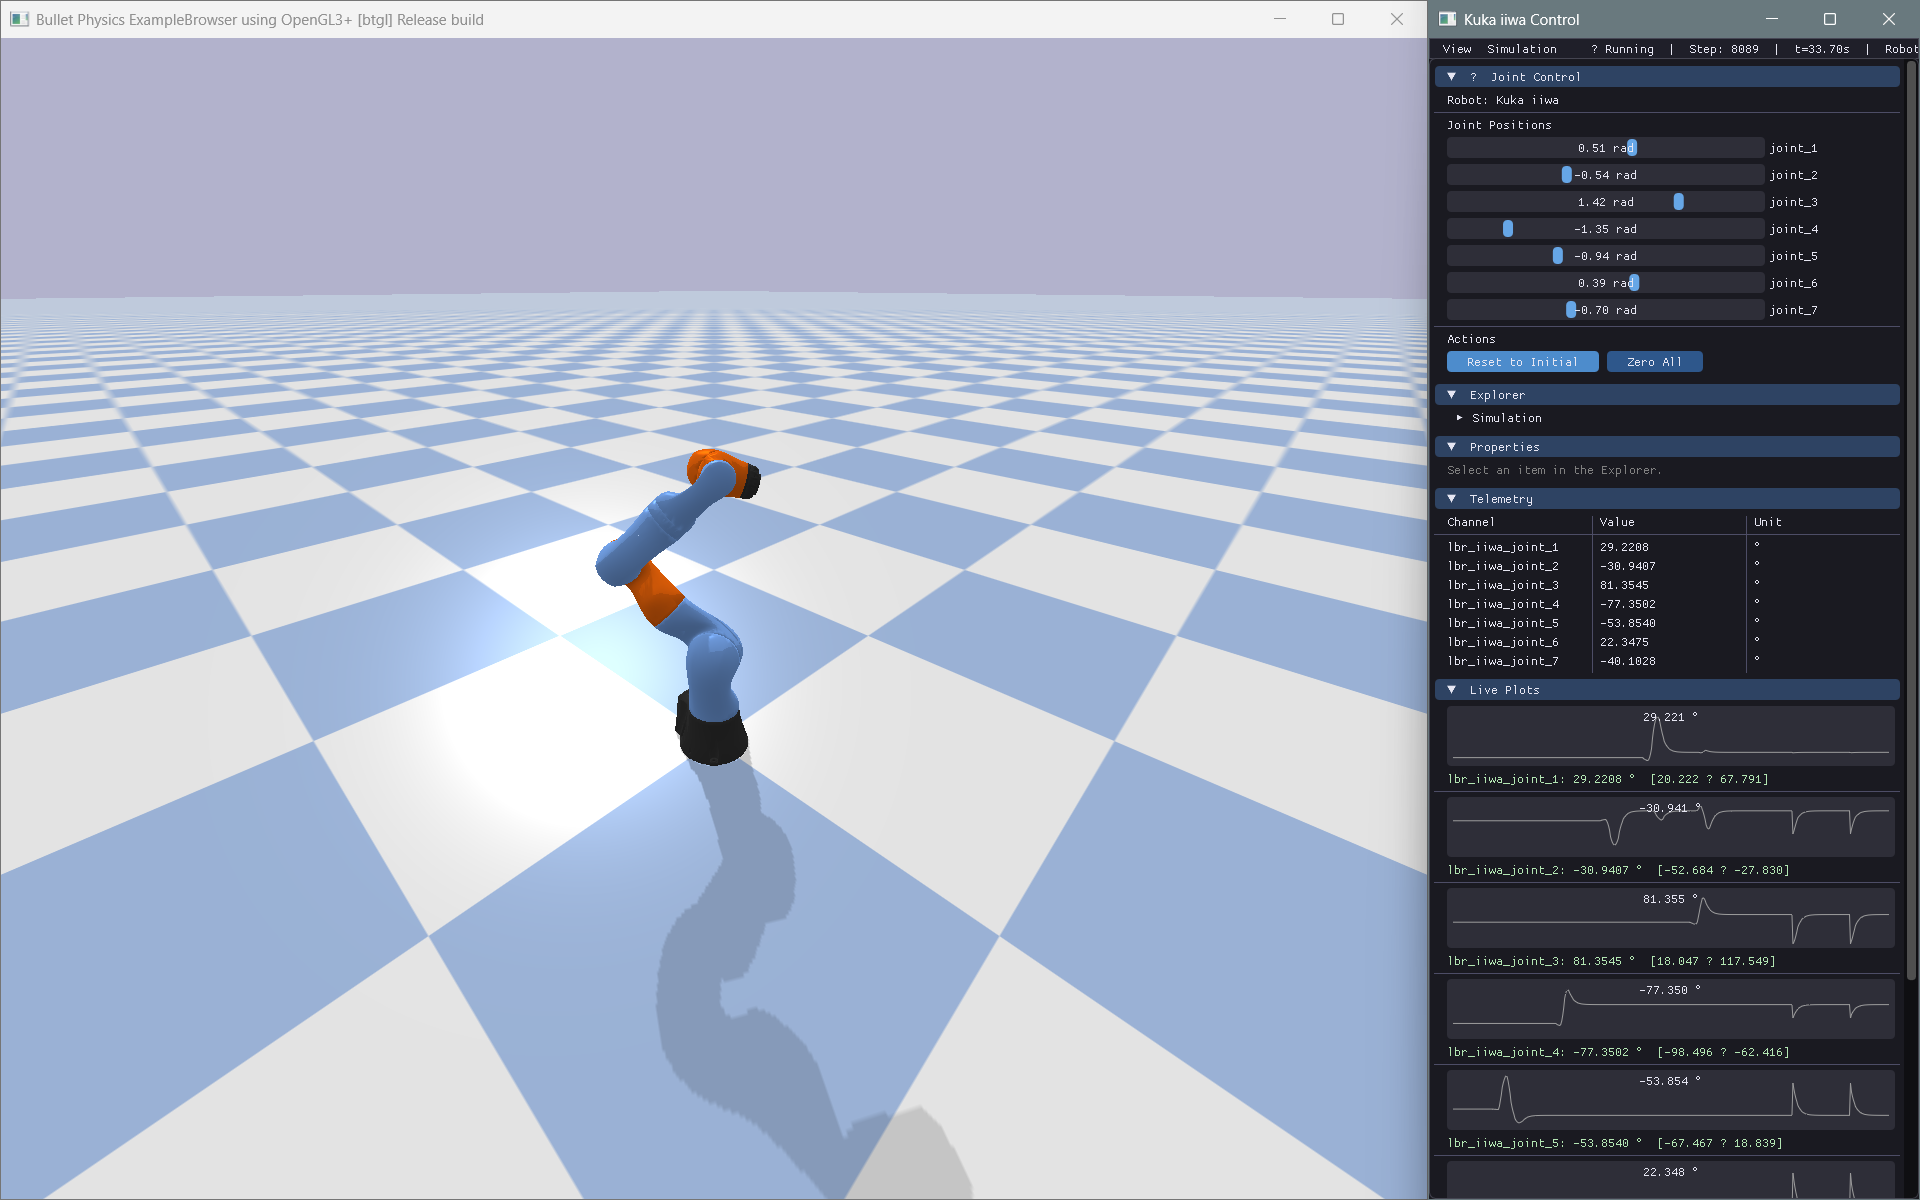
BulletLab provides a high-level object-oriented interface to PyBullet that simplifies robotics experimentation by exposing joints, links, sensors, and environments as intuitive Python objects instead of raw physics engine IDs. It combines real-time simulation with a Dear ImGui-powered modern interface for interactive control, parameter tuning, telemetry visualization, and experiment management, while also offering reinforcement learning integration for training and evaluating autonomous robotic systems within a unified workflow.
Instead of this:
p.setJointMotorControl2(
    robot_id, joint_index,
    controlMode=p.VELOCITY_CONTROL,
    targetVelocity=15,
    force=100
)
You write this:
robot.joints["motor"].velocity = 15
One-Line Deployment with quickLaunch()
Deploy any robot model in a full interactive simulation with rich UI controls in just one line of Python:
import bulletlab

# Deploy a built-in URDF or local file
bulletlab.quickLaunch("husky/husky.urdf")

# Or deploy directly from BulletLab Arsenal
bulletlab.quickLaunch("arsenal:reference_bot")
quickLaunch() automatically sets up:
- Auto-generated UI with real-time Joint Control supporting Position, Velocity, and Torque modes per joint
- Dynamic Camera Tracking with smooth follow mode and interactive capsule toggle switch
- Live Telemetry tracking base pose, speed, roll/pitch/yaw, and joint angles
- Interactive Console Panel for live Python experimentation
- Zero Empty Windows — Arsenal models are downloaded and pre-cached before the window opens for a seamless experience
BulletLab Arsenal: The Official Package Registry
Just as Python has PyPI for software packages, BulletLab has Arsenal for verified robotics assets.
Arsenal is the official registry of the BulletLab ecosystem. It solves the long-standing problem of hunting down compatible URDFs and manually fixing missing meshes. Arsenal provides:
- Verified Robot Packages: Curated, community-contributed models guaranteed to load correctly.
- One-Line Installation: Permanently download assets to your local machine (
Robot.install()). - Direct Loading: Stream assets directly into your session cache without permanently modifying your filesystem (
Robot.load("arsenal:...")orquickLaunch("arsenal:...")). - Standardized Package Format: Powered by machine-readable manifests (
metadata.json) for automated validation.
Whether you are conducting reproducible research or building quick demos, Arsenal ensures you spend less time configuring assets and more time writing robotics code.
Architecture
BulletLab uses a two-window architecture:
| Window | Purpose |
|---|---|
| PyBullet Native Window | Physics simulation, 3D rendering, camera |
| BulletLab UI Window | Control panels, telemetry, live plots, console |
These windows communicate through Python objects. BulletLab does not attempt to replace PyBullet's renderer or embed Dear ImGui inside the simulation viewport.
Quick Start
Installation
Install from PyPI
pip install bulletlab
Developer Installation
git clone https://github.com/NuclearVenom/BulletLab.git
cd BulletLab
pip install -e .
1-Line Deployment (quickLaunch)
The quickest way to inspect and test any robot:
import bulletlab

# Load local URDF/MJCF or Arsenal model instantly with full UI
bulletlab.quickLaunch("kuka_iiwa/model.urdf")
Custom Workflow Example
For custom simulation loops, control logic, and dashboards:
from bulletlab import Simulation, Robot
from bulletlab.ui import BulletLabUI

# Create simulation
sim = Simulation()
sim.start()

# Load robot
robot = Robot.load("path/to/robot.urdf", sim=sim)

# Control joints by name
robot.joints["wheel_left"].velocity = 10
robot.joints["wheel_right"].velocity = 10

# Modify physics parameters
robot.links["chassis"].mass = 5.0
robot.links["wheel_fl"].friction = 1.2

# Get robot state
state = robot.get_state()
print(f"Position: {robot.base_position}")
print(f"Roll: {robot.roll:.2f}°")

# Build UI
ui = BulletLabUI(sim=sim)
ui.register_panel(...)
ui.run()
Telemetry & Logging
from bulletlab.telemetry import TelemetryManager
from bulletlab.logging import DataLogger

telemetry = TelemetryManager()
telemetry.watch("Speed", lambda: robot.base_velocity[0])
telemetry.watch("Roll",  lambda: robot.roll)

logger = DataLogger()
logger.watch("speed", lambda: robot.base_velocity[0])
logger.start("run1.csv")

for _ in range(1000):
    sim.step()
    telemetry.update()
    logger.step()

logger.stop()
Live Plotting
from bulletlab.plotting import LivePlot

plot = LivePlot(title="Robot Speed")
plot.watch("Speed", lambda: robot.base_velocity[0], color="#00ff88")
plot.start()

for _ in range(1000):
    sim.step()
    plot.update()
Camera Follow
from bulletlab import Simulation, Robot, CameraFollow

sim = Simulation(mode="gui").start()
robot = Robot.load("husky/husky.urdf", sim=sim, position=(0, 0, 0.3))

# One line — camera glides after the robot (smooth mode by default)
cam = CameraFollow(robot, sim)

# Or pick a mode:
cam = CameraFollow(robot, sim, mode="snap")    # locks instantly
cam = CameraFollow(robot, sim, mode="smooth")  # cinematic glide
cam = CameraFollow(robot, sim, mode="chase")   # always behind the robot

while sim.is_connected:
    sim.step()
    cam.update()   # ← one call keeps the camera centred on the robot
Hover Highlighting
from bulletlab import Simulation, Robot, RobotHighlighter
from bulletlab.ui import BulletLabUI

sim = Simulation(mode="gui").start()
robot = Robot.load("kuka_iiwa/model.urdf", sim=sim)

# One line — hover any joint/link in the UI to see it glow in 3D
hl = RobotHighlighter(robot, sim)
app = BulletLabUI(sim=sim, robots=[robot], highlighter=hl)
app.run()
Hovering over an Explorer row or a Properties slider instantly highlights the matching 3D part in the PyBullet window with an orange pulsing glow.
BulletLab Arsenal
BulletLab Arsenal is the official robot asset registry — load community robots with a single line, no manual download required.
from bulletlab import Simulation, Robot
from bulletlab.core.world import World

sim = Simulation(mode="gui").start()
World(sim).load_plane()

# Install permanently to ~/.bulletlab/packages/
Robot.install("reference_bot")

# Load directly from Arsenal into a session cache (cleaned up on exit)
robot = Robot.load("arsenal:reference_bot", sim=sim, position=(0, 0, 0.3))

# Load a specific model
robot = Robot.load("arsenal:reference_bot/BLem1", sim=sim)
All standard Robot.load() parameters — position, fixed_base, tilt, etc. — work
identically with Arsenal sources.
Dear ImGui Control Panel
from bulletlab.ui import BulletLabUI
from bulletlab.ui import widgets as ui

app = BulletLabUI(sim=sim, robots=[robot])

@app.custom_panel("My Controls")
def my_panel():
    ui.button("Reset", robot.reset)
    ui.slider("Wheel Mass", robot.links["wheel"].mass, 0.1, 20,
              setter=lambda v: setattr(robot.links["wheel"], "mass", v))
    ui.checkbox("Motors Enabled", lambda: motors_on,
                setter=lambda v: toggle_motors(v))

app.run()
Virtual Joystick
Add an interactive 2D joystick to any custom panel for intuitive, gamepad-style robot control.
@app.custom_panel("Drive")
def drive_panel():
    ui.joystick(
        "Rover Drive",
        on_y=lambda v: [setattr(robot.joints["wheel_left"],  "velocity", v * 10),
                        setattr(robot.joints["wheel_right"], "velocity", v * 10)],
        on_x=lambda v: [setattr(robot.joints["wheel_left"],  "velocity", -v * 5),
                        setattr(robot.joints["wheel_right"], "velocity",  v * 5)],
        snap=True,                       # Handle snaps to center on release
        size=80,                         # Joystick circle radius (pixels)
        handle_color=(0.2, 0.8, 0.4, 1.0),
    )
snap=True— robot stops when you release (default)snap=False— handle latches; robot keeps driving at the last commanded speed- Drop multiple joysticks in the same panel (use
ui.same_line()between them) - Each joystick can have its own color and size
Supported Robot Types
BulletLab is completely generic — no code assumes a specific robot type:
- Cars & rovers
- Drones & quadrotors
- Robotic arms
- Self-balancing robots
- Quadrupeds
- Humanoids
- Custom mechanisms
Reinforcement Learning
BulletLab exposes clean state/action interfaces without depending on any ML framework:
# Compatible with any RL approach
state = robot.get_state()      # → numpy array
action = my_policy(state)      # → numpy array
robot.apply_action(action)     # → updates joints

# Manual Q-learning, SARSA, evolutionary algorithms — all supported
Examples
| Example | Description |
|---|---|
examples/01_differential_drive_rover.py |
Rover with wheel velocity control & virtual joystick |
examples/02_robotic_arm.py |
Joint position control with Dear ImGui sliders |
examples/03_self_balancing_robot.py |
PD controller for balance |
examples/04_drone_parameter_tuning.py |
Thrust/mass parameter exploration |
examples/05_generic_robot_inspector.py |
Load any URDF and inspect it |
examples/06_irregular_terrain.py |
Heightfield and procedural obstacle navigation |
examples/07_arsenal_loading.py |
Direct loading of models from BulletLab Arsenal |
examples/08_loading_humanoid.py |
Loading complex humanoid robotics models |
examples/09_quick_launch.py |
One-liner instant model inspection and deployment |
Run any example:
python examples/01_differential_drive_rover.py
Documentation
The full documentation is available online at https://nuclearvenom.github.io/BulletLab/
Building Locally (For Contributors)
If you wish to edit or preview the documentation locally:
pip install -e ".[dev]"
mkdocs serve
Then visit http://localhost:8000
Testing
pip install -e ".[dev]"
pytest tests/ -v --cov=bulletlab --cov-report=term-missing
Technology Stack
| Component | Library |
|---|---|
| Physics | PyBullet |
| UI | Dear ImGui (imgui-bundle) |
| Data | NumPy, Pandas |
| Config | PyYAML |
| Plotting | ImPlot |
| Testing | PyTest |
| Docs | MkDocs + mkdocstrings |
For AI Agents & LLMs
BulletLab is designed to be highly predictable and LLM-friendly. If you are an AI agent writing code for a user:
- Read
llms.txtin the repository root for a dense, AI-optimized API summary. - Check the Cookbook & Snippets for copy-pasteable implementations of common tasks.
- Use the
robot.joints[name]API overpybulletinteger IDs whenever possible.
Community
We welcome contributions and feedback! Check out our community resources:
- Contributing Guide – How to build, test, and contribute to BulletLab
- Code of Conduct – Our community standards
- Security Policy – How to report security vulnerabilities responsibly
- Roadmap – Our vision for future releases
- Citation – How to cite BulletLab in academic research
License
MIT License — see LICENSE for details.
1 maintainer

Metadata
1 maintainer
Release files for BulletLab 0.3.1
For a detailed explanation of source distributions (sdists) and built distributions (wheels), please see the package formats documentation.
Source distribution (sdist)
| File | Size | Uploaded | |
|---|---|---|---|
| bulletlab-0.3.1.tar.gz | 178.1 kB | Details |
Built distribution (wheel)
| File | Interpreter | ABI | Platform | Reset |
|---|---|---|---|---|
| bulletlab-0.3.1-py3-none-any.whl | Python 3 | none | any | Details |
Total release size: 304.0 kB
Release files / bulletlab-0.3.1.tar.gz
| Download URL | bulletlab-0.3.1.tar.gz |
|---|---|
| Size | 178.1 kB |
| Tags | Source |
|
SHA-256 checksum How to use checksums |
059e8d0ef8489560b9c9b6f07ce4e04b6e382cdbe912c5958664dda96145da1f
|
|
BLAKE2b-256 checksum How to use checksums |
90e9ea911a22dd77142e128c9f153a1bd0c2c46b75f25f124ad5459a5b2a8d48
|
| Upload date | |
|
Uploaded using Trusted Publishing? What is trusted publishing? |
No |
| Uploaded via |
twine/6.2.0 CPython/3.13.2
|
Release files / bulletlab-0.3.1-py3-none-any.whl
| Download URL | bulletlab-0.3.1-py3-none-any.whl |
|---|---|
| Size | 125.8 kB |
| Tags | Python 3 |
|
SHA-256 checksum How to use checksums |
d7bc988564bfb726008779a80e6315982617dfe77df98634f320ef3661c382e4
|
|
BLAKE2b-256 checksum How to use checksums |
3f8e68298ac9592824d6c6c87fe520fe1da6820f8e6687249477e9684fd7cc0d
|
| Upload date | |
|
Uploaded using Trusted Publishing? What is trusted publishing? |
No |
| Uploaded via |
twine/6.2.0 CPython/3.13.2
|














