CapInvest Platform MCP Server

Project description
CapInvest MCP Server
Model Context Protocol (MCP) server extension for CapInvest Platform. This extension enables LLM agents to interact with CapInvest Platform's REST API endpoints through the MCP protocol.
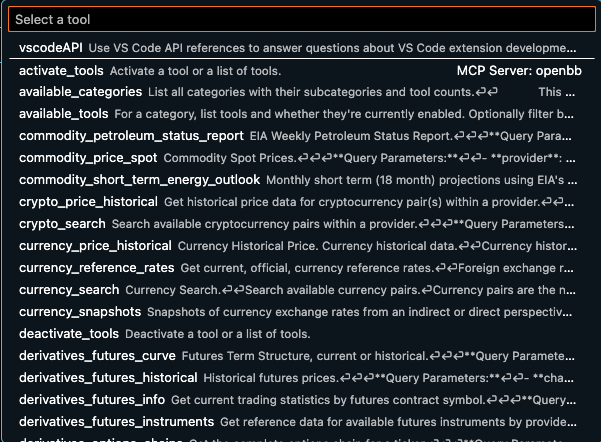
In addition, the server provides discovery tools that allow agents to explore different options and dynamically adjust their active toolset. This prevents agents from being overwhelmed with too many tools while allowing them to discover and activate only the tools they need for specific tasks.
Using these dynamic tool discovery, has one major drawback, it makes the server a single-user server. The tool updates are global, so if one user updates a tool, it will be updated for all users. If you plan to server multiple users, you should disable tool discovery, and instead use the allowed_tool_categories and default_tool_categories settings to control the tools that are available to the users.
Installation & Usage
pip install capinvest-mcp-server
Start the CapInvest MCP server with default settings:
capinvest-mcp
Or use the uvx command:
uvx --from capinvest-mcp-server --with capinvest capinvest-mcp
Command Line Options
--host: Host to bind to (default: 127.0.0.1)--port: Port to listen on (default: 8001)--allowed-categories: Comma-separated list of allowed tool categories--default-categories: Comma-separated list of categories enabled at startup (default: all)--transport: Transport protocol (default: streamable-http)--no-tool-discovery: Disable tool discovery for multi-client deployments
Examples
# Start with default settings
capinvest-mcp

# Start with specific categories and custom host/port
capinvest-mcp --default-categories equity,news --host 0.0.0.0 --port 8080

# Start with allowed categories restriction
capinvest-mcp --allowed-categories equity,crypto,news

# Disable tool discovery for multi-client usage
capinvest-mcp --no-tool-discovery
Claude Desktop:
To connect the CapInvest MCP server with Claude Desktop, you need to configure it as a custom tool server. Here are the steps:
- Locate the settings or configuration file for Claude Desktop where you can define custom MCP servers.
- Add the following entry to your
mcpServersconfiguration. This will configure Claude Desktop to launch the CapInvest MCP server automatically usingstdiofor communication.
{
  "mcpServers": {
    "capinvest-mcp": {
      "command": "uvx",
      "args": [
        "--from",
        "capinvest-mcp-server",
        "--with",
        "capinvest",
        "capinvest-mcp",
        "--transport",
        "stdio"
      ]
    }
  }
}
- Ensure that
uvx, is installed and available in your system's PATH. If not, follow the installation instructions. - Restart Claude Desktop to apply the changes. You should now see "capinvest-mcp" as an available tool source.
Cursor:
To use CapInvest tools within Cursor, you first need to run the MCP server and then tell Cursor how to connect to it.
Step 1: Run the CapInvest MCP Server
Open your terminal and start the server. You can use the default settings or customize it.
For a default setup, run:
capinvest-mcp
The server will start on http://127.0.0.1:8001.
Step 2: Configure Cursor
Add the following configuration to the mcpServers object in your mcp.json file. If the mcpServers object doesn't exist, you can add it.
{
  "mcpServers": {
    "capinvest-mcp": {
      "url": "http://localhost:8001/mcp/"
    }
  }
}
VS Code
Step 1: Enable MCP in VS Code Settings
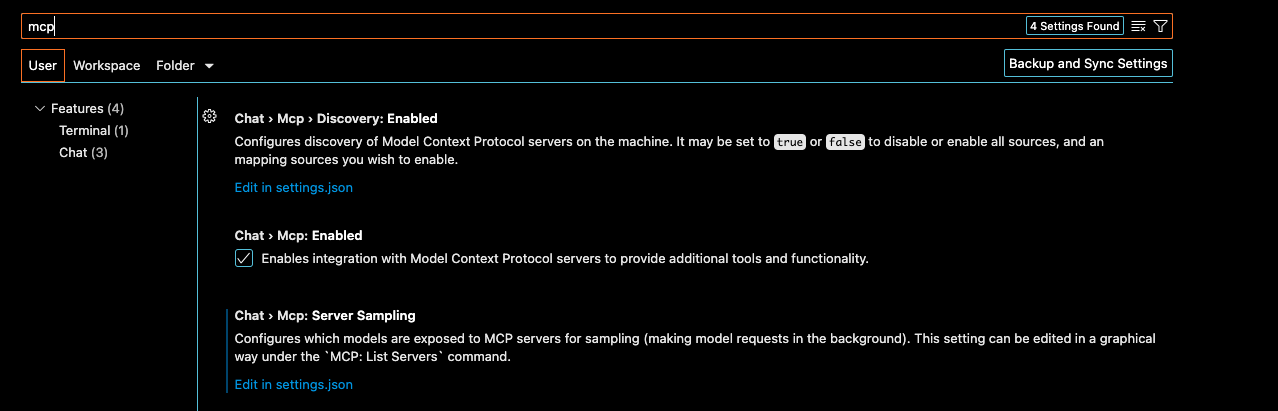
Enter shift + command + p and open "Preferences: Open User Settings"
Search for "mcp", and the item should show up under "Chat". Check the box to enable MCP server integrations.
Step 2: Run the CapInvest MCP Server
Open your terminal and start the server. You can use the default settings or customize it.
For a default setup, run:
capinvest-mcp
The server will start on http://127.0.0.1:8001.
Step 3: Add Server as HTTP
Enter shift + command + p and select "MCP: Add Server".
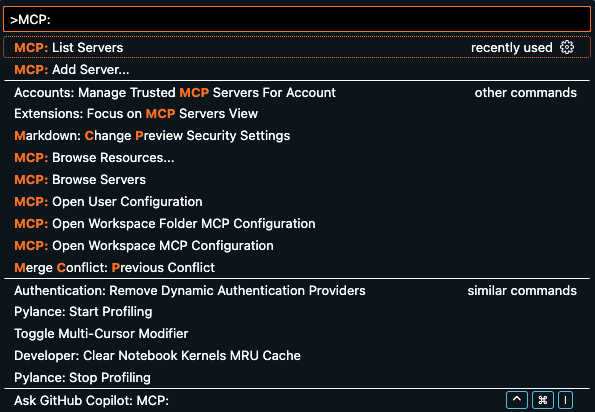
Press enter and then select HTTP.
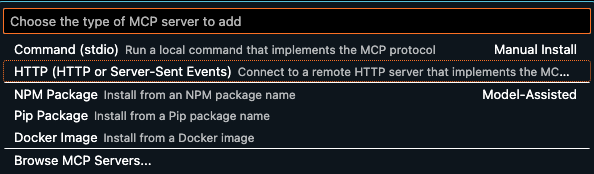
Copy the URL from the console of the running server, and enter it
INFO Starting MCP server 'CapInvest MCP' with transport 'streamable-http' on http://127.0.0.1:8001/mcp
Give it a name, and add it either as global or to a workspace. The end result will create a mcp.json VS Code configuration file for the chosen domain.
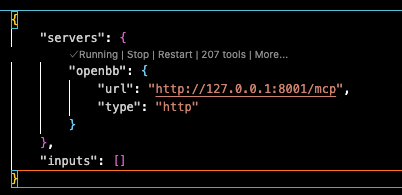
The tools can now be added as context to the chat.
Note: When adding to the Cline extension, set --transport sse when starting the server.
Configuration
The server can be configured through multiple methods:
Note: For some data providers you need to set your API key in the
~/.capinvest_platform/user_settings.jsonfile.
1. Configuration File (Recommended)
The server automatically creates and uses ~/.capinvest_platform/mcp_settings.json:
{
  "name": "CapInvest MCP",
  "description": "All CapInvest REST endpoints exposed as MCP tools...",
  "default_tool_categories": ["all"],
  "allowed_tool_categories": null,
  "enable_tool_discovery": true,
  "describe_responses": false
}
2. Environment Variables
Override settings using environment variables:
CAPINVEST_MCP_NAME: Server nameCAPINVEST_MCP_DESCRIPTION: Server descriptionCAPINVEST_MCP_DEFAULT_TOOL_CATEGORIES: Comma-separated list of default categoriesCAPINVEST_MCP_ALLOWED_TOOL_CATEGORIES: Comma-separated list of allowed categoriesCAPINVEST_MCP_ENABLE_TOOL_DISCOVERY: true/false - Enable tool discovery featuresCAPINVEST_MCP_DESCRIBE_ALL_RESPONSES: true/false - Include response details in descriptionsCAPINVEST_MCP_DESCRIBE_FULL_RESPONSE_SCHEMA: true/false - Include full response schemas
3. Command Line Arguments
Command line arguments override both configuration file and environment variables.
Settings Reference
| Setting | Type | Default | Description |
|---|---|---|---|
| name | string | "CapInvest MCP" | Server name displayed to MCP clients |
| description | string | "All CapInvest REST endpoints..." | Server description |
| default_tool_categories | list[string] | ["all"] | Categories enabled at startup. Use "all" to enable all categories, or specify individual categories |
| allowed_tool_categories | list[string] | null | If set, restricts available categories to this list |
| enable_tool_discovery | boolean | true | Enable discovery and management tools |
| describe_responses | boolean | false | Include response information in tool descriptions |
Tool Categories
The server organizes CapInvest tools into categories based on the REST API structure:
equity- Stock data, fundamentals, price history, estimatescrypto- Cryptocurrency data and analysiseconomy- Economic indicators, GDP, employment datanews- Financial news from various sourcesfixedincome- Bond data, rates, government securitiesderivatives- Options and futures dataetf- ETF information and holdingscurrency- Foreign exchange datacommodity- Commodity prices and dataindex- Market indices dataregulators- SEC, CFTC regulatory data
Each category contains subcategories that group related functionality (e.g., equity_price, equity_fundamental, etc.).
Tool Discovery
When enable_tool_discovery is enabled (default), the server provides discovery tools that allow agents to:
- Discover available tool categories and subcategories
- See tool counts and descriptions before activating
- Enable/disable specific tools dynamically during a session
- Start with minimal tools and progressively add more as needed
To take full advantage of minimal startup tools, you should set the --default-categories argument to admin this will enable only the discovery tools at startup.
For multi-client deployments or scenarios where you want a fixed toolset, disable tool discovery with --no-tool-discovery.
Release history Release notifications | RSS feed


Download files
Download the file for your platform. If you're not sure which to choose, learn more about installing packages.
Source Distribution
Built Distribution
Filter files by name, interpreter, ABI, and platform.
If you're not sure about the file name format, learn more about wheel file names.
Copy a direct link to the current filters
File details
Details for the file capinvest_mcp_server-1.0.10.tar.gz.
File metadata
- Download URL: capinvest_mcp_server-1.0.10.tar.gz
- Upload date:
- Size: 10.8 kB
- Tags: Source
- Uploaded using Trusted Publishing? No
- Uploaded via: poetry/2.2.1 CPython/3.11.4 Windows/10
File hashes
| Algorithm | Hash digest | |
|---|---|---|
| SHA256 |
7a9f1c076a9e252ee57d0a077bacf66df950b64a16641d8a74fc76e1d962610d
|
|
| MD5 |
6cf6918dc6803fa54dca1adfefa3fcad
|
|
| BLAKE2b-256 |
d357386d9aeb8504e515cbc146220f6eb0c9f570266a07ad1efb9d45bed27e05
|
File details
Details for the file capinvest_mcp_server-1.0.10-py3-none-any.whl.
File metadata
- Download URL: capinvest_mcp_server-1.0.10-py3-none-any.whl
- Upload date:
- Size: 13.7 kB
- Tags: Python 3
- Uploaded using Trusted Publishing? No
- Uploaded via: poetry/2.2.1 CPython/3.11.4 Windows/10
File hashes
| Algorithm | Hash digest | |
|---|---|---|
| SHA256 |
7cd15f4e9bbd1752e24b1789cb221dbdad03ee576c5adae21031e8204006f54c
|
|
| MD5 |
2bcae435305737954877574a9f7d2d2a
|
|
| BLAKE2b-256 |
14e521edd0a9cf0cc44dd29cd08022da9c7caa8e2ee016a3e78e0846b3e663f6
|


