Cell segmentation, tracking and event annotation


Project description
 Cell-ACDC
A GUI-based Python framework for segmentation, tracking, cell cycle annotations and quantification of microscopy data
Written in Python 3 by Francesco Padovani and Benedikt Mairhoermann.


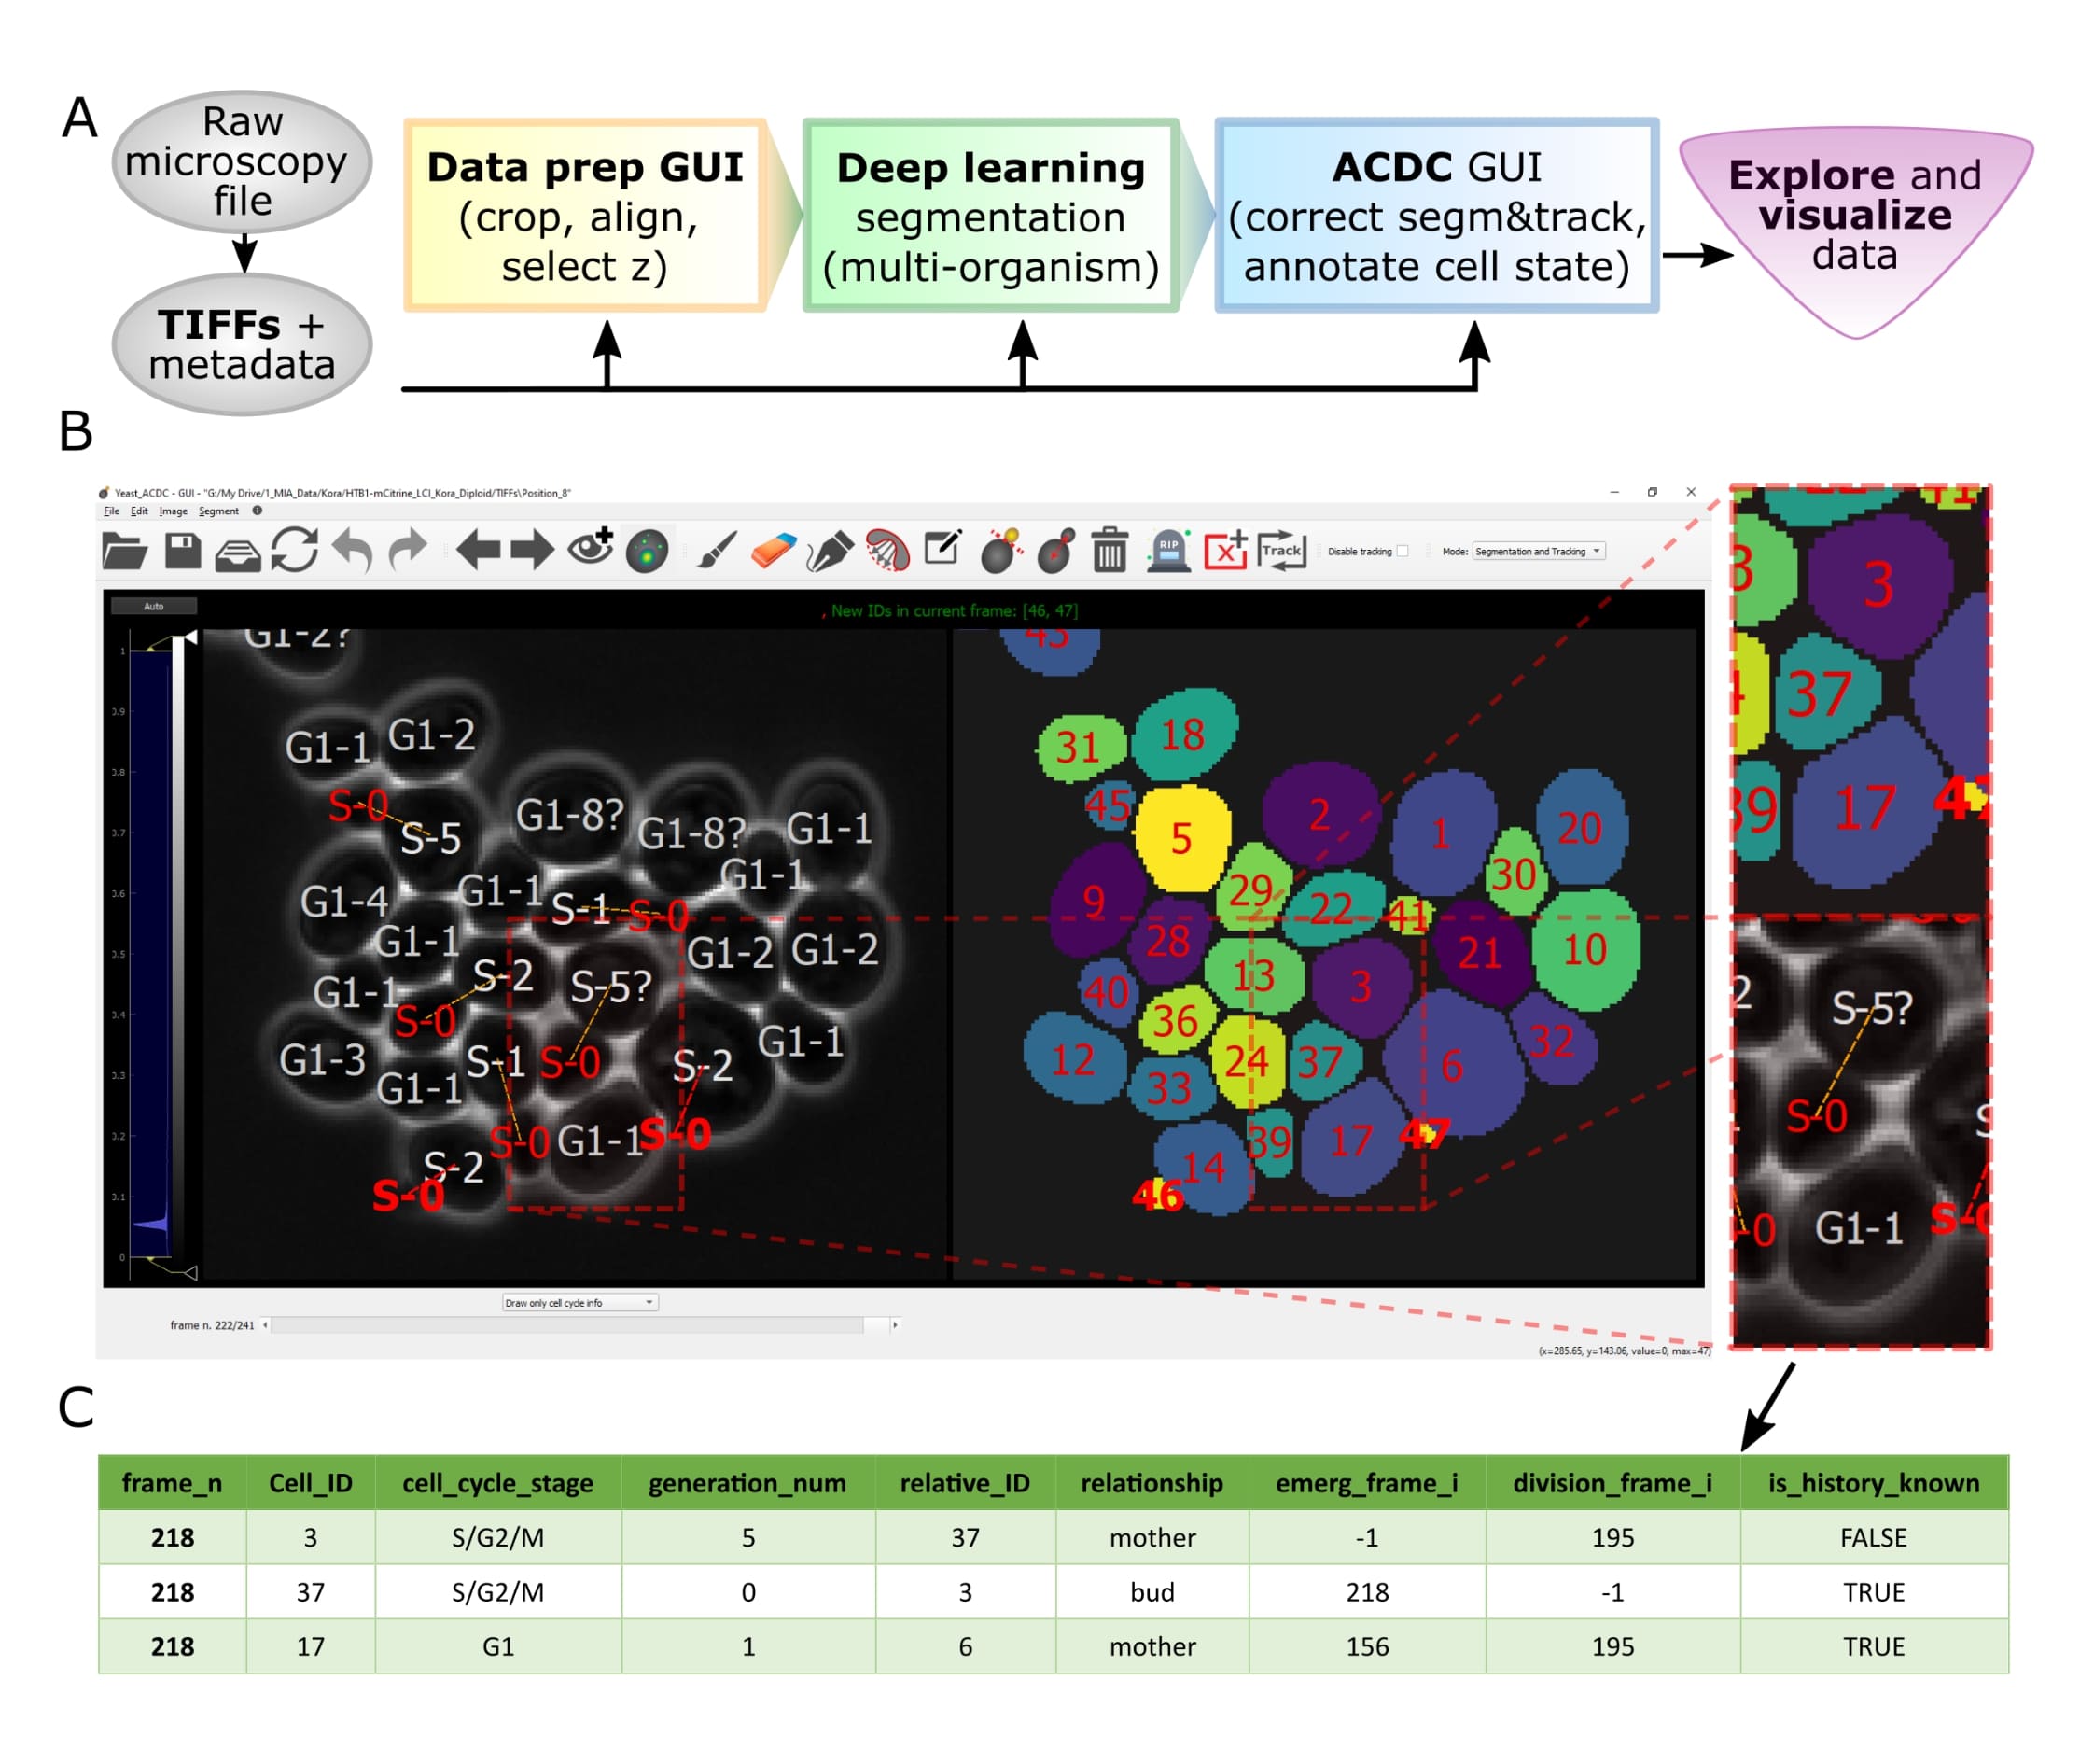
Overview of pipeline and GUI
Resources
- User Manual with detailed instructions
- Publication of Cell-ACDC
- Forum for discussions (feel free to ask any question)
- Report issues, request a feature or ask questions by opening a new issue here.
- Twitter thread
Overview
Let's face it, when dealing with segmentation of microscopy data we often do not have time to check that everything is correct, because it is a tedious and very time consuming process. Cell-ACDC comes to the rescue! We combined the currently best available neural network models (such as YeaZ, Cellpose, StarDist, and YeastMate) and we complemented them with a fast and intuitive GUI.
We developed and implemented several smart functionalities such as real-time continuous tracking, automatic propagation of error correction, and several tools to facilitate manual correction, from simple yet useful brush and eraser to more complex flood fill (magic wand) and Random Walker segmentation routines.
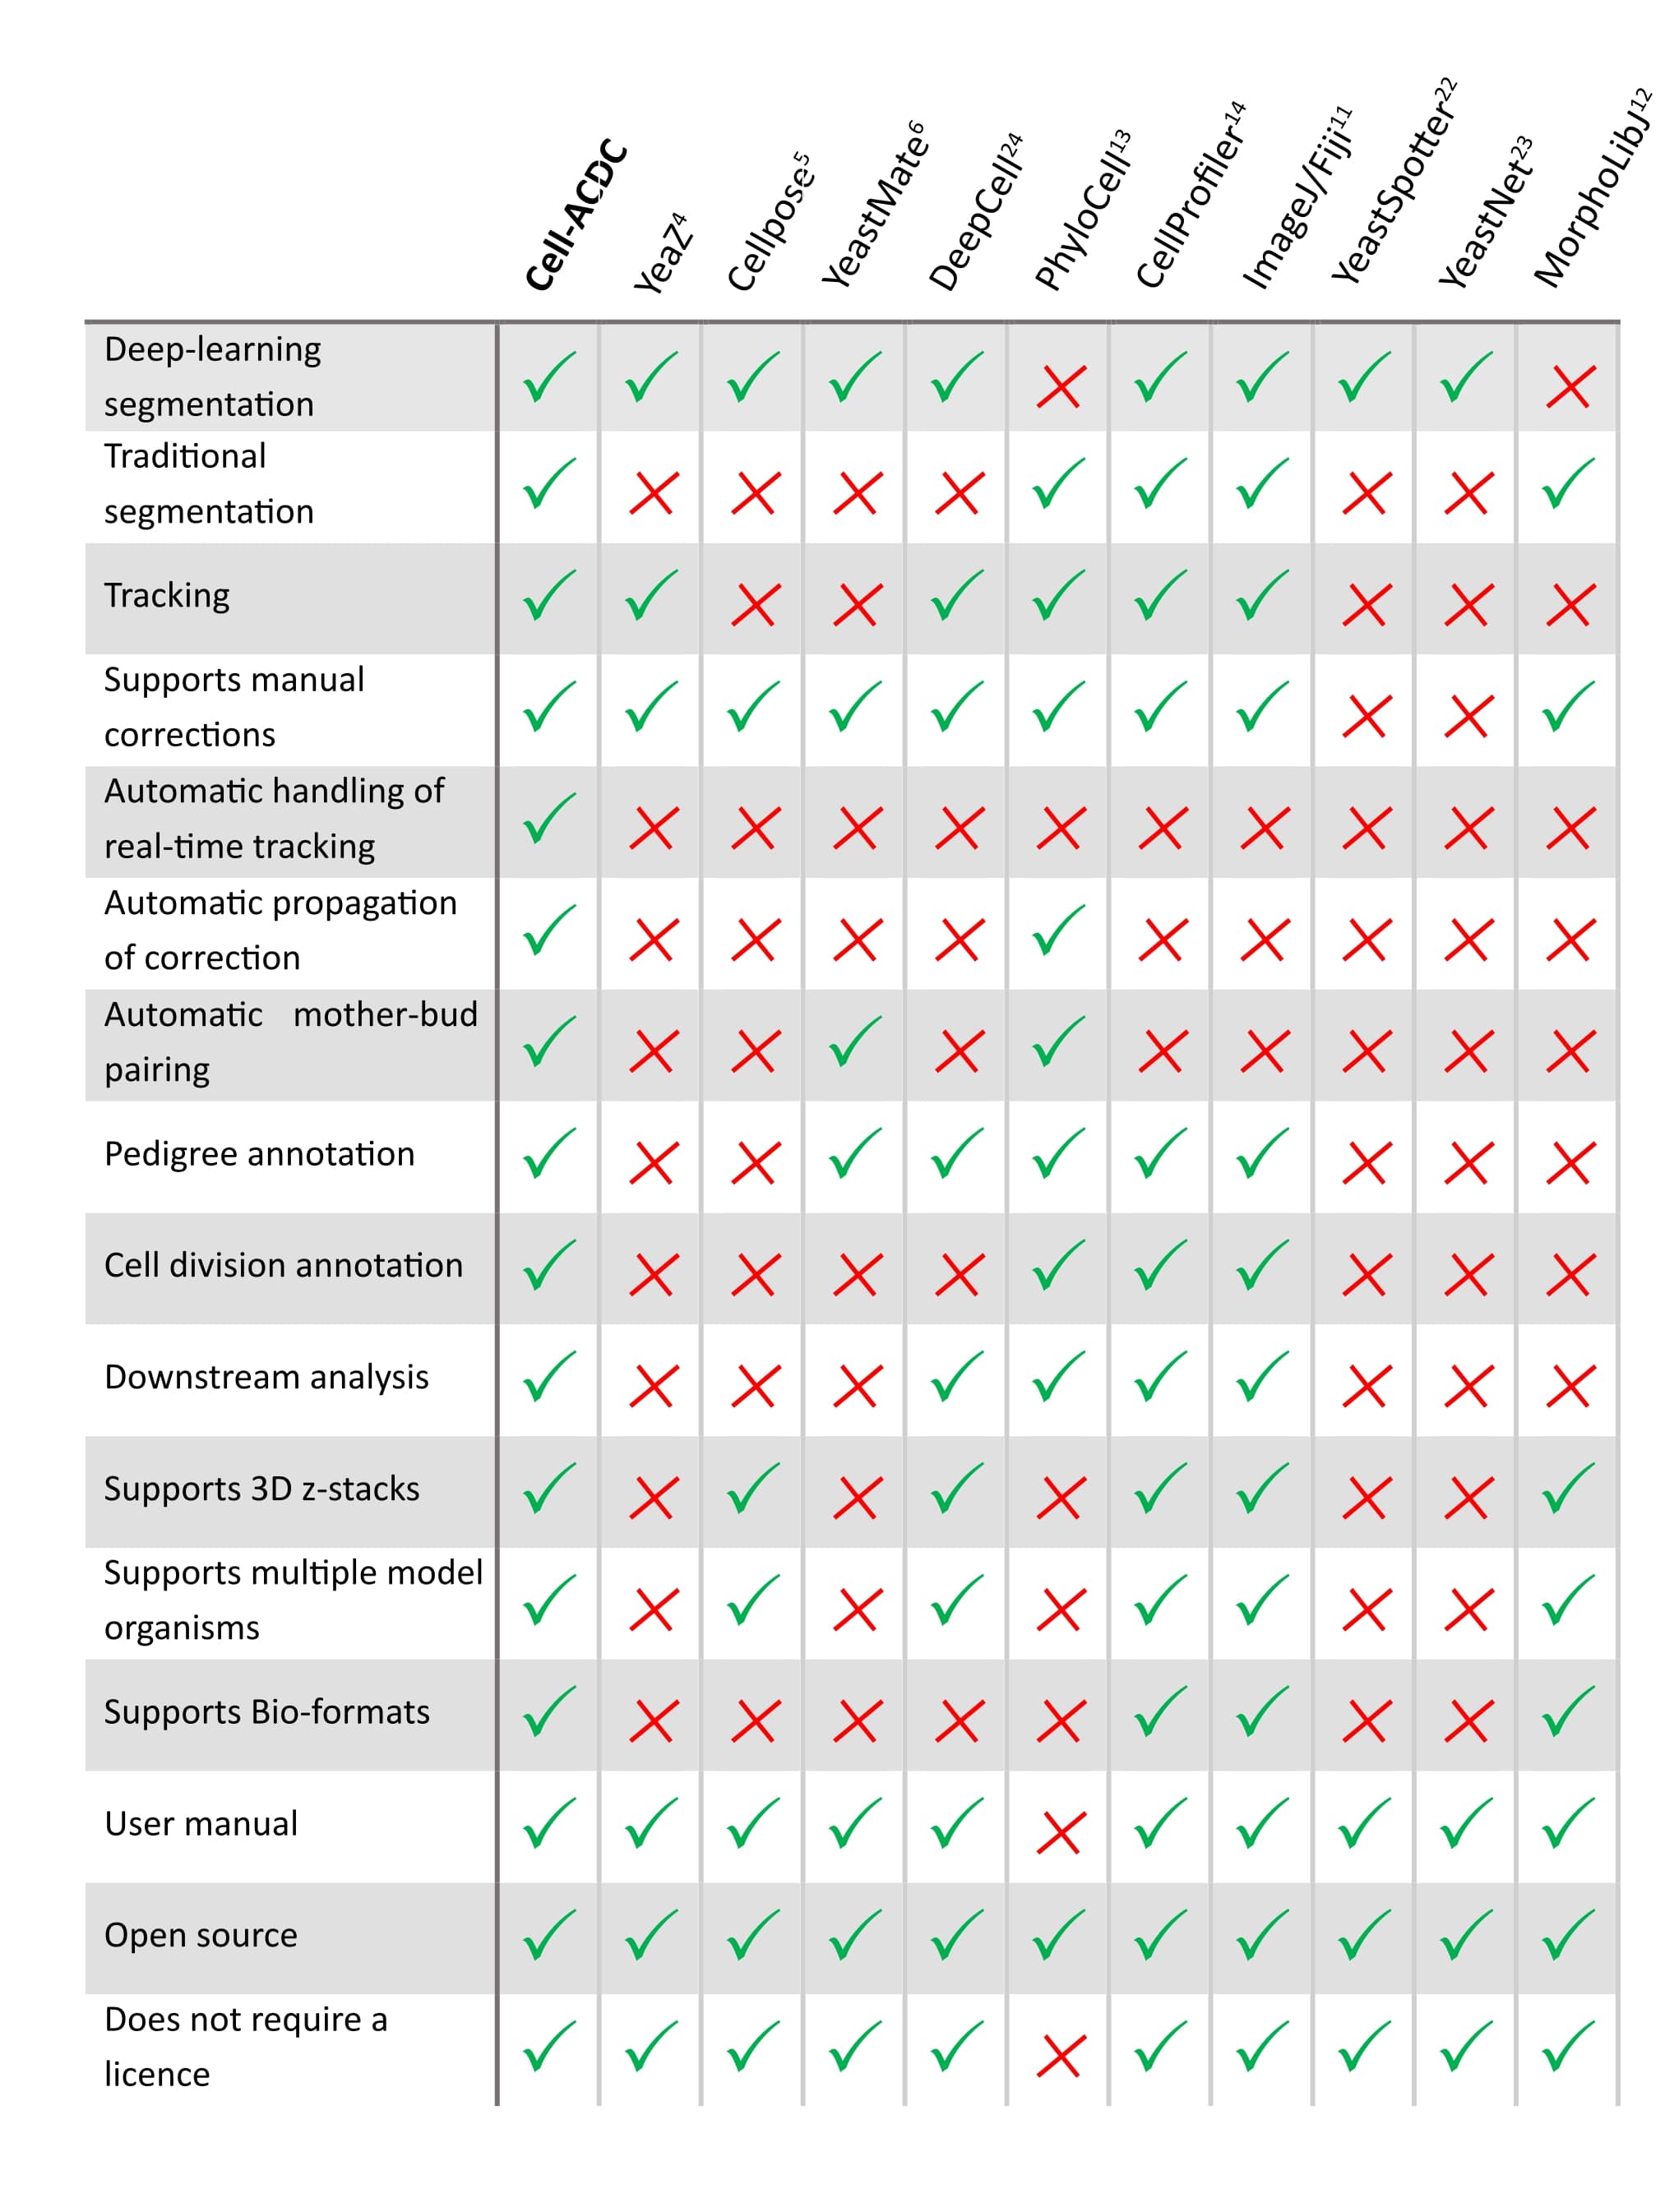
See below how it compares to other popular tools available (Table 1 of our publication).
Is it only about segmentation?
Of course not! Cell-ACDC automatically computes several single-cell numerical features such as cell area and cell volume, plus the mean, max, median, sum and quantiles of any additional fluorescent channel's signal. It even performs background correction, to compute the protein amount and concentration.
You can load and analyse single 2D images, 3D data (3D z-stacks or 2D images over time) and even 4D data (3D z-stacks over time).
Finally, we provide Jupyter notebooks to visualize and interactively explore the data produced.
Do not hesitate to contact me here on GitHub (by opening an issue) or directly at my email here for any problem and/or feedback on how to improve the user experience!
Update v1.2.4
First release that is finally available on PyPi.
Main new feature: custom trackers! You can now add any tracker you want by implementing a simple tracker class. See the manual at the section "Adding trackers to the pipeline".
Additionally, this release includes many UI/UX improvements such as color and style customisation, alongside a light/dark mode switch.
Update v1.2.3
NOTE: some users had issues installing the environment with this version. Please see this issue for a possible solution
This release includes new segmentation models:
- Cellpose v0.8.0 with the models cyto2 and omnipose
- StarDist
Update v1.2.2
This is the first release with full macOS support! Additionally, navigating through time-lapse microscopy data is now up to 10x faster than previous versions. More details here
Installation using Anaconda (recommended)
NOTE: If you don't know what Anaconda is or you are not familiar with it, we recommend reading the detailed installation instructions found in manual here.
- Install Anaconda or Miniconda for Python 3.9. IMPORTANT: For Windows make sure to choose the 64 bit version.
- Update conda with
conda update conda. Optionally, consider removing unused packages with the commandconda clean --all - Create a virtual environment with the command
conda create -n acdc python=3.9 - Upgrade pip with the command
python -m pip install --upgrade pip - Activate the environment
conda activate acdc - Install Cell-ACDC with the command
pip install cellacdc
Installation using Pip
- Download and install Python 3.9
- Upgrade pip: Windows:
py -m pip install --updgrade pip, macOS/Unix:python3 -m pip install --updgrade pip - Navigate to a folder where you want to create the virtual environment
- Create a virtual environment: Windows:
py -m venv acdc, macOS/Unixpython3 -m venv acdc - Activate the environment: Windows:
.\acdc\Scripts\activate, macOS/Unix:source acdc/bin/activate - Install Cell-ACDC with the command
pip install cellacdc
Install from source
If you want to contribute or try out experimental features (and, if you have time, maybe report a bug or two :D), you can install the developer version from source as follows:
- Open a terminal and navigate to a folder where you want to download Cell-ACDC
- Clone the repo with the command
git clone https://github.com/SchmollerLab/Cell_ACDC.git(if you are on Windows you need to installgitfirst. Install it from here) - Install Anaconda or Miniconda
- Update conda with
conda update conda. Optionally, consider removing unused packages with the commandconda clean --all - Create a new conda environment with the command
conda create -n acdc python=3.9 - Activate the environment with the command
conda activate acdc - In the terminal, navigate to the
Cell_ACDCfolder that you cloned before and install Cell-ACDC with the commandpip install -e ..
Running Cell-ACDC
- Open a terminal (on Windows use the Anaconda Prompt if you installed with
condaotherwise we recommend installing and using the PowerShell 7) - Activate the environment (conda:
conda activate acdc, pip on Windows:.\env\Scripts\activate, pip on Unix:source env/bin/activate) - Run the command
acdcorcellacdc
Usage
For details about how to use Cell-ACDC please read the User Manual downloadable from here
Release history Release notifications | RSS feed


Download files
Download the file for your platform. If you're not sure which to choose, learn more about installing packages.
Source Distribution
Built Distribution
Filter files by name, interpreter, ABI, and platform.
If you're not sure about the file name format, learn more about wheel file names.
Copy a direct link to the current filters
File details
Details for the file cellacdc-1.2.4rc36.tar.gz.
File metadata
- Download URL: cellacdc-1.2.4rc36.tar.gz
- Upload date:
- Size: 54.2 MB
- Tags: Source
- Uploaded using Trusted Publishing? No
- Uploaded via: twine/4.0.1 CPython/3.9.12
File hashes
| Algorithm | Hash digest | |
|---|---|---|
| SHA256 |
87e611c528701e99222d026dea5ad55c2e7850e27cbe19e55257d22386e931ba
|
|
| MD5 |
a8c40a8618e02b2fc815069651b9b084
|
|
| BLAKE2b-256 |
d8c1cb849e5523531cc122ebc0f55930a338c4e004c7081efb611155848ebb8c
|
File details
Details for the file cellacdc-1.2.4rc36-py3-none-any.whl.
File metadata
- Download URL: cellacdc-1.2.4rc36-py3-none-any.whl
- Upload date:
- Size: 52.4 MB
- Tags: Python 3
- Uploaded using Trusted Publishing? No
- Uploaded via: twine/4.0.1 CPython/3.9.12
File hashes
| Algorithm | Hash digest | |
|---|---|---|
| SHA256 |
074cdc5eb05ac80b3b49f2510ef56a618ab8b42e3b3d4e045daf9ab6cfbe165e
|
|
| MD5 |
9f9986189acf4bf6ba054b292dbd98cc
|
|
| BLAKE2b-256 |
42b52553e39a99e0e4ab12b995e6ef047c287719e0c5ab0764c119280fa09157
|


