comparative embedding visualization


Project description
Comparative Embedding Visualization with cev


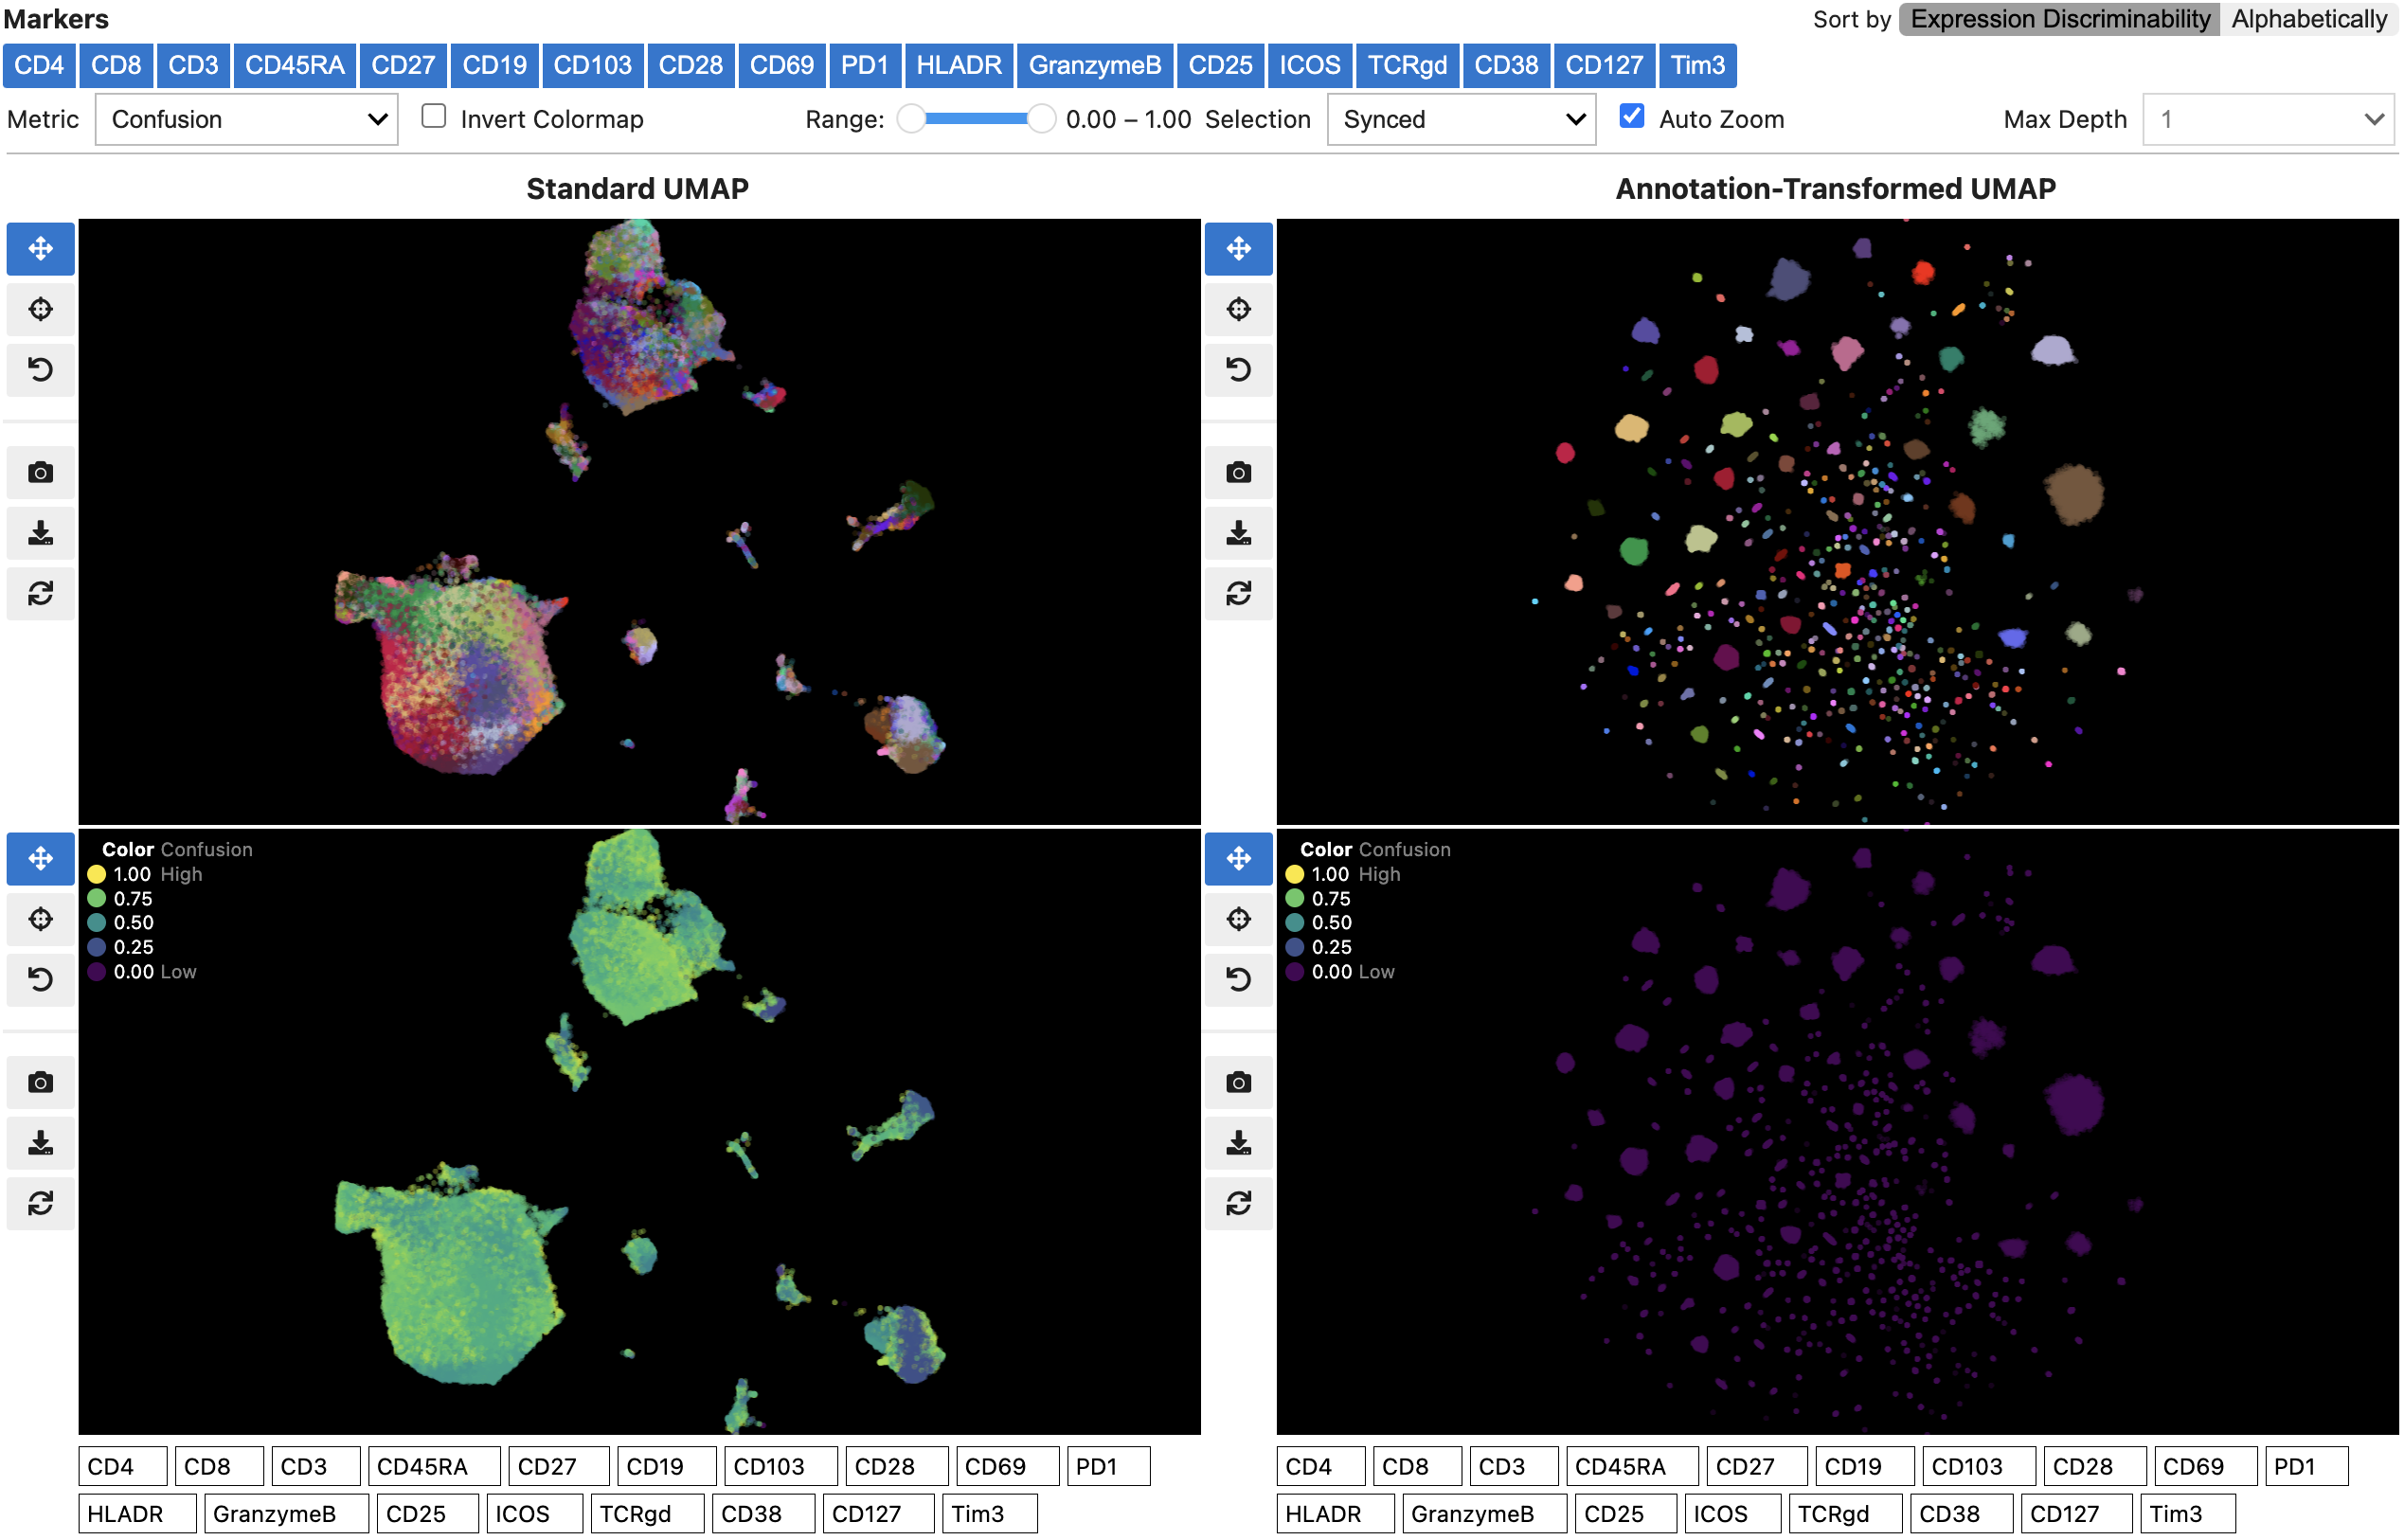
cev is an interactive Jupyter widget for comparing a pair of 2D embeddings with shared labels.
Its novel metric allows to surface differences in label confusion, neighborhood composition, and label size.
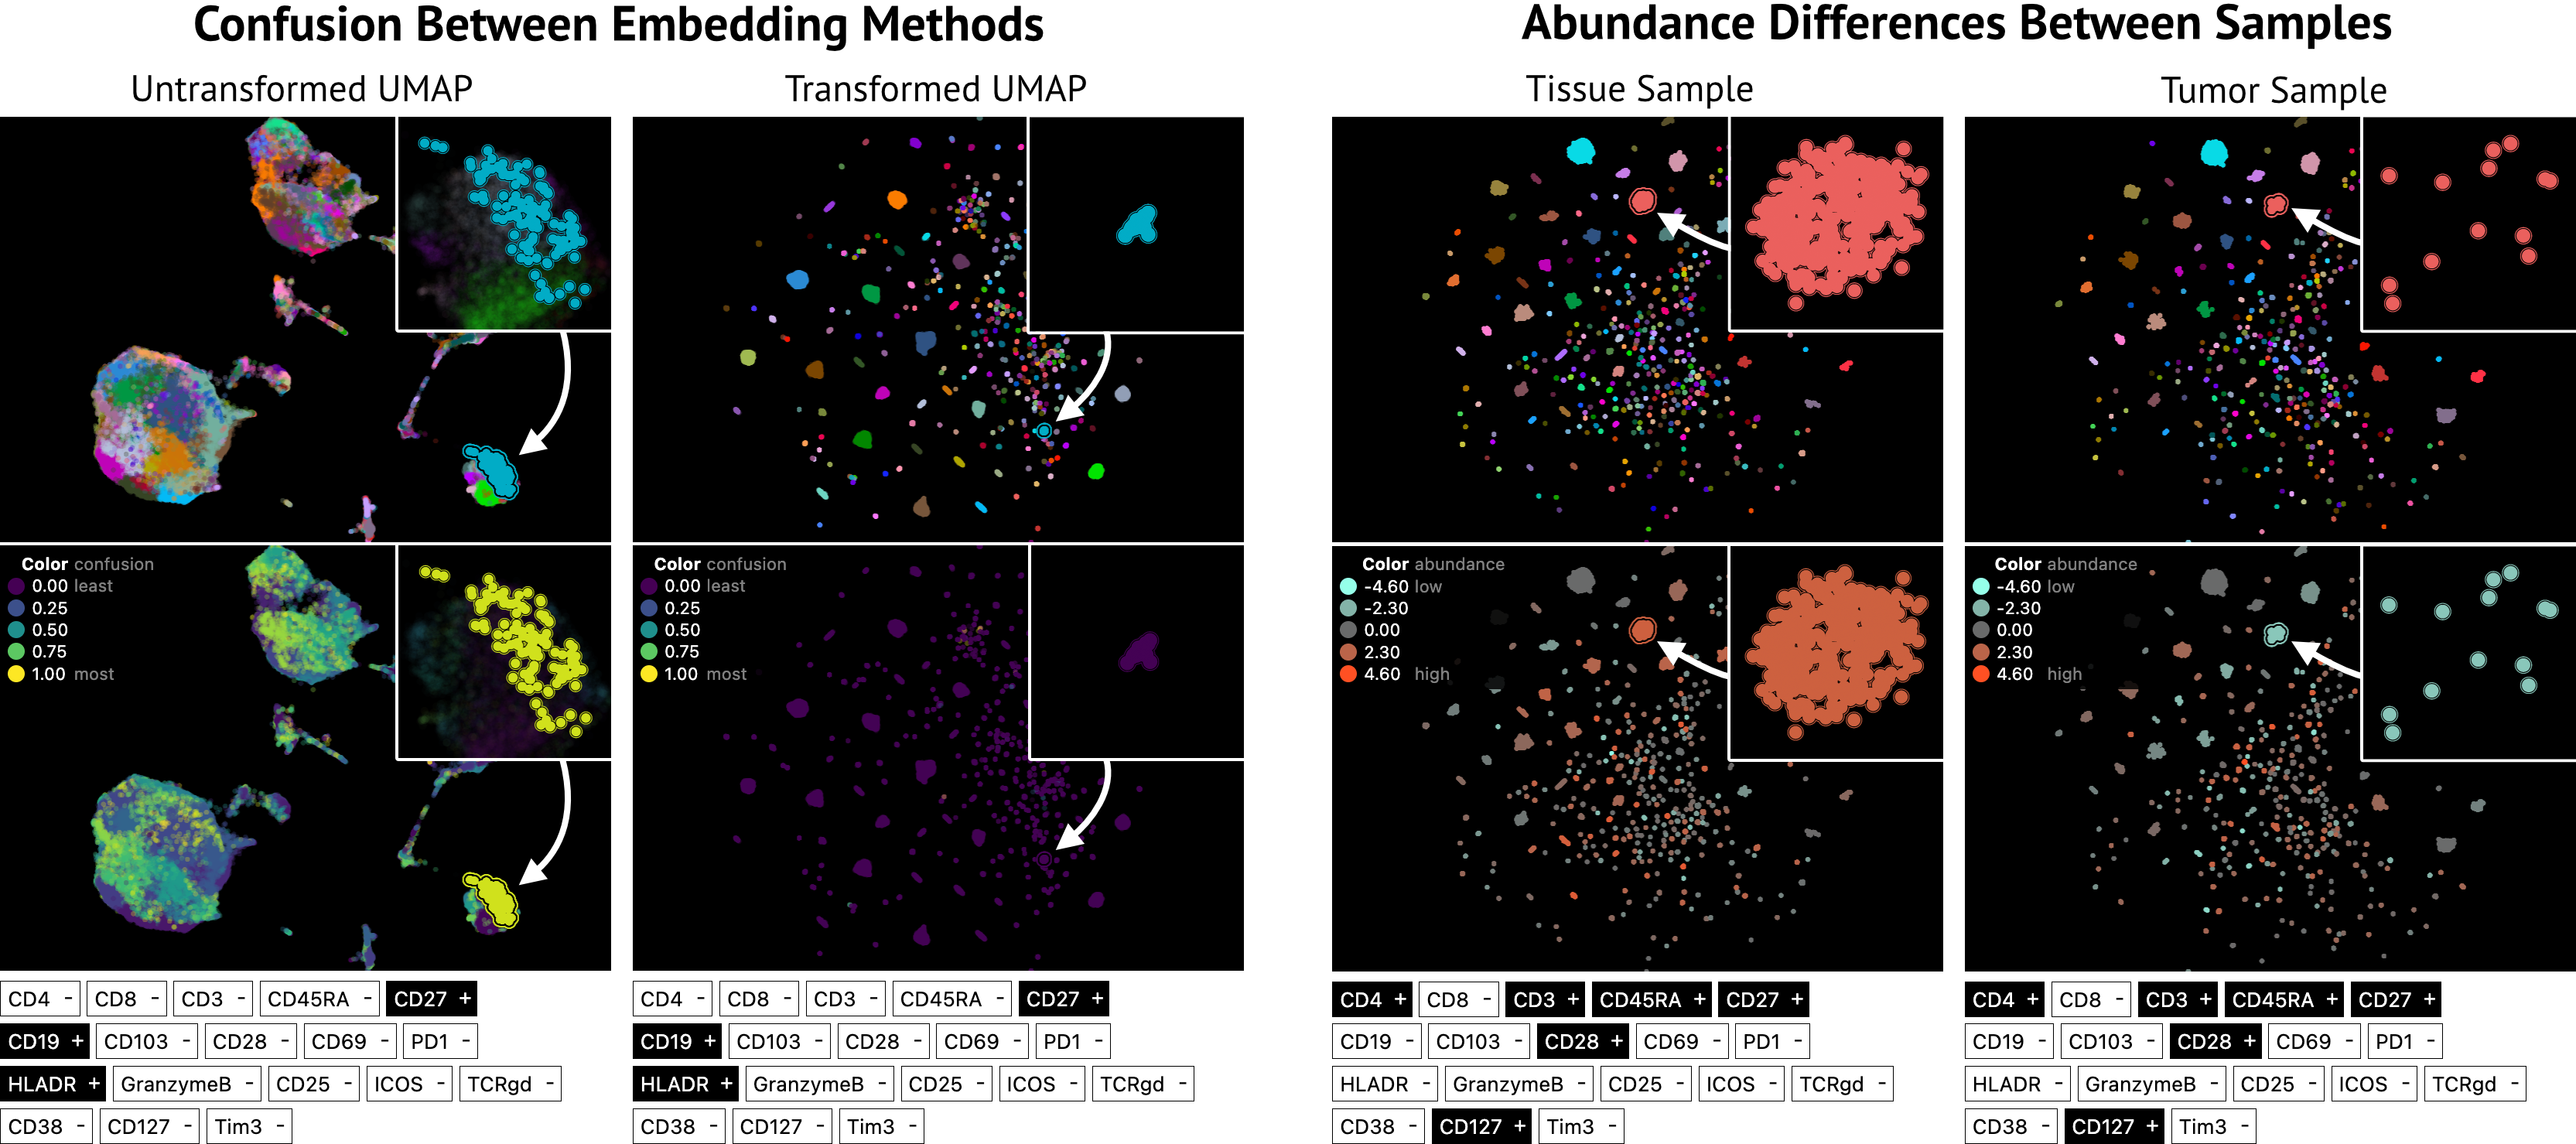
The figure shows data from Mair et al. (2022) that were analyzed with Greene et al.'s (2021) FAUST method.
The embeddings were generated with Greene et al.'s (2021) annotation transformation and UMAP.
cev is implemented with anywidget and builds upon jupyter-scatter.
Installation
Warning:
cevis new and under active development. It is not yet ready for production and APIs are subject to change.
pip install cev
Getting Started
import pandas as pd
from cev.widgets import Embedding, EmbeddingComparisonWidget

umap_embedding = Embedding.from_ozette(df=pd.read_parquet("../data/mair-2022-tissue-138-umap.pq"))
ozette_embedding = Embedding.from_ozette(df=pd.read_parquet("../data/mair-2022-tissue-138-ozette.pq"))

umap_vs_ozette = EmbeddingComparisonWidget(
    umap_embedding,
    ozette_embedding,
    titles=["Standard UMAP", "Annotation-Transformed UMAP"],
    metric="confusion",
    selection="synced",
    auto_zoom=True,
    row_height=320,
)
umap_vs_ozette
See notebooks/getting-started.ipynb for the complete example.
Development
First, create a virtual environment with all the required dependencies. We highly recommend to use hatch, which installs and sync all dependencies from pyproject.toml automatically.
hatch shell
Alternatively, you can also use conda.
conda env create -n cev python=3.11
conda activate cev
Next, install cev with all development assets.
pip install -e ".[notebooks,dev]"
Finally, you can now run the notebooks with:
jupyterlab
Commands Cheatsheet
If using hatch CLI, the following commands are available in the default environment:
| Command | Action |
|---|---|
hatch run fix |
Format project with black . and apply linting with ruff --fix . |
hatch run fmt |
Format project with black . and apply linting with ruff --fix . |
hatch run check |
Check formatting and linting with black --check . and ruff .. |
hatch run test |
Run unittests with pytest in base environment. |
hatch run test:test |
Run unittests with pytest in all supported environments. |
Alternatively, you can devlop cev by manually creating a virtual environment and managing
dependencies with pip.
Our CI linting/formatting checks are configured with pre-commit.
We recommend installing the git hook scripts to allow pre-commit to run automatically on git commit.
pre-commit install # run this once to install the git hooks
This will ensure that code pushed to CI meets our linting and formatting criteria. Code that does not comply will fail in CI.
Release
releases are triggered via tagged commits
git tag -a vX.X.X -m "vX.X.X"
git push --follow-tags
License
cev is distributed under the terms of the Apache License 2.0.
Citation
If you use cev in your research, please cite the following preprint:
@article{manz2024general,
  title = {A General Framework for Comparing Embedding Visualizations Across Class-Label Hierarchies},
  author = {Trevor Manz and Fritz Lekschas and Evan Greene and Greg Finak and Nils Gehlenborg},
  url = {https://doi.org/10.1109/TVCG.2024.3456370},
  doi = {10.1109/TVCG.2024.3456370},
  journal = {IEEE Transactions on Visualization and Computer Graphics},
  series = {VIS ’24},
  publisher = {IEEE},
  year = {2024},
  month = {9},
  pages = {1-11}
}


Download files
Download the file for your platform. If you're not sure which to choose, learn more about installing packages.
Source Distribution
Built Distribution
Filter files by name, interpreter, ABI, and platform.
If you're not sure about the file name format, learn more about wheel file names.
Copy a direct link to the current filters
File details
Details for the file cev-0.2.2.tar.gz.
File metadata
- Download URL: cev-0.2.2.tar.gz
- Upload date:
- Size: 1.5 MB
- Tags: Source
- Uploaded using Trusted Publishing? No
- Uploaded via: twine/5.1.1 CPython/3.12.7
File hashes
| Algorithm | Hash digest | |
|---|---|---|
| SHA256 |
de5e7be79b7fd1e01a5f1a8559c4b96f022695dc91bca3b98f8ab78f5d53c2ab
|
|
| MD5 |
73e3ccc255b8e68610a28dd495735ab7
|
|
| BLAKE2b-256 |
545aa2e5248b72d72db1e0b0ef0cb5398326ce834384c44e4983915fca9bdcb9
|
File details
Details for the file cev-0.2.2-py3-none-any.whl.
File metadata
- Download URL: cev-0.2.2-py3-none-any.whl
- Upload date:
- Size: 31.4 kB
- Tags: Python 3
- Uploaded using Trusted Publishing? No
- Uploaded via: twine/5.1.1 CPython/3.12.7
File hashes
| Algorithm | Hash digest | |
|---|---|---|
| SHA256 |
da6a7df9311a9fd488bbcd0f1ecbe66b6302f9b2049e515ea043913555e39b97
|
|
| MD5 |
2d469610649201c9c9f29eb51b8bf12c
|
|
| BLAKE2b-256 |
712ec6419673d9da7db93053ce9d23cec6c8e2d6c8cf38aabab4c028f8b4f565
|


