A CLI tool to deploy your game server to the cloud with a single command.

Project description
☁️ Cloud Game Starter (CGS)
Deploy your game server to the cloud with a single command.
An open-source automation tool for students, indie developers, and everyone new to the cloud.
Also available in: 🇰🇷 한국어


What's the Problem? (Why CGS?)
"I want to test my multiplayer game, but AWS is too complex and intimidating." "How do I deploy a server, find its IP, and safely delete it afterward to avoid surprise bills?"
Cloud Game Starter is here to solve these problems. Let CGS handle the complex cloud settings and tedious repetitive tasks, so you can focus on what truly matters: developing your game.
✨ Features
- One-Command Deployment: Automatically create and deploy a test game server on AWS with a single command line.
- Real-time Log Streaming: Monitor your remote server's logs in real-time from your local machine for easy debugging.
- Safe Resource Destruction: Cleanly delete all created cloud resources with one command, eliminating the fear of unexpected costs.
- Template-Based: Designed to be extensible, allowing easy addition of sample servers in various languages like Go, C#, etc. (Currently supports Go).
🚀 Getting Started
Deploy your first game server in less than 10 minutes.
1. Prerequisites
Before you begin, ensure you have the following tools installed on your computer:
- ✅ An AWS Account: The cloud account where your server will be created.
- ✅ Python (3.8+): Required to run the CGS CLI tool.
- ✅ Terraform: The tool CGS uses internally to build infrastructure. (Official Installation Guide)
- ✅ AWS CLI: The tool that connects your computer to your AWS account. (Official Installation Guide)
2. Installation & Setup
STEP 1: Install cgs-cli
Open your terminal (PowerShell, Command Prompt, or Terminal on Mac/Linux) and install CGS with this simple command:
pip install cgs-cli
Once installed, the cgs command will be available system-wide. Verify the installation by running:
cgs --help
If you see a list of commands and options, the installation was successful.
STEP 2: Configure AWS Credentials
You need to grant CGS permission to manage resources in your AWS account.
-
Create an IAM Access Key: In your AWS Console, create an Access Key ID and a Secret Access Key for programmatic access. (For security, we strongly recommend using keys from an IAM User, not your root account.)
-
Configure AWS CLI: Run the following command in your terminal and enter your key information.
aws configureAWS Access Key ID [None]: YOUR_ACCESS_KEY_ID AWS Secret Access Key [None]: YOUR_SECRET_ACCESS_KEY Default region name [None]: ap-northeast-2 (Seoul region is recommended) Default output format [None]: (Just press Enter)
STEP 3: Prepare an SSH Key (for the logs command)
To use the cgs logs command for real-time log streaming, you need a "secret key" to access the server.
- Create a Key Pair: In your AWS Console > EC2 > Key Pairs, create a new key pair.
- Download the
.pemfile: When creating the key, download the.pemfile and store it in a safe, memorable location on your computer (e.g.,D:\Keys\my-aws-key.pem).
3. The Workflow
You're all set! Follow this simple workflow to manage your server.
STEP 1: Deploy the Server (deploy)
Deploy the default Go echo server to the cloud.
cgs deploy
Starting server deployment...
✅ Deployment successful!
Deployment takes about 2-3 minutes.
STEP 2: Get Server Info (info)
Check the IP address of your deployed server.
cgs info
Fetching server info...
Server IP Address: 54.180.xx.xx
STEP 3: Connect and Test
It's time to connect to your server with your game client or a simple test tool.
-
Windows (PowerShell):
Test-NetConnection -ComputerName 54.180.xx.xx -Port 7777
TcpTestSucceeded : Truemeans the connection is successful! -
macOS / Linux (Terminal):
nc 54.180.xx.xx 7777
If the cursor is blinking, the connection is successful. Type any text, and the server will echo it back.
STEP 4: Stream Real-time Logs (logs)
See what's happening on your server in real-time. Provide the path to the .pem key file you downloaded in Step 3 of the setup.
cgs logs --key-path "D:\Keys\my-aws-key.pem"
📡 Connecting to server to stream logs... (Press Ctrl+C to exit)
2024/05/15 10:30:00 Server started on port 7777
2024/05/15 10:31:15 Client connected from ...
STEP 5: Destroy the Server (destroy) (Very Important!)
When you're done testing, you must destroy the server to prevent any further charges.
cgs destroy
⚠️ Destroying all resources...
Are you sure you want to destroy all resources? ... [y/N]: y
✅ All resources have been destroyed.
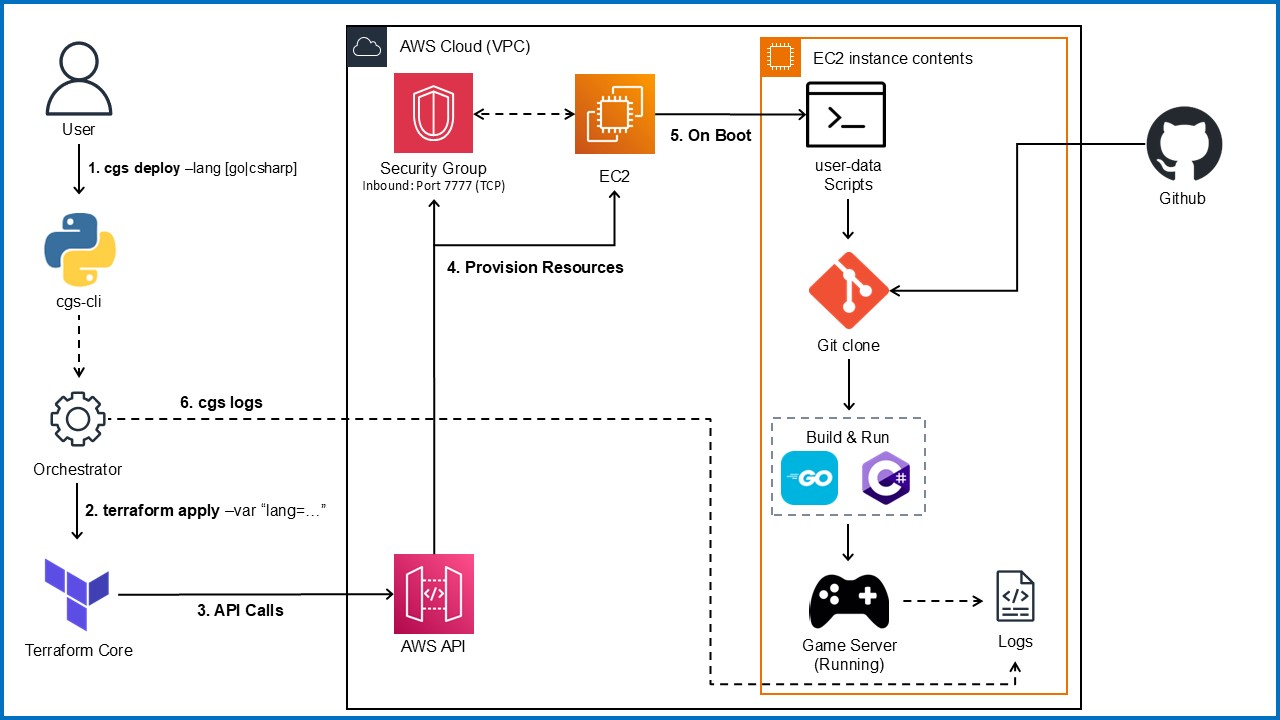
System Architecture
🗺️ Roadmap
Cloud Game Starter is just getting started. We have ambitious plans to evolve this tool into an even more powerful utility for developers. Your ideas and contributions are always welcome!
Short-term Goals
Our immediate focus is on enhancing the core functionality and expanding support.
- Package and release the CLI tool on PyPI
- Add support for C# (.NET) sample servers for Unity developers
- Implement a CI/CD pipeline (with GitHub Actions) to ensure code stability and automate testing
Mid/Long-term Vision
Looking ahead, we aim to make CGS a more versatile and comprehensive platform.
- Support for other major cloud providers (GCP, Azure)
- Introduce a container-based deployment option (Docker + AWS ECS/Fargate)
- Provide templates for simple database integration
💡 Have an idea or interested in a specific feature? Feel free to open a discussion in our GitHub Issues!
🤝 Contributing
Contributions are welcome! Whether it's bug reports, feature suggestions, or code contributions, any form of participation is appreciated.
📝 License
This project is licensed under the MIT License.


Download files
Download the file for your platform. If you're not sure which to choose, learn more about installing packages.
Source Distribution
Built Distribution
Filter files by name, interpreter, ABI, and platform.
If you're not sure about the file name format, learn more about wheel file names.
Copy a direct link to the current filters
File details
Details for the file cgs_cli-0.3.0.tar.gz.
File metadata
- Download URL: cgs_cli-0.3.0.tar.gz
- Upload date:
- Size: 10.2 kB
- Tags: Source
- Uploaded using Trusted Publishing? No
- Uploaded via: twine/6.1.0 CPython/3.13.5
File hashes
| Algorithm | Hash digest | |
|---|---|---|
| SHA256 |
158aa7a4e017e0297f803b9bb924bbb96770e364f19117902951369c5102b4e0
|
|
| MD5 |
3cfb21a75a4899293a0a2eb630e4d0e3
|
|
| BLAKE2b-256 |
2e3caccebd00a5c5d43cceb75daf6b90389dbaab6182d6ccbad2eb8c8e31207d
|
File details
Details for the file cgs_cli-0.3.0-py3-none-any.whl.
File metadata
- Download URL: cgs_cli-0.3.0-py3-none-any.whl
- Upload date:
- Size: 10.7 kB
- Tags: Python 3
- Uploaded using Trusted Publishing? No
- Uploaded via: twine/6.1.0 CPython/3.13.5
File hashes
| Algorithm | Hash digest | |
|---|---|---|
| SHA256 |
d9cadccbe125859987925acee222ba53b5b1c06168e224dc65eab9cce2482a7a
|
|
| MD5 |
0d111f1138b1cc162ab01b6ef3fffcde
|
|
| BLAKE2b-256 |
2bdbb11962efa448d2e8dae0aefa73292452e4f6dd09723ac6b16faeeded01fa
|


