
CICADA GUI

📖 Full documentation: cicada-analysis.readthedocs.io
cicada-gui is the PyQt5 desktop application for the CICADA pipeline (see BiorXiv preprint).
The pipeline codebase is split into three independent, installable Python packages:
| Package | Role | Docs |
|---|---|---|
cicada-nwb |
NWB file access layer — opens files, exposes data through submodules | docs |
cicada-analysis |
Headless analysis engine — plugin analyses, utils, config runner | docs |
cicada-gui |
PyQt5 desktop application | docs |
cicada-gui provides a graphical interface to browse NWB sessions, configure analysis parameters interactively, and launch analyses.
The GUI also allows the user to create NWB session groups and save analysis parameters to YAML to be used headlessly — the GUI and the headless runner use identical analysis plugins.
What's inside
cicada_gui/
├── main_window.py   # Main window: menus, sessions panel, analysis tree
├── sessions/        # Loading sessions (local folder, DANDI dialog), groups (sessions YAML)
├── analysis/        # Analysis tree, parameter window built from each plugin's parameters,
│                    # run thread, results viewer (files and figures)
├── metadata/        # Session metadata display
└── config/          # User settings (results folder, last folders, DANDI mode)
Install
User : install from release
From PyPI:
conda create -n cicada_env python=3.11
conda activate cicada_env
pip install cicada-gui
Or from GitLab, a given release (tag):
conda create -n cicada_env python=3.11
conda activate cicada_env
pip install "git+https://gitlab.com/cossartlab/cicada_gui.git@0.3.2"
Contributor : install from clone
Install the clones from the bottom up (cicada-nwb, cicada-analysis, cicada-gui): each one then uses the clones installed before it; the packages you did not clone come from PyPI.
Contributing to cicada-gui only (cicada-analysis and cicada-nwb installed from PyPI):
git clone https://gitlab.com/cossartlab/cicada_gui.git /path/to/cicada_gui
conda create -n cicada_env python=3.11
conda activate cicada_env
pip install -e /path/to/cicada_gui
Contributing to cicada-gui and cicada-analysis (cicada-nwb installed from PyPI):
git clone https://gitlab.com/cossartlab/cicada_analysis.git /path/to/cicada_analysis
git clone https://gitlab.com/cossartlab/cicada_gui.git /path/to/cicada_gui
conda create -n cicada_env python=3.11
conda activate cicada_env
pip install -e /path/to/cicada_analysis
pip install -e /path/to/cicada_gui
Contributing to all three repos:
git clone https://gitlab.com/cossartlab/cicada_nwb.git /path/to/cicada_nwb
git clone https://gitlab.com/cossartlab/cicada_analysis.git /path/to/cicada_analysis
git clone https://gitlab.com/cossartlab/cicada_gui.git /path/to/cicada_gui
conda create -n cicada_env python=3.11
conda activate cicada_env
pip install -e /path/to/cicada_nwb
pip install -e /path/to/cicada_analysis
pip install -e /path/to/cicada_gui
How to use -- Quick start
Launch the GUI
conda activate cicada_env
python -m cicada_gui
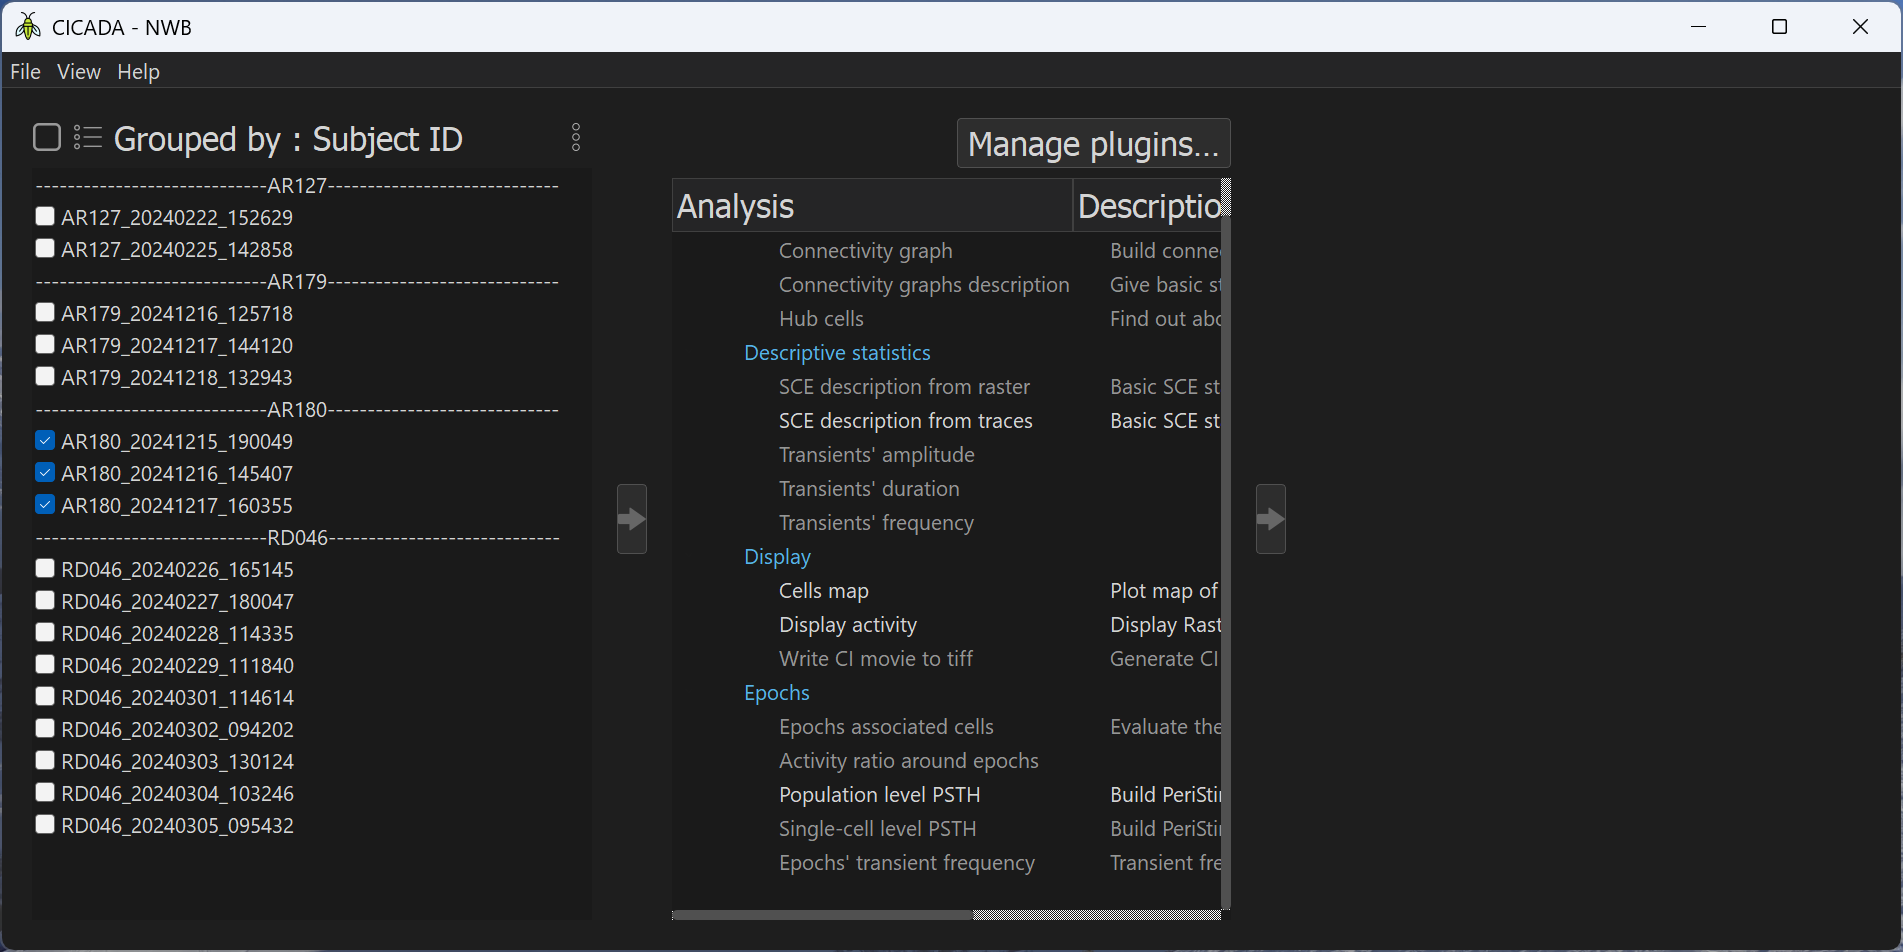
cicada-gui main window with example NWB loaded and sorted by 'Subject ID'
Minimal use workflow
1. Load sessions
Click Open new dataset using the File menu and select the directory containing
your .nwb files. All valid NWB files are listed in the sessions panel.
2. Select sessions
Tick the sessions you want to include in the next analysis run.
Use Group by from the View menu to sort the list by metadata field (age, genotype, sex, subject ID, session type, etc.) — useful for quickly selecting a subset of sessions.
3. Save / load a group
Create group in the File menu writes a sessions_<name>.yaml file to your configured result
directory (see Configuration in the GUI guide). This file can be reloaded later (Load group) or used directly in
the headless workflow.
Tip: the Load group option can replace Open folder — it will load only the files listed in the selected group.
4. Pick an analysis
The analysis tree shows all available plugins, organized by family. Click a family header to expand it.
Analyses that are incompatible with the currently checked sessions are greyed out
(the cicada-analysis - check_data() guard reported a problem — hover to see why).
5. Open the parameter form
Double-click an analysis to open its parameter window. The form is organized into collapsible sections (families).
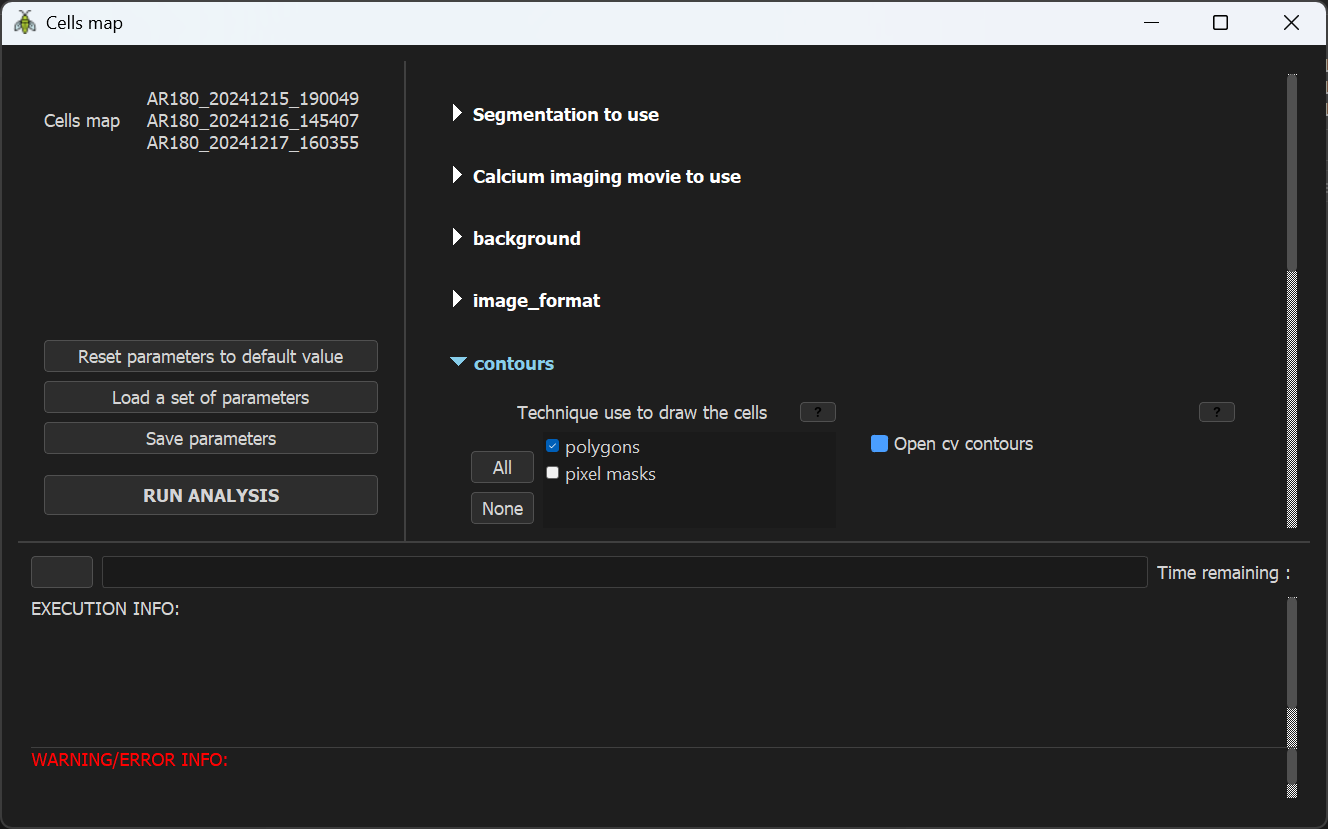
cicada-gui analysis window for the cicada-analysis 'Display cell maps' plugin.
Session-specific parameters (ROI response series, epoch names, etc.) are pre-filled from the checked sessions.
6. Save / load parameters
- Save parameters — writes a
params_<ClassName>.yamlto disk. Compatible with the headless runner: use it as theparamsargument ofrun_from_config. - Load parameters — loads a previously saved
params_<ClassName>.yamlorcombined_*.yaml. Session-specific parameters (ROI response series, etc.) are skipped automatically when loading across different session groups.
7. Run
Fill all mandatory parameters (highlighted if missing), then click RUN ANALYSIS.
After the run:
- Results are saved to the
results_pathparameter you set. - A
combined_<ClassName>_<timestamp>.yamlfile is written alongside the results — it records the exact sessions and parameters used, enabling headless replay.
Full GUI documentation
| Page | Content |
|---|---|
| GUI guide | GUI workflow step by step, parameter form, group management |
GUI / headless equivalence
The same analysis plugin runs identically in both modes:
# GUI mode
cicada_gui

# Headless mode — same analysis, same parameters, no GUI required
python templates/run_from_config_template.py
See cicada-analysis for the full headless workflow.
Upgrade
For user installation
From PyPI, the latest release:
conda activate cicada_env
pip install -U cicada-gui
Or from GitLab, a given release: replace the tag with its version (check available releases on GitLab):
conda activate cicada_env
pip install "git+https://gitlab.com/cossartlab/cicada_gui.git@<new_version>"
For contributor installation
If you only cloned cicada-gui: pull cicada_gui, then update cicada-nwb and cicada-analysis from PyPI.
cd /path/to/cicada_gui && git pull
conda activate cicada_env
pip install -U cicada-analysis cicada-nwb
If you cloned cicada-gui and cicada-analysis: pull both repos, then update cicada-nwb from PyPI.
cd /path/to/cicada_analysis && git pull
cd /path/to/cicada_gui && git pull
conda activate cicada_env
pip install -U cicada-nwb
If you cloned all three repos: pull each repo.
cd /path/to/cicada_nwb      && git pull
cd /path/to/cicada_analysis  && git pull
cd /path/to/cicada_gui       && git pull
Publication
See BiorXiv Preprint
1 maintainer

Metadata
1 maintainer
Release files for cicada-gui 0.4.0
For a detailed explanation of source distributions (sdists) and built distributions (wheels), please see the package formats documentation.
Source distribution (sdist)
| File | Size | Uploaded | Provenance | Actions |
|---|---|---|---|---|
| cicada_gui-0.4.0.tar.gz | 331.4 kB | Without provenance | Details for cicada_gui-0.4.0.tar.gz |
Built distribution (wheel)
| File | Interpreter | ABI | Platform | Actions Reset |
|---|---|---|---|---|
| cicada_gui-0.4.0-py3-none-any.whl | Python 3 | none | any | Details for cicada_gui-0.4.0-py3-none-any.whl |
Total release size: 786.9 kB
Release files / cicada_gui-0.4.0.tar.gz
| Download URL | cicada_gui-0.4.0.tar.gz |
|---|---|
| Size | 331.4 kB |
| Tags | Source |
|
SHA-256 checksum How to use checksums |
46babb4fe372e2eef54cdc03f094c531c3dc62235628201c06f73360011edd7e
|
|
BLAKE2b-256 checksum How to use checksums |
f2cd7dccd5820be3f33497efaf6a8ebabf9856c2dd12ed44a32b2b5e6ef6119f
|
| Upload date | |
|
Uploaded using Trusted Publishing? What is trusted publishing? |
Yes |
| Uploaded via |
twine/7.0.0 CPython/3.11.18
|
Release files / cicada_gui-0.4.0-py3-none-any.whl
| Download URL | cicada_gui-0.4.0-py3-none-any.whl |
|---|---|
| Size | 455.5 kB |
| Tags | Python 3 |
|
SHA-256 checksum How to use checksums |
fbceebeb1c28fc544ef35631ddb46d8f467be7acb87f3328632e5e56fd72eb26
|
|
BLAKE2b-256 checksum How to use checksums |
c25df5ffe0e9129b2b4bb2fb634741b74d783748ed49da9cf67ada43422518d6
|
| Upload date | |
|
Uploaded using Trusted Publishing? What is trusted publishing? |
Yes |
| Uploaded via |
twine/7.0.0 CPython/3.11.18
|
Security for cicada-gui 0.4.0
Provenance
Provenance describes where a file came from. On PyPI, provenance is shared via attestations, which provide a verifiable record of the build or publishing details. View details, limitations and caveats.
No provenance found
None of the files in this release were uploaded with provenance metadata.
A note on package security
PyPI is a repository for distributing packages, not a service for auditing them. While third-party security researchers and our staff do their best to detect and remove malicious packages, PyPI cannot guarantee the quality, security or suitability of any given package.
To learn more about protecting yourself from malicious actors, visit our package security documentation.













