Non-blocking LED controlling library

Project description
Introduction


An embedded library for Python to control LEDs. It uses a non-blocking approach and can control LEDs in simple (on/off) and complex (blinking, breathing and more) ways in a time-driven manner.
This is a pure Python port of my JLed C++ library.

Features
non-blocking
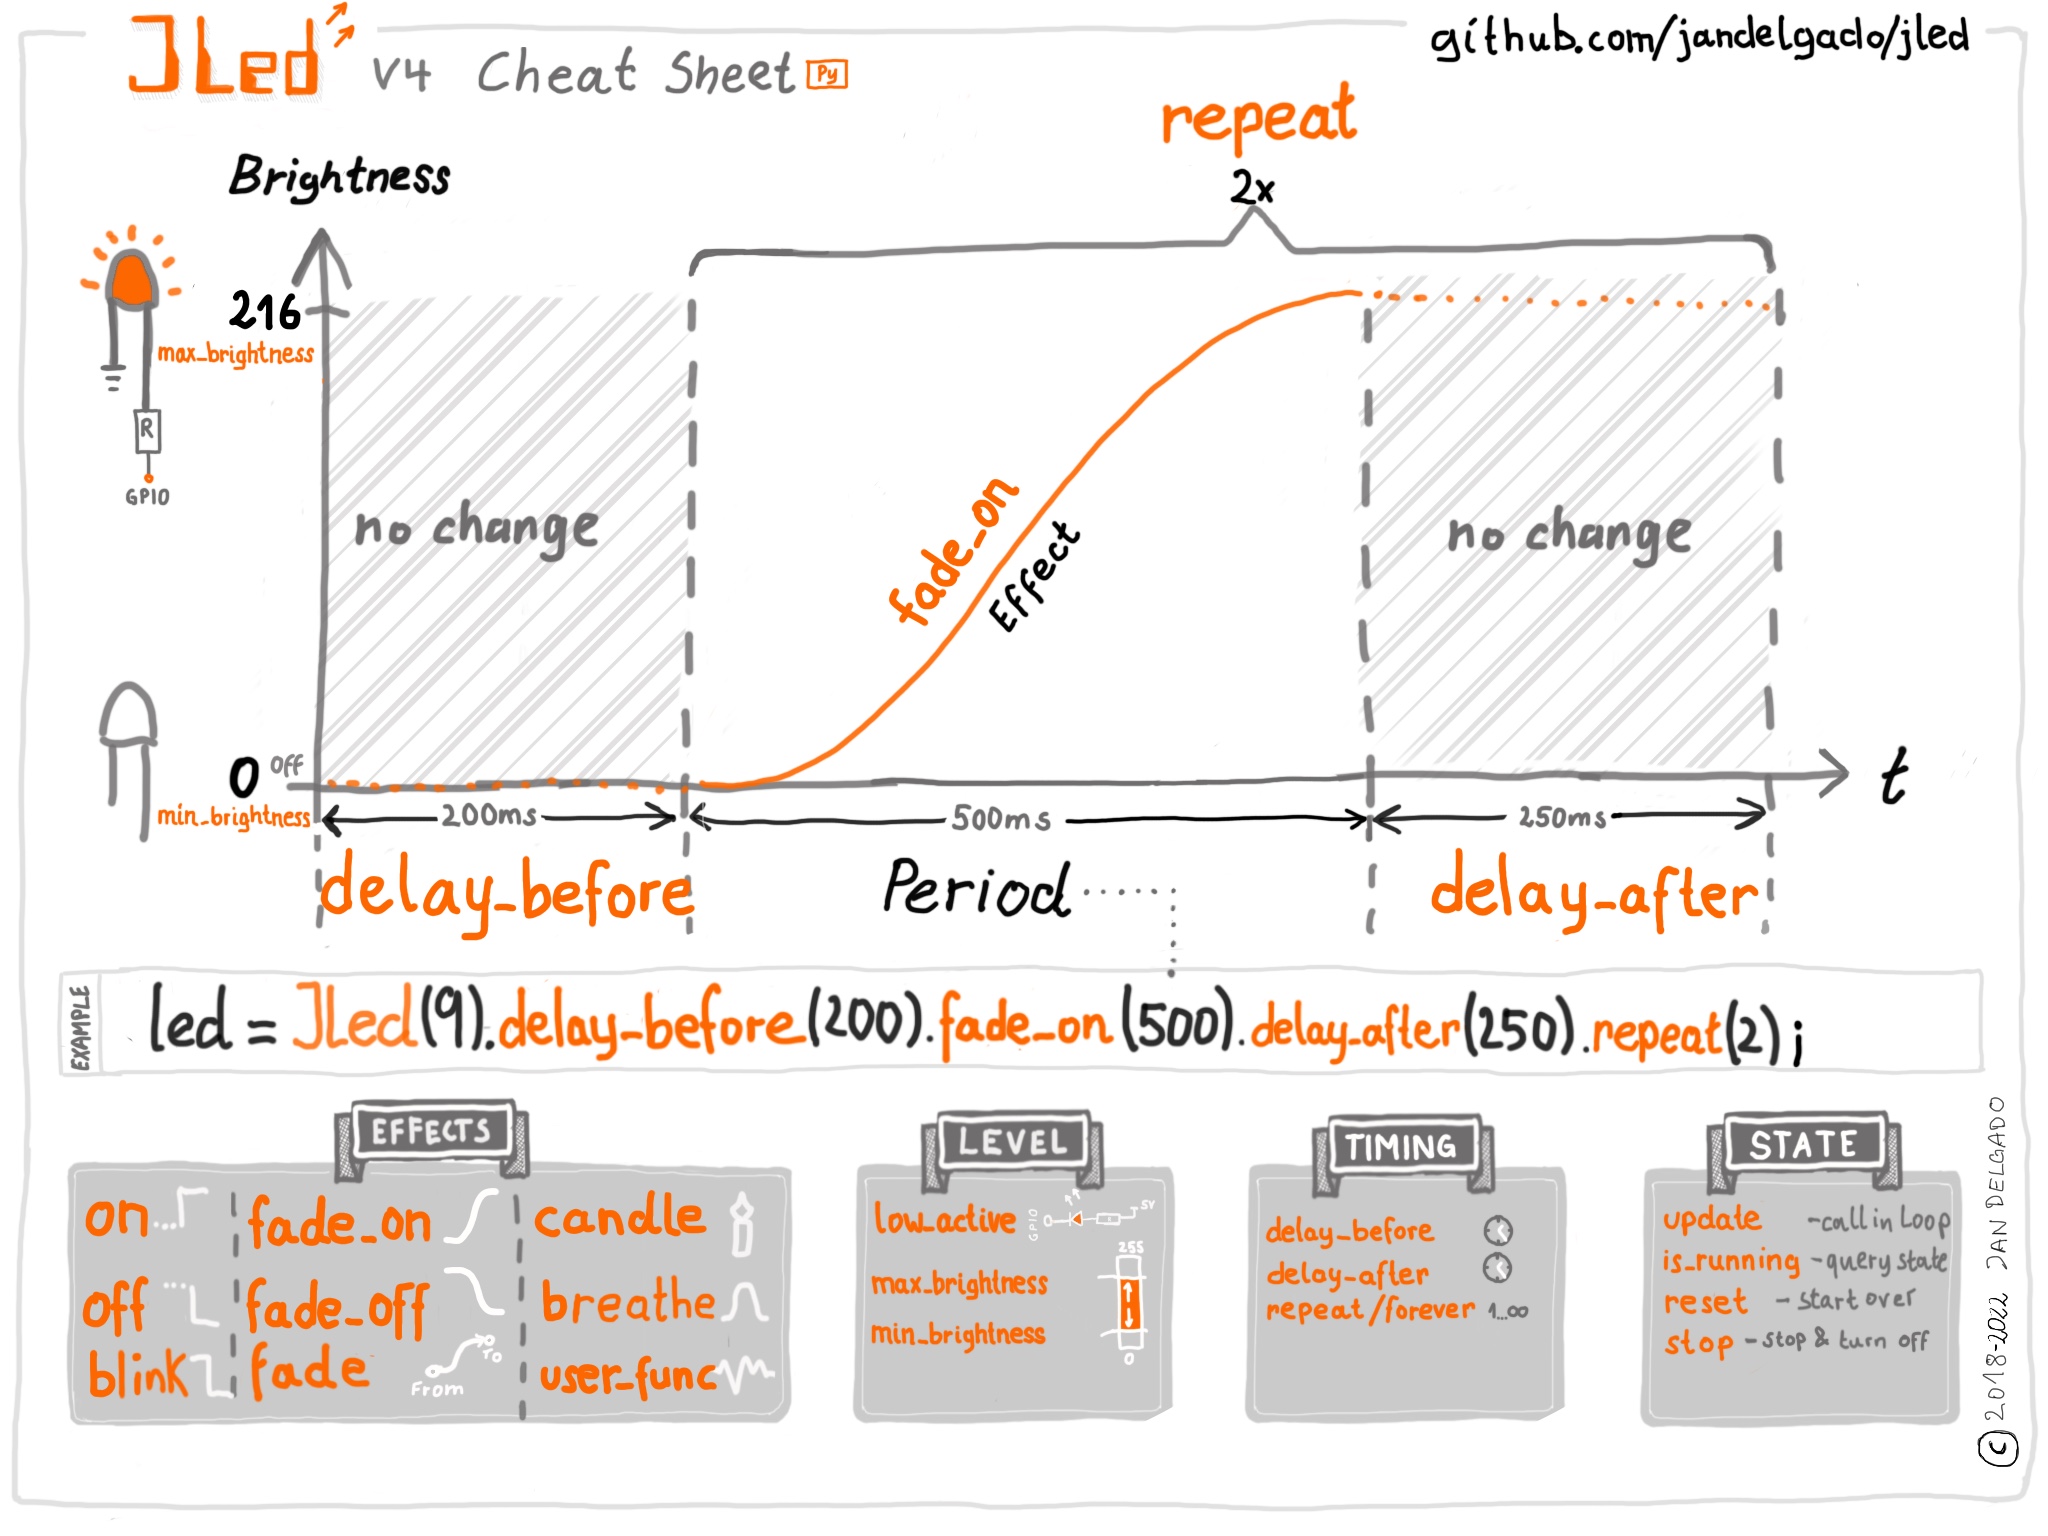
effects: simple on/off, breathe, blink, candle, fade, user-defined
supports inverted polarity of LED
easy configuration using fluent interface
can control groups of LEDs sequentially or in parallel
supports CircuitPython and MicroPython
Usage Example
Test JLed interactively in a CircuitPython REPL:
Adafruit CircuitPython 7.3.3 on 2022-08-29; Raspberry Pi Pico with rp2040
>>> import board
>>> from jled import JLed
>>> led=JLed(board.LED).breathe(500).delay_after(250).repeat(5)
>>> while led.update(): pass
This creates a JLed object connected to the builtin LED (board.LED), with a breathe effect that is repeated 5 times. Each iteration is followed by a delay of 250 ms, before starting again. By calling led.update() periodically, the LED gets physically updated. Alternatively play(led) can be call in the REPL as a shortcut. Once finished, call led.reset() before playing the effect again.
Cheat Sheet
Installation
On supported GNU/Linux systems like the Raspberry Pi (with Adafruit-Blinka), you can install the lib locally from PyPI. To install for current user:
pip3 install circuitpython-jledTo install system-wide (this may be required in some cases):
sudo pip3 install circuitpython-jledTo install in a virtual environment in your current project:
mkdir project-name && cd project-name
python3 -m venv .venv
source .env/bin/activate
pip3 install circuitpython-jled
Installing to a Connected CircuitPython Device with Circup
JLed is available in the Circuitpython Community Bundle and can easily installed with circup by running:
$ circup install jled
Optionally copy also one of the example as code.py to the root of the filesystem.
Installing on a MicroPython device
Create a directory called jled on the device and copy the following files into this directory: jled.py, jled_sequence.py hal_pwm_micropython.py, hal_time_micropython.py, play.py, __init__.py`. Optionally also copy one of the example as main.py to the root of the filesystem. The overall structure is:
/
├─ main.py
└─ jled
    ├─ __init__.[m]py
    ├─ hal_pwm_micropython.[m]py
    ├─ hal_time_micropython.[m]py
    ├─ jled.[m]py
    ├─ jled_sequence.[m]py
    └─ play.[m]py
To reduce memory consumption, Python source files can be compiled to binary mpy format using the mpy-cross tool. For convenience, a script to compile and copy jled to a connected device is provided here (see scripts/install_mp.sh).
Documentation
API documentation for this library can be found on here.
Rebuild the documentation with sphinx-build -E -W -b html . _build/html in the docs directory. Run pip install ".[optional]" before to install build-time dependency Sphinx
Tests
Unit tests (using https://docs.pytest.org) are provided, run the tests with:
$ pip install ".[optional]"
$ pytest
To run the pre-commit-hook locally, run pre-commit run --all-files
Tip
Instead of installing the various tools like circup, mp-remote, mpy-cross etc. you can easily run the tools using uv:
uv tool run circup list, uv tool run circup update --all
uv tool run mpremote to start a REPL on the micro controller
uv tool run --with pytest-cov pytest to run the unit tests
uv tool run --from sphinx sphinx-build -E -W -b html . build/html to build the documentation using sphinx (run inside docs/)


Download files
Download the file for your platform. If you're not sure which to choose, learn more about installing packages.
Source Distribution
Built Distribution
Filter files by name, interpreter, ABI, and platform.
If you're not sure about the file name format, learn more about wheel file names.
Copy a direct link to the current filters
File details
Details for the file circuitpython_jled-1.0.5.tar.gz.
File metadata
- Download URL: circuitpython_jled-1.0.5.tar.gz
- Upload date:
- Size: 1.0 MB
- Tags: Source
- Uploaded using Trusted Publishing? No
- Uploaded via: twine/6.1.0 CPython/3.13.5
File hashes
| Algorithm | Hash digest | |
|---|---|---|
| SHA256 |
77135974ef1468a0eac031edb3bed4c33424c45a303a6d985a1d446fd1881cb6
|
|
| MD5 |
7495f83e0412edfcb94a2e647fa2b805
|
|
| BLAKE2b-256 |
ba44c12692939c2952e65618afec0a619caf3d3e8063df29cf48e949e236f61f
|
File details
Details for the file circuitpython_jled-1.0.5-py3-none-any.whl.
File metadata
- Download URL: circuitpython_jled-1.0.5-py3-none-any.whl
- Upload date:
- Size: 16.6 kB
- Tags: Python 3
- Uploaded using Trusted Publishing? No
- Uploaded via: twine/6.1.0 CPython/3.13.5
File hashes
| Algorithm | Hash digest | |
|---|---|---|
| SHA256 |
a1d23ab435f7b1ff92da257489c0f20763c9becb7d38c39d5579dd6433d0d7fa
|
|
| MD5 |
70be5da52bb17768baaab19208181c37
|
|
| BLAKE2b-256 |
0314f75cdaed3eb2e3d0a847a923250b30246c8b685503f23813153e0eef3468
|


