
Educational tool for understanding detector errors in QEC circuits

Project description
CircuitScope
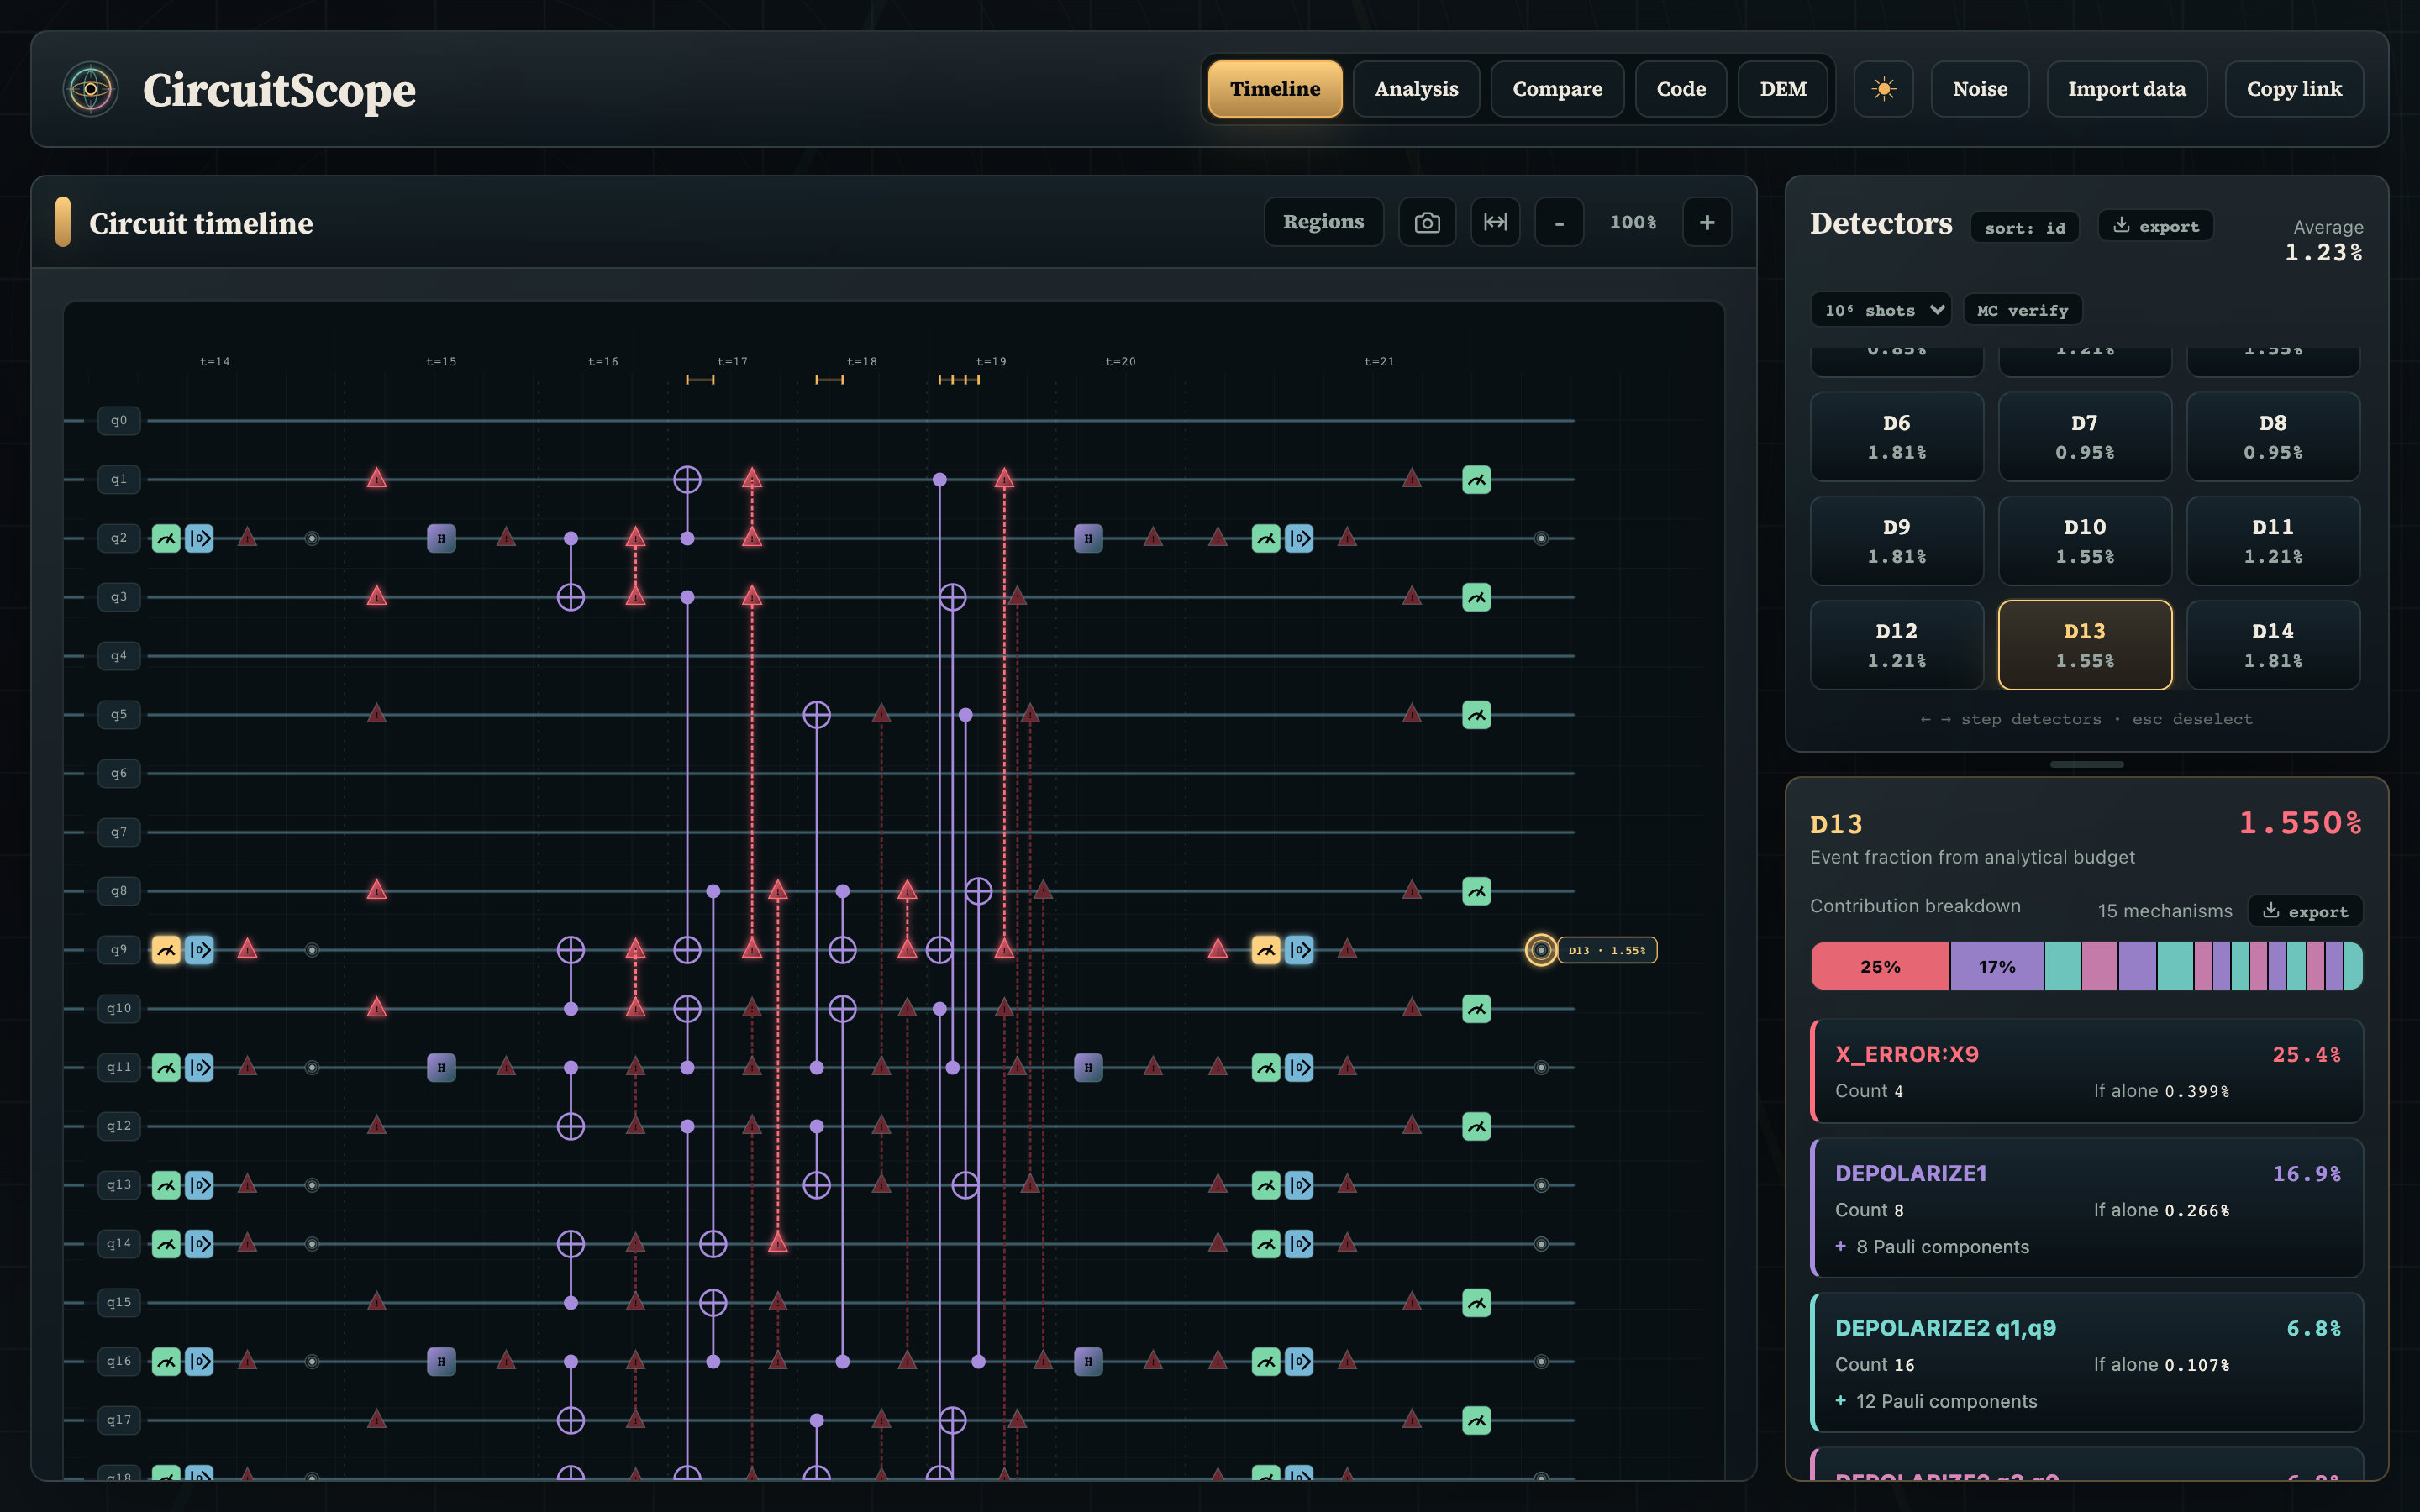
CircuitScope is an educational tool for understanding detector errors in quantum error correction circuits. It helps answer how likely is each detector to fire, which circuit error mechanisms influence it, and how detector probabilities change with those error mechanisms.
CircuitScope accepts Stim circuits, uses Stim's detector error model and explanation APIs for the underlying circuit analysis, and outputs an interactive circuit diagram, error budget, and analytical expressions for detector probabilities.
Installation
CircuitScope requires Python 3.10+. Install from PyPI:
pip install circuitscope
This installs the circuitscope command and its dependencies (stim, flask).
To install the latest development version from source instead:
git clone https://github.com/j-t-wilson/circuitscope
cd circuitscope
pip install .
Run
circuitscope                    # Opens browser automatically
circuitscope --port 8080        # Use a different port
circuitscope --no-browser       # Don't auto-open browser
circuitscope --host 0.0.0.0     # Bind to a different host
On launch, choose an example circuit or paste your own Stim circuit, then click Analyze Circuit.
Opening a circuit from the command line
Pass a Stim circuit file (or - to read from stdin) to skip the launch screen
and open the app with the circuit already analyzed:
circuitscope mycircuit.stim             # Open with the circuit pre-analyzed
cat mycircuit.stim | circuitscope -     # Read the circuit from stdin
Add --data to preload measured per-detector event fractions, exactly as the
Import data button in the app accepts them (CSV with D0, 0.0214 lines and an
optional shots, 100000 line, or the equivalent JSON):
circuitscope mycircuit.stim --data fractions.csv
The circuit is validated with Stim at startup, so a malformed file fails fast on
the command line rather than in the browser. These flags compose with the others
above (--port, --no-browser, etc.). Note that a circuit shared via a URL
hash link takes precedence over a circuit passed on the command line.
Basic Workflow
- Load a stim circuit.
- Select a detector from the right panel.
- Inspect the highlighted timeline to see which errors influence the detector.
- Open the Analysis view to generate a analytical expressions for the detector fraction.
- Adjust parameter sliders to see sensitivities and assess hypotheticals.
Comparing measured data
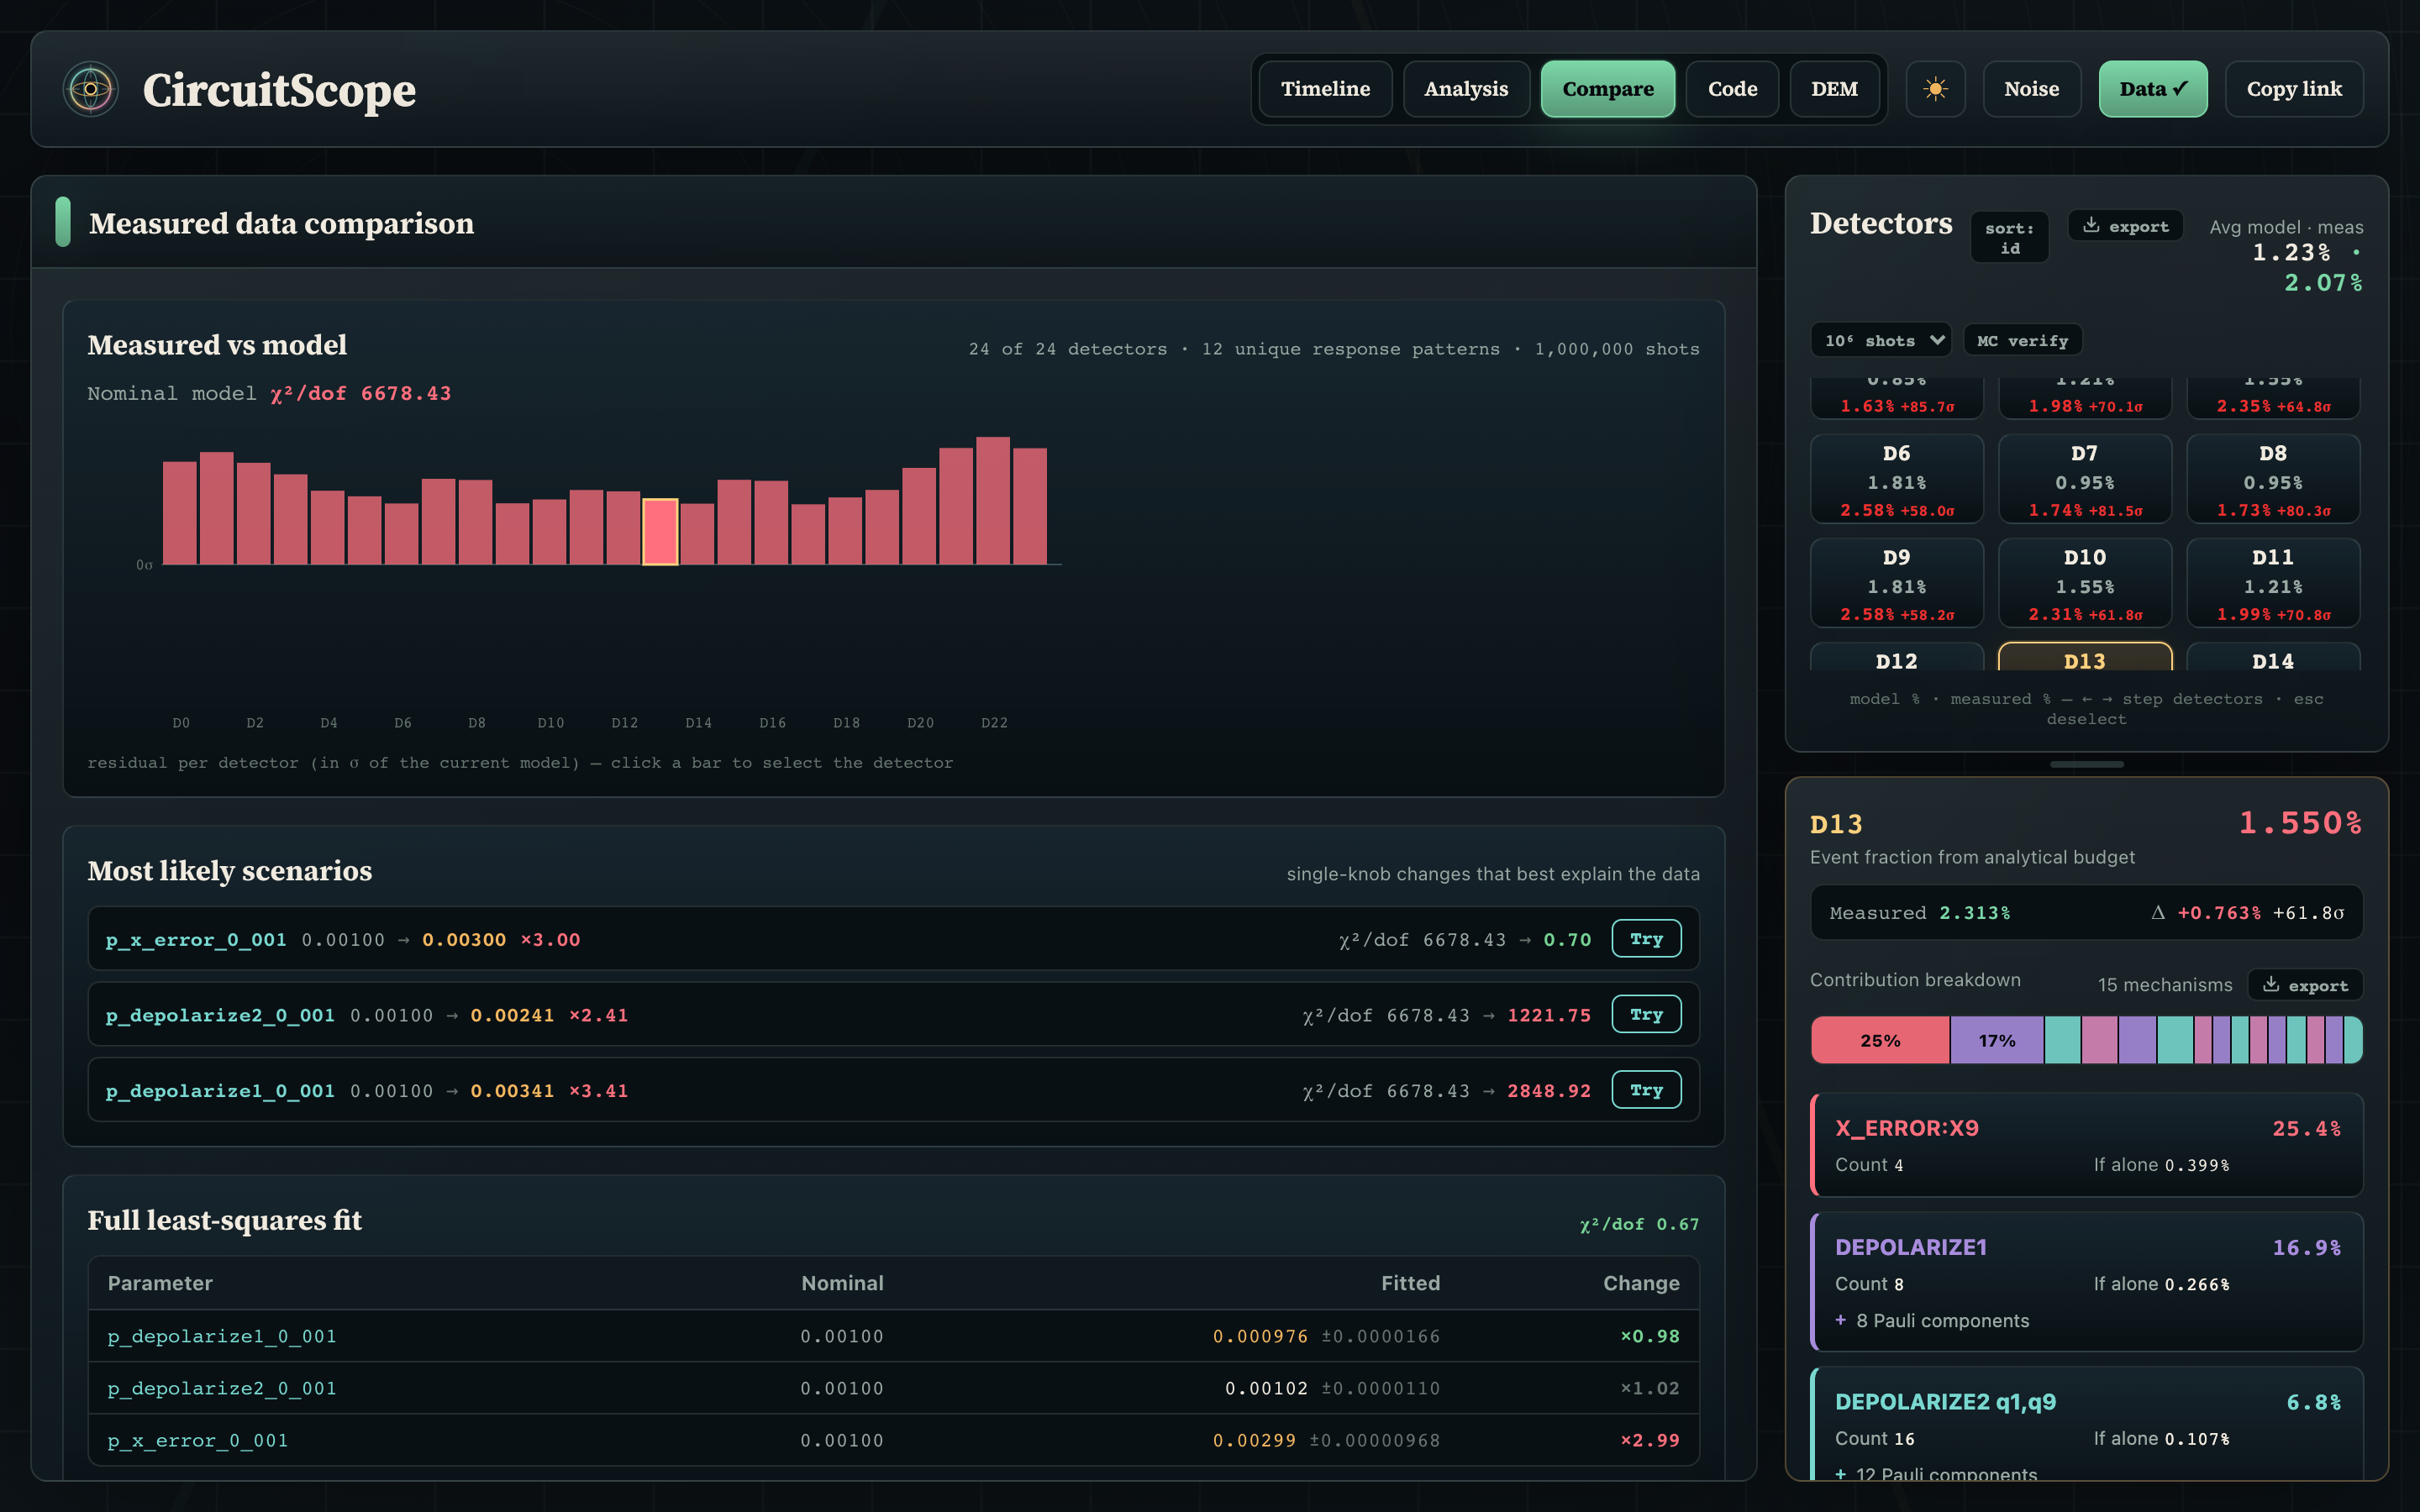
Import per-detector measured event fractions and the Compare view shows residuals against the model, ranks single-knob explanations, and runs a full least-squares fit of the noise parameters (here recovering a deliberately tripled measurement-flip rate):
Analytical response
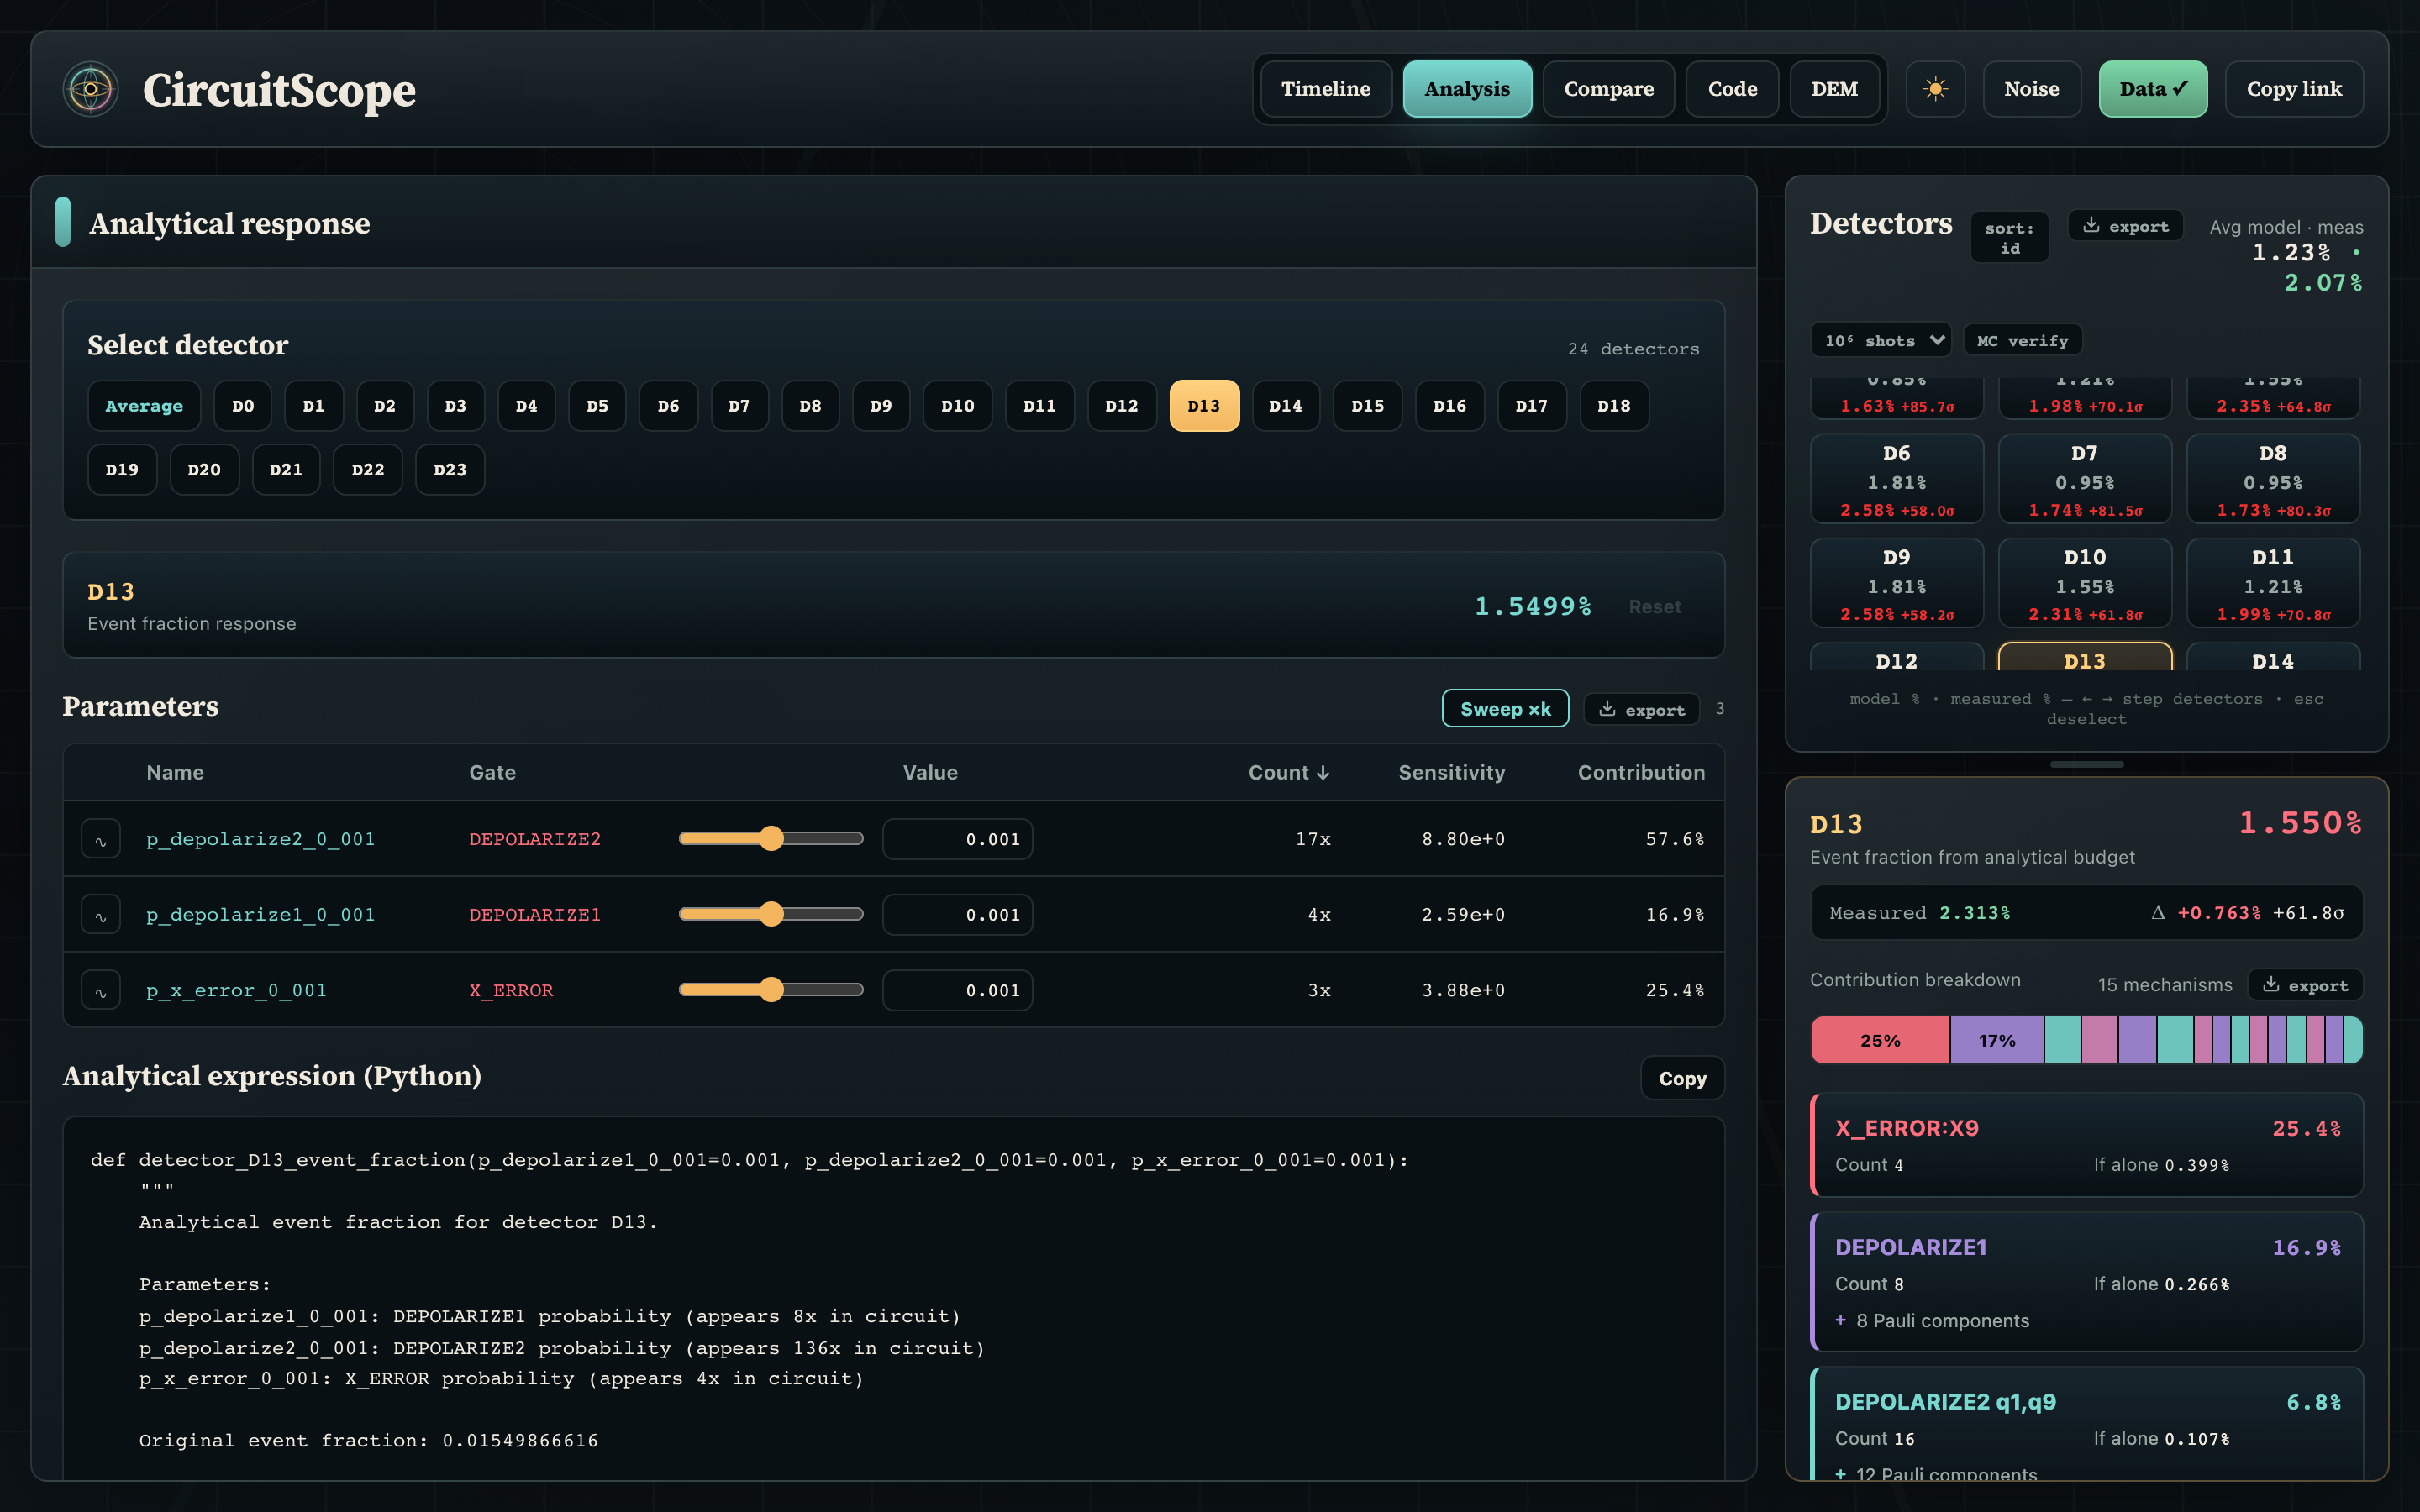
The Analysis view generates a standalone Python function for any detector's event fraction, with interactive sliders and per-parameter sensitivities:
The screenshots above are generated against the live app by
node scripts/readme-screenshots.mjs (see the header of that script).
What You Can Inspect
- Detector event fractions: Per-detector firing probabilities and their average across the circuit.
- Timeline context: Qubits, gates, measurements, detector locations, error locations, and detecting-region overlays.
- Error attribution: Log-weight contribution shares and "If alone" probabilities for mechanisms affecting a selected detector.
- Stim source and DEM terms: Syntax-highlighted circuit source and detector error model entries linked to detector selection.
- Analytical response: Generated Python functions for a detector or for the average across all detectors, with sortable parameter sensitivities.
- Monte Carlo verification: One click samples the circuit server-side and overlays sampled detector fractions ± error bars next to the analytical ones, with an agreement verdict in units of the expected sampling noise.
The formula and budget path currently focuses on Stim noise mechanisms with
direct probability extraction in CircuitScope: X_ERROR, Y_ERROR, Z_ERROR,
CORRELATED_ERROR, DEPOLARIZE1, DEPOLARIZE2, and measurement flip
probabilities. Additional Stim channels can be visualized in the timeline when
recognized, but need explicit probability extraction before they participate in
the analytical budget/formula path.
Mathematical Details
The core calculation treats detector error model terms as independent toggles. A detector fires when an odd number of toggles affect it:
$$P(D) = \frac{1}{2}\left(1 - \prod_i (1 - 2p_{\text{eff},i})^{c_i}\right)$$
The generated formulas handle DEPOLARIZE1 and DEPOLARIZE2 decorrelation
internally, so sliders and Python function parameters stay in terms of the
original circuit probabilities. See
docs/mathematical_framework.md for the full
model, contribution-budget interpretation, sensitivity formulas, and Stim API
references.
Development
For development, you'll need Node.js in addition to Python:
# Install Python package plus test dependency
pip install -e ".[dev]"

# Terminal 1: Run Python backend
python -m circuitscope.server --no-browser

# Terminal 2: Run frontend dev server (hot reload)
npm install
npm run dev

# Build for production
npm run build
The frontend dev server (port 5173) proxies /api requests to the Python backend on port 8050.
Run tests with:
pytest                  # Full suite
pytest -m "not slow"    # Skip Monte Carlo tests
pytest -v               # Verbose output
After changing frontend source under src/, run npm run build so the packaged
Flask app in circuitscope/static/ stays in sync.
Release history Release notifications | RSS feed


Download files
Download the file for your platform. If you're not sure which to choose, learn more about installing packages.
Source Distribution
Built Distribution
Filter files by name, interpreter, ABI, and platform.
If you're not sure about the file name format, learn more about wheel file names.
Copy a direct link to the current filters
File details
Details for the file circuitscope-0.1.1.tar.gz.
File metadata
- Download URL: circuitscope-0.1.1.tar.gz
- Upload date:
- Size: 135.3 kB
- Tags: Source
- Uploaded using Trusted Publishing? No
- Uploaded via: twine/6.2.0 CPython/3.12.8
File hashes
| Algorithm | Hash digest | |
|---|---|---|
| SHA256 |
2f456123b2ad7e2b1a0e7e136e2d3cce5a23e8bf5a63eb7f59c821ce096d08e4
|
|
| MD5 |
dd6808a94ea71d744606711e4acecfb6
|
|
| BLAKE2b-256 |
c6472e12f975d70839d198fcf768bf04ef046df78cf316ac5ae75f516ef33d54
|
File details
Details for the file circuitscope-0.1.1-py3-none-any.whl.
File metadata
- Download URL: circuitscope-0.1.1-py3-none-any.whl
- Upload date:
- Size: 126.9 kB
- Tags: Python 3
- Uploaded using Trusted Publishing? No
- Uploaded via: twine/6.2.0 CPython/3.12.8
File hashes
| Algorithm | Hash digest | |
|---|---|---|
| SHA256 |
f95efcee7d527d674ae21b0fff6902230b1630c8718a94420da4d88551eafaa3
|
|
| MD5 |
1c9e8a5f4cddc729f9cbf289b110ea84
|
|
| BLAKE2b-256 |
3df836ef9a48350626712985e580d7fa6dd907298aa31cd28cbb6250a4257dce
|






