Your GitHub clone stats, visualized and celebrated.

Project description
ClonePulse
Your GitHub clone stats, visualized and celebrated.
Track weekly trends, highlight milestones, and share visual dashboards—all automatically.


Add Badges to Your README
ClonePulse can generate badges you can embed in your repo:
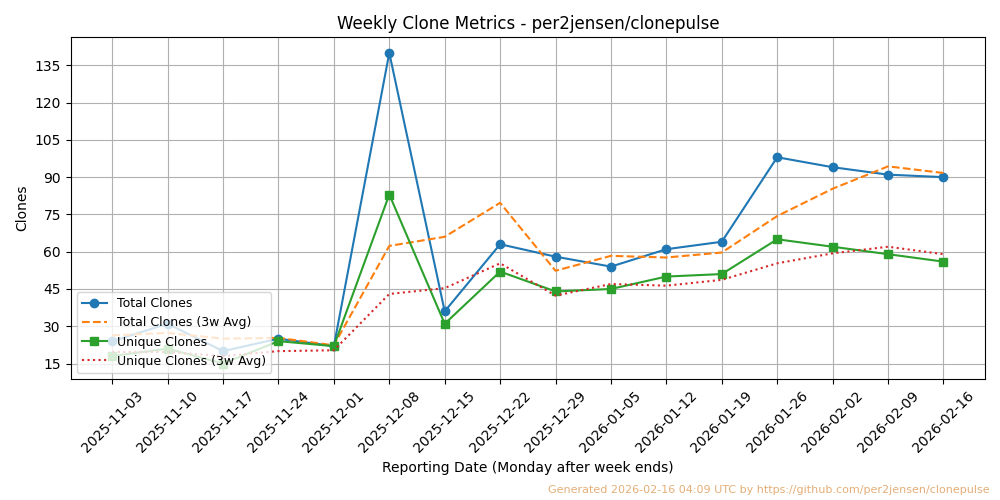
Example dashboards
Weekly dashboard (default)
A weekly clone activity chart is automatically updated and saved in clonepulse/weekly_clones.png.
- Runs every Monday morning
- Discards partial weeks
- Shows only complete Monday–Sunday periods

Reproducible window (--start + --weeks)
Command: python src/clonepulse/generate_clone_dashboard.py --start 2025-08-15 --weeks 6

Calendar year (--year)
Command: python src/clonepulse/generate_clone_dashboard.py --year 2025

Quick Setup
-
Create a GitHub Token
See 🔐 Token Setup below. -
Drop essentials into your repo
Copy the contents ofclonepulse/andsrc/clonepulse/plus the workflows in.github/workflows/. -
Add badges to your README
Replaceyour-username/your-repo:[](https://github.com/your-username/your-repo/blob/main/clonepulse/weekly_clones.png) [](https://github.com/your-username/your-repo/blob/main/clonepulse/weekly_clones.png)
-
Configure the workflow
Updatefetch_clones.ymlwith your--userand--repo.- name: Run fetch_clones.py env: TOKEN: ${{ secrets.CLONEPULSE_METRICS }} run: | PYTHONPATH=src python src/clonepulse/fetch_clones.py \ --user <your GitHub login> \ --repo <your repo>
-
Generate the dashboard in your workflow
Default (last 12 weeks):
- name: Render dashboard
  run: PYTHONPATH=src python src/clonepulse/generate_clone_dashboard.py
Reproducible window:
- name: Render dashboard
  run: |
    PYTHONPATH=src python src/clonepulse/generate_clone_dashboard.py \
      --start 2025-06-02 --weeks 8
Dashboard title & repo label
- Banner title always says “Weekly Clone Metrics”.
- If you provide
--userand--repo, the banner also showsuser/repo. - If only one is provided, that single value is shown.
- If neither flag is passed, the script falls back to env vars
GITHUB_USER/GITHUB_REPOfor the label.
Additional CLI options (can also be used locally):
PYTHONPATH=src python src/clonepulse/generate_clone_dashboard.py \
  [--user your-username] \
  [--repo your-repo] \
  [--start YYYY-MM-DD --weeks N] \
  [--year YYYY]
Token Setup
ClonePulse fetches traffic stats from the GitHub API. This requires a Personal Access Token (PAT).
Permissions
For public repos:
- Administration: Read-only
- Metadata: Read-only
For private repos:
- Administration: Read-only
- Metadata: Read-only
- Contents: Read-only
- Traffic: Read-only
How to Create the Token
-
Visit https://github.com/settings/tokens
Click Generate new token → Fine-grained token -
Configure:
- Name: e.g.
your-repo_ClonePulse - Expiration: e.g. 90 days
- Resource owner: Your user or organization
- Repository access: select your repo
- Permissions: set as above
- Name: e.g.
-
Generate and copy the token. (You only see it once.)
Add Token to Secrets
-
Go to your GitHub repository:
Settings → Secrets and variables → Actions → New repository secret -
Name the secret:
CLONEPULSE_METRICS -
Paste the token and save.
Use in Workflow
- name: Run fetch_clones.py
  env:
    TOKEN: ${{ secrets.CLONEPULSE_METRICS }}
  run: python src/clonepulse/fetch_clones.py
Contributing
Found a bug or want to suggest a feature?
Open an issue or send a PR.
License
ClonePulse is licensed under MIT.


Download files
Download the file for your platform. If you're not sure which to choose, learn more about installing packages.
Source Distribution
Built Distribution
Filter files by name, interpreter, ABI, and platform.
If you're not sure about the file name format, learn more about wheel file names.
Copy a direct link to the current filters
File details
Details for the file clonepulse-1.0.5.tar.gz.
File metadata
- Download URL: clonepulse-1.0.5.tar.gz
- Upload date:
- Size: 111.7 kB
- Tags: Source
- Uploaded using Trusted Publishing? No
- Uploaded via: twine/6.1.0 CPython/3.12.3
File hashes
| Algorithm | Hash digest | |
|---|---|---|
| SHA256 |
2b12868baefb704f8ab3a5232a9271b360e982b53b88e11bd20ac6dfa5dd9de5
|
|
| MD5 |
a5d85c5ba39b795d18b70d2b8e7cf57b
|
|
| BLAKE2b-256 |
6460c421cef2fd5047042c4a3f8f8e7b54e89461ee535f3f895a33a6c49eaacc
|
File details
Details for the file clonepulse-1.0.5-py3-none-any.whl.
File metadata
- Download URL: clonepulse-1.0.5-py3-none-any.whl
- Upload date:
- Size: 15.6 kB
- Tags: Python 3
- Uploaded using Trusted Publishing? No
- Uploaded via: twine/6.1.0 CPython/3.12.3
File hashes
| Algorithm | Hash digest | |
|---|---|---|
| SHA256 |
9612edd10d35a00a48a03cf4ef8079fc730f4c4d392d4a2e58f1a5aef44ba207
|
|
| MD5 |
8c34fa3c74966b66fdbddde2b1c3d6da
|
|
| BLAKE2b-256 |
860c6f22ada0548d018ddcdc44026d958b50b61299b44f70f16371961013b905
|


