Distributed storage for community archives using ipfs-cluster, Tailscale and Docker

Project description
⇧📁 community-cloud-storage

community-cloud-storage is a command line utility that lets you create and manage a Docker based, trusted, decentralized storage system for community archives. All the heavy lifting is done by IPFS Cluster and Tailscale which provides a virtual private mesh network for the cluster participants that the rest of the world can't see. A small static web application is also included which makes it easy to see see what files have been added to the cluster, and retrieve them.
This work is part of Shift Collective's Modeling Sustainable Futures: Exploring Decentralized Digital Storage for Community Based Archives project, which was funded by the Filecoin Foundation for the Decentralized Web. For more details you can read reports linked from the project's homepage.
In a nutshell, the goal of community-cloud-storage is to provide an alternative to "big-tech" storage services, that is:
- Decentralized instead of Centralized: the software is open source and can be deployed on infrastructure that is operated by the members in their data centers, offices and homes. Members can join at any time to increase the capacity of the network, and can leave without disrupting the remaining members.
- Trustful instead of Trustless: members have shared values and goals in order to join the network. It is up to specific communities to decide what this means for them.
- Mutable instead of Immutable: data doesn't get replicated outside of the trusted network, and it's possible to remove data from the entire network at any time.
- Private instead of Public: many peer-to-peer and distributed web systems are built around the idea of data being globally available, and easy to replicate. Data in community-cloud-storage is not made available to the wider IPFS network. The use of Tailscale allows peers to communicate directly with each other using a virtual private mesh network, that only they can see.
community-cloud-storage is really just a Docker Compose configuration for reliably bringing up Docker services that allows a network of community-cloud-storage instances to talk to each other. The containers are:
- tailscale: a Tailscale client that establishes your node's connection to other trusted nodes in the mesh network.
- ipfs: an IPFS daemon running on the Tailscale network.
- ipfs-cluster: an IPFS Cluster daemon configured to talk to the IPFS service using the Tailscale network.
- ui: a single-page web application served up by nginx which talks to the IPFS Cluster API
Of course it's not all rainbows and unicorns, there are tradeoffs to this approach:
- The data in the storage cluster is only as stable as the people and organizations that are helping host it.
- Participants in the cluster can potentially access and delete data that does not belong to them.
- Unlike polished "big-tech" storage platforms (e.g. Google Drive, Box, etc) there are usability challenges to adding and removing content from the storage cluster.
- The IPFS and Tailscale software being used is open source, but the people maintaining it may change their minds, and focus on other things.
- Tailscale makes establishing a virtual private mesh network easy using the open source Wireguard software and some of their own open source code and infrastructure. However, Tailscale are a company and could decide to change how they do things at any time.
- Tailscale doesn't have access to any of the stored data, but they do know the network topology of the IPFS cluster, and could be issued a subpoena in some jurisdictions that forces them to share who is a member of the network. Read more about this here.
In short, community-cloud-storage doesn't solve the Governance Problem. You have to decide who is in your trusted network, and everyone in your network needs to decide what your values are, and specifically what norms are around deleting content, and growing the network.
Install
First, install the ipfs and ipfs-cluster-ctl command line utilities, and make sure they are in your system path. You don't need to run the cluster on your workstation, however having these utilities available makes it easy for the community-cloud-storage command line tool to talk to running nodes.
ipfs: https://docs.ipfs.tech/install/command-line/#install-official-binary-distributionsipfs-cluster-ctl: https://dist.ipfs.tech/#ipfs-cluster-ctl
You will want to install Docker on whatever machine you are planning to run your node on.
You will also need to install the community-cloud-storage utility which helps create the Docker compose file for the bootstrap node and then clone that for subsequent nodes in your network.
The preferred way to run community-cloud-storage is with the uvx utility from uv. uv makes it easy to run Python utilities without needing to download and install them, or even have Python available.
uvx community-cloud-storage
Alternatively, you can install community-cloud-storage using Python's package manager with:
pip install community-cloud-storage
The rest of the documentation uses examples with uvx but if you install with pip you should be able to remove that part of the command.
Setup Bootstrap Node
Note: if you are creating a community-cloud-storage node in an existing network jump down to the Let Others Join section below.
The first node in a community-cloud-storage network is known as the bootstrap node. It requires a bit more setup than subsequent nodes because the Tailscale mesh network needs to be created and configured, and a couple secret keys need to be defined. This bootstrap node will be used by subsequent nodes to find the rest of the network when they join.
Tailscale
Your IPFS Cluster will run in a virtual private mesh network using Tailscale. Tailscale is a service for the open source Wireguard software. Creating a Tailscale account will give you access to the free tier which will be fine for your network. If you are interested in learning more about Tailscale they have a good series of instructional videos such as Tailscale: Get Started in 10 minutes.
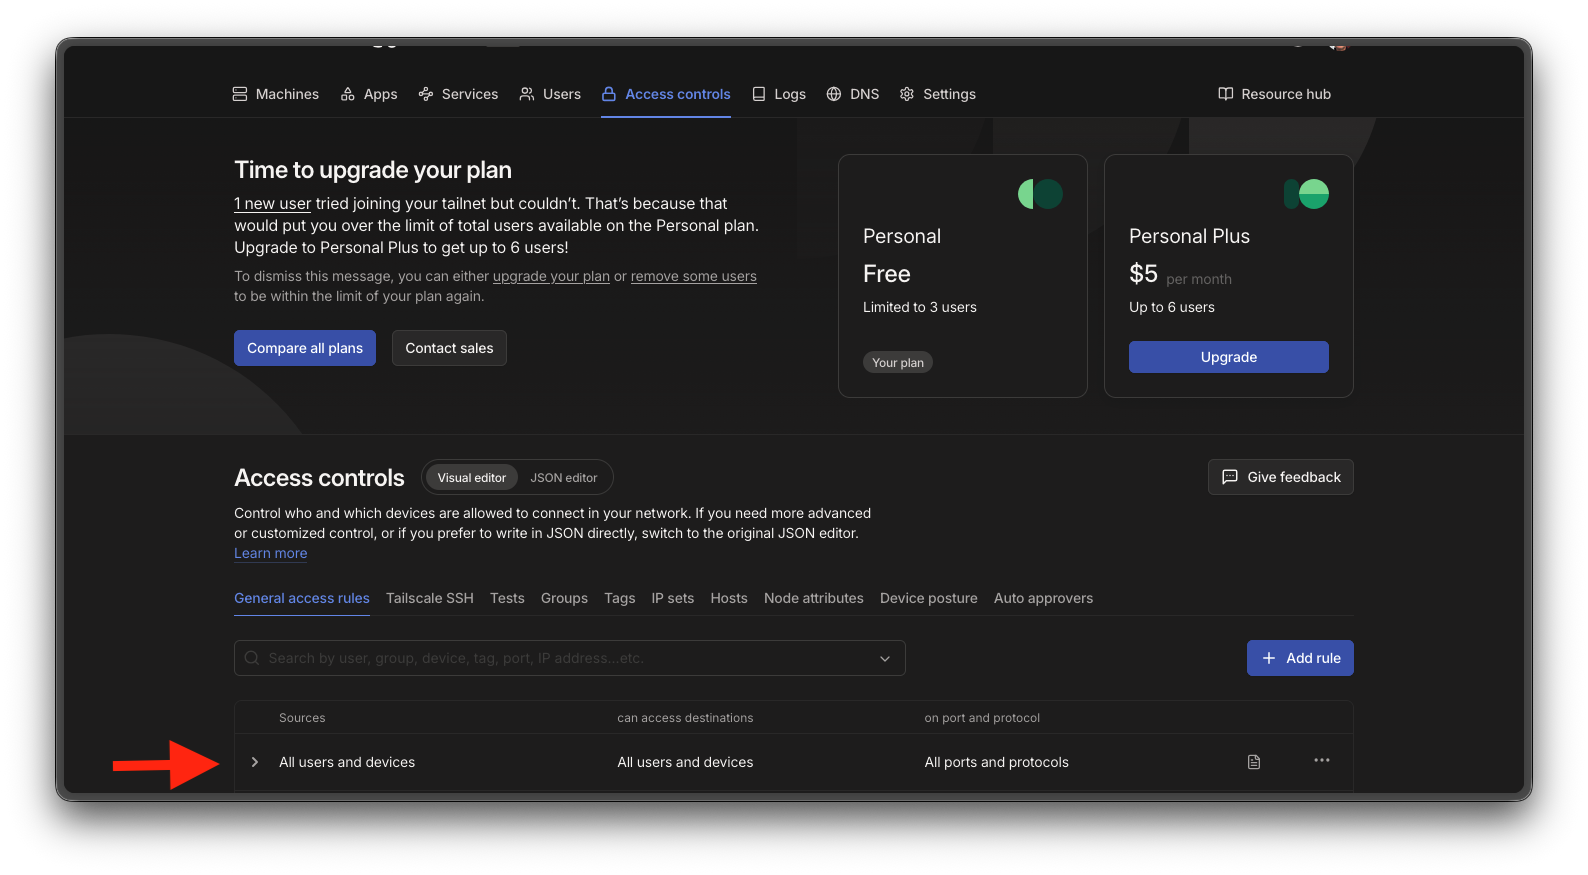
After you create your account, you will need to ensure that the access rules allow the nodes in your cluster to talk to each other. Tailscale gives you a great deal of control over these rules but a useful place to start is to simply allow all the user and devices to see each other. To do this go to your Access Control tab in Tailscale admin and use the Visual Editor to ensure it has a rule that allows all users and devices in your tailnet to see each other.
These settings are just to get you started with your storage cluster. You can further refine them as needed as you develop your cluster and use Tailscale for other things.
Be sure to also mention that any admins should get invited to the Tailscale so they can see it from their workstation.
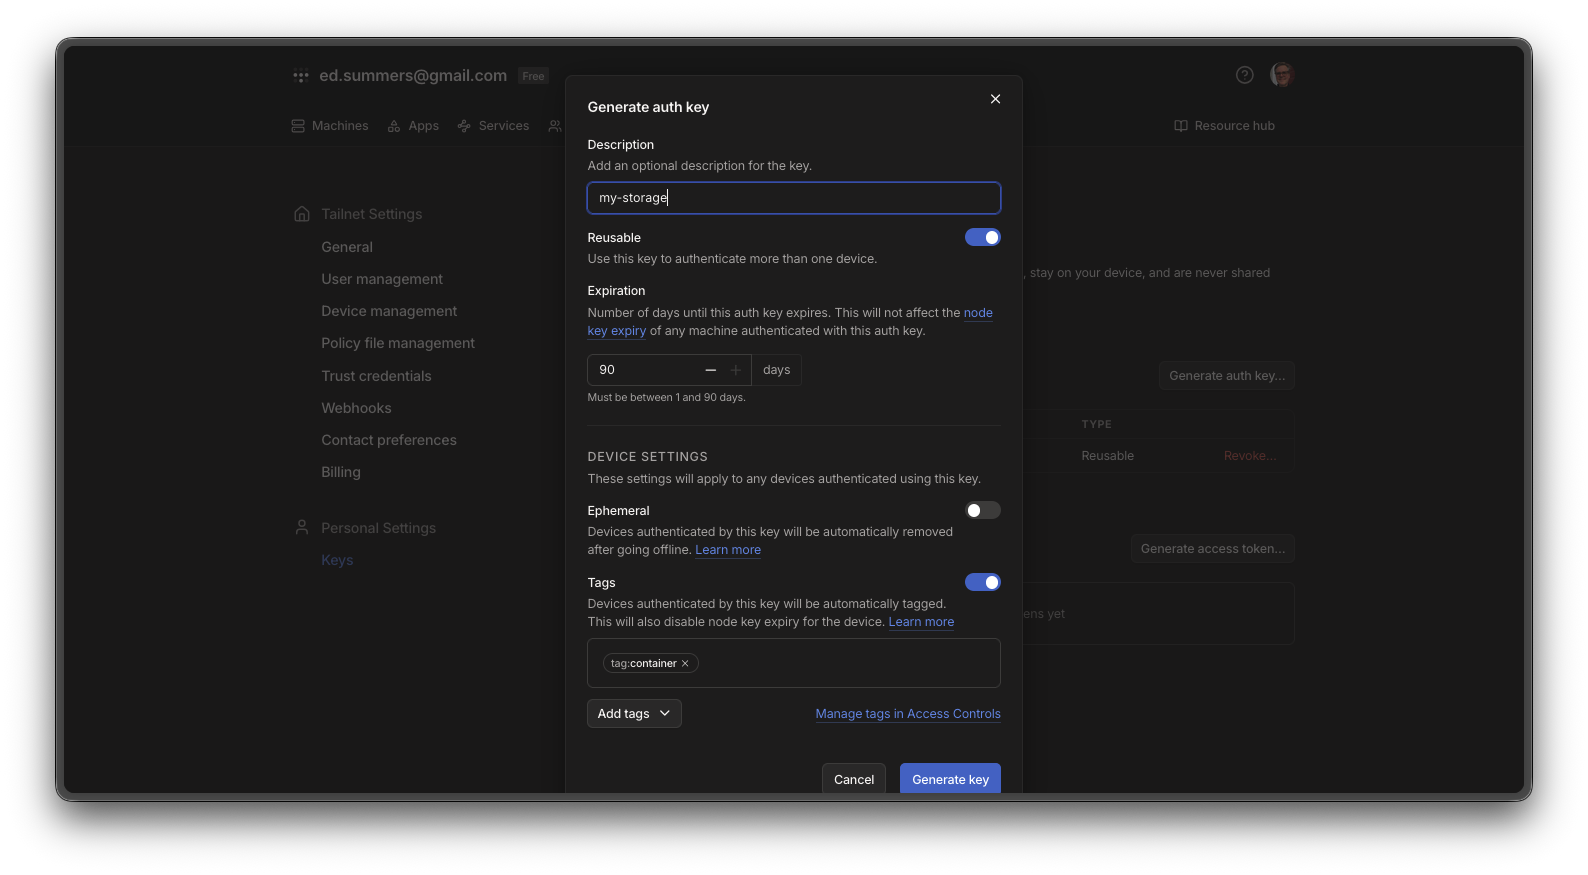
Tailscale Auth Key
You will need to create an Authorization Key to use in your community-cloud-storage configuration so that new containers can join the private network. To do this click on Settings in the top menu, and then Keys in the menu to the left. Here you click on Generate auth key button and enter:
- a description for your storage network (e.g. my-storage)
- make the key reusable
- set the maximum of 90 days for the expiration which should be plenty of time to set up your network
- not ephemeral (allows your node to go offline and come back up again)
- tags: add the container tag
- click the Generate Key button
- copy the new key, and save it somewhere private where you can find it again
Create Compose File
Use your Tailscale token to create your bootstrap node, which here is named bootstrap but can be whatever you like. This will be the hostname of the bootstrap node in your Tailscale network.
In place of the "YOUR KEY HERE" you will want to put the Tailscale Auth Key you generated in the previous step.
uvx community-cloud-storage create --ts-authkey "YOUR KEY HERE" --cluster-peername bootstrap --output compose.yml
This should write a Docker Compose configuration to compose.yaml.
DANGER: Be careful to not make this compose file public since it contains secret keys!
Start Bootstrap
You can now start up your bootstrap node with:
$ docker compose up -d
If you want to stop the service at any time you can execute this command, as long as you are in the community-cloud-storage directory:
$ docker compose stop
Let Others Join
In order to let others join the network you will need to share a modified version of the compose file with them via a secure channel (e.g. WhatsApp or Signal).
uvx community-cloud-storage clone --input compose.yml --cluster-peername acme --output acme-compose.yml --bootstrap-host bootstrap
This will write out a acme-compose.yml file which you can share via a secure channel with someone running a machine at that organization.
You should be able to run this using docker compose, but for the original Shift-FFDW project we have been standardizing on partners using a QNAP NAS which makes is easy to set up. You can use whatever device you want as long as you can run Docker on it and it has at least 4GB of memory (more couldn't hurt).
For people with a QNAP you can:
- Install Container Station from Apps if it's not already available.
- Open Container Station.
- Click
Applicationsoption in the menu on the left. - Click the
Createbutton. - In the Application Name box enter
community-cloud-storage - Paste the contents of the supplied
compose.ymlfile into the text box. - Click the
createbutton. - Click the
Containersoption in the menu on the left. - Verify that you see three containers running.
Working With Storage
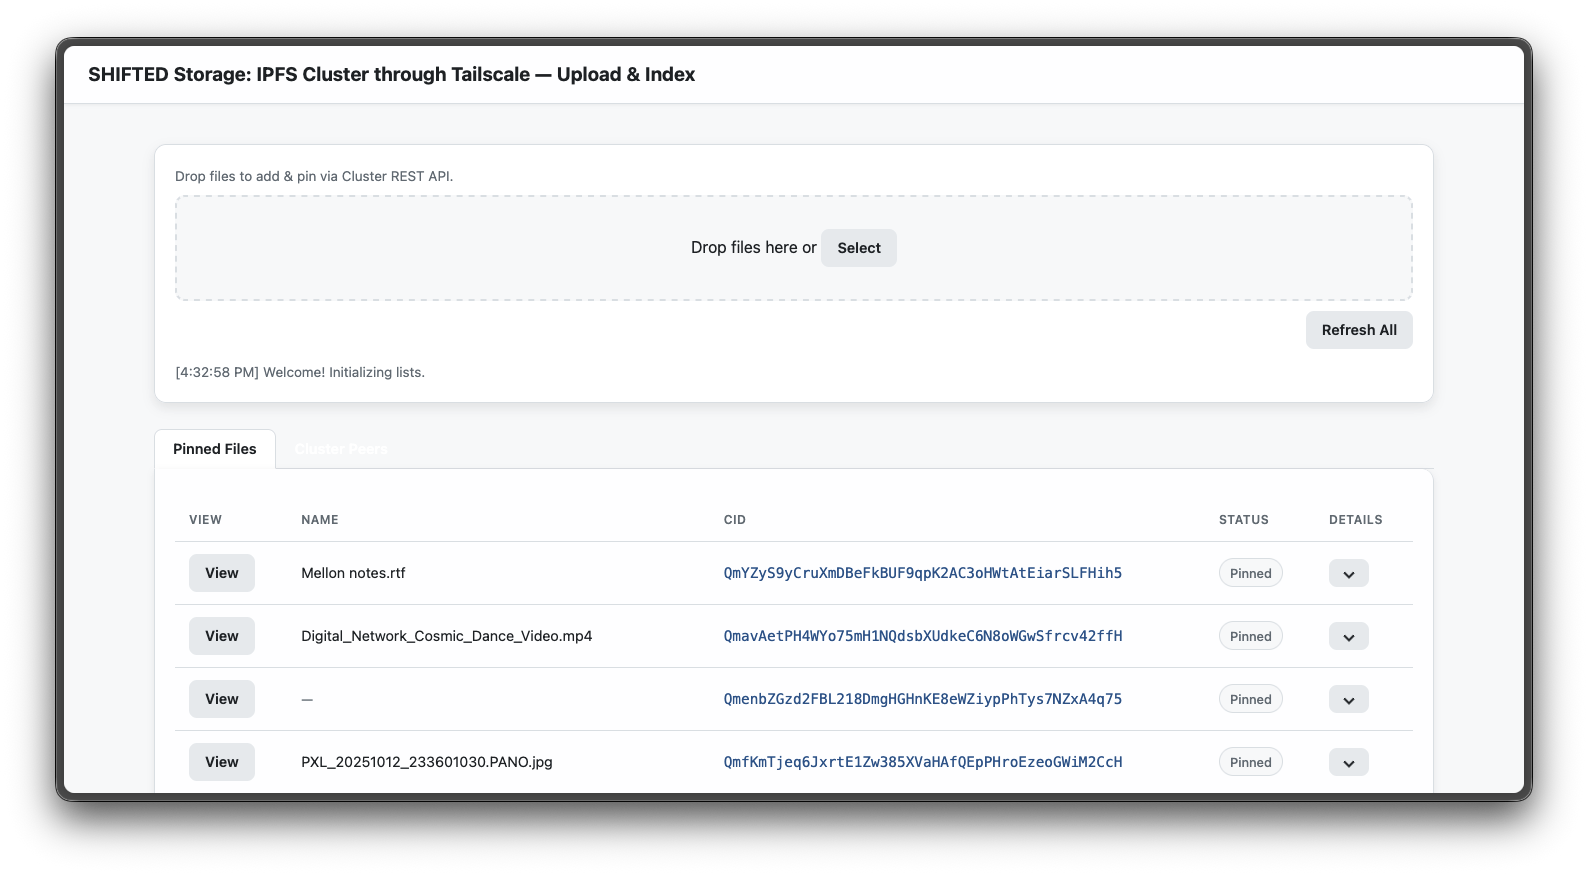
If you have added your workstation to the Tailnet (see the Add Device in the Machines tab of the Tailscale Admin) you should be able to see the community-cloud-storage-ui web interface at the node's host name. Each node is running the same web application that is able to communicate to its IPFS Cluster node.
So if you created a node called bootstrap you should be able to visit http:bootstrap in your browser and see this interface, which lets you add content to the cluster, see how it has been replicated, and download it.
Command Line
The community-cloud-storage utility also offers some functionality to add and remove content from storage. These are really just wrappers around the ipfs-cluster-ctl command, which you can choose to use directly of course.
Adding Content
Add a file:
uvx community-cloud-storage add --cluster-peername acme my-file.pdf
or a directory:
uvx community-cloud-storage add --cluster-peername acme my-directory/
Checking Status
See what the status of a given CID is in the cluster:
uvx communitycloudstorage status --cluster-peername acme <cid>
Get a CID
Fetch a CID and store as a local file:
uvx communitycloudstorage get --cluster-peername acme --output /path/to/file <cid>
Removing Content
Remove a CID from the cluster:
uvx community-cloud-storage rm --cluster-peername acme <cid>
Release history Release notifications | RSS feed


Download files
Download the file for your platform. If you're not sure which to choose, learn more about installing packages.
Source Distribution
Built Distribution
Filter files by name, interpreter, ABI, and platform.
If you're not sure about the file name format, learn more about wheel file names.
Copy a direct link to the current filters
File details
Details for the file community_cloud_storage-0.3.1.tar.gz.
File metadata
- Download URL: community_cloud_storage-0.3.1.tar.gz
- Upload date:
- Size: 8.7 kB
- Tags: Source
- Uploaded using Trusted Publishing? No
- Uploaded via: uv/0.9.8
File hashes
| Algorithm | Hash digest | |
|---|---|---|
| SHA256 |
dec32d43bc2e054287f5650857a024d83801bfa518f84d221133c51cb79bcb50
|
|
| MD5 |
a43dd4d9aa1fecfcd3d2c35f656cbf2c
|
|
| BLAKE2b-256 |
c02e1cd6cd1fc9394bf15fed893ab699087294e0c73c96cd914bb657752eeef3
|
File details
Details for the file community_cloud_storage-0.3.1-py3-none-any.whl.
File metadata
- Download URL: community_cloud_storage-0.3.1-py3-none-any.whl
- Upload date:
- Size: 10.6 kB
- Tags: Python 3
- Uploaded using Trusted Publishing? No
- Uploaded via: uv/0.9.8
File hashes
| Algorithm | Hash digest | |
|---|---|---|
| SHA256 |
db51f745f73b67d6a67c834c7c950311dbc411b376a1236e92017944add680bb
|
|
| MD5 |
369979e0bf5a039916a7adf478677236
|
|
| BLAKE2b-256 |
286876f70e77ab005dd496dfe4f05ab12ed3e5fa0541500652d3dc30e120e01c
|


