
D2NT: A High-Performing Depth-to-Normal Translator

Project description
D2NT: A High-Performing Depth-to-Normal Translator
This repo is the official implementation of the paper:
Introduction
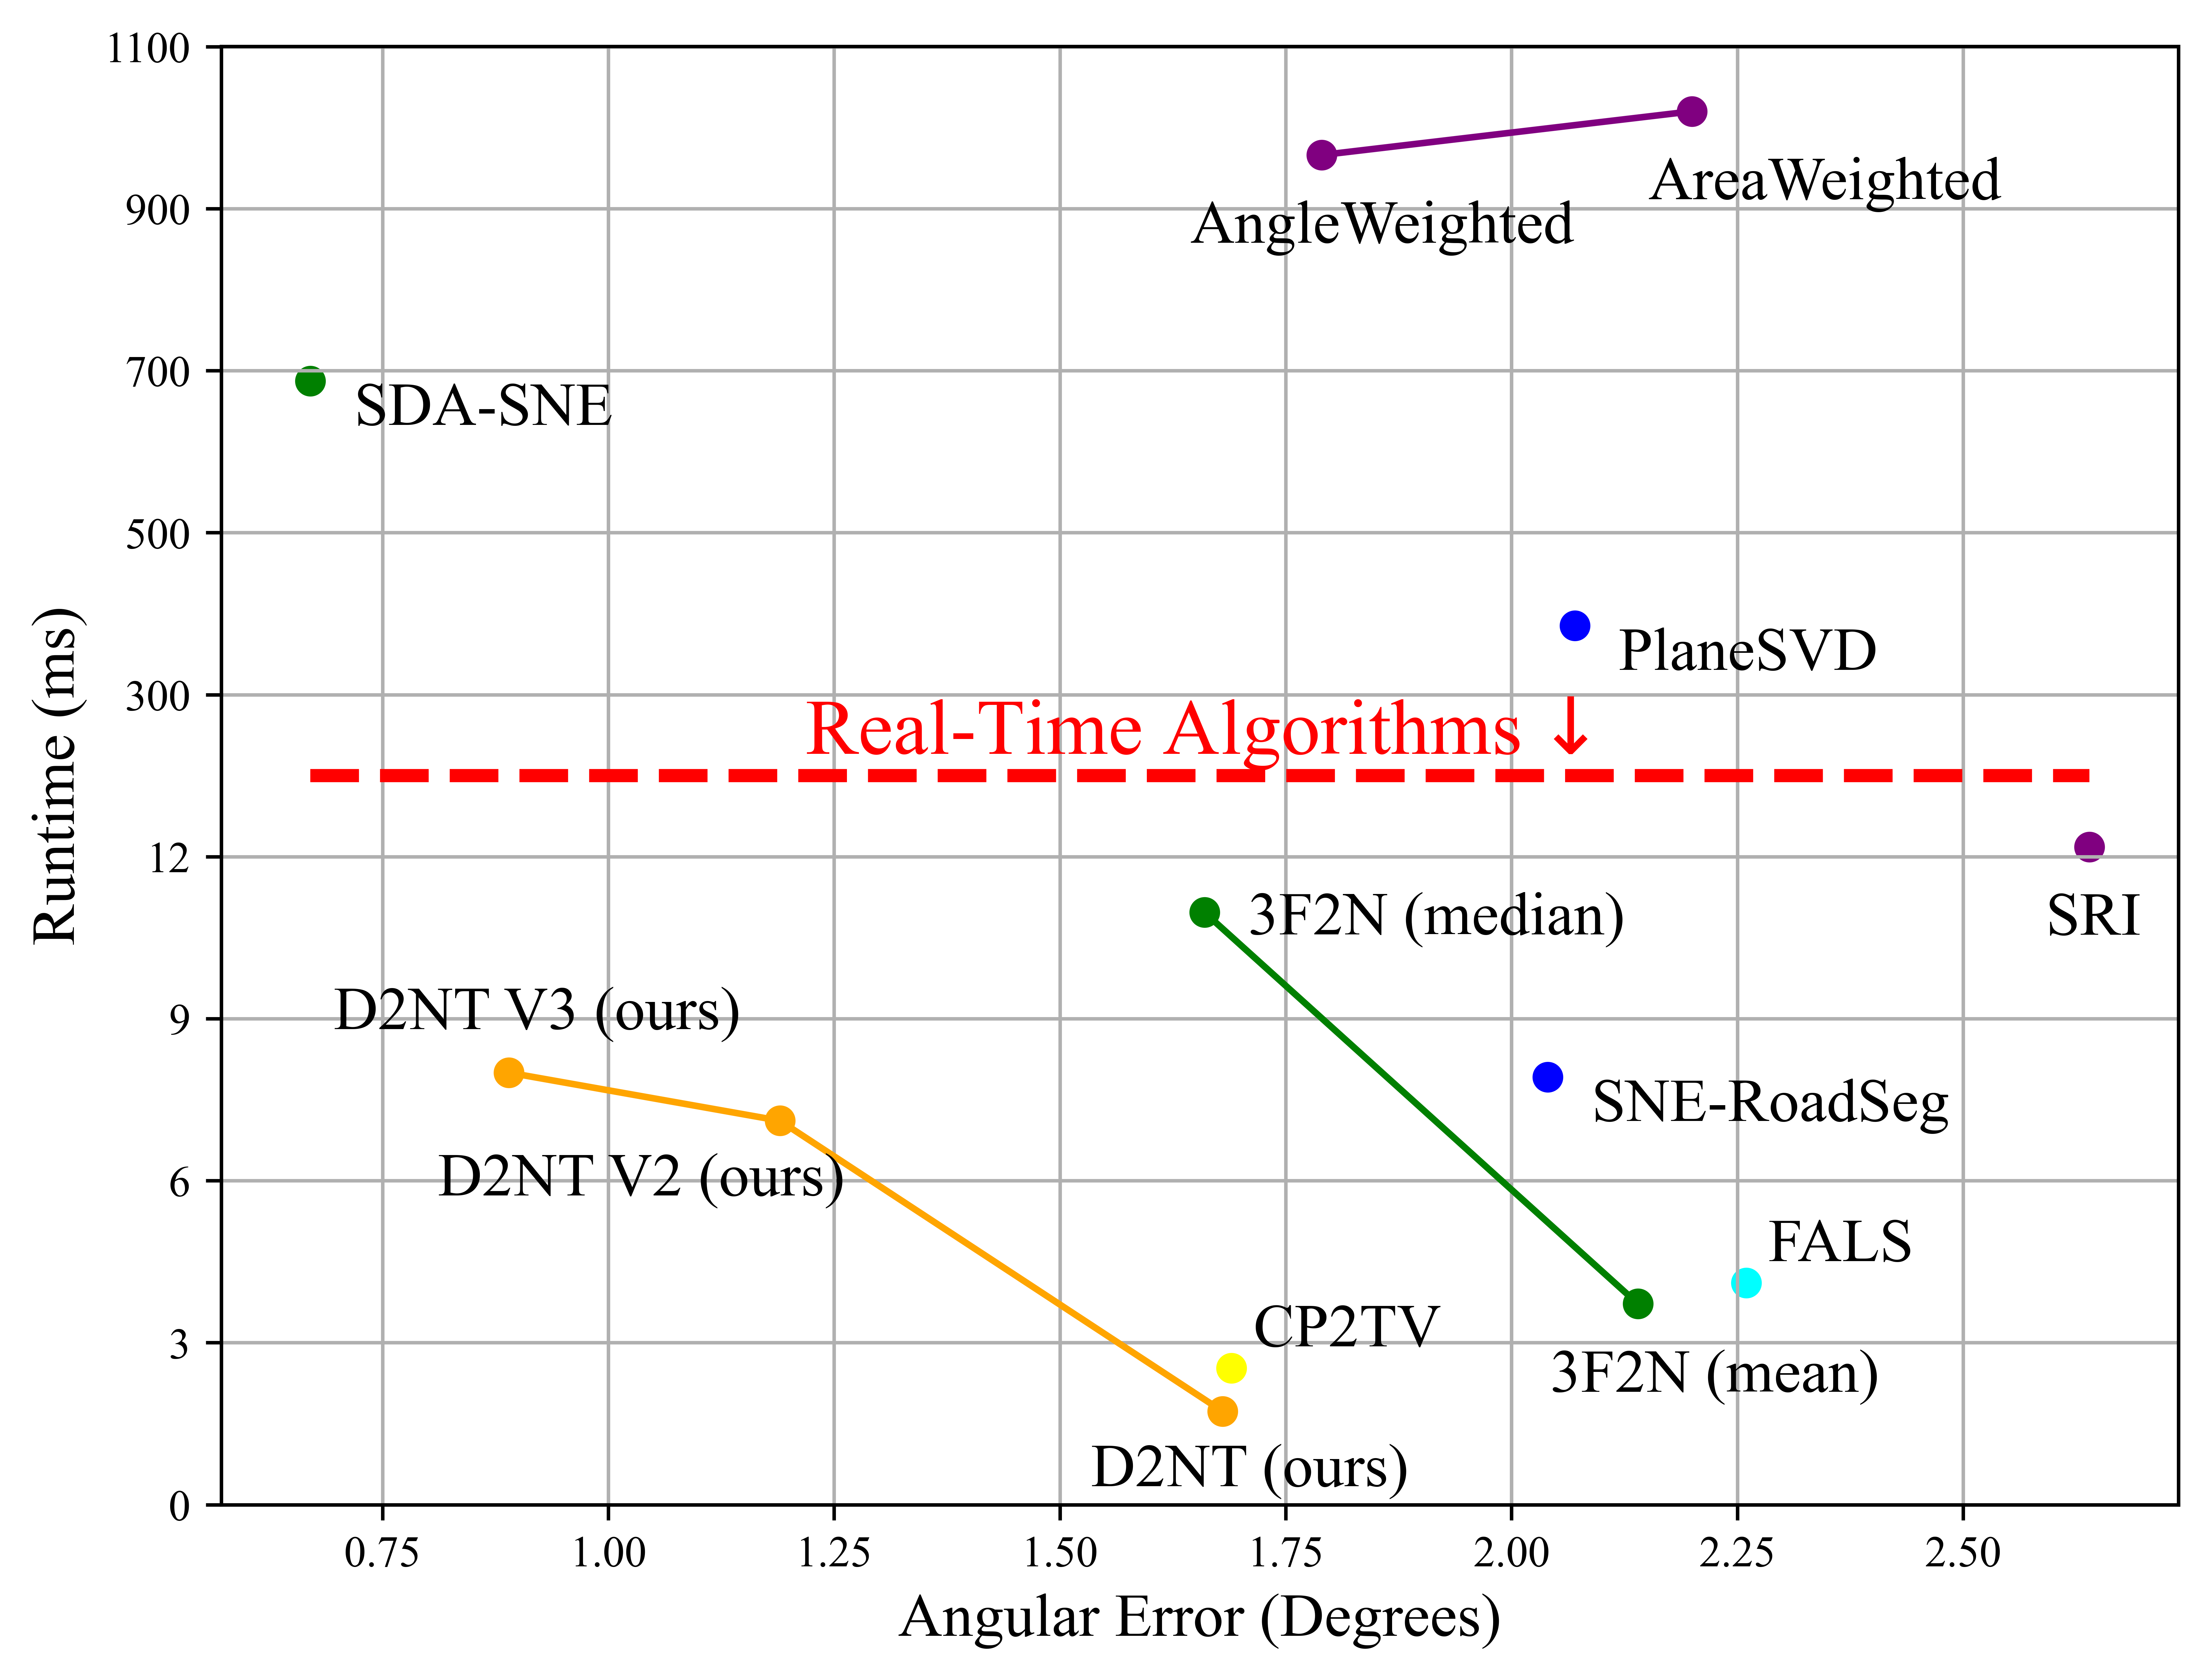
D2NT is a high-performance Python library for converting depth maps directly to surface normal maps. Unlike prevalent methods or computational libraries (e.g., Open3D, Kornia) that typically require projecting depth images to 3D point clouds and then estimating normals through local plane fitting, D2NT explicitly constructs the mathematical relationship between depth maps and normal maps, enabling end-to-end normal estimation. On 640×480 images, D2NT achieves 28× computational speed faster than Open3D and 1.8× faster than Kornia (even though it's implemented with cuda), significantly outperforming traditional point-cloud-based approaches in both speed and accuracy.
D2NT provides three algorithm versions with increasing accuracy: a fast basic version, an optimized version with Discontinuity-Aware Gradient (DAG) filter, and a refined version with DAG filter and MRF-based Normal Refinement. The library is designed for efficiency, accuracy, and ease of use in computer vision and robotics applications.
Installation
Install from PyPI (Recommended)
pip install d2nt
Install from Source
# Clone the repository
git clone https://github.com/fengyi233/depth-to-normal-translator.git
cd depth-to-normal-translator

# Install in development mode
pip install -e .

# Or install normally
pip install .
Prerequisites
- Python >= 3.7
- numpy >= 1.20.0
- opencv-python >= 4.0.0
- matplotlib >= 3.5.0 (optional, for visualization)
Dataset Preparation
Public real-world datasets generally obtain surface normals by local plane fitting, which makes the surface normal ground truth unreliable. Therefore, we use the synthesis 3F2N dataset provided in this paper to evaluate estimation performance.
The 3F2N dataset can be downloaded from:
GoogleDrive
The dataset is organized as follows:
3F2N
 |-- Easy
 |  |-- android
 |  |  |-- depth
 |  |  |-- normal
 |  |  |-- params.txt
 |  |  |-- pose.txt
 |  |-- cube
 |  |-- ...
 |  |-- torusknot
 |-- Medium
 |  |-- ...
 |-- Hard
 |  |-- ...
Usage
Python Package Usage
After installation, you can use the depth2normal() function directly:
import numpy as np
from d2nt import depth2normal

# Prepare depth map (example)
depth = np.random.rand(480, 640) * 10.0

cam_intrinsic = np.array([
    [525.0, 0, 320.0],  # fx=525.0, u0=320.0
    [0, 525.0, 240.0],  # fy=525.0, v0=240.0
    [0, 0, 1]
])

# Convert depth to normal
normal = depth2normal(depth, cam_intrinsic, version='d2nt_v3')

print(f"Normal map shape: {normal.shape}")  # (480, 640, 3)
Algorithm Versions
d2nt_basic: Basic version without any optimization methodd2nt_v2: With Discontinuity-Aware Gradient (DAG) filterd2nt_v3: With DAG filter and MRF-based Normal Refinement (MNR) module (recommended)
Performance
We benchmarked D2NT against popular depth-to-normal conversion libraries on 640×480 images:
| Method | FPS | Speedup vs d2nt_basic |
|---|---|---|
| d2nt_basic | 65.5 | 1.0× (baseline) |
| Kornia | 36.9 | 0.56× (1.8× slower) |
| Open3D | 2.3 | 0.04× (28× slower) |
Note: Performance was measured on a standard CPU. Results may vary depending on hardware configuration. Run python test_speed.py to benchmark on your system.
Python Demo
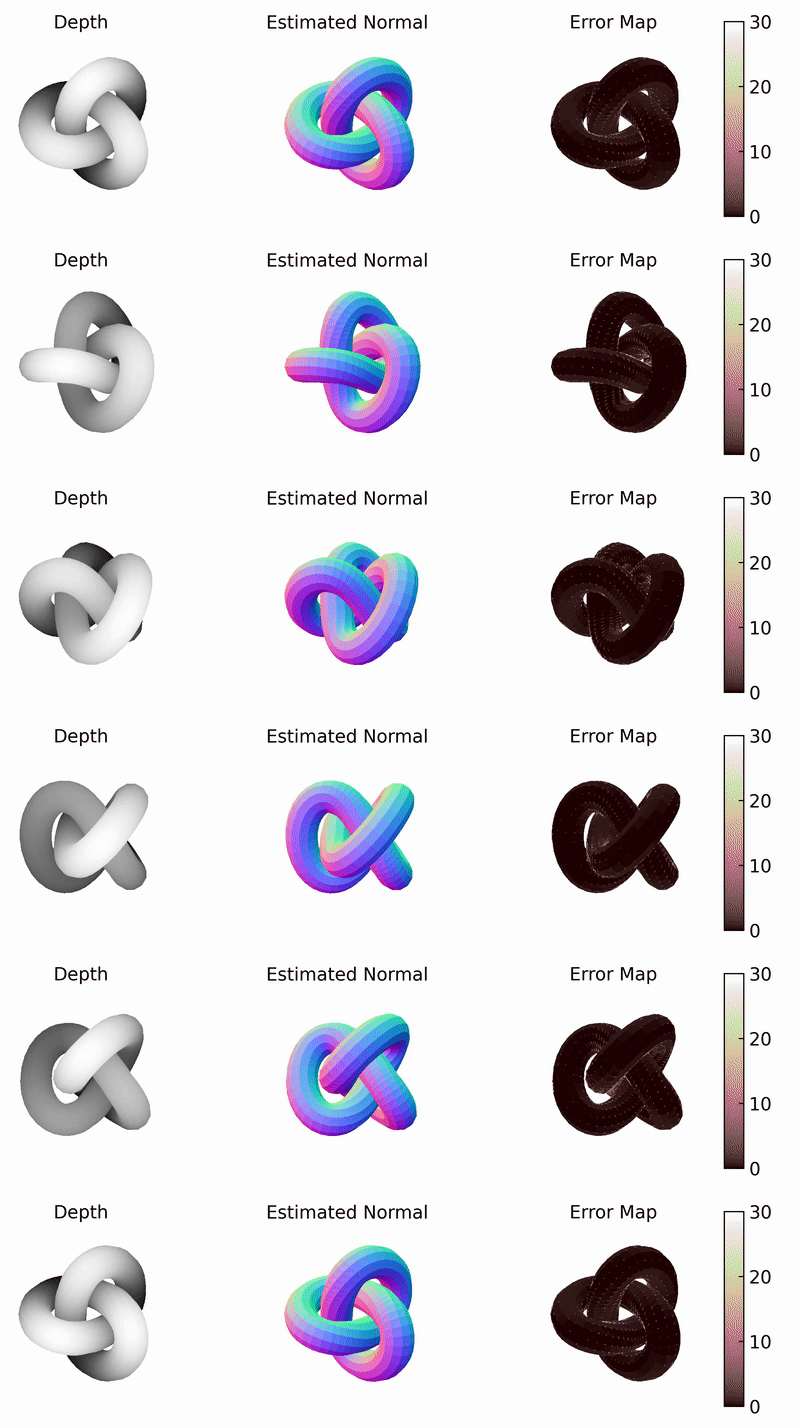
Run the demo script in the root directory to see visualization results and error maps:
python demo.py
This will display:
- Ground truth normal map
- Estimated normal map
- Error map (in degrees) with mean angular error
The demo uses test data from demo_data/ directory. The results will be saved in demo_results/ directory.
You can change the VERSION parameter in demo.py to select different D2NT versions:
d2nt_basic: Basic version without any optimization methodd2nt_v2: With Discontinuity-Aware Gradient (DAG) filterd2nt_v3: With DAG filter and MRF-based Normal Refinement (MNR) module (recommended)
Coordinate System and Normal Visualization
Coordinate System
The normal vectors returned by depth2normal() are defined in the camera coordinate system:
- X-axis (nx): Points to the right in the image
- Y-axis (ny): Points downward in the image
- Z-axis (nz): Points forward into the image plane
The normal vectors are normalized unit vectors with values in the range [-1, 1] for each component.
Normal Visualization
This package provides visualization functions that convert normal vectors to RGB images for display:
from d2nt import get_normal_vis, get_normal_vis_reference
import matplotlib.pyplot as plt

# Visualize normal map
normal_vis = get_normal_vis(normal, valid_mask=mask)
plt.imshow(normal_vis)

# Generate normal visualization reference
plt.imsave("normal_vis_reference.png", get_normal_vis_reference())
Visualization Formula: The visualization uses the formula:
normal_img = (1 - normal) / 2
This formula maps normal vectors from the range [-1, 1] to [0, 1] for RGB display. This convention is chosen to match the 3F2N dataset ground truth encoding, where normal maps are stored with this specific encoding scheme.
Note on Different Conventions: Other projects (e.g., DSINE) may use the alternative formula (normal + 1) / 2 for visualization, which is also valid. However, when comparing results or using different datasets, it is important to be aware of which convention is being used, as the color mapping will be inverted. The get_normal_vis() function in this package uses (1 - normal) / 2 to maintain consistency with the 3F2N dataset format.
Cite
If you find our work useful in your research, please consider citing our paper:
@inproceedings{feng2023d2nt,
	author      = {{Yi Feng, Bohuan Xue, Ming Liu, Qijun Chen, and Rui Fan}},
	title       = {{D2NT: A High-Performing Depth-to-Normal Translator}},
	booktitle   = {{IEEE International Conference on Robotics and Automation (ICRA)}},
	year        = {{2023}}
}


Download files
Download the file for your platform. If you're not sure which to choose, learn more about installing packages.
Source Distribution
Built Distribution
Filter files by name, interpreter, ABI, and platform.
If you're not sure about the file name format, learn more about wheel file names.
Copy a direct link to the current filters
File details
Details for the file d2nt-0.1.3.tar.gz.
File metadata
- Download URL: d2nt-0.1.3.tar.gz
- Upload date:
- Size: 6.5 MB
- Tags: Source
- Uploaded using Trusted Publishing? No
- Uploaded via: twine/6.2.0 CPython/3.9.7
File hashes
| Algorithm | Hash digest | |
|---|---|---|
| SHA256 |
8cd28b33e038a7aa05196c606ad005f6be93bc878008a72ed58dabae16104d8b
|
|
| MD5 |
905540324205138d622e4c9e0c774858
|
|
| BLAKE2b-256 |
e1436188342d27fb8a933d53e9ce8d0911ac8c88931e7168c5240db4173d2e9d
|
File details
Details for the file d2nt-0.1.3-py3-none-any.whl.
File metadata
- Download URL: d2nt-0.1.3-py3-none-any.whl
- Upload date:
- Size: 11.3 kB
- Tags: Python 3
- Uploaded using Trusted Publishing? No
- Uploaded via: twine/6.2.0 CPython/3.9.7
File hashes
| Algorithm | Hash digest | |
|---|---|---|
| SHA256 |
6d1d3daa9909ab9ffca5dad5bc1bd8e01d1aa9ad201e2339dbda7862fc62e95b
|
|
| MD5 |
fbdc72b6ca35f201fb1fb2a8602bef39
|
|
| BLAKE2b-256 |
0981e7e128f17c9e98d74db95251603069c83e40fb57f01c74c3c167d541a48d
|






