

- ingest multiple data streams of pointwise or gridded modalities
- handle missing data and varying resolutions
- predict at arbitrary target locations
- quantify prediction uncertainty
A Python package and open-source project for modelling environmental data with neural processes








DeepSensor streamlines the application of neural processes (NPs) to environmental sciences by
providing a simple interface for building, training, and evaluating NPs using xarray and pandas
data. Our developers and users form an open-source community whose vision is to accelerate the next
generation of environmental ML research. The DeepSensor Python package facilitates this by
drastically reducing the time and effort required to apply NPs to environmental prediction tasks.
This allows DeepSensor users to focus on the science and rapidly iterate on ideas.
DeepSensor is an experimental package, and we welcome contributions from the community. We have an active Slack channel for code and research discussions; you can join by signing up for the Turing Environment & Sustainability stakeholder community. The form includes a question on signing up for the Slack team, where you can find DeepSensor's channel.
Why neural processes?
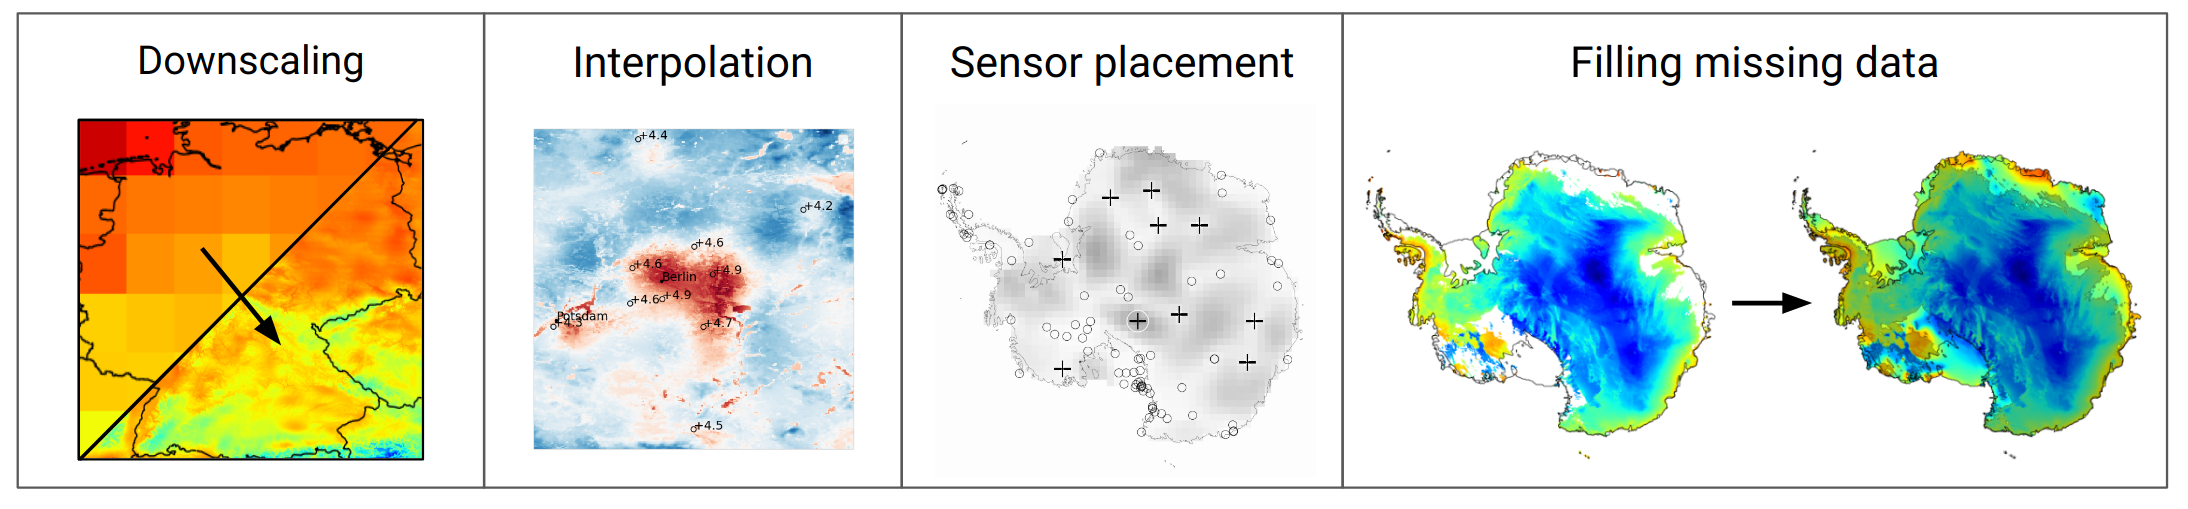
NPs are a highly flexible class of probabilistic models that offer unique opportunities to model satellite observations, climate model output, and in-situ measurements. Their key features are the ability to:
These capabilities make NPs well suited to a range of spatio-temporal data fusion tasks such as downscaling, sensor placement, gap-filling, and forecasting.
Why DeepSensor?
This package aims to faithfully match the flexibility of NPs with a simple and intuitive interface. Under the hood, DeepSensor wraps around the powerful neuralprocessess package for core modelling functionality, while allowing users to stay in the familiar xarray and pandas world from end-to-end. DeepSensor also provides convenient plotting tools and active learning functionality for finding optimal sensor placements.
Documentation
We have an extensive documentation page here, containing steps for getting started, a user guide built from reproducible Jupyter notebooks, learning resources, research ideas, community information, an API reference, and more!
DeepSensor Gallery
For real-world DeepSensor research demonstrators, check out the DeepSensor Gallery. Consider submitting a notebook showcasing your research!
Deep learning library agnosticism
DeepSensor leverages the backends package to be compatible with
either PyTorch or TensorFlow.
Simply import deepsensor.torch or import deepsensor.tensorflow to choose between them!
Quick start
Here we will demonstrate a simple example of training a convolutional conditional neural process (ConvCNP) to spatially interpolate random grid cells of NCEP reanalysis air temperature data over the US. First, pip install the package. In this case we will use the PyTorch backend (note: follow the PyTorch installation instructions if you want GPU support).
pip install deepsensor[torch]
We can go from imports to predictions with a trained model in less than 30 lines of code!
import deepsensor.torch
from deepsensor.data import DataProcessor, TaskLoader
from deepsensor.model import ConvNP
from deepsensor.train import Trainer

import xarray as xr
import pandas as pd
import numpy as np
from tqdm import tqdm

# Load raw data
ds_raw = xr.tutorial.open_dataset("air_temperature")

# Normalise data
data_processor = DataProcessor(x1_name="lat", x2_name="lon")
ds = data_processor(ds_raw)

# Set up task loader
task_loader = TaskLoader(context=ds, target=ds)

# Set up ConvNP, which by default instantiates a ConvCNP with Gaussian marginals
model = ConvNP(data_processor, task_loader)

# Generate training tasks with up 100 grid cells as context and all grid cells
#   as targets
train_tasks = []
for date in pd.date_range("2013-01-01", "2014-11-30")[::7]:
    N_context = np.random.randint(0, 100)
    task = task_loader(date, context_sampling=N_context, target_sampling="all")
    train_tasks.append(task)

# Train model
trainer = Trainer(model, lr=5e-5)
for epoch in tqdm(range(10)):
    batch_losses = trainer(train_tasks)

# Predict on new task with 50 context points and a dense grid of target points
test_task = task_loader("2014-12-31", context_sampling=50)
pred = model.predict(test_task, X_t=ds_raw)
After training, the model can predict directly to xarray in your data's original units and
coordinate system:
>>> pred["air"]
<xarray.Dataset>
Dimensions:  (time: 1, lat: 25, lon: 53)
Coordinates:
  * time     (time) datetime64[ns] 2014-12-31
  * lat      (lat) float32 75.0 72.5 70.0 67.5 65.0 ... 25.0 22.5 20.0 17.5 15.0
  * lon      (lon) float32 200.0 202.5 205.0 207.5 ... 322.5 325.0 327.5 330.0
Data variables:
    mean     (time, lat, lon) float32 267.7 267.2 266.4 ... 297.5 297.8 297.9
    std      (time, lat, lon) float32 9.855 9.845 9.848 ... 1.356 1.36 1.487
We can also predict directly to pandas containing a timeseries of predictions at off-grid
locations
by passing a numpy array of target locations to the X_t argument of .predict:
# Predict at two off-grid locations over December 2014 with 50 random, fixed context points
test_tasks = task_loader(pd.date_range("2014-12-01", "2014-12-31"), 50, seed_override=42)
pred = model.predict(test_tasks, X_t=np.array([[50, 280], [40, 250]]).T)
>>> pred["air"]
                          mean       std
time       lat lon
2014-12-01 50  280  260.282562  5.743976
           40  250  270.770111  4.271546
2014-12-02 50  280  255.572098  6.165956
           40  250  277.588745  3.727404
2014-12-03 50  280  260.894196   6.02924
...                        ...       ...
2014-12-29 40  250  266.594421  4.268469
2014-12-30 50  280  250.936386  7.048379
           40  250  262.225464  4.662592
2014-12-31 50  280  249.397919  7.167142
           40  250  257.955505  4.697775

[62 rows x 2 columns]
DeepSensor offers far more functionality than this simple example demonstrates. For more information on the package's capabilities, check out the User Guide in the documentation.
Citing DeepSensor
If you use DeepSensor in your research, please consider citing this repository. You can generate a BiBTeX entry by clicking the 'Cite this repository' button on the top right of this page.
Funding
DeepSensor has received funding from The Alan Turing Institute under the Environmental monitoring: blending satellite and surface data project, and the ARIA Forecasting Tipping Points programme specifically as part of the GIANT project. The PI for DeepSensor development is Dr Scott Hosking.
Contributors
We appreciate all contributions to DeepSensor, big or small, code-related or not, and we thank all contributors below for supporting open-source software and research. For code-specific contributions, check out our graph of code contributions. See our contribution guidelines if you would like to join this list!



















3 maintainers


Metadata
3 maintainers
Release files for deepsensor 0.4.3
For a detailed explanation of source distributions (sdists) and built distributions (wheels), please see the package formats documentation.
Source distribution (sdist)
| File | Size | Uploaded | |
|---|---|---|---|
| deepsensor-0.4.3.tar.gz | 7.1 MB | Details |
Built distribution (wheel)
| File | Interpreter | ABI | Platform | Reset |
|---|---|---|---|---|
| deepsensor-0.4.3-py3-none-any.whl | Python 3 | none | any | Details |
Total release size: 7.2 MB
Release files / deepsensor-0.4.3.tar.gz
| Download URL | deepsensor-0.4.3.tar.gz |
|---|---|
| Size | 7.1 MB |
| Tags | Source |
|
SHA-256 checksum How to use checksums |
2224f99d652f04aea9a4f3fa8c60e03a02e33e5c219531ae38c6116965006fe4
|
|
BLAKE2b-256 checksum How to use checksums |
6e631bc4a7802803c5d9d0701ba95b05dd108fc13dd2d6f9c73cb2dda8d20cc1
|
| Upload date | |
|
Uploaded using Trusted Publishing? What is trusted publishing? |
Yes |
| Uploaded via |
twine/6.1.0 CPython/3.13.12
|
Provenance
Provenance describes where a file came from. On PyPI, provenance is shared via attestations, which provide a verifiable record of the build or publishing details. View details, limitations and caveats.


PyPI Publish Attestation
PyPI verified that this artifact, at this checksum, originated from the publisher listed below.
Signed by GitHub Actions, verified by PyPI on May 7, 2026.
Transparency logRelease files / deepsensor-0.4.3-py3-none-any.whl
| Download URL | deepsensor-0.4.3-py3-none-any.whl |
|---|---|
| Size | 85.5 kB |
| Tags | Python 3 |
|
SHA-256 checksum How to use checksums |
ae9852c2878763c608866cb7c774e55c8d228982bb0c8d8aa2aa1a5775061251
|
|
BLAKE2b-256 checksum How to use checksums |
17cc9b8a6951a9c408ef35cad440408199d2abcc33cba972eeb0a92b01f1b6e9
|
| Upload date | |
|
Uploaded using Trusted Publishing? What is trusted publishing? |
Yes |
| Uploaded via |
twine/6.1.0 CPython/3.13.12
|
Provenance
Provenance describes where a file came from. On PyPI, provenance is shared via attestations, which provide a verifiable record of the build or publishing details. View details, limitations and caveats.
PyPI Publish Attestation
PyPI verified that this artifact, at this checksum, originated from the publisher listed below.
Signed by GitHub Actions, verified by PyPI on May 7, 2026.
Transparency log













