The delayed_image module


Project description


Read the docs |
|
Gitlab (main) |
|
Github (mirror) |
|
Pypi |
The delayed image module lets you describe (a tree of) image operations, but waits to execute them until the user calls finalize. This allows for a sequence of operations to be optimized before it is executed, which means faster execution and fewer quantization artifacts.
The optimization logic can also leverage image formats that contain builtin tiling or overviews using the GDAL library. Formats that contain tiles allow delayed image to read only a subset of the image, if only a small part is cropped to it. Overviews allow delayed image to load pre-downscaled images if it detects a scaling operation. This is much faster than the naive way of accomplishing these operations, and much easier than having to remember to do everything in the right order yourself.
Note: GDAL is optional, but recommended. Precompiled GDAL wheels are available on Kitware’s large image wheel repository. Use pip install gdal -f https://girder.github.io/large_image_wheels/ to install GDAL from this server. Track status of official GDAL wheels here.
History
This module is still in its early days of development and is a port the following code from kwcoco:
ChannelSpec
SensorChannelSpec
DelayedLoad & other delayed operations
Quick Start
# Given a path to some image
import kwimage
fpath = kwimage.grab_test_image_fpath('amazon')

# Demo how to load, scale, and crop a part of an image.
import delayed_image
delayed = delayed_image.DelayedLoad(fpath)
delayed = delayed.prepare()
delayed = delayed.scale(0.1)
delayed = delayed[128:256, 128:256]

import kwplot
kwplot.autompl()
kwplot.imshow(delayed.finalize())
kwimage.imwrite('foo.png', delayed.finalize())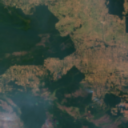
See the quickstart jupyter notebook for more details.
Delayed Loading
Example of delayed loading:
>>> from delayed_image import DelayedLoad
>>> import kwimage
>>> fpath = kwimage.grab_test_image_fpath(overviews=3)
>>> dimg = DelayedLoad(fpath, channels='r|g|b').prepare()
>>> quantization = {'quant_max': 255, 'nodata': 0}
>>> #
>>> # Make a complex chain of operations
>>> dimg = dimg.dequantize(quantization)
>>> dimg = dimg.warp({'scale': 1.1})
>>> dimg = dimg.warp({'scale': 1.1})
>>> dimg = dimg[0:400, 1:400]
>>> dimg = dimg.warp({'scale': 0.5})
>>> dimg = dimg[0:800, 1:800]
>>> dimg = dimg.warp({'scale': 0.5})
>>> dimg = dimg[0:800, 1:800]
>>> dimg = dimg.warp({'scale': 0.5})
>>> dimg = dimg.warp({'scale': 1.1})
>>> dimg = dimg.warp({'scale': 1.1})
>>> dimg = dimg.warp({'scale': 2.1})
>>> dimg = dimg[0:200, 1:200]
>>> dimg = dimg[1:200, 2:200]
>>> dimg.write_network_text()
╙── Crop dsize=(128,130),space_slice=(slice(1,131,None),slice(2,130,None))
    ╽
    Crop dsize=(130,131),space_slice=(slice(0,131,None),slice(1,131,None))
    ╽
    Warp dsize=(131,131),transform={scale=2.1000}
    ╽
    Warp dsize=(62,62),transform={scale=1.1000}
    ╽
    Warp dsize=(56,56),transform={scale=1.1000}
    ╽
    Warp dsize=(50,50),transform={scale=0.5000}
    ╽
    Crop dsize=(99,100),space_slice=(slice(0,100,None),slice(1,100,None))
    ╽
    Warp dsize=(100,100),transform={scale=0.5000}
    ╽
    Crop dsize=(199,200),space_slice=(slice(0,200,None),slice(1,200,None))
    ╽
    Warp dsize=(200,200),transform={scale=0.5000}
    ╽
    Crop dsize=(399,400),space_slice=(slice(0,400,None),slice(1,400,None))
    ╽
    Warp dsize=(621,621),transform={scale=1.1000}
    ╽
    Warp dsize=(564,564),transform={scale=1.1000}
    ╽
    Dequantize dsize=(512,512),quantization={quant_max=255,nodata=0}
    ╽
    Load channels=r|g|b,dsize=(512,512),num_overviews=3,fname=astro_overviews=3.tif

>>> # Optimize the chain
>>> dopt = dimg.optimize()
>>> dopt.write_network_text()
╙── Warp dsize=(128,130),transform={offset=(-0.6115,-1.0000),scale=1.5373}
    ╽
    Dequantize dsize=(80,83),quantization={quant_max=255,nodata=0}
    ╽
    Crop dsize=(80,83),space_slice=(slice(0,83,None),slice(3,83,None))
    ╽
    Overview dsize=(128,128),overview=2
    ╽
    Load channels=r|g|b,dsize=(512,512),num_overviews=3,fname=astro_overviews=3.tif

#
>>> final0 = dimg.finalize(optimize=False)
>>> final1 = dopt.finalize()
>>> assert final0.shape == final1.shape
>>> # xdoctest: +REQUIRES(--show)
>>> import kwplot
>>> kwplot.autompl()
>>> kwplot.imshow(final0, pnum=(1, 2, 1), fnum=1, title='raw')
>>> kwplot.imshow(final1, pnum=(1, 2, 2), fnum=1, title='optimized')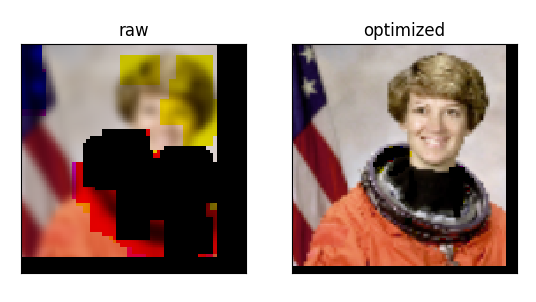
Native Resolution Sampling
Consider the case where we have multiple images on disk in different resolutions, but they correspond to the same scene (e.g. a satellite image may have RGB bands at 10 meter resolution and an infrared band at 30 meter resolution), and we want to sample corresponding regions in each image. Typically a developer may opt to simply rescale everything to the same resolution, so everything corresponds and then just crop out the region. This works but it has the negative effect of incurring resampling artifacts.
Delayed image allows for easy and intuitive “native resolution sampling”. We can perform a delayed scale operation to get a “view” of an image as if we rescaled all component bands to the same resolution, and then perform a delayed crop. Finalizing this delayed operation is exactly the same as the previously described case (except that it benefits from delayed image’s optimized operation reordering). However, we can go further. Because we know about the underlying operation graph we can undo the scale component while keeping the crop component, which results in loading the corresponding parts of the image inside the cropped area, but does not do any resampling. The images on disk can differ in more than just resolution, they could also be offset, skewed or rotated, and this unwarping procedure will still work.
The following image illustrates an extreme example of this were we simulate a low resolution red band (R), a medium but rotated resolution green band (G), and a high but cropped resolution blue (B) band.
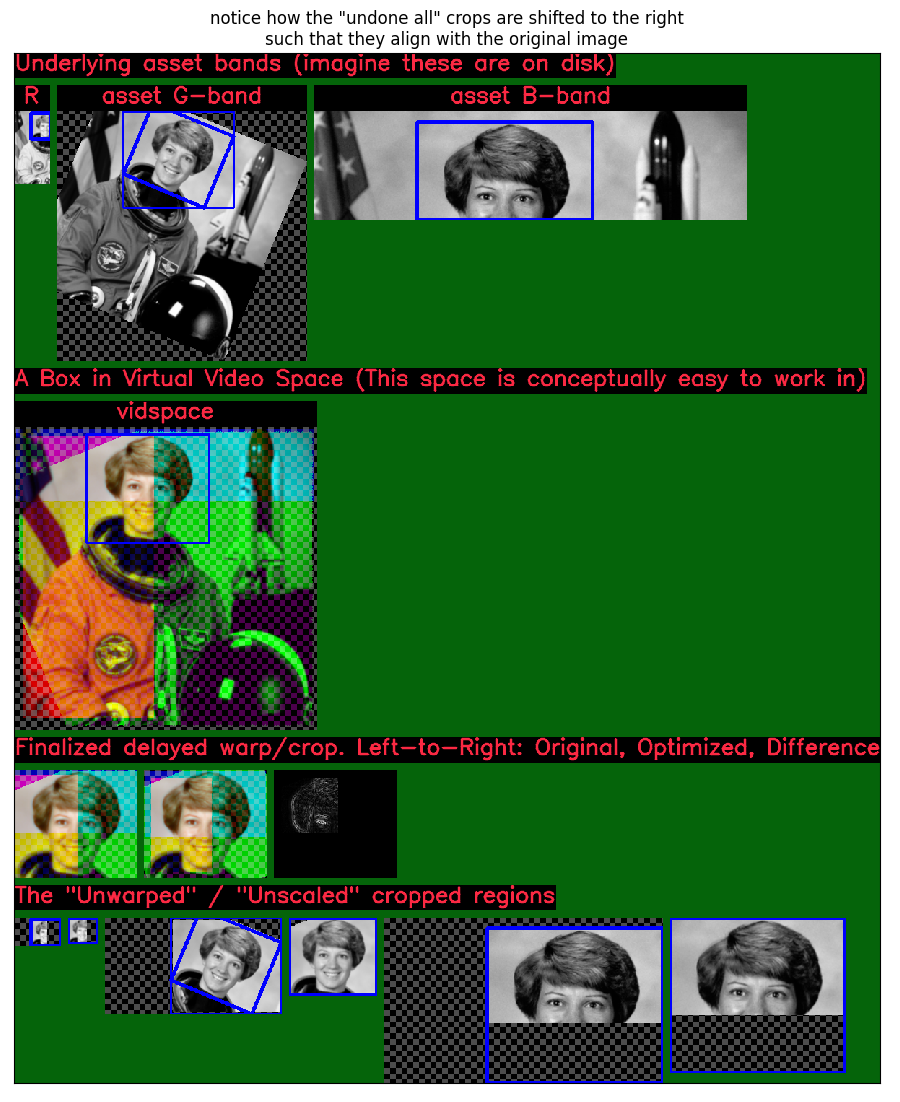
The raw bands on disk are shown in the top row. The second row demonstrates the aligned space that we can conceptually think in when performing the crop. The blue box defined in this row and is projected to all other images using delayed image. The third row shows the result of the naive resampled alignment and cropping of the blue box (and also pixel differences between optimized and non-optimized finalizations). Lastly the fourth row shows the native sampling where each crop corresponds to the same region, but we have removed all scale factors (rotation and skew resamplings are still done to align to image corners up to a scale factor).
For code details see the doctest in delayed_image/__init__.py __doc__:2
SensorChanSpec
Includes the SensorChan spec, which makes handling channels from different sensing sources easier.
The sensor/channel spec isn’t necessary to use delayed image, but it helps — particularly the channel spec — to be able to semantically label the channels when performing delayed load operations.
On a simple level all you need to know to use the basic channel spec is that channel names are | delimited. E.g. red|green|blue refers to a 3 channel image. You can use these names to select subsets of channels. Here is an example where you load an image, provide it with the semantic labels for each channel, and then use them to select a single channel.
import delayed_image
import kwimage
fpath = kwimage.grab_test_image_fpath(overviews=3)

# When you create a delayed image, you can enrich the image with
# information about what channels it contains by specifying the
# channels attribute.
delayed = DelayedLoad(fpath, channels='red|green|blue').prepare()

# You can use this to semantically interact with the channels
delayed_g = delayed.take_channels('green')
assert delayed_g.shape == (512, 512, 1)

# Specifying more than one channel works too
delayed_rb = delayed.take_channels('blue|red')
assert delayed_rb.shape == (512, 512, 2)
Much of the Sensor/Channel spec functionality exists for the benefit of other projects like kwcoco. Admittedly, this library isn’t the perfect home for the full sensor / channel spec, but this is where it currently lives.
The full sensor channel spec has a formal grammar defined in this package.
// SENSOR_CHAN_GRAMMAR
?start: stream

// An identifier can contain spaces
IDEN: ("_"|"*"|LETTER) ("_"|" "|"-"|"*"|LETTER|DIGIT)*

chan_single : IDEN
chan_getitem : IDEN "." INT
chan_getslice_0b : IDEN ":" INT
chan_getslice_ab : (IDEN "." INT ":" INT) | (IDEN ":" INT ":" INT)

// A channel code can just be an ID, or it can have a getitem
// style syntax with a scalar or slice as an argument
chan_code : chan_single | chan_getslice_0b | chan_getslice_ab | chan_getitem

// Fused channels are an ordered sequence of channel codes (without sensors)
fused : chan_code ("|" chan_code)*

// A channel only part can be a fused channel or a sequence
channel_rhs : fused | fused_seq

// Channels can be specified in a sequence but must contain parens
fused_seq : "(" fused ("," fused)* ")"

// Sensors can be specified in a sequence but must contain parens
sensor_seq : "(" IDEN ("," IDEN)* "):"

sensor_lhs : (IDEN ":") | (sensor_seq)

sensor_chan : sensor_lhs channel_rhs?

nosensor_chan : channel_rhs

stream_item : sensor_chan | nosensor_chan

// A stream is an unordered sequence of fused channels, that can
// optionally contain sensor specifications.

stream : stream_item ("," stream_item)*

%import common.DIGIT
%import common.LETTER
%import common.INT
You can think of a channel spec is that splitting the spec by “,” gives groups of channels that should be processed together and “late-fused”. Within each group the “|” operator “early-fuses” the channels.
For instance, say we had a network and we wanted to process 3-channel rgb images in one stream and 1-channel infrared images in a second stream and then fuse them together. The channel specification for channels labled as ‘red’, ‘green’, ‘blue’, and ‘infrared’ would be:
infrared,red|green|blueSensors can be included with a colon prefix. Parenthesis can be used for grouping.
S2:(infrared,red|green|blue)Release history Release notifications | RSS feed


Download files
Download the file for your platform. If you're not sure which to choose, learn more about installing packages.
Source Distribution
Built Distribution
Filter files by name, interpreter, ABI, and platform.
If you're not sure about the file name format, learn more about wheel file names.
Copy a direct link to the current filters
File details
Details for the file delayed_image-0.4.6.tar.gz.
File metadata
- Download URL: delayed_image-0.4.6.tar.gz
- Upload date:
- Size: 112.9 kB
- Tags: Source
- Uploaded using Trusted Publishing? No
- Uploaded via: twine/6.2.0 CPython/3.13.9
File hashes
| Algorithm | Hash digest | |
|---|---|---|
| SHA256 |
5689da43eeea9ac31195cafc275cce0c8dc17eff9ca056a52dc813525c052567
|
|
| MD5 |
a377fe56172a0051641b3dda8b0a1b78
|
|
| BLAKE2b-256 |
39395d9e67786b55673212465169ea082be3025f642b6840f98f51783ad90af8
|
File details
Details for the file delayed_image-0.4.6-py3-none-any.whl.
File metadata
- Download URL: delayed_image-0.4.6-py3-none-any.whl
- Upload date:
- Size: 97.1 kB
- Tags: Python 3
- Uploaded using Trusted Publishing? No
- Uploaded via: twine/6.2.0 CPython/3.13.9
File hashes
| Algorithm | Hash digest | |
|---|---|---|
| SHA256 |
5dbbea986c45ae90367f9726b74b814fd54b88cb3875ca87c01a017e145868a1
|
|
| MD5 |
25d0d434f59516d46a215a935963e456
|
|
| BLAKE2b-256 |
30f43d421be077c4f909ed715da70b573cbd39ead6a1afefec9dd2061267e8bb
|


