
dev-link-mcp
Your AI. Your project. A real development workspace.
Connect your AI client to a project on your machine. Edit code, run tests, manage dev servers and drive a browser, with a live dashboard to follow the work.




Quick start · Capabilities · Tunnels · Security · Documentation
What is dev-link?
dev-link is an open-source Model Context Protocol (MCP) server that gives an AI client tools to work on a project folder on your machine. Your client sends tool calls; dev-link runs them and returns the results.
Use it to bring a local project into a web chat such as ChatGPT or Grok, or to give an editor or CLI agent the same workspace tools and dashboard. It works with clients that support remote MCP servers over Streamable HTTP, including Claude Code, Codex CLI, Cursor and VS Code.
dev-link runs no model and requires no model API key of its own. Your AI client's plan, usage limits and MCP support still apply.
- Work on the actual project. Read and edit files, search code, run builds and tests, and keep development servers running between tool calls.
- Check the app in a browser. Navigate pages, interact with the UI, inspect console and network activity, and take screenshots with Playwright.
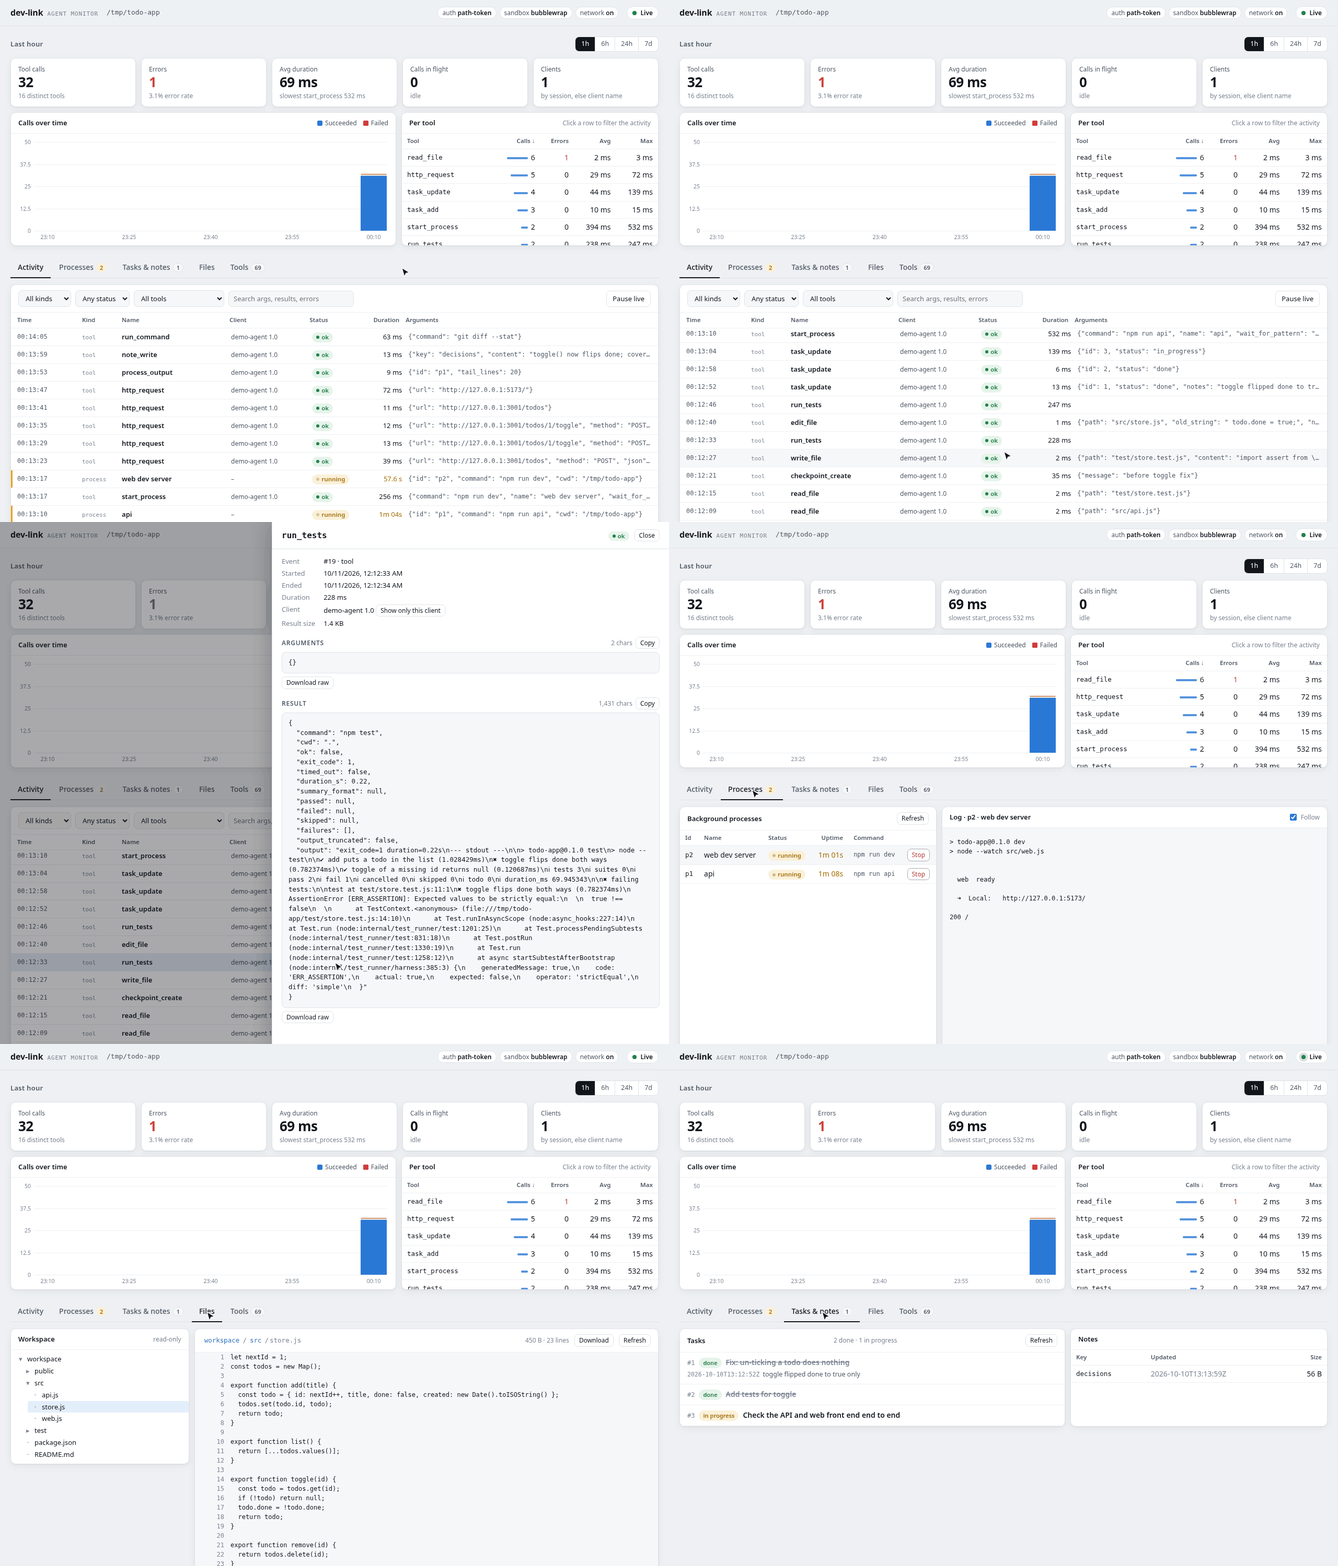
- Follow the work. Watch tool calls and results, running processes, files, tasks and notes in the dashboard. Tool calls are also recorded in an audit log.
- Save a recovery point. Create, compare and restore workspace checkpoints before risky edits.
- Choose how to connect. Connect locally, or use built-in ngrok and Cloudflare tunnel support for web clients. Linux commands run in a bubblewrap sandbox by default.
Status: Alpha. Linux is supported; macOS is experimental and requires --no-sandbox.
Windows is not supported. See platforms and security before starting.
Quick start
1. Install
curl -fsSL https://raw.githubusercontent.com/ajeetkharel/dev-link-mcp/main/scripts/install.sh | sh
The install script
sets up uv, dev-link, Chromium and system dependencies. On Linux it uses your package manager
for bubblewrap, git and ripgrep and may request sudo. Open a new terminal if dev-link is
not found after installation.
In an interactive terminal, the installer offers ngrok, cloudflared, both or neither. Choose ngrok for a reusable public URL or cloudflared for a temporary URL without an account. ngrok setup needs your account's authtoken and assigned domain. Without a terminal, the installer defaults to cloudflared unless configured otherwise.
Prefer to install dependencies yourself? See manual installation.
2. Start in your project folder
For a web client, start with a public tunnel:
cd ~/code/my-project
dev-link start --tunnel
For an editor or CLI on the same machine, start locally:
cd ~/code/my-project
dev-link start
The startup output includes connection and dashboard URLs. For example, with ngrok configured:
MCP URL        : http://127.0.0.1:8765/mcp/<token>
dashboard      : http://127.0.0.1:8765/ui/<token>/
public MCP URL : https://<your-ngrok-domain>/mcp/<token>
public dash    : https://<your-ngrok-domain>/ui/<token>/
These are illustrative; use the URLs printed by your server. The port may differ.
Without --tunnel, only local URLs are printed.
Treat these URLs like passwords. They contain an access token. Anyone with the token can use the server's tools, including running commands. Keep the dashboard URL private and read Security before exposing a workspace.
3. Connect your client
| Client | Connect with | Setup guide |
|---|---|---|
| ChatGPT or Grok | Add the public MCP URL as a custom MCP server/connector | Web clients |
| Claude Code | claude mcp add --transport http dev-link "$(dev-link url)" |
Local clients |
| Codex CLI | codex mcp add dev-link --url "$(dev-link url)" |
Local clients |
| Cursor or VS Code | Add the MCP URL to your MCP configuration | Local clients |
| Other MCP clients | Add the appropriate URL using Streamable HTTP | Connection and authentication |
Run CLI setup commands from the project folder. dev-link url prints the public URL when a
tunnel is active, otherwise the local URL. For the default path-token setup, choose
No authentication if your web client asks: the secret is already in the URL.
Client availability can depend on your plan and workspace settings.
Open the local dashboard URL in your browser to follow the session. dev-link dashboard
prints it again.
4. Try it
Start with a task that helps the client understand your project:
Inspect this project, explain how to run it, run the existing tests and report any failures. Don't change any files yet.
Then try a development workflow:
Start the development server, open the app in the browser and check the main user flow. Include a screenshot and any console errors in your report.
Or make a focused change:
Create a checkpoint, fix the failing test, and run the relevant tests again. Show me the diff and explain what changed.
When you're done, run dev-link stop to stop the server and its tunnel.
Capabilities
| What you need | What dev-link provides |
|---|---|
| Files and search | Read, write and patch files; search with ripgrep; replace across files |
| Commands and processes | Run shell commands and code snippets; manage background servers and watchers |
| Code navigation | Inspect outlines, definitions and references with tree-sitter |
| Build and test | Detect the project stack; install dependencies; build, lint, format and test |
| Browser automation | Drive Chromium with Playwright; inspect pages, screenshots, console and network activity |
| APIs and data | Make HTTP requests, download files, query SQLite, and inspect JSON and CSV |
| Checkpoints | Snapshot, compare and restore workspace files |
| Tasks and notes | Keep a persistent task list and notes for the workspace |
| Docker (opt-in) | Work with containers and Compose, subject to workspace restrictions |
Git and other installed CLIs are available through command tools. Browser and code-navigation
tools need the [browser] and [code] extras; the installer includes both via [all].
Docker is disabled by default and requires --enable docker; see the security implications below.
For the current tool list and parameters, use dev-link tools or the generated
tool reference.
You can also add tool groups through plugins.
How it works
Editor / CLI agent ─────── local HTTP ──────────┐
                                                │
Web AI client ── HTTPS ── ngrok / cloudflared ──┤
                                                ▼
                                    dev-link on your machine
                                                │
                            ┌───────────────────┼───────────────────┐
                            ▼                   ▼                   ▼
                       Project files     Commands, processes   Dashboard
                       and checkpoints   and browser tools     and audit log
The AI stays in your client. The project and tools run on your machine; tool inputs and results travel between them. Connecting a cloud AI client does not keep project data entirely local: file contents and command output returned by tools can be sent to that client.
The Linux sandbox applies to commands. Some tools, including HTTP and browser tools, run in the server process with their own restrictions. See the security model for the boundaries.
Tunnels
dev-link start --tunnel selects the provider from your configuration:
| ngrok | Cloudflare quick tunnel | |
|---|---|---|
| Setup | ngrok installed, account authenticated, and tunnel.ngrok_url configured |
cloudflared installed; no account needed |
| Public address | Your assigned or configured ngrok domain | A temporary trycloudflare.com address |
| After a restart | Same public URL while the domain and saved token remain unchanged | New public URL; reconnect your client |
| Useful for | Returning to the same workspace regularly | Temporary development sessions |
With tunnel.ngrok_url set, dev-link uses ngrok. Otherwise it uses cloudflared.
Installing ngrok alone does not select it. The installer can configure the domain for you;
for manual setup, see a URL that stays the same.
For ngrok, dev-link saves a token per workspace so the public URL survives restarts. To replace
that saved token, run dev-link restart --tunnel --new-token, then reconnect your clients. Explicitly configured tokens must be changed in their configuration instead.
Local starts and Cloudflare quick tunnels generate a new token by default. For a stable local connection, see pinning the token and port.
Provider limits still apply. Check ngrok's plan limits and Cloudflare's quick tunnel documentation for current terms. Use the local dashboard URL to avoid ngrok's browser warning page.
Everyday commands
Run these from your project folder, or pass the folder explicitly, for example
dev-link status ~/code/my-project.
dev-link status             # Check the server
dev-link url                # Print the MCP URL
dev-link dashboard          # Print the local dashboard URL
dev-link logs server        # Read server logs
dev-link logs tunnel        # Read tunnel logs
dev-link doctor             # Diagnose dependencies and sandbox setup
dev-link restart --tunnel   # Restart with a public tunnel
dev-link stop               # Stop the server and its tunnel
Use dev-link --help for all commands and
Configuration
for tool selection, environment variables, timeouts and sandbox settings.
Security
dev-link gives an AI the ability to modify files and execute commands. Connect clients you trust and choose the workspace carefully.
- Protect the token. MCP and dashboard URLs contain the same secret in the default setup. Do not post them, commit them or include them in screenshots.
- The workspace is writable. The agent can read, change or delete its contents, including
.envfiles and.git. Checkpoints are useful recovery points, not a replacement for backups. - Linux commands are sandboxed by default. bubblewrap exposes the workspace, read-only system and toolchain paths, and a private home. Extra mounts can widen access. The sandbox does not make arbitrary commands harmless.
- Network access is on by default. Tools can reach the internet, your LAN and localhost
services.
--no-networkrestricts network access, including browser and HTTP tools; package installs and workflows that need network access will fail. - Public tunnels expose the server. ngrok or Cloudflare terminates TLS and handles the traffic, including the token. Stop the server when it is no longer needed.
- Some modes grant much broader access.
--no-sandboxruns commands with your user access. Enabling Docker with a rootful daemon is effectively root-equivalent access. - Logging is visibility, not prevention. The dashboard and audit log record activity; they do not approve or block a harmful command.
Read the full security model for restrictions and known limits. Report vulnerabilities privately through SECURITY.md.
Platforms
| Platform | Support |
|---|---|
| Linux | Supported, with bubblewrap sandboxing by default |
| macOS | Experimental; requires --no-sandbox. Not currently tested in CI; process port detection has known limitations |
| Windows | Not supported |
The package requires Python 3.11 or newer. The installer uses uv to provision Python 3.13.
Manual installation
Install uv first. On Debian or Ubuntu:
sudo apt install bubblewrap git ripgrep
uv tool install --python 3.13 'dev-link-mcp[all] @ git+https://github.com/ajeetkharel/dev-link-mcp'
dev-link install-browser
dev-link doctor
On other Linux distributions, use the equivalent system packages. macOS needs git and ripgrep, but cannot use the bubblewrap sandbox. Browser tools also need Chromium's system libraries; the installer handles these on supported Debian/Ubuntu systems.
For web clients, install and configure ngrok or cloudflared. Local clients do not need a tunnel.
Troubleshooting
| Symptom | First thing to check |
|---|---|
| Server refuses to start | Run dev-link doctor and dev-link logs server. For Ubuntu sandbox restrictions, see the setup notes |
| Client stops connecting after a restart | Run dev-link url and compare it with the saved URL. See Tunnels for stable URLs |
--tunnel asks for cloudflared when ngrok is installed |
Configure tunnel.ngrok_url; installing ngrok alone does not select it |
| Public connection fails | Check dev-link logs tunnel, your tunnel configuration and provider limits |
| Browser tools cannot start | Run dev-link install-browser and dev-link doctor; check for missing Chromium system libraries |
| A long command times out in the client | Check the client's tool-call timeout as well as dev-link's command timeout; see local clients |
If you report a bug, include the failing command, platform and relevant logs, with tokens and project secrets removed.
Documentation
| Guide | Contents |
|---|---|
| Client setup | Web clients, editors, CLI agents and authentication |
| Configuration | Settings, environment variables and tool selection |
| Tool reference | Available tools and parameters, generated from the code |
| Architecture | Tool execution, components and state |
| Security | Sandbox boundaries, authentication and known limits |
| Extending | Build and register your own tool groups |
| Changelog | Release history and unreleased changes |
Contributing
Bug reports, documentation improvements and focused pull requests are welcome. Start with CONTRIBUTING.md for setup and checks. For larger changes, open an issue first to discuss the approach. Contributors follow the Code of Conduct.
License
MIT.
1 maintainer

Metadata
1 maintainer
Release files for dev-link-mcp 0.3.0
For a detailed explanation of source distributions (sdists) and built distributions (wheels), please see the package formats documentation.
Source distribution (sdist)
| File | Size | Uploaded | |
|---|---|---|---|
| dev_link_mcp-0.3.0.tar.gz | 234.9 kB | Details |
Built distribution (wheel)
| File | Interpreter | ABI | Platform | Reset |
|---|---|---|---|---|
| dev_link_mcp-0.3.0-py3-none-any.whl | Python 3 | none | any | Details |
Total release size: 499.6 kB
Release files / dev_link_mcp-0.3.0.tar.gz
| Download URL | dev_link_mcp-0.3.0.tar.gz |
|---|---|
| Size | 234.9 kB |
| Tags | Source |
|
SHA-256 checksum How to use checksums |
bb2c4c2558d3f1d1f1b2ee04a43dfb01a7eec34781f4ac72c2a799538e8782f2
|
|
BLAKE2b-256 checksum How to use checksums |
c523d0b3bae72fbcec6100731235226977ea6d26e327bb63fba206b7c1c1bb2e
|
| Upload date | |
|
Uploaded using Trusted Publishing? What is trusted publishing? |
Yes |
| Uploaded via |
twine/7.0.0 CPython/3.13.14
|
Provenance
Provenance describes where a file came from. On PyPI, provenance is shared via attestations, which provide a verifiable record of the build or publishing details. View details, limitations and caveats.


PyPI Publish Attestation
PyPI verified that this artifact, at this checksum, originated from the publisher listed below.
Signed by GitHub Actions, verified by PyPI on Oct 14, 2026.
Transparency logRelease files / dev_link_mcp-0.3.0-py3-none-any.whl
| Download URL | dev_link_mcp-0.3.0-py3-none-any.whl |
|---|---|
| Size | 264.7 kB |
| Tags | Python 3 |
|
SHA-256 checksum How to use checksums |
d7178d005889bc08fe17c4a2aba49ec286cf77753d82c1723f9182d464908283
|
|
BLAKE2b-256 checksum How to use checksums |
f1305377fb763665750bd27f53f18303c0607714a0e442305025da351a3a99a1
|
| Upload date | |
|
Uploaded using Trusted Publishing? What is trusted publishing? |
Yes |
| Uploaded via |
twine/7.0.0 CPython/3.13.14
|
Provenance
Provenance describes where a file came from. On PyPI, provenance is shared via attestations, which provide a verifiable record of the build or publishing details. View details, limitations and caveats.
PyPI Publish Attestation
PyPI verified that this artifact, at this checksum, originated from the publisher listed below.
Signed by GitHub Actions, verified by PyPI on Oct 14, 2026.
Transparency log













