
DigLibrary
Em português: LEIAME.md — mesmo conteúdo, passo a passo.
A desktop application for the state a music collection is actually in: hundreds of albums, from a hundred sources, each named however it happened to arrive.
It reads the folders you point it at, works out what every album is against Discogs and MusicBrainz — and against the sound itself when the name says nothing — then proposes one plan for the whole batch: folder names, file names, tags and cover art. You approve it, edit any line of it, or reject it. Nothing is written until you say so, and everything written can be reverted.
It also measures the audio, so it can tell you whether a .flac is really
lossless, which is the one thing the file itself will never admit.
Organise first, import afterwards — or simply keep the collection in order and up to date as it grows. DigLibrary never opens your Rekordbox or Serato library; it works on the files, which is what those applications read.
It runs only on your machine, with no account to create. There is no service behind it — no telemetry, nothing counted about you — and nothing leaves your computer except the catalogue lookups you can see, and the searches on Soulseek if you use that service.
What it does
Identifies albums. Names and tags are read off the folder and matched against Discogs and MusicBrainz, with iTunes as a witness. When the names are not enough, the audio itself is fingerprinted with Chromaprint and looked up on AcoustID.
Measures what the audio actually is. A .flac transcoded from a 128 kbps
MP3 is still a .flac to every other tool. DigLibrary decodes each track, finds
where the high frequencies stop, and says so — in the folder name if you want it
there, and in a spectrogram you can look at yourself. It also asks a question a
spectrogram cannot answer: where the audio was cut into frames. An MP3
compresses on a fixed 576-sample grid, and converting it to FLAC copies that
grid along with the sound, so trying all 576 alignments finds it — which reaches
even a 320 kbps transcode encoded with no low-pass, the file every
ceiling-based test lets walk. The Analyze in depth feature reads the whole
file at fourteen probe frequencies when you decide an album is worth analysing
in depth.
Renames and tags, reversibly. Every run is a plan you read before it
happens, shown as now → after, with every name editable — and your word
outranks the catalogue: you can make small adjustments by hand, and those are
what stands. Files are written on a copy and moved into place, so even if a
write is interrupted halfway through, no file is left half-made.
And the reversal is rehearsed before it starts. Every applied run is in
History with a Revert, which walks the whole undo first and refuses the lot if
any step of it cannot be taken. It also finds the album even if you have moved
it somewhere else, within the folders it knows.
Finds music, optionally, over your own slskd instance on the Soulseek network. It is the only acquisition provider, and it does nothing until you point it at an slskd you run yourself, with an API key. Downloads are followed in Transfers, and an album joins the library when every file of it has arrived.
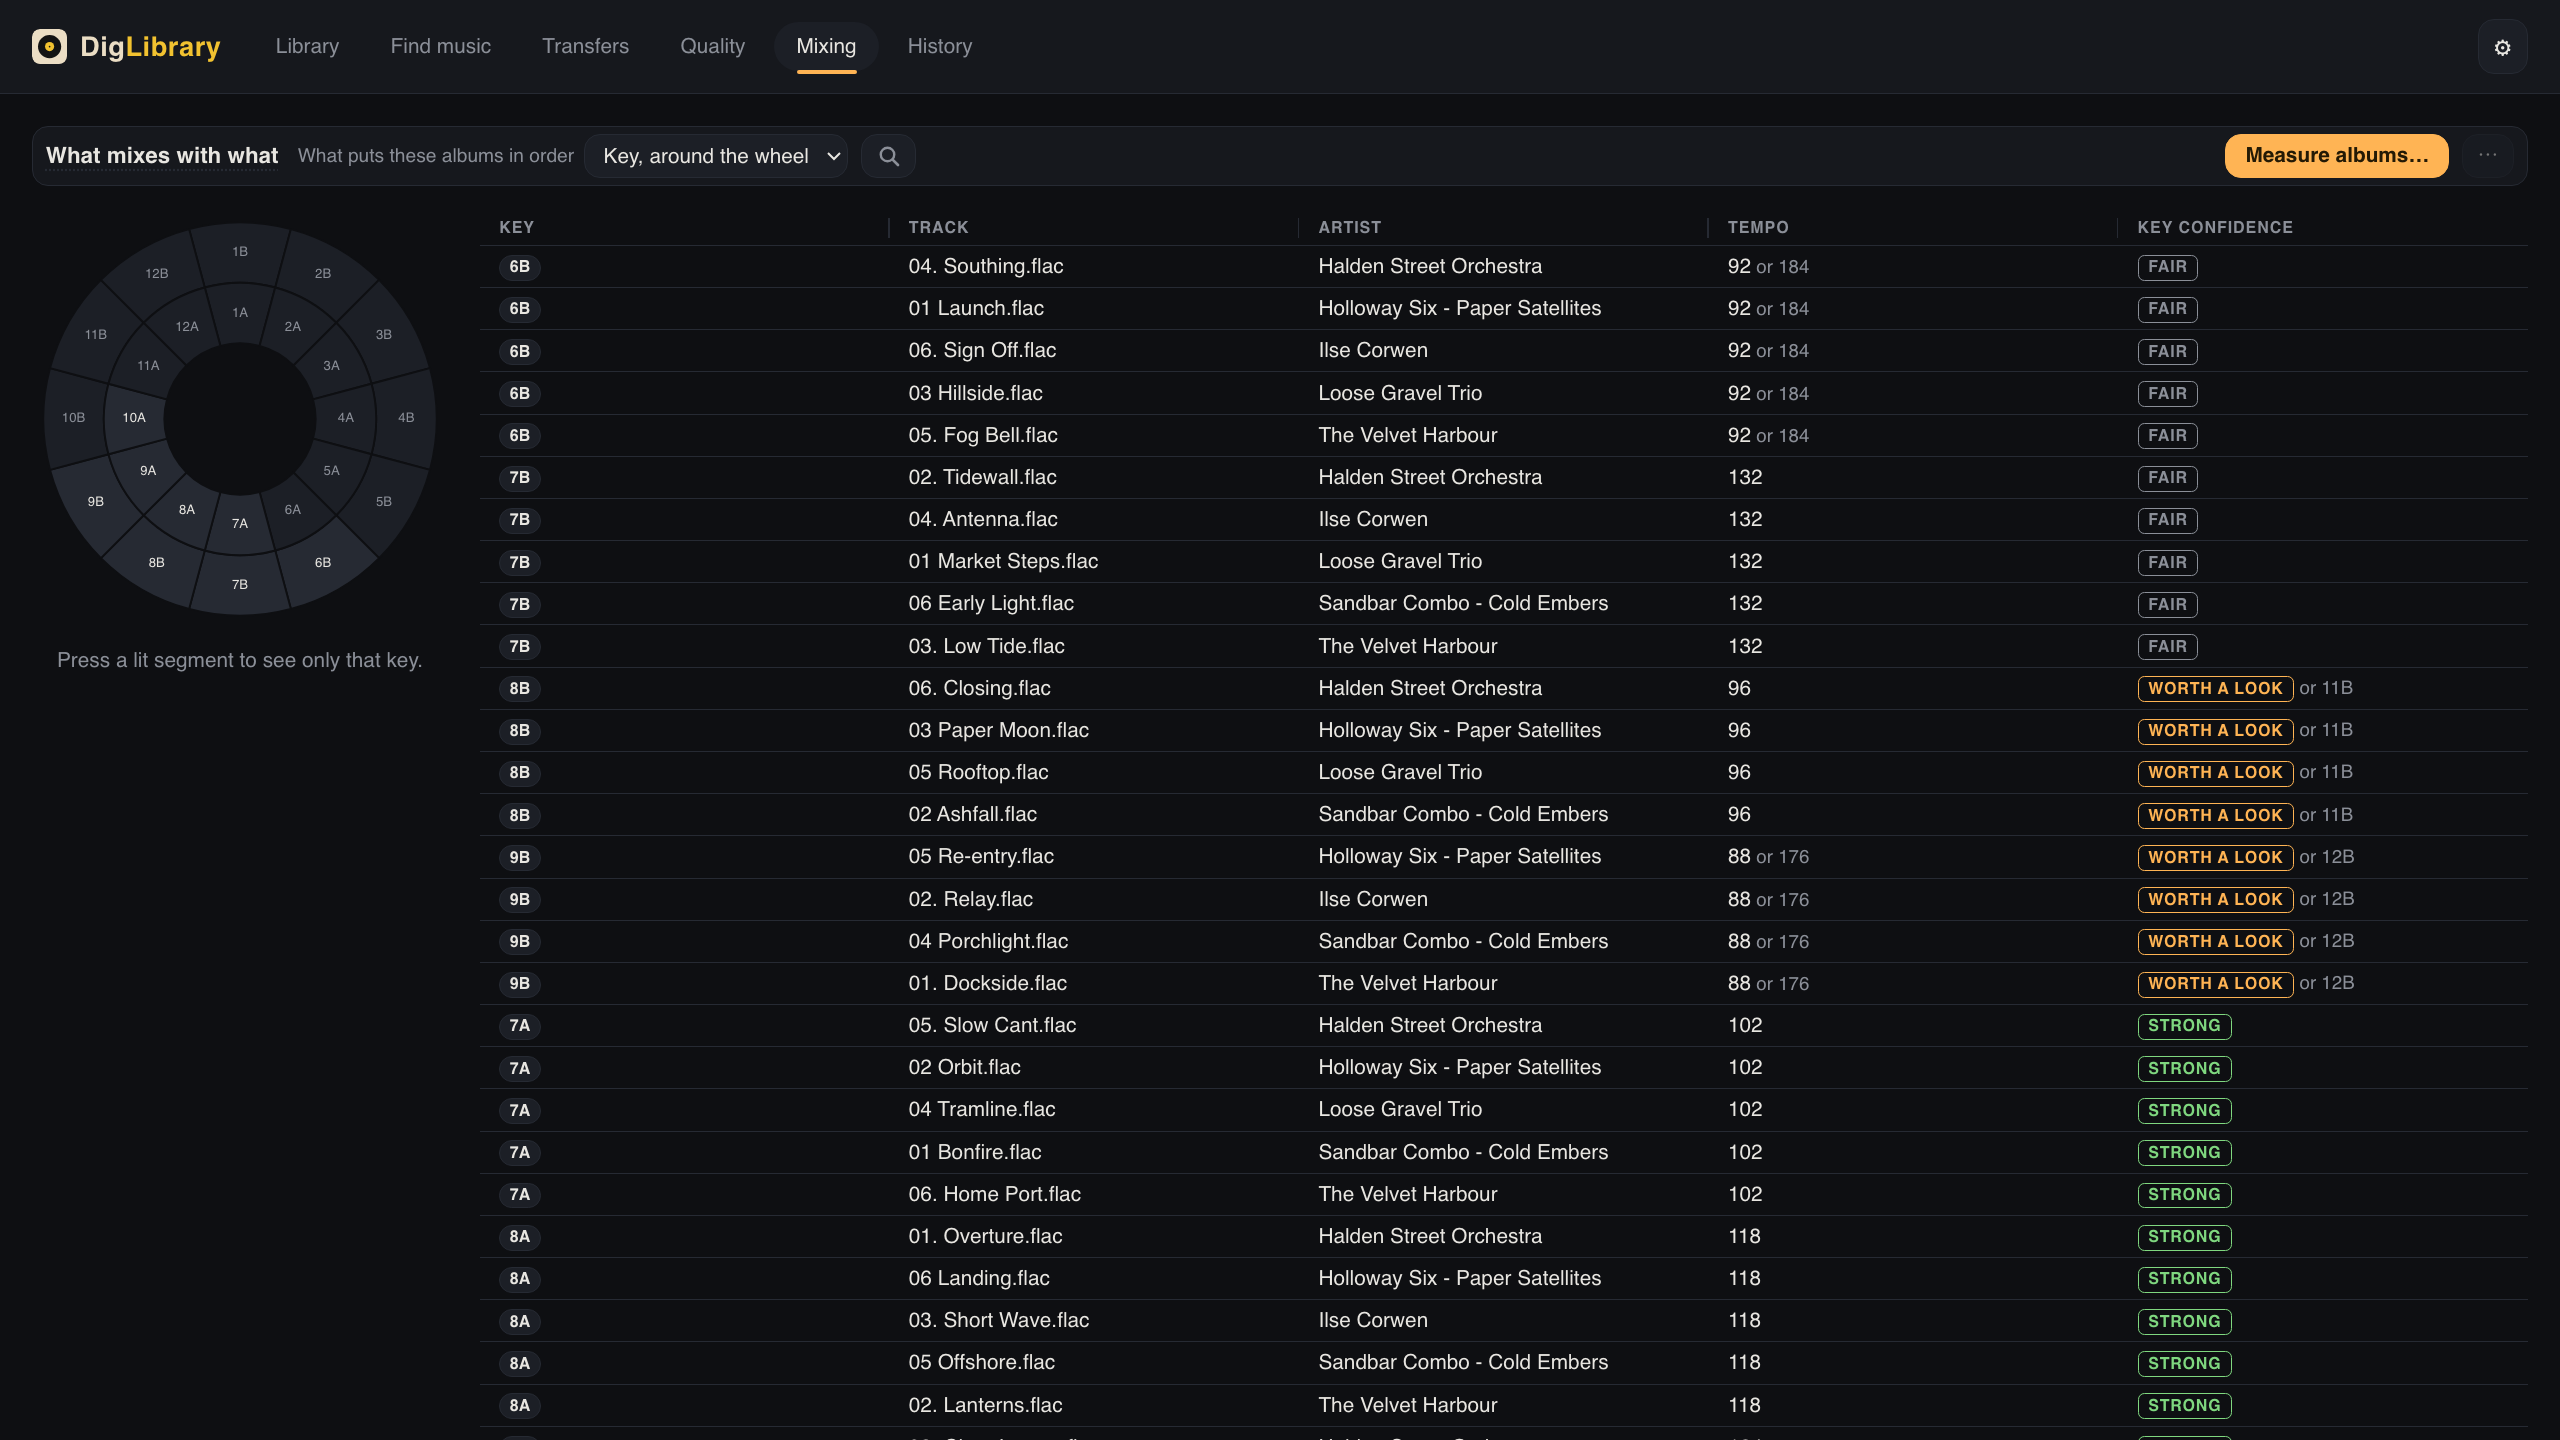
Measures key and tempo, and lays them on the Camelot wheel. The Mixing screen shows the tracks you have asked it to measure. Beside each key it says how decided the reading was — and where two keys came in almost level it names the other one, because a tie between neighbours on the wheel is not a doubtful answer: either of them mixes the same way.
Rate a record out of five on its sleeve, sort and filter the shelf by that, and give an album a cover when the archive has none.
Never invents metadata. An album it cannot identify with confidence is left untouched and sent to review with the reason why. It never touches a Rekordbox database.
The six screens
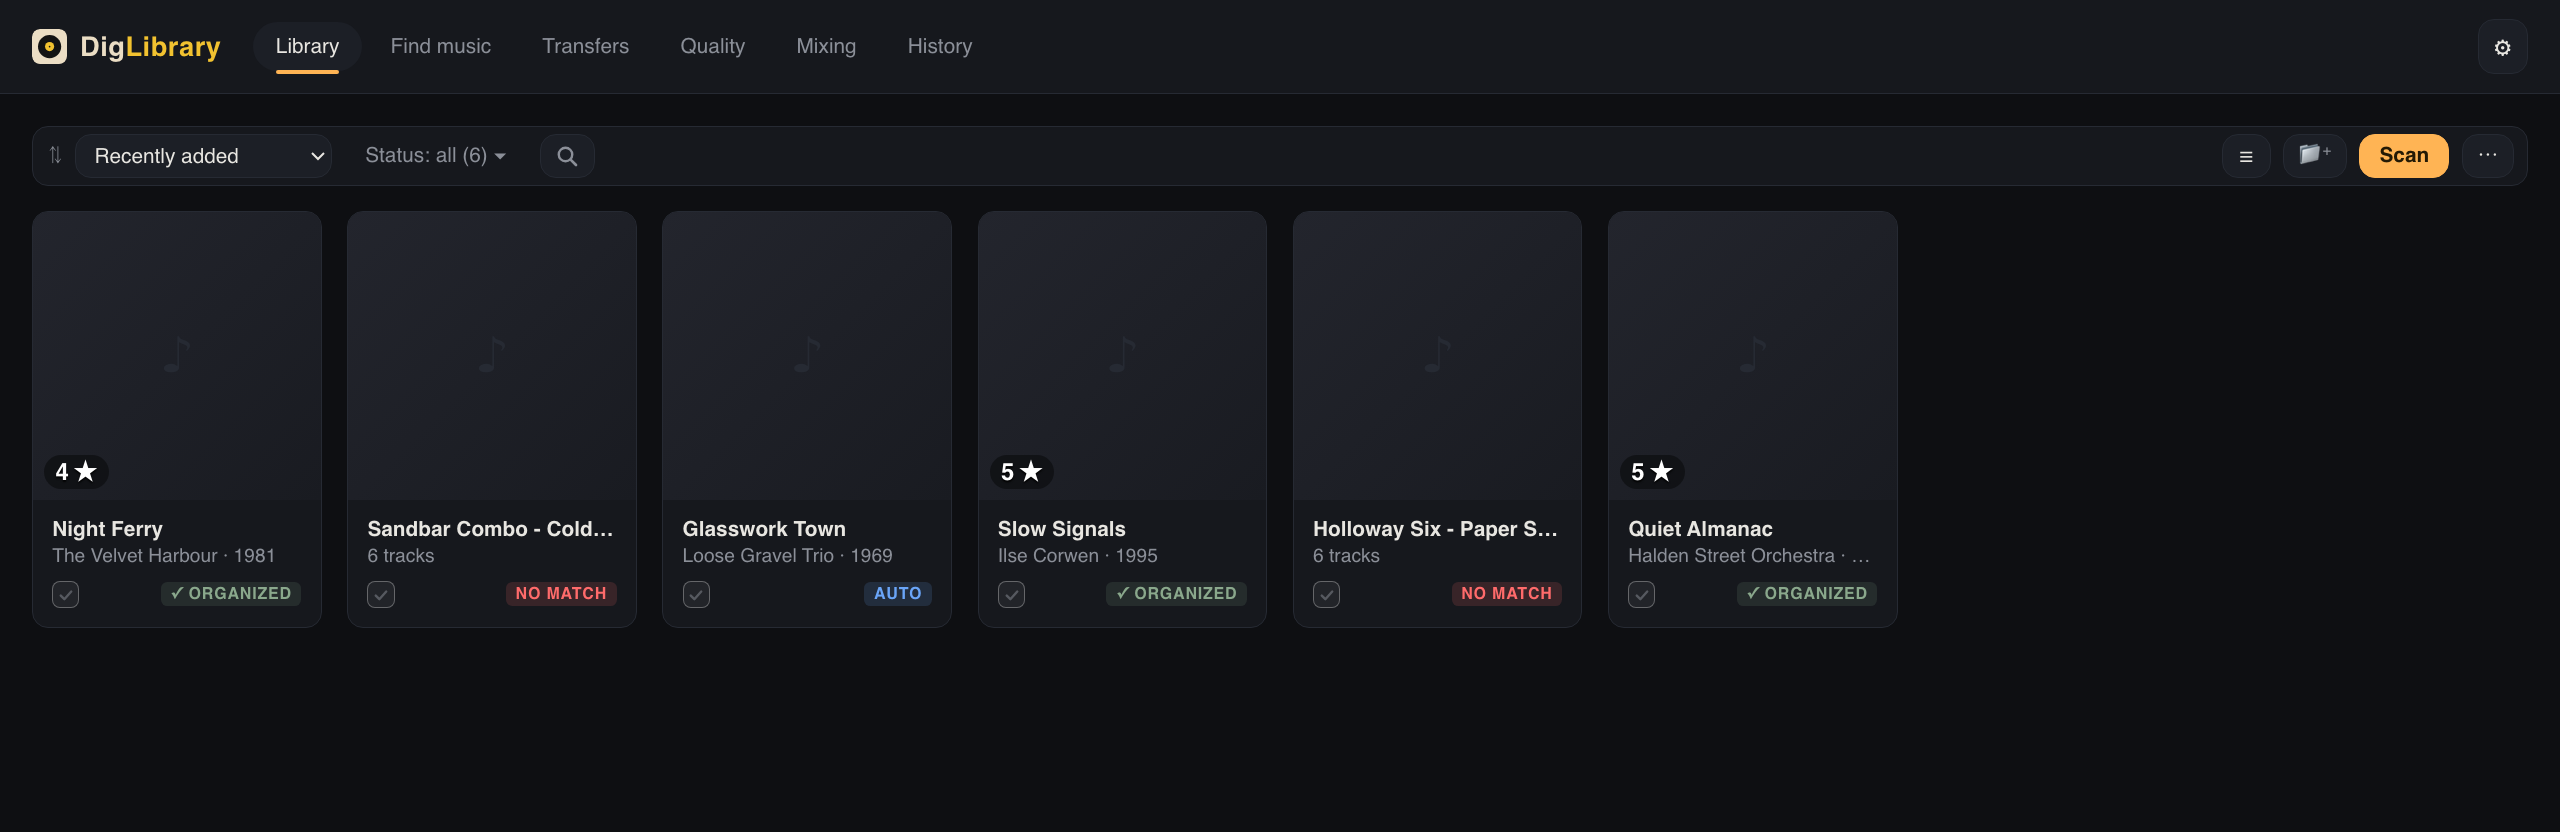
| Library | Your shelf, as cards or as a list: identify, plan, apply, rate. |
| Find music | Search Soulseek through your own slskd and ask for what you find. |
| Transfers | What is downloading, what arrived whole, and what stopped short. |
| Quality | The bench: what a file really is, with a spectrogram and a verdict. |
| Mixing | Key, tempo and the Camelot wheel over the tracks you have measured. |
| History | Every run that wrote to your files, each with a Revert. |
Requirements
| What | Why | How |
|---|---|---|
| macOS 12 or later | Windows and Linux are not supported yet — the folder panel, the stay-awake call during downloads, and the app bundle are macOS. They are intended, with no date; installing on either succeeds and then refuses to open, saying so. If you would like to be the reason one of them arrives, open an issue and say which | — |
| Python 3.12 or later | The application is Python | brew install python, or the python.org installer |
| ffmpeg | Measures audio and draws spectrograms. Without it the application still runs, and the Quality screen says plainly that it cannot measure | brew install ffmpeg |
| chromaprint (optional) | Audio fingerprinting, for identifying albums by sound | brew install chromaprint |
| slskd (optional) | Only for the Find music screen — downloads over Soulseek, which also needs a free Soulseek account | slskd's own docs |
If you don't have Homebrew: brew.sh.
Getting started
You do not need to know how to program. You do need to type a few lines into an application called Terminal, which comes with every Mac.
Opening Terminal: press
⌘ Space, typeterminal, press Return (Enter). A window with text in it appears. That is the whole tool.
Three lines, and the first two are done once and never again:
/bin/bash -c "$(curl -fsSL https://raw.githubusercontent.com/Homebrew/install/HEAD/install.sh)"
brew install python ffmpeg pipx && pipx ensurepath
pipx install diglibrary
Close the Terminal, open it again — the pipx ensurepath in the second line is
what put diglibrary on your path, and a Terminal that was already open has not
heard about it. Then, to open the application, type:
diglibrary
Leave that Terminal window open while you use it this first time — the application is running inside it, so closing it closes the application. That lasts exactly one session: the box on the next screen is what ends it.
The first time it opens, it offers to put itself in your Applications folder. The box is already ticked; leave it that way and press Start using DigLibrary. From then on DigLibrary opens the way every other application on your Mac opens — from Applications, or from Launchpad — and you are done with the Terminal for good. Drag it to the Dock if you want it there.
If you untick it and change your mind, the button is in Settings. There is a command for it too, which is the same gesture by another door:
diglibrary make-icon
Any of the three builds ~/Applications/DigLibrary.app. It is built here, on
your Mac, for this installation — it is not something you can send to anybody,
and on another machine it would open nothing.
To update it later: pipx upgrade diglibrary. To remove it entirely:
pipx uninstall diglibrary, and delete ~/.diglibrary.
The first line is Homebrew, which is what installs the other two, and it
will ask for your Mac password — it needs it to install, and it is your own Mac
asking. Nothing here ever asks for a password for anything else. Skip that line
if you already have Homebrew: type brew --version and see whether it answers.
Homebrew ends by printing a short Next steps list, and those lines are part
of the first line. Run every one of them, in order, before you type the second
line — they are what puts brew on your path, and until they have run,
brew install … answers command not found: brew.
ffmpeg is not optional in the way the rest is. It is not a Python package,
so nothing pipx does can bring it: without it DigLibrary still runs and the
Quality screen says plainly that it cannot measure anything. chromaprint is
genuinely optional, and worth it if you have albums whose names say nothing:
brew install chromaprint
Installing from the source instead, step by step
You do not need this if the three lines above worked. This is the same application, installed from the code rather than by name — which is what you want if you mean to read it, change it, or run its test suite.
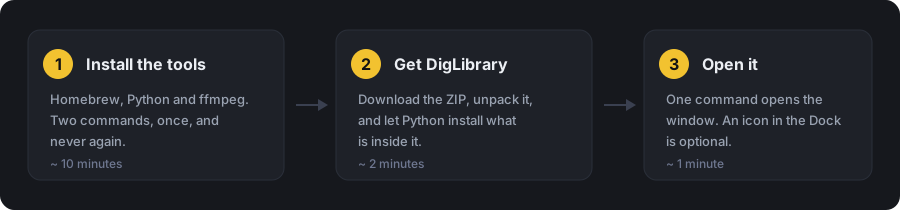
Each step below is one line: copy it, paste it, press Return (Enter), wait for it to finish. About fifteen minutes in total, and steps 1 and 2 are done once and never again.
1. Install Homebrew
Homebrew is what installs the two things DigLibrary needs. Skip this if you
already have it (type brew --version and see whether it answers).
/bin/bash -c "$(curl -fsSL https://raw.githubusercontent.com/Homebrew/install/HEAD/install.sh)"
It will ask for your Mac password — it needs it to install, and it is your own Mac asking. Nothing here ever asks for a password for anything else.
When it finishes it prints a Next steps list with a few more lines in it.
Run every one of them, in order. They are what puts brew on your path —
the last one does it for the Terminal window you already have open, and the
others do it for every window you open afterwards. How many there are depends on
what your Mac already had, so run what it printed rather than counting.
2. Install Python and ffmpeg
brew install python ffmpeg
Optional, and worth it if you have albums whose names say nothing:
brew install chromaprint
3. Download DigLibrary and unpack it
Download the ZIP from the
latest release and
double-click it. You get a folder called something like diglibrary-1.7.0,
normally in Downloads. Leave it there or move it wherever you keep things —
just remember where.
4. Point the Terminal at that folder
Type cd and a space, then drag the folder from Finder onto the Terminal
window — it writes the path for you — then press Return (Enter).
cd ~/Downloads/diglibrary-1.7.0
5. Make a place for it to live
python3 -m venv .venv
This makes a folder called .venv inside it, so DigLibrary's parts stay
together and touch nothing else on your Mac. Nothing is printed. That is normal.
6. Install it
.venv/bin/python -m pip install -e .
A minute of scrolling text, ending in Successfully installed diglibrary-….
That line is how you know it worked.
7. Open it
.venv/bin/python -m diglibrary
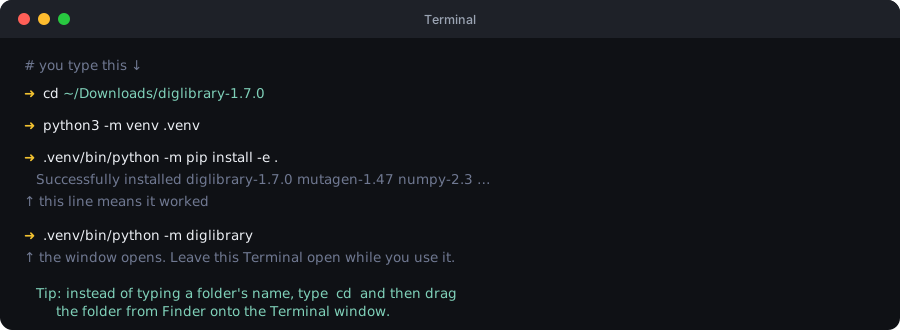
The window opens. Leave the Terminal open while you use the app — closing it closes DigLibrary. From now on, opening DigLibrary again is steps 4 and 7: point the Terminal at the folder, run that one line.
8. Optional: an icon you can double-click
.venv/bin/diglibrary make-icon
The first time you opened it, at step 7, it offered to do this for you — the box on that screen and this command are the same gesture by two doors, and so is the button in Settings.
That builds ~/Applications/DigLibrary.app, which opens the app without the
Terminal. It points at this folder rather than being a copy of the program,
so it works only on this Mac and only while the folder stays where it is. Do not
send it to anyone — on their machine it opens nothing. They install from source,
the same way you just did.
What you see the first time
A window offers you the optional services and lets you skip them all. Then:
drag a folder of albums onto the window, or add one with the 📁+ button, and
press Scan. Nothing is written to your files until you read a plan and press
Approve & apply — and everything that is written can be undone from
History.
The Library, where your records live. The sleeves are blank in the picture below because it shows a simulated library, made of invented albums.
Mixing, for DJs: the key and the tempo of the tracks you asked it to measure, laid around the Camelot wheel, each key with how decided the reading was and — where it was close — the key it beat.
When something goes wrong
| What it says | What it means |
|---|---|
command not found: brew |
Homebrew is installed but not on your path yet. Run every line of the Next steps list it printed at the end — all of them, in order. |
command not found: python3 |
Step 2 did not finish, or the Terminal was open before it. Close the Terminal, open it again. |
no such file or directory after cd |
The Terminal is not in the right folder. Redo step 4 with the drag trick. |
| The Quality screen says it cannot measure | ffmpeg is missing — step 2. |
| macOS asks for access to your folders again | Nothing changed in DigLibrary. macOS grants folder access to a binary, and brew upgrade replaces the Python that DigLibrary runs on — a new binary is a new application as far as macOS is concerned, so it asks once more. Granting it again is safe and it stops asking. |
| Something else | Open an issue and paste what the Terminal said. |
Where DigLibrary keeps your things
The first run writes ~/.diglibrary/config.toml and keeps everything beside it
— the database, the logs, the caches and the backups. One folder to back up,
one folder to delete. Your music is never moved there; DigLibrary only ever
writes inside the folders you point it at, and only after you approve a plan.
What all these files are
The download is the program's own source code, so most of what is in it is for people changing DigLibrary rather than using it. You can ignore all of it.
README.md / LEIAME.md |
This page. The only two files here written for you. |
CHANGELOG.md |
What changed in each version. |
src/ |
The program itself. |
tests/, tools/, docs/, benchmark/, packaging/ |
For people who work on DigLibrary: its test suite, its scripts, its documentation, the benchmark behind the quality verdicts, and the Homebrew formula. |
pyproject.toml, LICENSE |
How Python installs it, and the licence (MIT). |
Why .md and not .txt or .docx? A .md file is a plain text file —
double-click it and TextEdit opens it, no special program needed. The difference
is that GitHub renders it with headings and tables, which a .txt does not get,
and unlike a .docx it needs no Word, weighs nothing, and can be read on any
machine ever made.
A config.toml in the directory you run from wins over that one, and everything
it names is resolved beside it. That is how a checkout keeps its own
installation; it is not how a clone starts, because this repository ships no
config.toml of its own.
For an icon in the Dock:
.venv/bin/diglibrary make-icon
That builds ~/Applications/DigLibrary.app. It is a bundle pointing at your
own checkout rather than a self-contained build: it launches the code as it
stands, so there is nothing to rebuild after an edit — and for the same reason
it cannot be copied to another machine, where it would launch nothing. Install
from source there instead.
Two local ports, while the app is open
Both are bound to 127.0.0.1, neither is reachable from your network, and both
stop when the application does.
The cover port. Drawing a shelf of covers needs a URL for each, so the application serves cover images to its own window, and nothing else. It hands out only covers of albums on your shelf, it never accepts a path — a request names an opaque id — and every request carries a token minted fresh each run. A request without the token gets the same answer as a request for something that does not exist, so the port cannot be used to ask whether your library holds a given album.
The window port. The interface is HTML, and its script is an ES module,
which a browser engine refuses to load from a file:// address. So pywebview
serves the four files of the window itself. That directory is all it serves.
What leaves your machine
Only what is needed to identify an album or to find one, and only when you ask:
- Album and track names, durations and any barcode go to MusicBrainz and iTunes, and to Discogs when it is connected, to find which release you have.
- The identifier of the release goes to the Cover Art Archive, to fetch its cover, unless you switched cover art off.
- An acoustic fingerprint — a compact summary of the sound, not the audio —
goes to AcoustID, and only if you installed
chromaprintand supplied a key. The audio itself is never uploaded. - A Spotify link you paste goes to Spotify, to be read as an artist and an album.
- What you search for in Find music goes to your own slskd, and from there to the Soulseek network.
- Nothing else. No telemetry, no crash reporting, no analytics, no account. Your library never leaves the machine, and neither does the database.
The log at logs/diglibrary.jsonl stays local and records the full path of
folders it worked on, so read it before attaching it to a bug report.
Credentials — none are required
It works with nothing configured. Albums are identified against MusicBrainz, covers come from the Cover Art Archive, iTunes is asked as a witness, and every audio measurement happens on your own machine. The first time you open it, a window says so and offers the optional services below; you can skip it and connect them later from Settings.
DigLibrary ships no API keys. An open-source desktop application cannot keep
a secret, so the optional ones are keys you create and hold yourself. Paste
them into that window and they are written to ~/.diglibrary/env, readable only
by you — never into config.toml, never into a log, and never read back out to
the window, which is only ever told whether a service is connected.
| Service | What it adds | Needed? |
|---|---|---|
| Discogs | Matches get much better, especially for catalogues outside the US and UK, where Discogs is often the only source listing the pressing you actually have. Create a token. | Optional, and the one worth doing |
| AcoustID | Identifies an album by the sound of the audio when the names say nothing useful. Also needs chromaprint. Register an application. |
Optional |
| slskd | Your own slskd instance, for the Find music screen. Needs the readwrite role. |
Only for downloads |
| Spotify | Lets you paste a Spotify album link and search for that record by name. The link is read as words — an artist and an album — and nothing it returns is ever stored, cached or written to a file. Create an app. | Optional |
If you would rather not use the window, the same environment variables still work, and still win over anything stored:
export DIGLIBRARY_DISCOGS_TOKEN="…"
export DIGLIBRARY_ACOUSTID_KEY="…"
export DIGLIBRARY_SLSKD_API_KEY="…"
export DIGLIBRARY_SPOTIFY_CLIENT_ID="…"
export DIGLIBRARY_SPOTIFY_CLIENT_SECRET="…"
# Only if you want your own address on your own MusicBrainz traffic; the
# application identifies itself by default, which is what MusicBrainz asks for.
export DIGLIBRARY_MUSICBRAINZ_CONTACT="you@example.com"
An application opened by its icon inherits no shell environment, which is why
~/.diglibrary/env exists. DigLibrary reads it at every launch, however you
started it, so a key you paste into the window is in force the next time you
open it — from Applications, from a terminal, from anywhere. A name your own
shell already exports wins over the file.
Configuration
~/.diglibrary/config.toml is yours to edit and nothing rewrites it. Its own
comments explain each setting; the ones people change first are the naming
style, whether cover art is fetched, and the cache limits. Naming templates are
in there too, if none of the six shipped styles is how you name things.
--config /some/other.toml runs against a different installation entirely.
Copies of your database, and putting one back
A compressed copy of the database is written whenever the window opens on something that changed, and before any schema upgrade. Each one is read back before it is accepted — opened as a database and unpacked to check its checksum — so a copy that exists is a copy that worked.
They are the only record of your library outside the live file, so point
copies_directory at somewhere that is not beside the database:
[database]
copies_directory = "~/Documents/DigLibrary-database-copies"
To see what there is, and to put one back:
.venv/bin/diglibrary restore-copy
With no arguments it lists them. --newest restores the most recent, or name a
file to choose. Quit DigLibrary first. The database being replaced is renamed
aside rather than deleted, so undoing a restore is one mv.
This is not a backup. Every copy lives on the same disk as the original. Configure Time Machine, or copy that folder somewhere else — a disk that fails takes the library and its history together.
What it will not do
- It will not touch your Rekordbox database. Ever, by design.
- It will not write metadata it is unsure of. No trusted match means the files are left exactly as they were, and the album is queued for your review.
- It will not require an AI service on any essential path.
- It will not reverse-engineer anything. Every integration is an official API or a documented protocol, and each one's published terms were read before it was written.
Cover art comes from the Cover Art Archive. Those images are copyrighted by whoever holds the rights to them and are provided for archival purposes; using them is at your own risk. DigLibrary re-hosts nothing and writes only into your own files. Discogs images are never downloaded or embedded — their terms do not permit it.
For contributors
.venv/bin/python -m pip install -e ".[dev]"
.venv/bin/python -m pytest        # the suite must stay green
.venv/bin/python -m ruff check .
.venv/bin/python -m black --check .
The architectural boundaries are enforced by tests rather than by convention:
tests/architecture/ reads the source by its syntax tree and fails when a layer
reaches across one. CHANGELOG says what each release
changed for the files on your disk.
How to add a provider or a metadata source without editing the core: Extending DigLibrary.
There is a Homebrew tap, if you would rather install this the way you install
everything else — ffmpeg arrives with it and no Terminal has to be reopened:
brew trust --tap cankblunt/diglibrary
brew install cankblunt/diglibrary/diglibrary
It is here rather than in Getting started on purpose. Homebrew now asks you to
trust a third-party tap before it will load one, and it is right to ask — that
is a stranger's Ruby about to run on your machine. Somebody installing their first
application should not have to answer that question, so the front of this page
gives the route that never poses it. If you are reading this section, you already
know how to decide. The formula is written and reviewed in packaging/homebrew/
here; the tap repository is a copy of that one file.
License
MIT — see LICENSE.
1 maintainer

Metadata
1 maintainer
Release files for diglibrary 1.7.0
For a detailed explanation of source distributions (sdists) and built distributions (wheels), please see the package formats documentation.
Source distribution (sdist)
| File | Size | Uploaded | |
|---|---|---|---|
| diglibrary-1.7.0.tar.gz | 925.2 kB | Details |
Built distribution (wheel)
| File | Interpreter | ABI | Platform | Reset |
|---|---|---|---|---|
| diglibrary-1.7.0-py3-none-any.whl | Python 3 | none | any | Details |
Total release size: 1.9 MB
Release files / diglibrary-1.7.0.tar.gz
| Download URL | diglibrary-1.7.0.tar.gz |
|---|---|
| Size | 925.2 kB |
| Tags | Source |
|
SHA-256 checksum How to use checksums |
a0b4ba824c1e72771ed06c669d7214220719e08d18801b32cc8f46dd8026fe0c
|
|
BLAKE2b-256 checksum How to use checksums |
39b88a9eeb0bdbf3a344283af75814f04c59dbf104f37590b5739e3cfc0fc889
|
| Upload date | |
|
Uploaded using Trusted Publishing? What is trusted publishing? |
Yes |
| Uploaded via |
twine/7.0.0 CPython/3.13.14
|
Provenance
Provenance describes where a file came from. On PyPI, provenance is shared via attestations, which provide a verifiable record of the build or publishing details. View details, limitations and caveats.


PyPI Publish Attestation
PyPI verified that this artifact, at this checksum, originated from the publisher listed below.
Signed by GitHub Actions, verified by PyPI on Oct 3, 2026.
Transparency logRelease files / diglibrary-1.7.0-py3-none-any.whl
| Download URL | diglibrary-1.7.0-py3-none-any.whl |
|---|---|
| Size | 974.0 kB |
| Tags | Python 3 |
|
SHA-256 checksum How to use checksums |
3d4799e8b3d54a18d3085f583fb5047a22efd4bf380807e04a3313b9ac835649
|
|
BLAKE2b-256 checksum How to use checksums |
84d3624c53949e7cdc606317edd9a12f3ceb1edb95229767b4eb9c87ce22af39
|
| Upload date | |
|
Uploaded using Trusted Publishing? What is trusted publishing? |
Yes |
| Uploaded via |
twine/7.0.0 CPython/3.13.14
|
Provenance
Provenance describes where a file came from. On PyPI, provenance is shared via attestations, which provide a verifiable record of the build or publishing details. View details, limitations and caveats.
PyPI Publish Attestation
PyPI verified that this artifact, at this checksum, originated from the publisher listed below.
Signed by GitHub Actions, verified by PyPI on Oct 3, 2026.
Transparency log












