An app to create any form in django admin panel.

Project description
Django Form Generator
django form generator will help you create forms very easily. you can use it any where in your html files.
there is an API-manager tool for you to call some APIs on loading form or after submit.
Installation
-
install it via pip:
pip install django-form-generator
-
add (
'django_form_generator','django_htmx','crispy_forms','crispy_bootstrap5','captcha') to yourINSTALLED_APPS:INSTALLED_APPS = [ ... 'django_htmx', 'crispy_forms', 'crispy_bootstrap5', 'captcha', 'django_form_generator', ]
-
do a
migrate:python manage.py migrate
-
do a
collectstatic:python manage.py collectstatic
-
finally include django_form_generator urls to your
urls.pyfrom django.contrib import admin from django.urls import path, include urlpatterns = [ path('admin/', admin.site.urls), ... path('form-generator/', include(('django_form_generator.urls', 'django_form_generator'), namespace='django_form_generator')), ... ]
Requirements
- Python >= 3.10
- Django >= 4.0
Form Usage
-
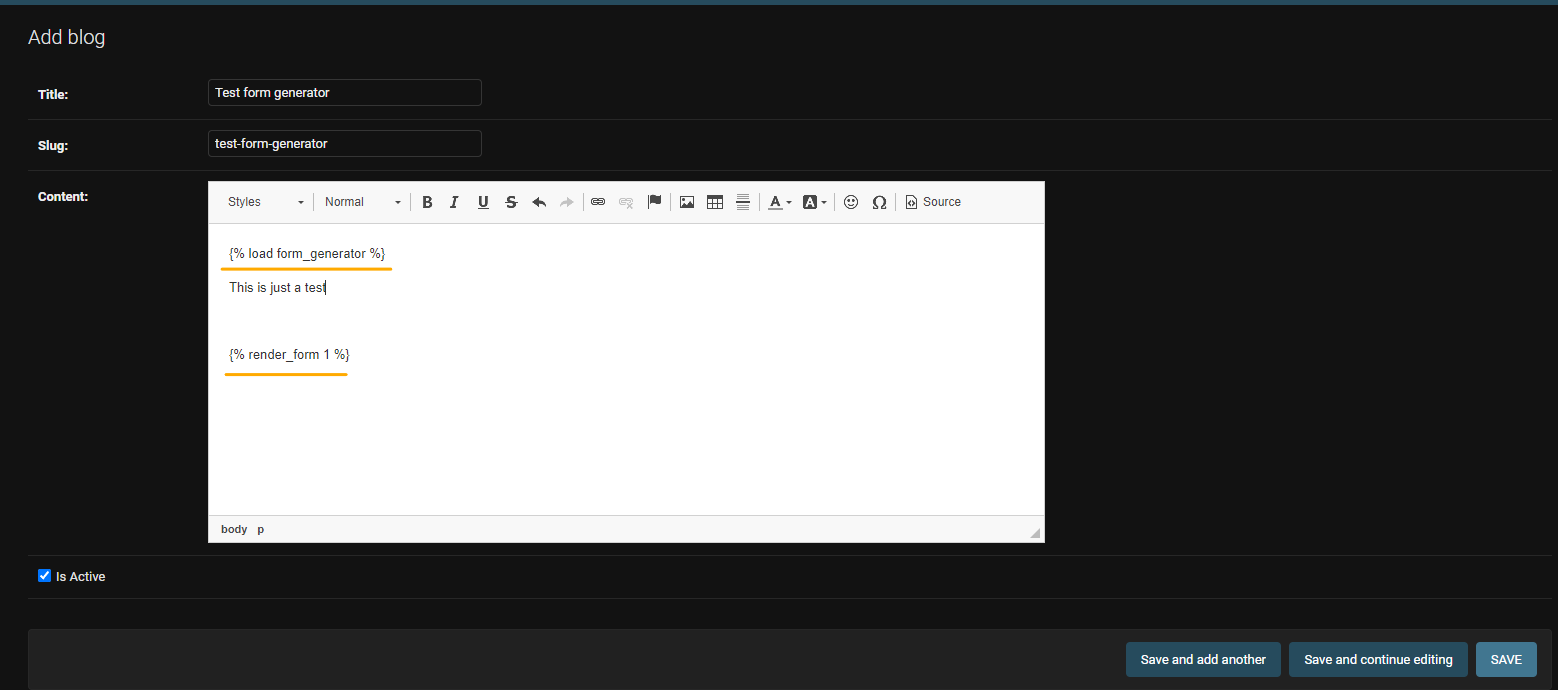
regular html usage:
<!doctype html>
<html lang="en">
<head>
...
</head>

<body>
    {% load django_form_generator %}

    {% render_form 1 %} {# it will render the form that has id of 1 #}

</body>

</html>
-
RichText fields:
To use this tags on a Richtext field like
CKeditorortinymce.Note: In some richtext packages some elements (specialy jinja elements) will be removed from the field there are some tweaks to solve this problems on the packages documentations.
-
Admin panel:
CK-Editor example
-
./app_name/templates/index.html<!doctype html> <html lang="en"> <head> ... </head> <body> {% load django_form_generator %} {{ object.rich_text_field|eval_data }} </body> </html>
-
API manager Usage
There is also an API manager for the forms
-
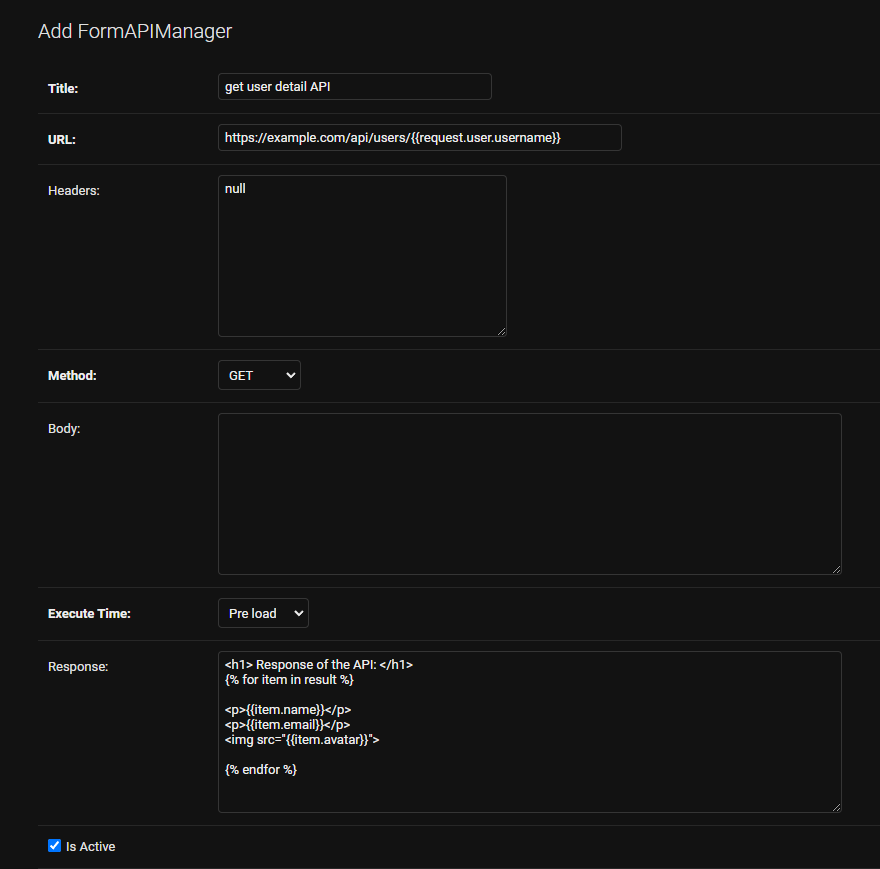
Admin panel:
-
example:
Note:
first_name,last_nameandjobare the name of the fields that are defined in a form which this api is assigned to.
-

Note: assigend apis will be called automatically. the ones with execution_time of
PREwill be called when form renders. and the ones with execution_time ofPOSTwill be called after form submition.
Note: in the response field you can write HTML tags it will be rendrend as
safe.
Note: You have access to
requestglobaly in api manager
Also you have access to the response of the api. so you can use Jinja syntax to access data.
You can use this feature on the (url, body, response) fields of APIManager model
-
Creating API
- example:
Note: To show the response use the template tag of
{% render_pre_api form_id api_id %}inside your html file that theformis there. -
Response
example:
-
output of the api:
{
  "result": [
    {
    "first_name": "john",
    "last_name": "doe",
    "avatar": "https://www.example.com/img/john-doe.png",
    },
    {
    "first_name": "mary",
    "last_name": "doe",
    "avatar": "https://www.example.com/img/mary-doe.png",
    }
  ]
}
-
in the response field you can do:
<h1> Response of the API: </h1>
{% for item in result %}

  <p>{{item.first_name}}</p>
  <p>{{item.last_name}}</p>
  <img src="{{item.avatar}}">

{% endfor %}
-
-
html usage:
<!doctype html>
<html lang="en">
<head>
...
</head>

<body>
    {% load django_form_generator %}

    {% render_pre_api 1 %} {# it will render all pre apis that are assigned to a form with id of 1 #}

    {% render_pre_api 1 6 %} {# it will render the pre api with id of 6 which is assigned to a form with id of 1 #}


    {% render_post_api 1 %} {# it will render all pre apis that are assigned to a form with id of 1 #}

    {% render_post_api 1 7 %} {# it will render the post api with id of 7 which is assigned to a form with id of 1 #}

</body>

</html>
Extra
-
API Manager:
you can access the whole submited data by adding
{{ form_data }}to your apibody. -
Form Theme:
to have multiple themes the html of
template_name_p(attribute of django.forms.Form) will be replace by our html file. ({{form.as_p}})there are 3 themes(or actualy styel of rendering fields) for the forms:
-
In-line Theme[^1].
-
In-order Theme[^2].
-
Dynamic Theme[^3].
[^1]: In every line two fields will be rendered.
[^2]: In every line one field will be rendered.
[^3]: this theme will render fields respect to the field position (
inline,inorder,break)Note: If you want to render two fields
inlineand one fieldinorderyou should usebreakfor the second field- example:
- field1 inline
- field2 break
- field3 inorder
Note: You can add your custom themes by create new TextChoices object and add it to
settings.py- example:
- myapp/const.py
from django.db.models import TextChoices

class CustomFormGeneratorTheme(TextChoices):
  MY_THEME = "myapp/templates/my_theme.html", 'My Custom Theme'
  ...
- myproject/settings.py
  DJANGO_FORM_GENERATOR = {
    "FORM_THEME_CHOICES": "myapp.const.CustomFormGeneratorTheme"
  }
- myapp/const.py
-
-
URLS:
# to access the form you can call this url:
"""GET: http://127.0.0.1:8000/form-generator/form/1/"""
#or
reverse('django_form_generator:form_detail', kwargs={'pk': 1})

# to access the response of the form you can call this url the kwarg_lookup is UUID field
"""GET: http://127.0.0.1:8000/form-generator/form-response/xxxxxxxx-xxxx-xxxx-xxxx-xxxxxxxxxxxx/"""
#or
reverse('django_form_generator:form_response', kwargs={'unique_id': 'xxxxxxxx-xxxx-xxxx-xxxx-xxxxxxxxxxxx'})
-
Settings:
below is the default settings for django_form_generator. you can change them by adding it to your
settings.pyDJANGO_FORM_GENERATOR = { 'FORM_RESPONSE_SAVE': 'django_form_generator.models.save_form_response', 'FORM_EVALUATIONS': {'form_data': '{{form_data}}'}, 'MAX_UPLOAD_FILE_SIZE': 5242880, # default: 50 mb 'FORM_GENERATOR_FORM': 'django_form_generator.forms.FormGeneratorForm', 'FORM_RESPONSE_FORM': 'django_form_generator.forms.FormGeneratorResponseForm', 'FORM_THEME_CHOICES': 'django_form_generator.const.FormTheme', 'FORM_MANAGER': 'django_form_generator.managers.FormManager', }
Attention
To have nice styled fields you can add crispy-form to your settings.py
  CRISPY_ALLOWED_TEMPLATE_PACKS = 'bootstrap5'
  CRISPY_TEMPLATE_PACK = 'bootstrap5'
To access google recaptcha you should add these to your settings.py
Note: you can have public & private keys by registring your domain on Google recaptcha admin console
  RECAPTCHA_PUBLIC_KEY = 'public_key'
  RECAPTCHA_PRIVATE_KEY = 'private_key'
Note: If you don't want to use google-recaptcha(
django-recaptcah) you should add below code to yoursettings.py
SILENCED_SYSTEM_CHECKS = ['captcha.recaptcha_test_key_error']
Dependency Packages
License
Release history Release notifications | RSS feed


Download files
Download the file for your platform. If you're not sure which to choose, learn more about installing packages.
Source Distribution
Built Distribution
Filter files by name, interpreter, ABI, and platform.
If you're not sure about the file name format, learn more about wheel file names.
Copy a direct link to the current filters
File details
Details for the file django_form_generator-0.0.13.tar.gz.
File metadata
- Download URL: django_form_generator-0.0.13.tar.gz
- Upload date:
- Size: 121.1 kB
- Tags: Source
- Uploaded using Trusted Publishing? No
- Uploaded via: twine/4.0.1 CPython/3.10.7
File hashes
| Algorithm | Hash digest | |
|---|---|---|
| SHA256 |
c13a389d3be83545385a78ff7459bca5c49a8731bf968e13f61d6dbe734ef643
|
|
| MD5 |
330c15dda0db1707bf5cbe4611541c1a
|
|
| BLAKE2b-256 |
01e6b606c272e7f3ff0acea7bd0100ee715b1eb8a1352ef1c2a4d11b8405fd83
|
File details
Details for the file django_form_generator-0.0.13-py3-none-any.whl.
File metadata
- Download URL: django_form_generator-0.0.13-py3-none-any.whl
- Upload date:
- Size: 123.9 kB
- Tags: Python 3
- Uploaded using Trusted Publishing? No
- Uploaded via: twine/4.0.1 CPython/3.10.7
File hashes
| Algorithm | Hash digest | |
|---|---|---|
| SHA256 |
0c3e260d00a902937957ab8a6402f7b15139d88b4e172f8c9b7da10c7af8c3be
|
|
| MD5 |
a2af4177da191ef55ad9243eabd34d41
|
|
| BLAKE2b-256 |
418b40f9a2f52ffaf5d441a92169a047bd90868a0c13f98423336b5209e35210
|


